We may receive a commission when you use our affiliate links. However, this does not impact our recommendations.
Build a dedicated setup that creates perfect joints every time.
Imagine routing perfect box joints whenever you want, without having to waste time setting up your router table. This notion may seem half-baked, because box joints can be fussy to fit. But it isn’t! This jig allows you to go directly from milling the parts to cutting the joints—it’s perfect for woodworkers like me, who love to make boxes in multiples.
A box joint consists of pins and sockets that are all the same width. To create a box joint, you rout a series of slots (the sockets) that are spaced so that the wood left between them forms the pins. Correctly sizing the pins so they perfectly fit the sockets is the fussy part.
For box joints to go together, the pins and sockets must be offset—where one part has pins, the other has sockets. Sometimes called “finger joints” because the pins resemble the fingers in a pair of folded hands, box joints are popular because they’re strong, attractive and easy to make—as long as you have a dependable jig.
Think of the jig shown here as a miniature router table that’s dedicated to making one specific joint. You can build it in a day, using hardwood plywood or MDF, a couple pieces of solid hardwood and a small router. Dial in the perfect fit once (it’s easy—I’ll show you), and the jig is ready to be used again and again.
Make the jig
1. Create the jig’s base and sled from a single blank. Cut dadoes for the runners, then rip the blank into the two parts. This method ensures the slots will align.
Start by cutting a pair of dadoes in a blank that contains the jig’s plywood base and sled (Photo 1 and Fig. A). After cutting the blank into the two parts, note that the dadoes are in the top face of the base and the bottom face of the sled. Flip over the sled and cut a dado for the fence 2-1/4″ from the back edge. This dado is perpendicular to the dadoes for the runners.
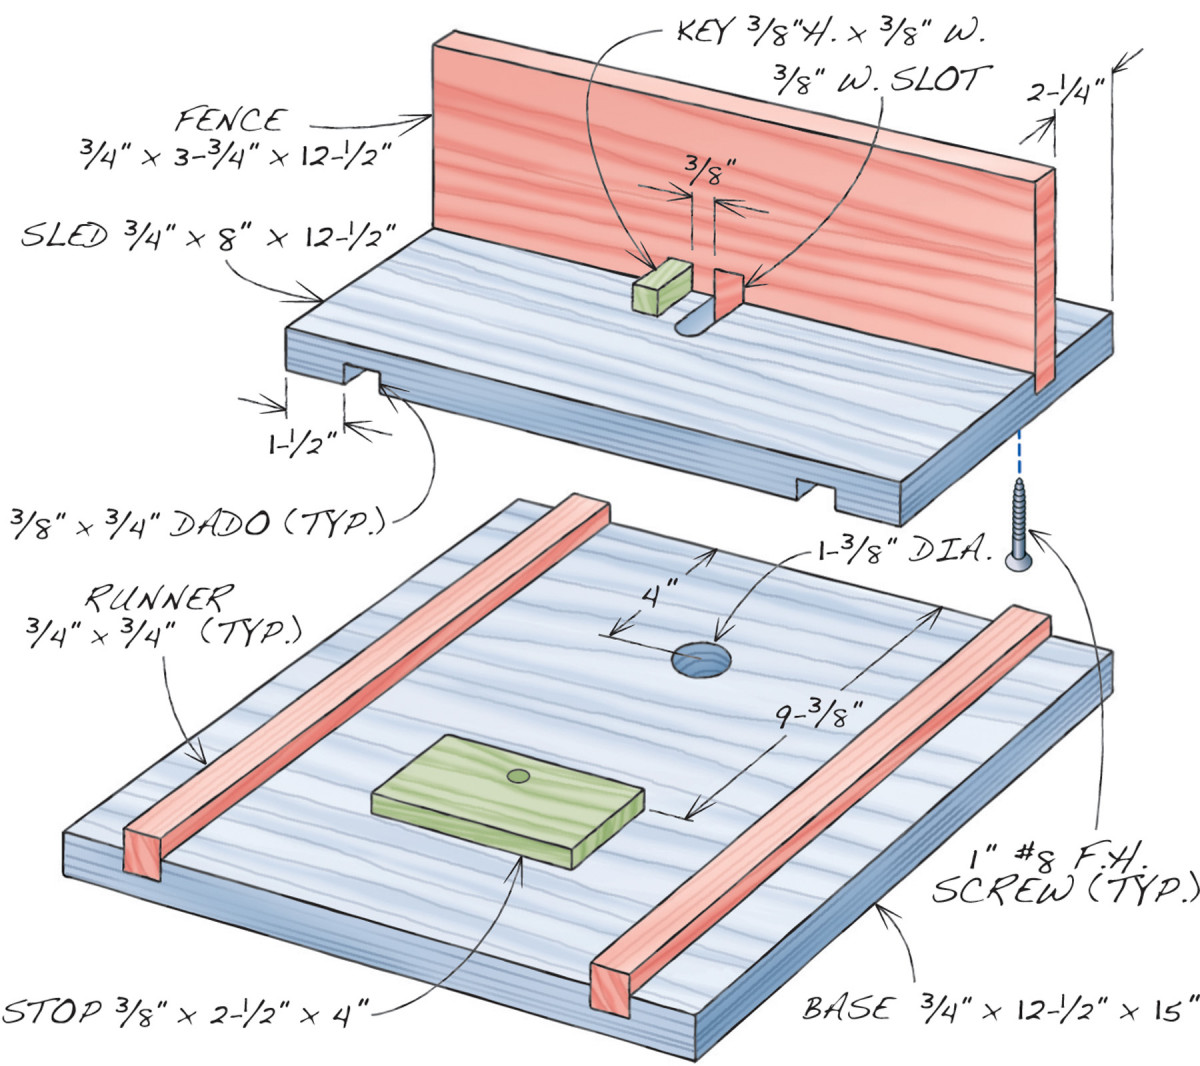
Fig. A) Exploded View
Make the runners and fence of solid hardwood and plane them to fit the dadoes. The runners must allow the sled to slide smoothly on the base, without binding or wobbling. If the runners are too loose, the jig won’t be accurate. If they’re too tight, the jig just won’t work. The fence should fit more tightly, almost needing to be forced into place. This pressed fit is necessary to allow fine-tuning the jig. Cut the fence so its length matches the width of the sled so that later, during fine-tuning, you’ll be able to feel minute changes in position between these two parts.

2. Mount the router base after drilling a centered hole large enough for the router’s collet in the jig’s base. Then attach the runners.
Install the router base and the runners on the jig’s base (Photo 2). Mark a centerline for the router and then drill a hole on this line that’s large enough for the router’s collet to fit through, 4″ from one end of the base. Remove the router’s base plate, center it on the hole you’ve just drilled, and then carefully transfer the location of its mounting holes to the jig’s base. Use these marks to drill holes for the mounting screws, countersinking them on the base’s top face. You’ll need 1″ long flathead machine screws to mount the router base. I decided to use larger (5/32″) screws as well, so I tapped the mounting holes in the router base to accommodate them.
Attach the runners with screws after drilling countersunk holes through the sled’s bottom face.
Dedicate the sled
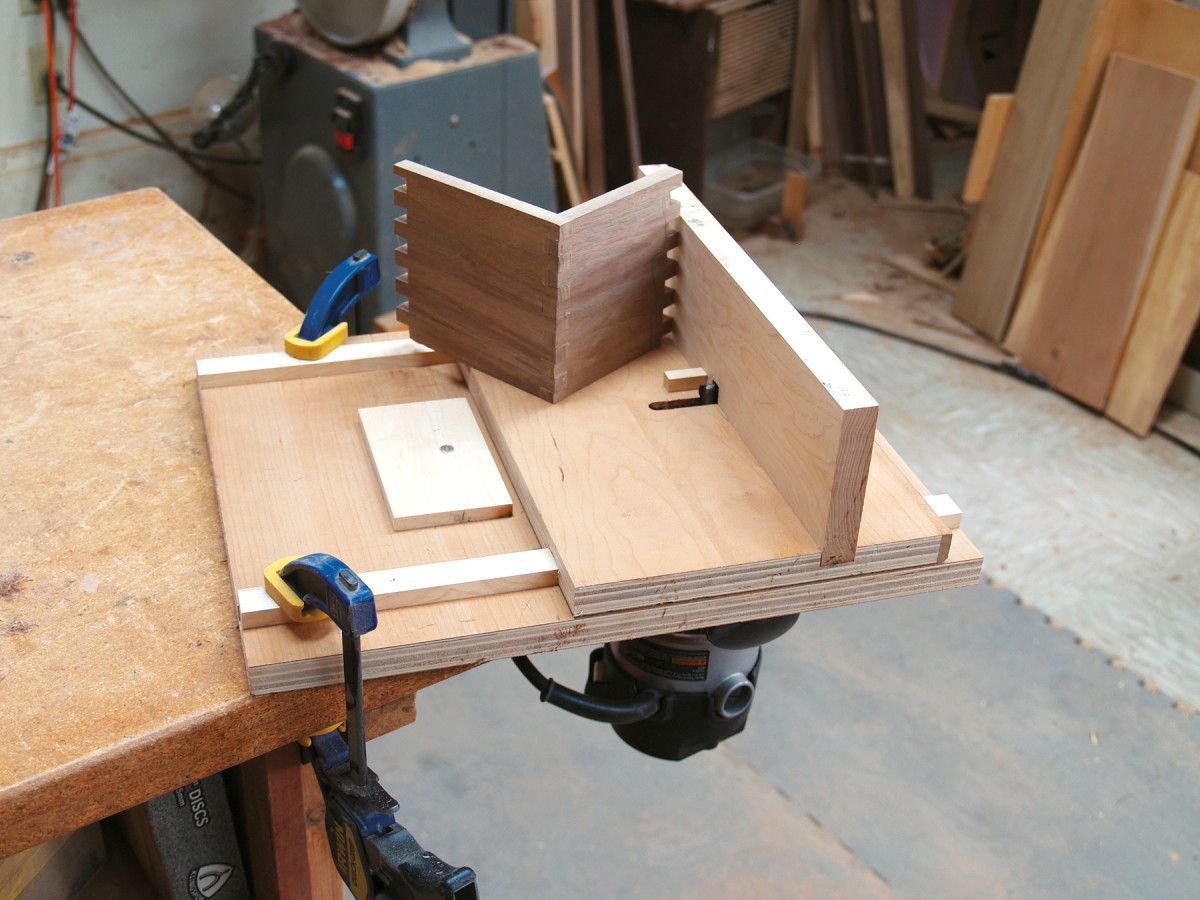
Clamp the jig’s base to the corner of your workbench. Mount the sled on the base and make sure it slides properly. Screw the stop block to the base, positioned to stop the sled when the router bit is completely housed in the fence.
Remove the sled and install a bit in the router. An upcut spiral bit works best because it minimizes tearout. The width of the pins and sockets you want to make determines the size of the bit you’ll use. Choosing the bit also dedicates the sled to making one specific box joint—the sled shown here was made with a 3/8″ dia. bit, so it’s dedicated to making box joints with 3/8″ wide pins and sockets. If you commonly make box joints in a variety of sizes, simply make additional sled assemblies that are dedicated to the appropriate router bits.
3. Rout a slot in the sled using an upcut spiral bit. The bit’s diameter determines the width of both the pins and sockets. The jig’s stop block keeps the bit from passing all the way through the fence.
Rout a slot in the sled (Photo 3). Lower the bit below the sled’s surface. Position the sled flush with the back end of the base and clamp the two parts together. Start the router and gradually raise the bit to rout a hole through the sled. Shut off the router, lower the bit to 1/8″ exposure and remove the clamps. Now rout the slot. Start the router, push the sled forward to the stop block and pull it back flush with the back of the base. Raise the bit another 1/8″ and go again. Repeat this process until you’ve routed through the sled. Finish the job by raising the bit above the sled’s surface by the same dimension as its diameter (3/8″ in this case) to complete the slot in the fence.
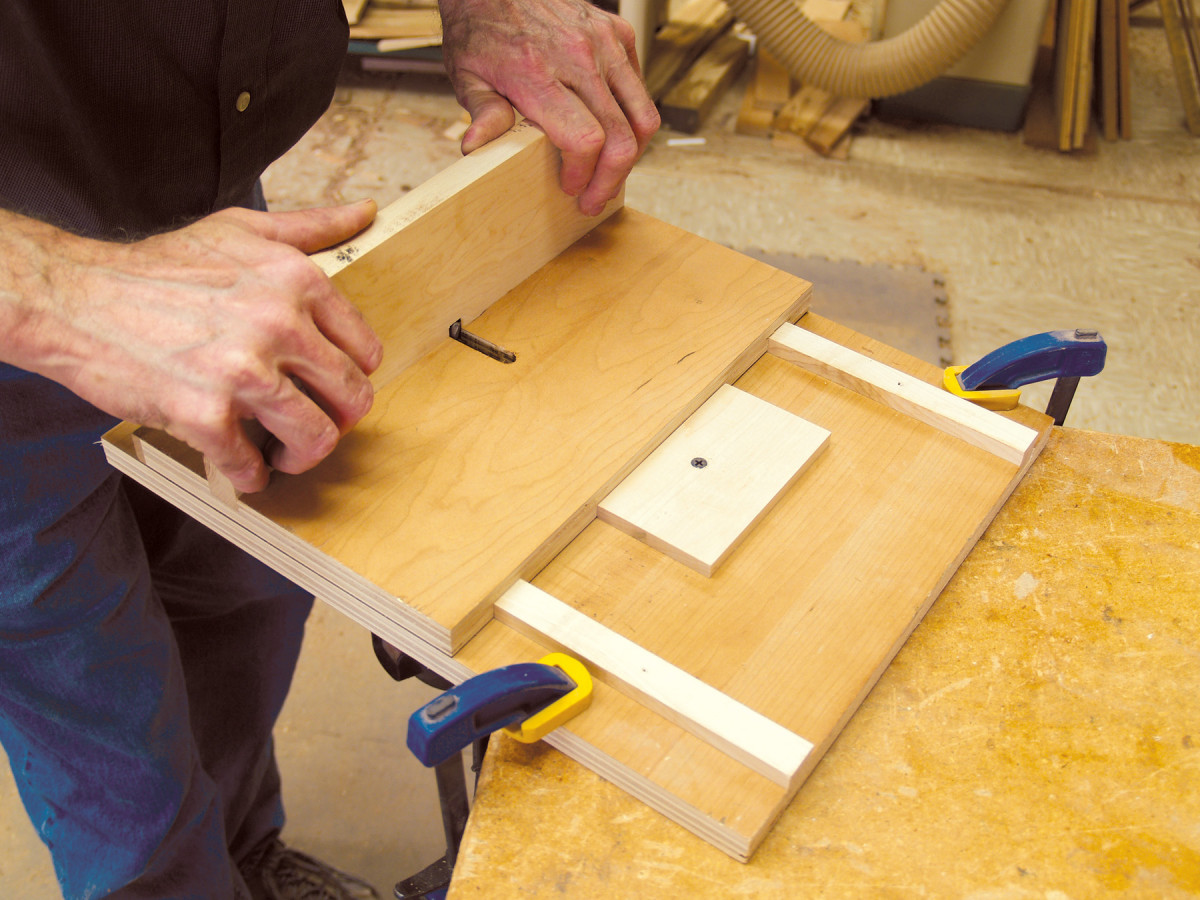
Install the key
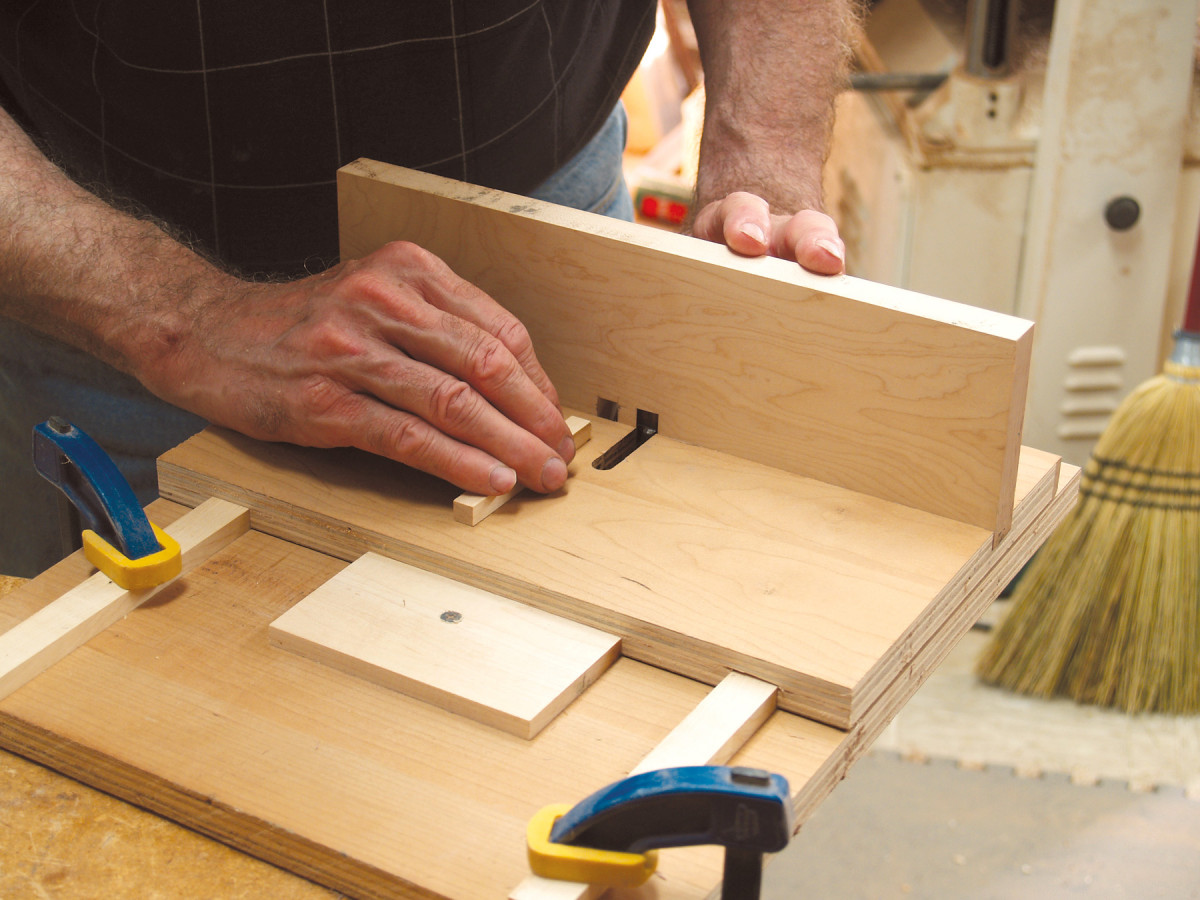
4. Install the key after routing a second slot. The distance between the slots must match the diameter of the bit. The key indexes the workpiece for routing.
A solid maple key indexes the workpiece for routing each socket (Photo 4). This key is installed in a second square slot that’s routed in the fence. The space between these slots matches their width. On the jig shown here, the slots measure 3/8″ wide, so they’re spaced 3/8″ apart.
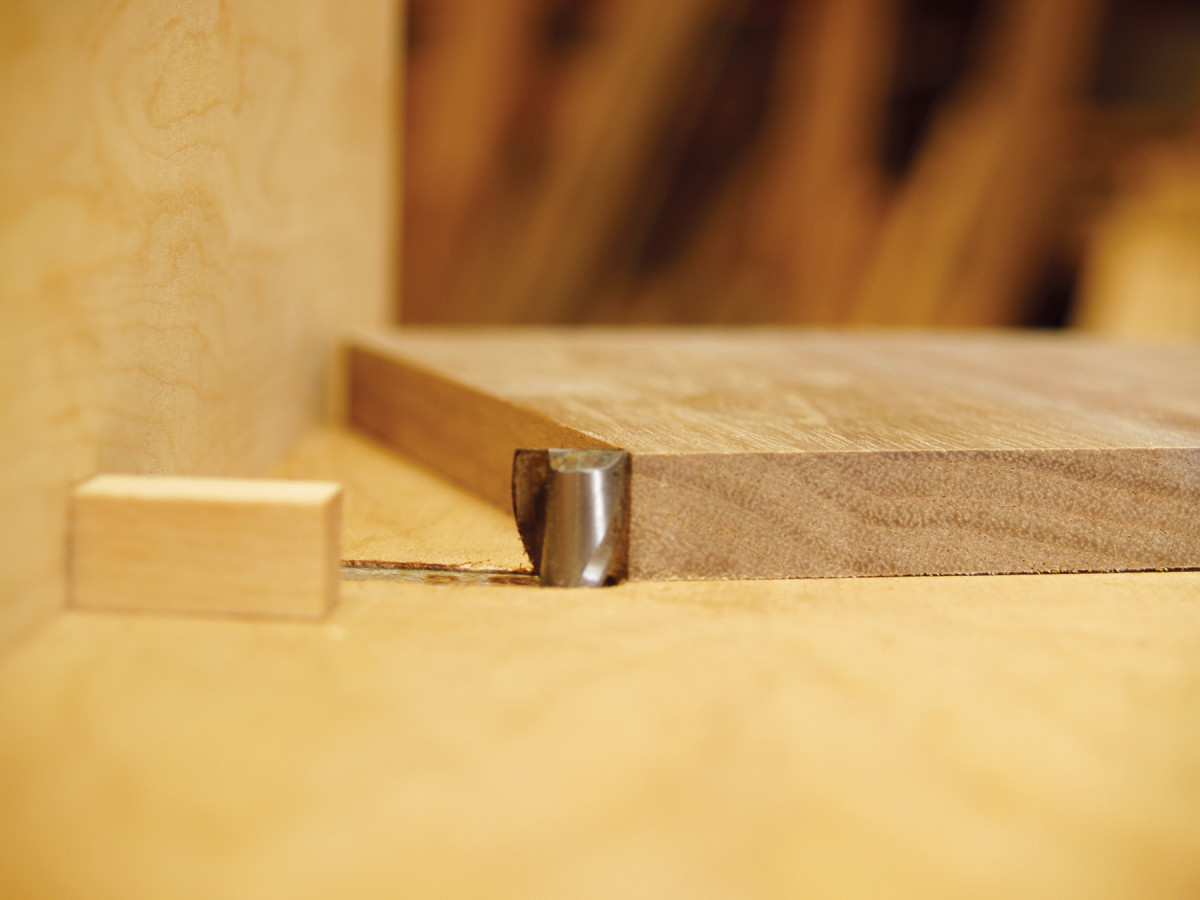
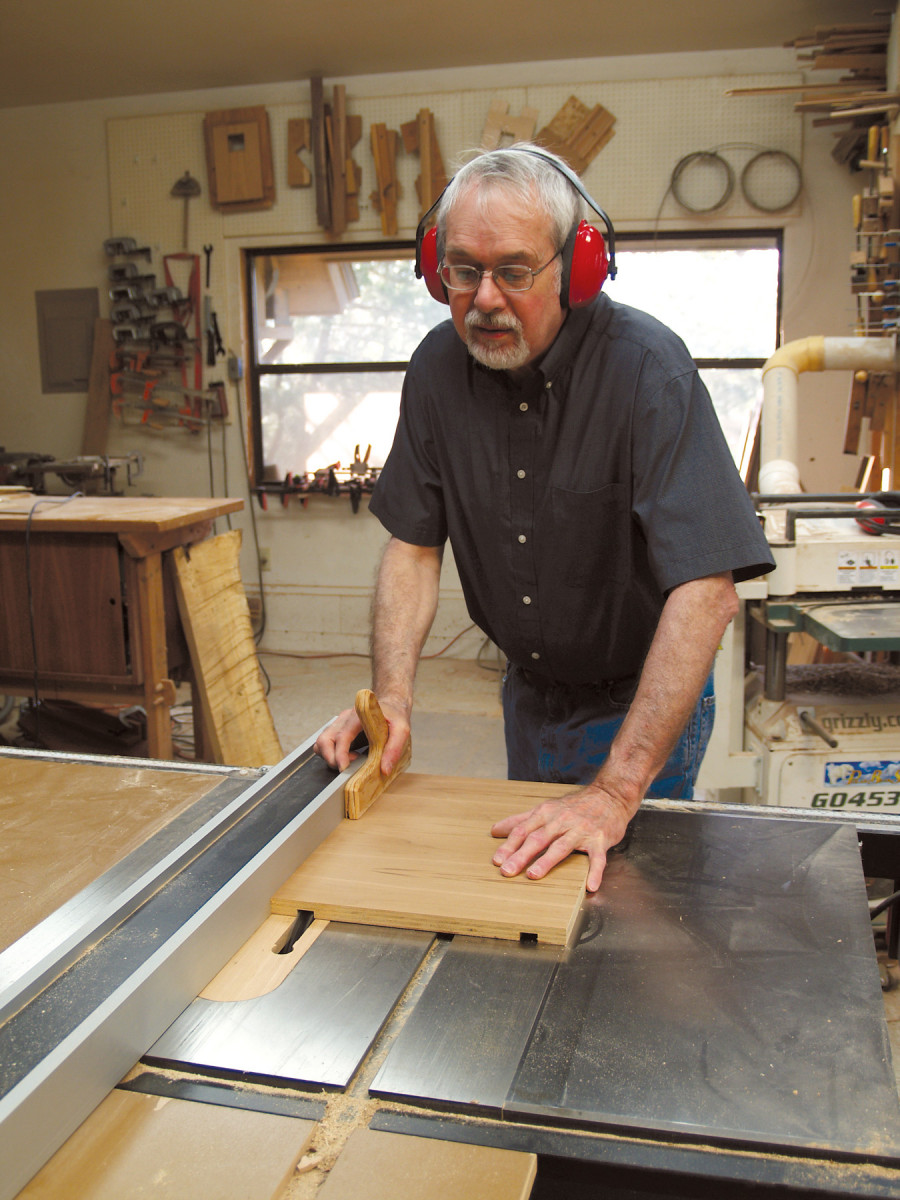
5. Set the bit a tiny bit higher than the thickness of the stock you plan to rout. Routing the sockets a bit too deep makes the assembled joint easier to clean up.
Start by milling a long, square key blank to match the width of the slot in the sled. The resistance you feel when you insert the key in this slot will be the same resistance you’ll feel each time you index a workpiece on the jig, so a snug but not forced fit is ideal.
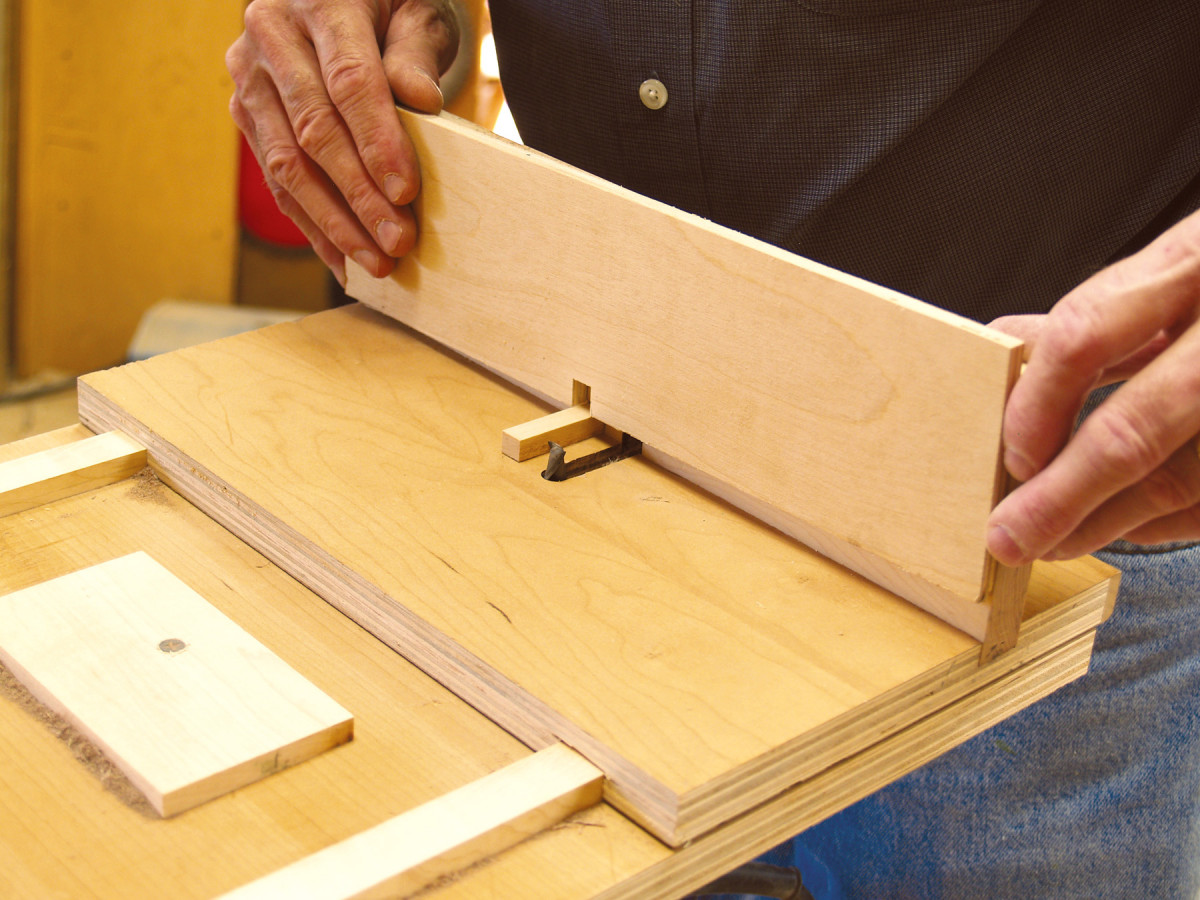
6. Rout the first socket in a test piece. Position the sled flush with the baack of the base. Hold the test piece against the fence and snug against the key. Then slide the sled forward.
Mark the second slot’s location on the fence. Then reposition the fence on the sled, carefully aligning your mark with the far side of the slot in the sled. Remove the jig’s stop block. Then rout a square slot for the key through the fence. Complete this slot in several passes, incrementally raising the bit. Then install the key and reinstall the stop block.
Rout a test joint
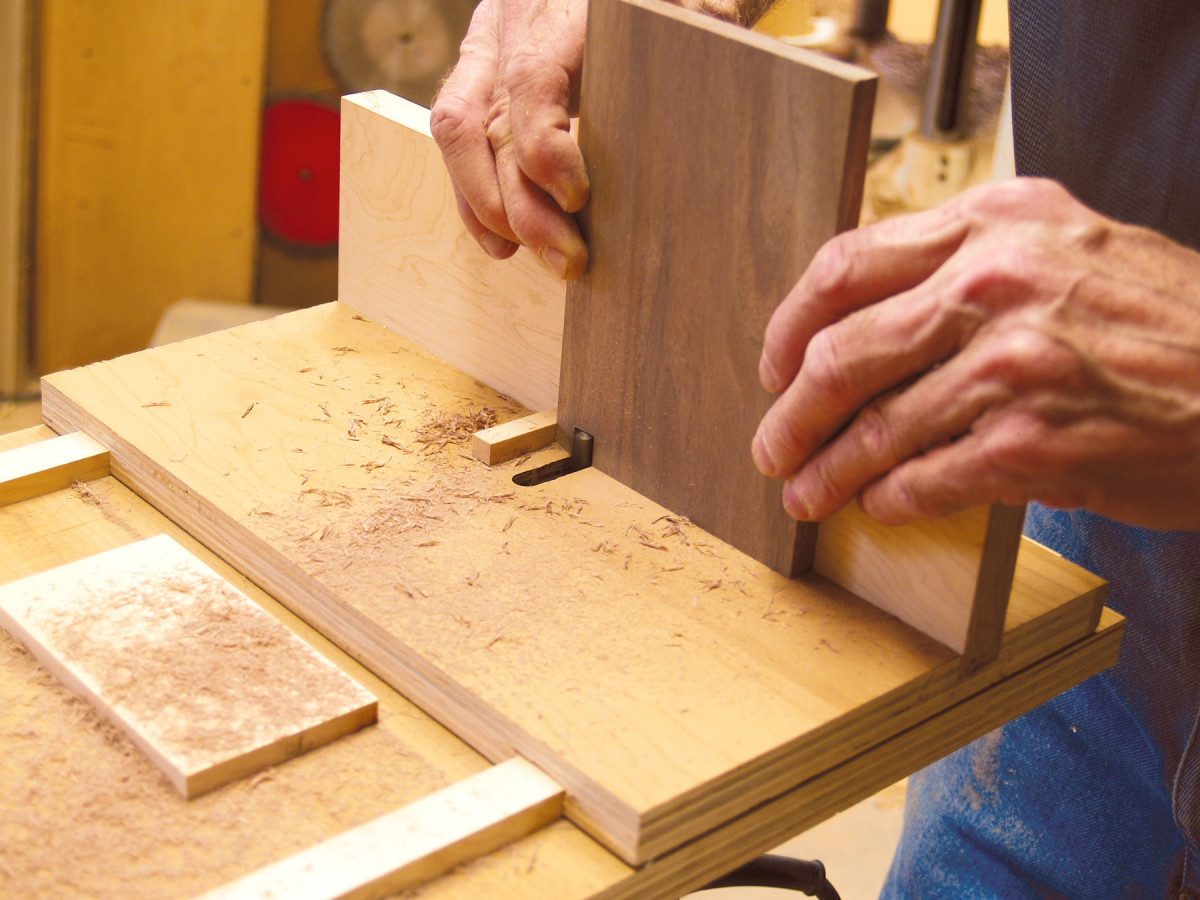
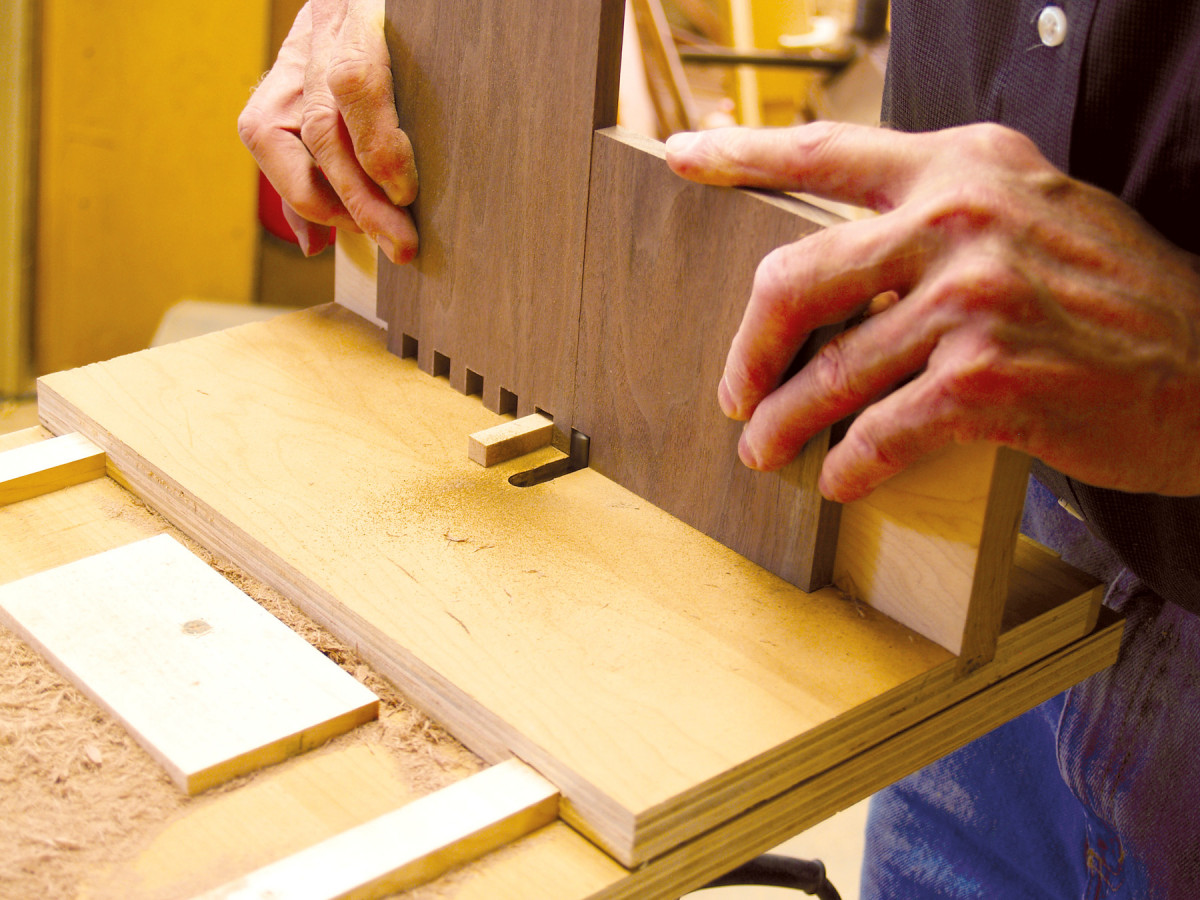
7. Use the key to reposition the test piece after cutting each socket. Then slide the sled forward to rout the next socket.
Raise the bit slightly higher than the thickness of the stock you plan to use (Photo 5). Cut the parts that you intend to join oversize in width. It’s best to wait until all the pins and sockets have been routed before you trim these parts to final width, because it allows you to true up any uneven edges before you make those final cuts.
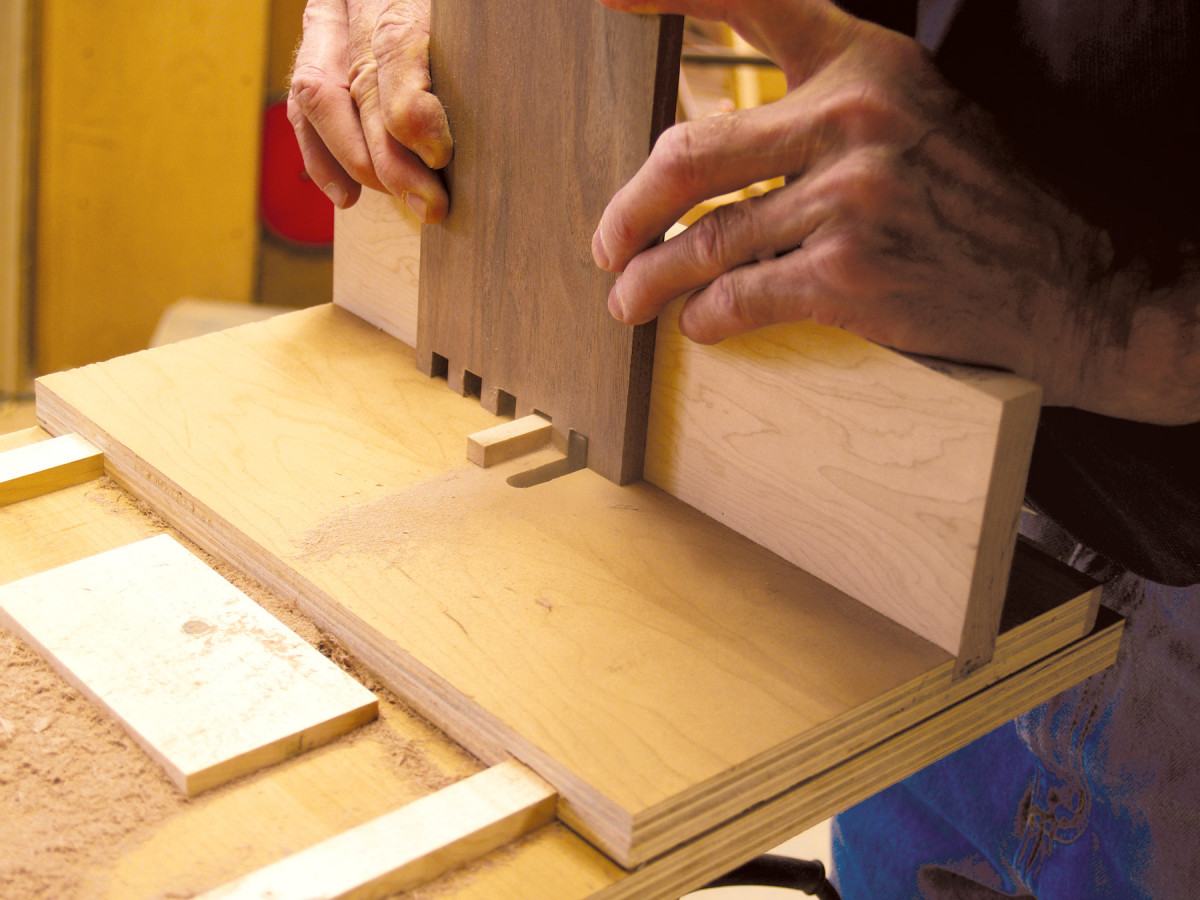
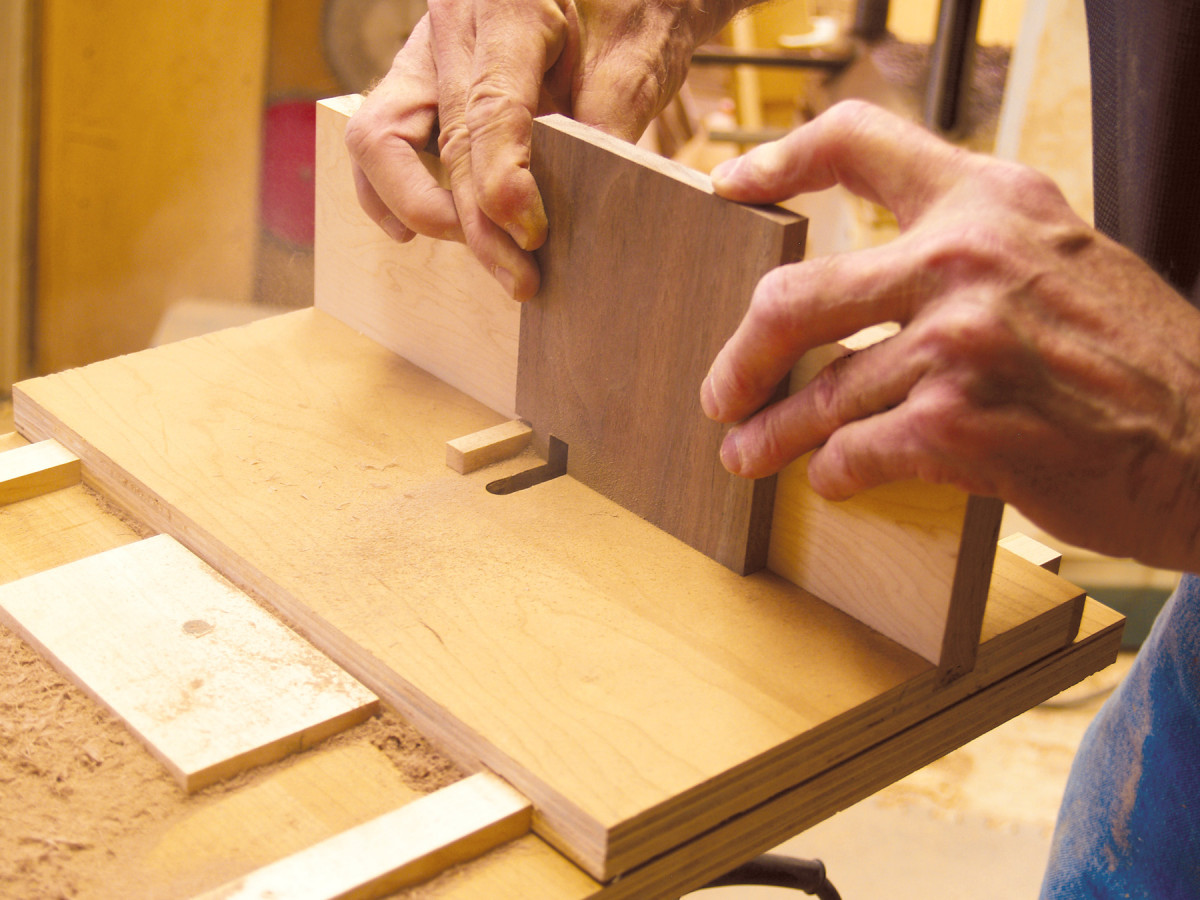
8. To index the second test piece, flip over the completed test piece and mount it on the key, using the first socket you routed. This correctly offsets the sockets, so the pieces will fit together.
Rout the first socket while firmly holding the test piece against the key (Photo 6). Use the socket you’ve just routed to index this piece for routing the next socket (Photo 7).
9. Use the key as before, to index the second test piece for routing each remaining socket.
After routing all the sockets, flip this piece to its opposite face and use it to rout the first socket in the second test piece (Photo 8). Then rout the remaining sockets (Photo 9). Assemble the joint to test the fit (Photo 10).
Fine-tune the joint
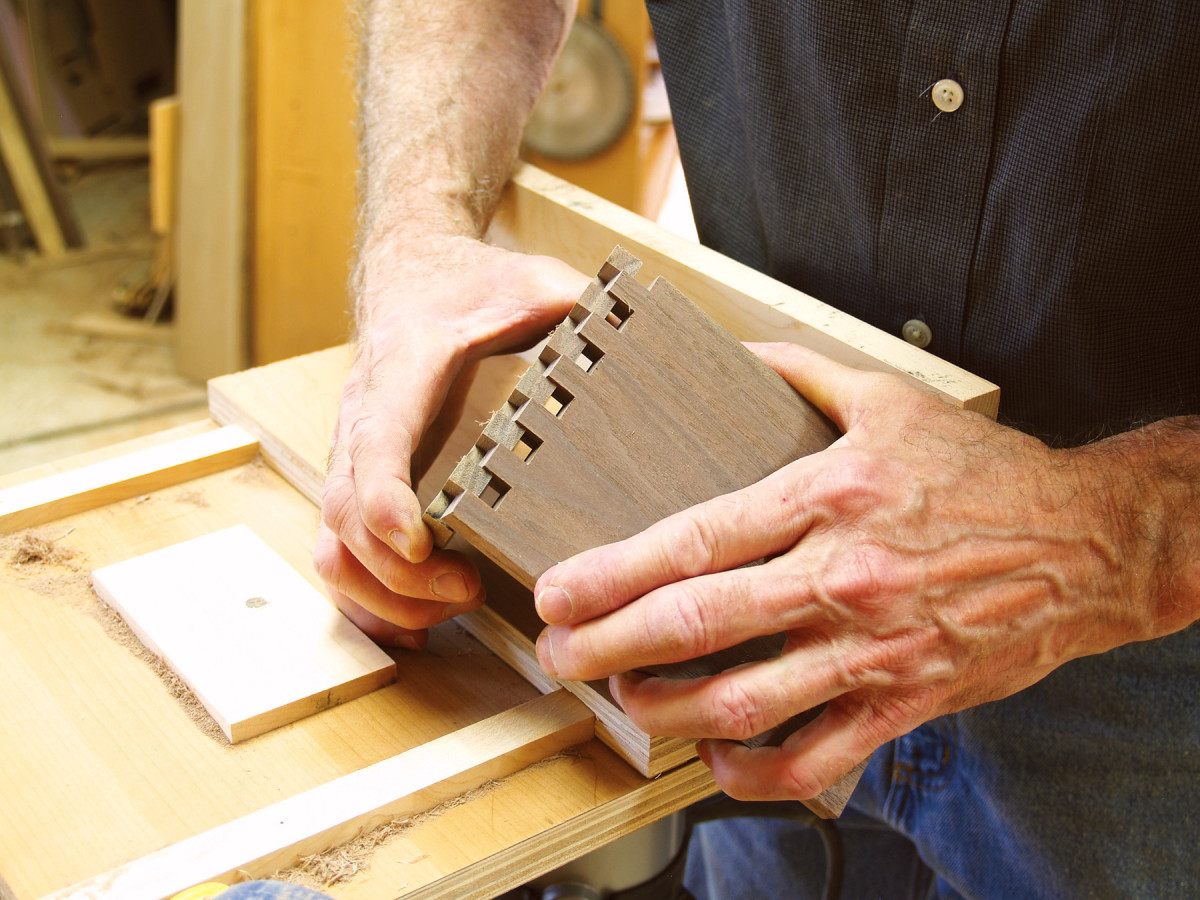
10. Test-fit the joint. The parts should slide together without wobbling or binding and the pins should stand slightly proud, so they’re easy to sand flush.
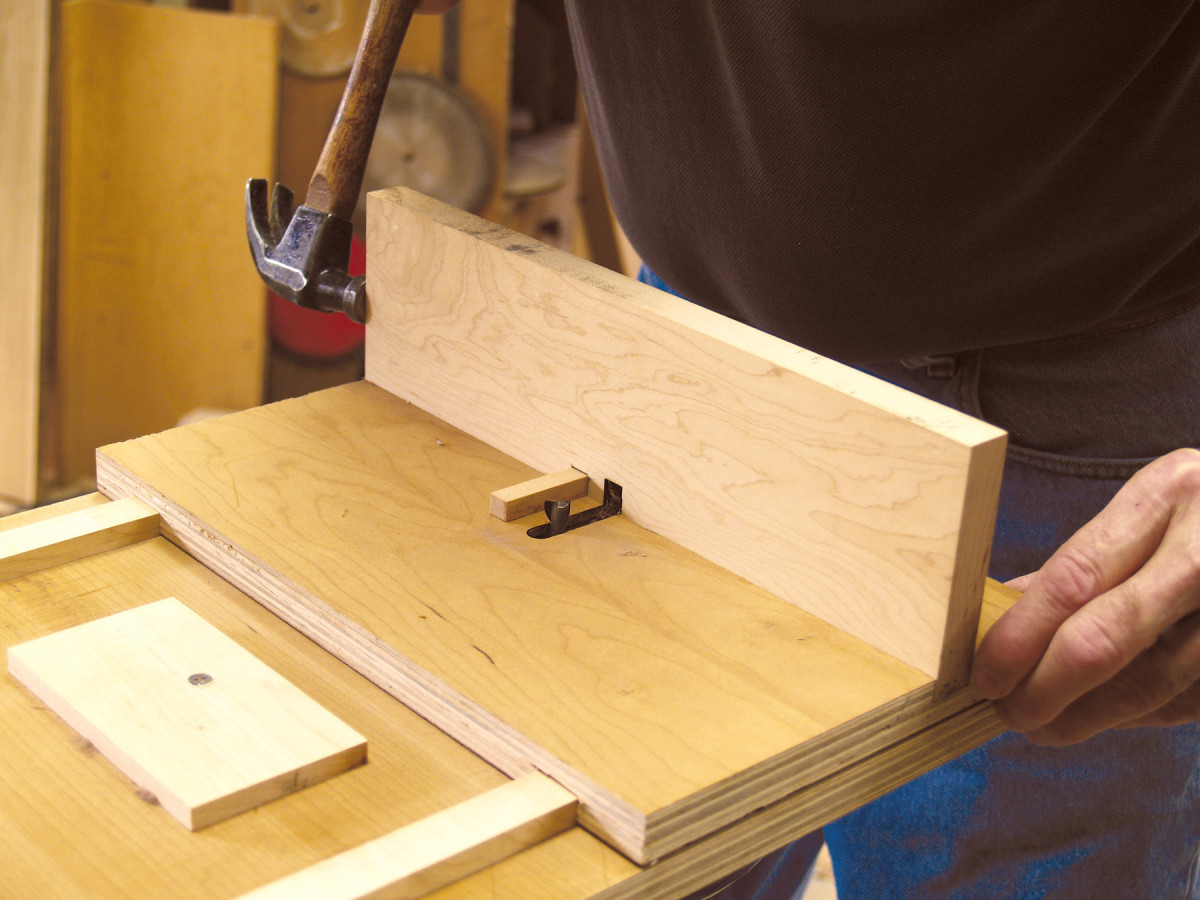
If the joint is too tight, tap the right end of the fence to reduce the space between the key and the routed slot (Photo 11). This reduces the width of each pin. If the fit is too loose, tap lightly on the left end, to make each pin wider.
11. Fine-tune the joint by adjusting the fence. If the fit is too tight, move the key a tiny bit closer to the slot. If the fit is too loose, move the key farther away.
As the fence and the sled are the same dimension, you can use your fingers to accurately gauge these tiny adjustments. Rout additional test joints to assess your adjustments. When the joint fits perfectly, install screws to lock the fence in position.
Adapt the sled
12. Make an auxiliary fence to eliminate tearout when you rout joints in thinner stock. Set the bit’s height for the thinner stock, use the key to index the fence and rout a new, shorter slot.
You can use the same sled assembly to cut box joints in stock of different thicknesses, but you’ll quickly discover a problem: When you rout joints in thin stock after routing joints in thicker stock, the top of each socket tends to tear out on the back side. This tearout occurs because the routed slot in the fence is too tall to fully support the shorter sockets required by the thinner stock. The solution is to install an auxiliary fence with a shorter slot that will fully support these shorter sockets (Photo 12).
Here are some supplies and tools we find essential in our everyday work around the shop. We may receive a commission from sales referred by our links; however, we have carefully selected these products for their usefulness and quality.