


We may receive a commission when you use our affiliate links. However, this does not impact our recommendations.

Expert craftsman Tom Donahey shares his plans for an essential tool to work green wood.
Few woodworking experiences are as sweet as working wood that’s just been split from a recently felled tree. Green wood is much easier to shape with hand tools than wood that’s been dried. It has a special character–a pungent odor and soft texture that make it all the more pleasurable to handle. Simple utilitarian items, such as chairs, benches, rakes and so on, have long been made from green wood. All you need are a few basic tools and one essential device for holding the work: a shaving horse.
I’ve always wanted to build a shaving horse. When I started thinking about how to go about making one I turned to Drew Langsner, an expert in green woodworking (that’s Drew, above). Drew has been an inspiring instructor of the craft for over thirty years, and runs Country Workshops, a school in North Carolina. Drew introduced me to Tom Donahey, who makes shaving horses for students at the school and for sale through the school’s web site.
Tom has created an elegant design. “When I got into green woodworking, I already had a shaving horse,” Tom said. “It was the old style, big and clunky. I took a class from Brian Boggs, the well-known chairmaker from Berea, Kentucky, and he had brought along his own shaving horse. It was much better than mine. With Brian’s permission, I took photos of that horse, went home, and studied its construction.”
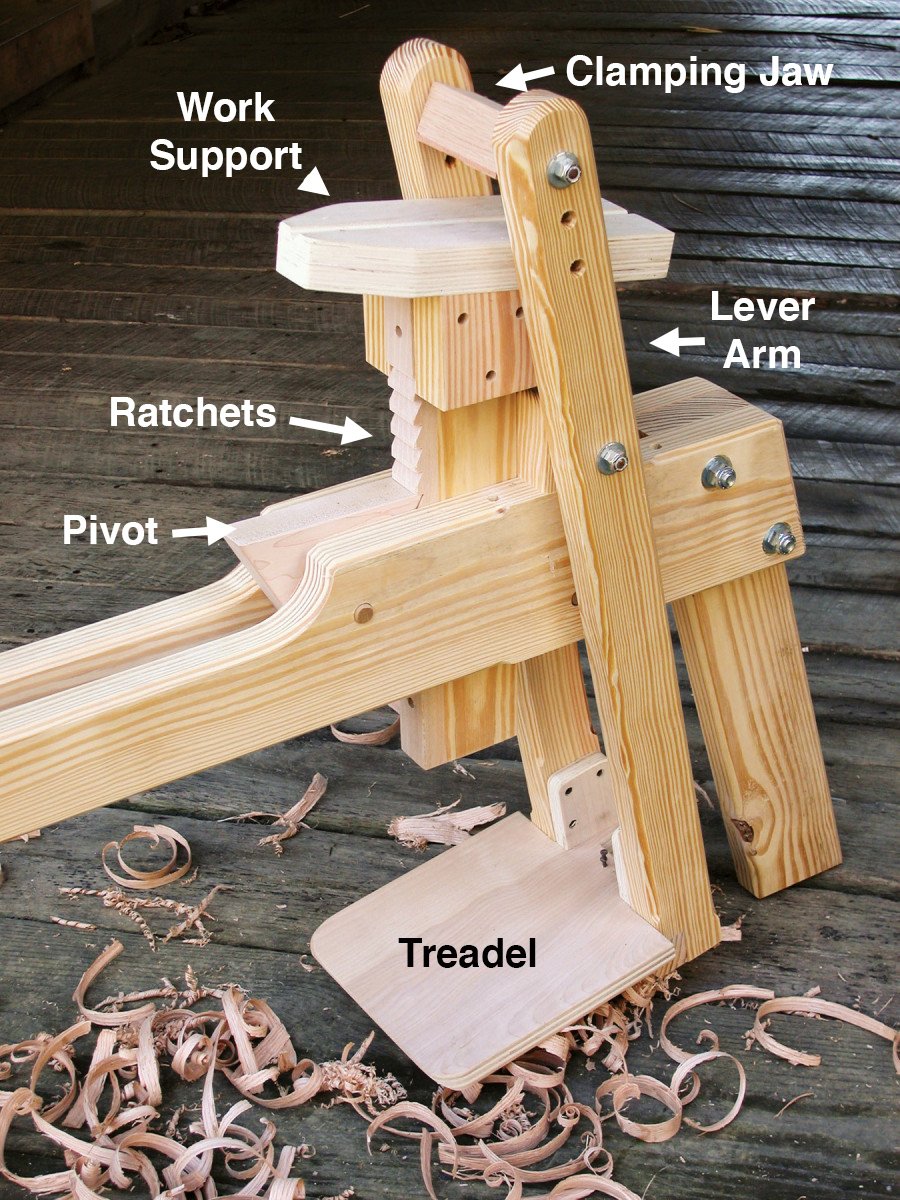
Brian had developed a new feature: an adjustable, ratcheting work support (see photo at right). Drew suggested a futher change: use a treadle instead of the traditional cross bar for applying foot pressure. “It’s much more comfortable,” he said. Tom built a few horses, with Brian’s permission, and started refining the design. Over the years, Tom has built more than 100 horses and streamlined their production. Tom has graciously allowed us to publish his design.
How This Shaving Horse Works
 A shaving horse is a workbench, vise, and chair all rolled into one. It’s primarily used to work green wood with a drawknife, which cuts on the pull stroke, or a spokeshave, which you can push or pull. The design of this shaving horse is rather unusual, mixing traditional elements and modern engineering. Here’s how it works:
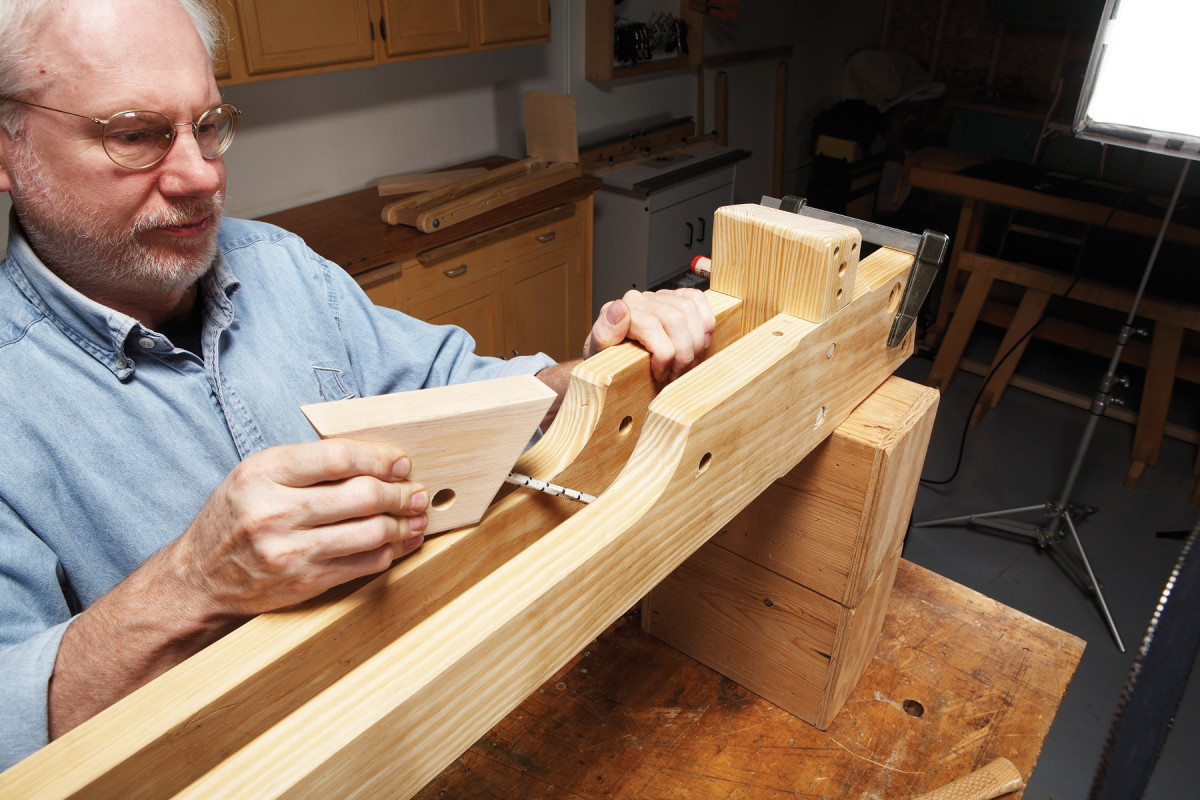
To set up the horse, place your workpiece on the work support. Then, raise the work support up to the clamping jaw, which is free to rotate. The work support will click into one of eight different height positions, to accommodate thick or thin work. It’s locked by a pivot that engages a series of ratchets on the work support’s column. To clamp your workpiece, push the treadle forward with your foot. This swings the lever arms, squeezing the clamping jaw against the workpiece .
All that sounds quite complicated, but this shaving horse is as easy to operate as stepping on the brake in your car. It only takes a few seconds to release the clamping pressure on a workpiece, reposition it, and go back to making those glorious, huge curls.
Choose Your Wood

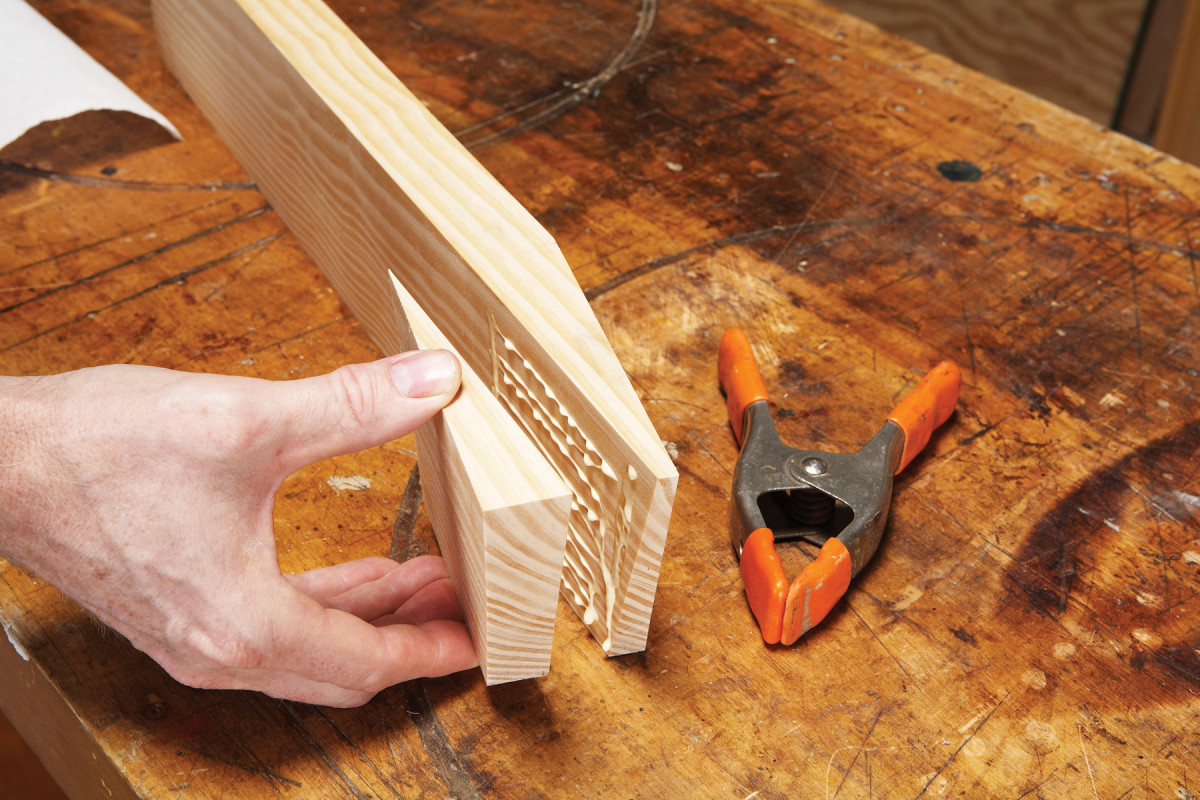
1. All of the parts for this shaving horse can be cut from southern yellow pine construction lumber. It’s a durable, strong wood that’s relatively inexpensive, but you could substitute many other hardwoods, such as maple or oak.
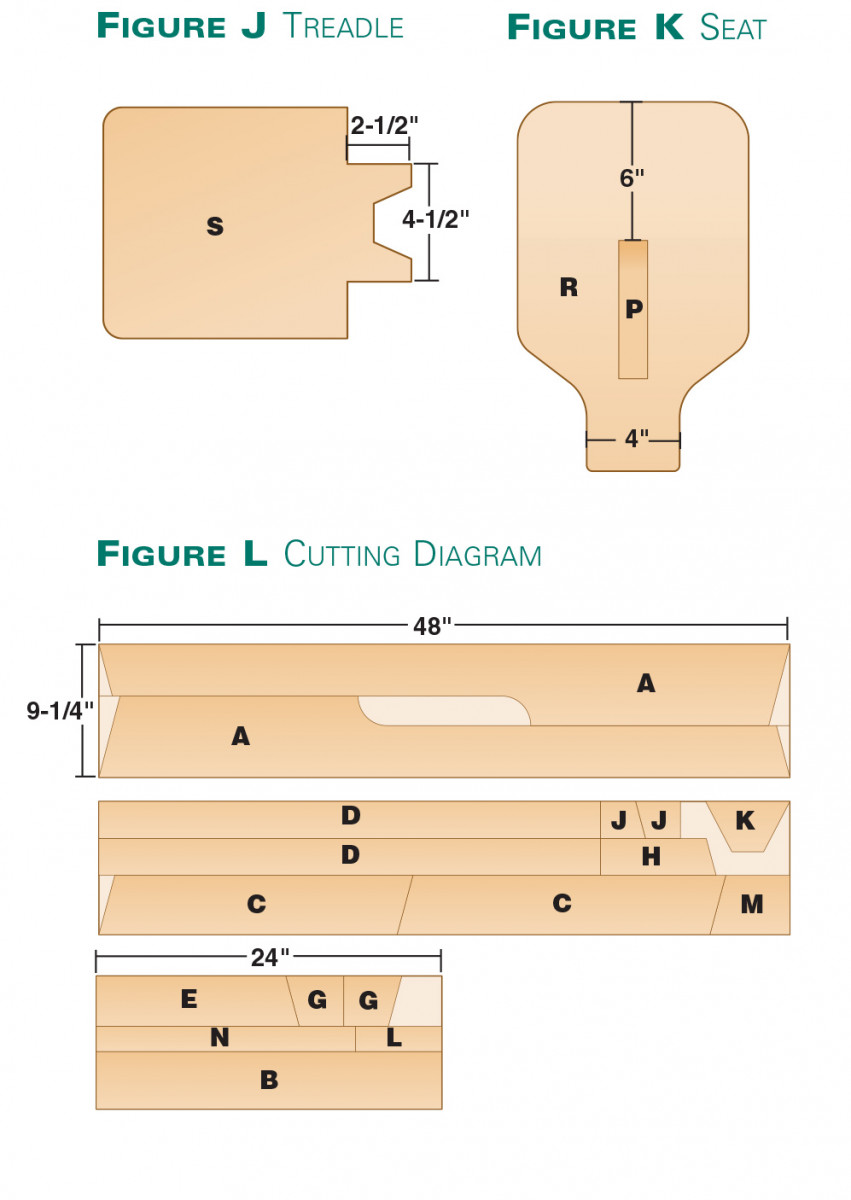
You can make this shaving horse out of any strong wood, such as oak, ash, hard maple or Douglas fir. Tom Donahey uses southern yellow pine construction lumber because it’s economical, strong, and relatively lightweight. He’s figured out a way to get virtually all the parts of a shaving horse from one 10-ft. long 2×10 (Photo 1 and Fig. L). Tom selects clear, straight-grained stock for maximum strength.
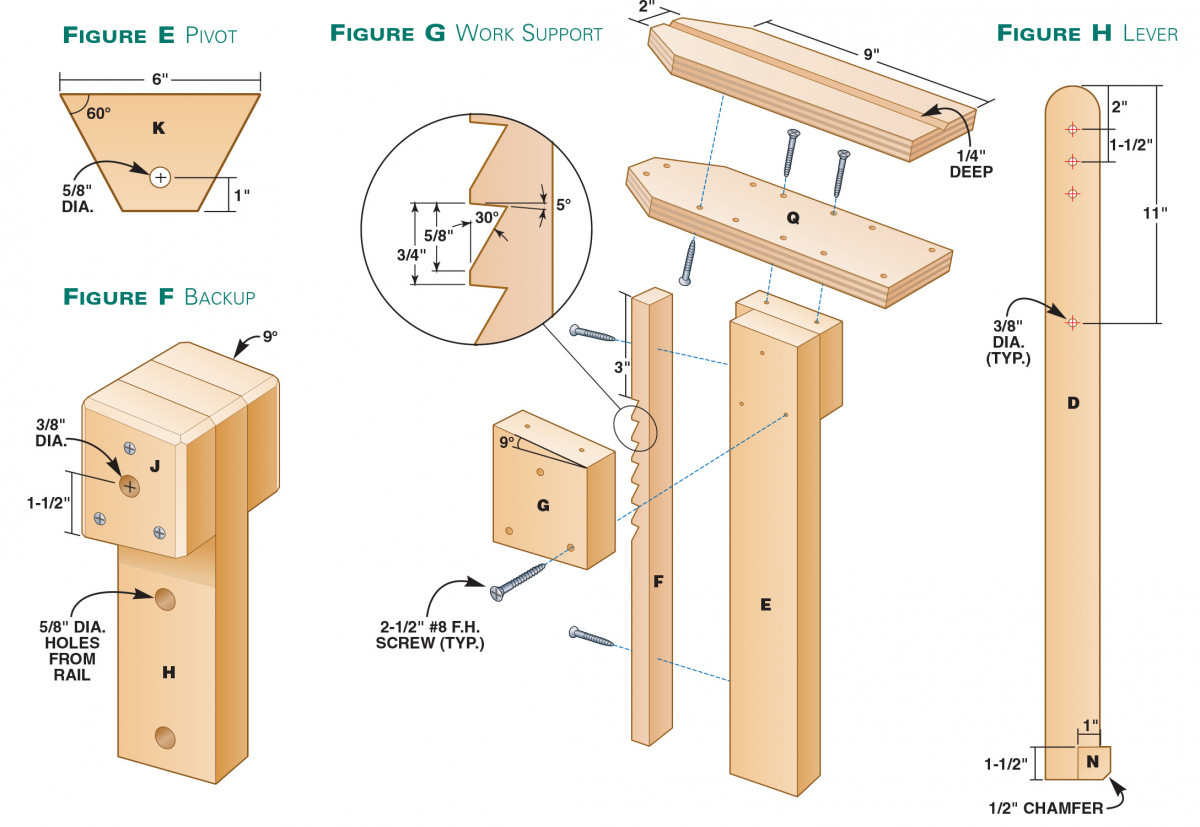
Southern yellow pine isn’t his top choice for the horse’s ratcheting mechanism, however. These pieces take a lot of stress, so he uses hard maple for the pivot piece (K) and sycamore for the ratchet bar (F). Any wood that’s hard to split is suitable for these pieces, though. A wood that’s hard to dent, such as maple or white oak, is also preferable for the rotating jaw (L), which clamps down on a workpiece.
You’ll need a small amount of 3/4-in. Baltic Birch plywood for the treadle (S), work support (Q), and seat (R).
Start With The Back Legs
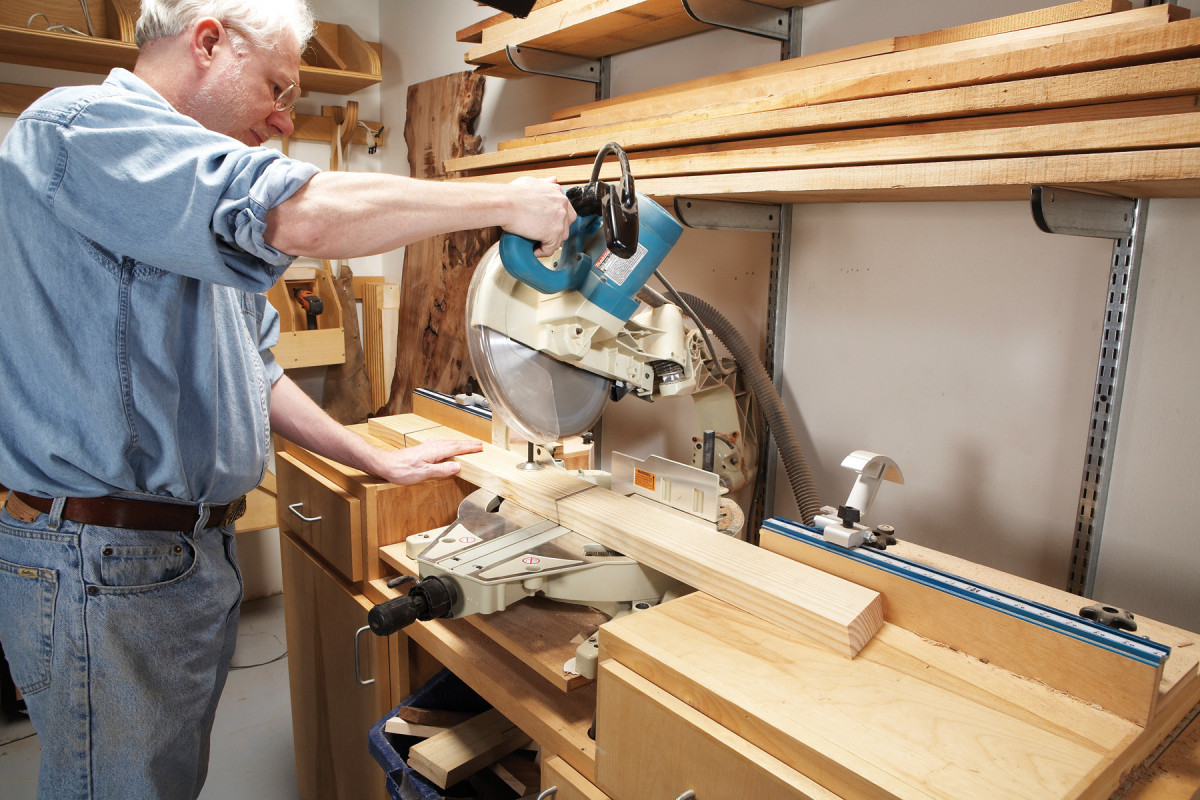
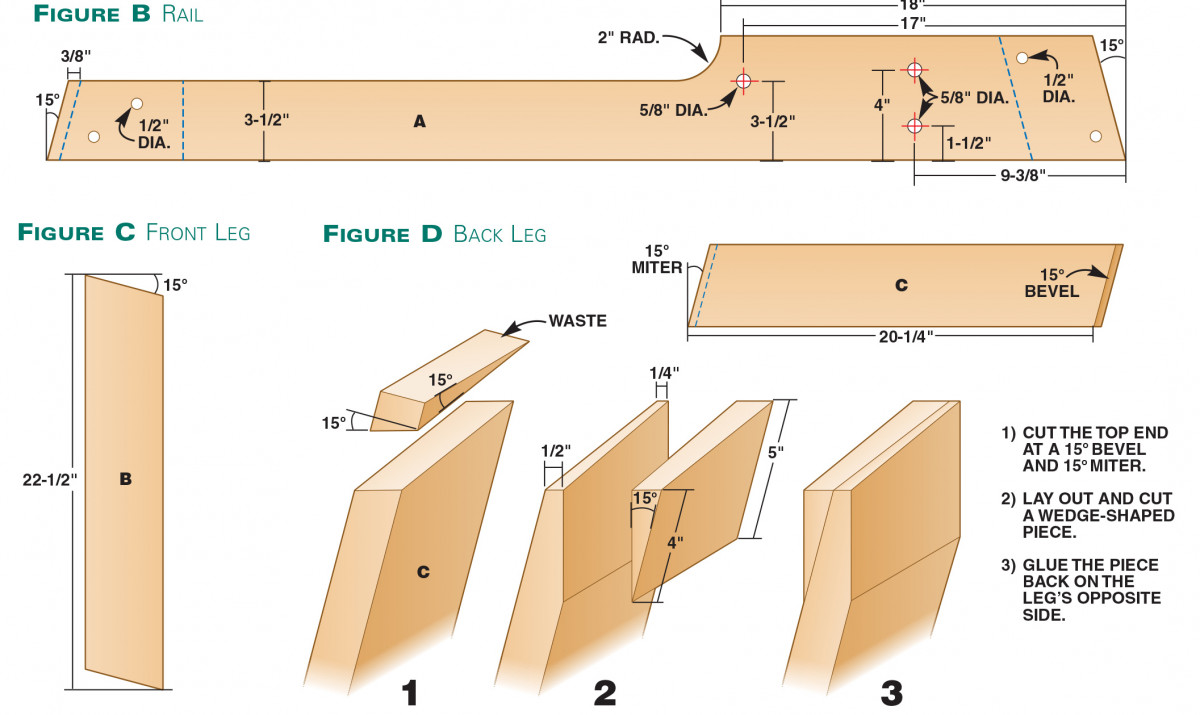
2. Cut both back legs from one long blank. Adjust your miter saw to a 15-15 compound angle, then place the blank to the left of the blade and cut the right end. Slide the piece over to cut the middle, then cut the left end.
If you’re making the horse from a 2×10, cut a 10-ft. board into three pieces: 4-ft., 4-ft., and 2-ft. long. As with any project, parts are easier to mill and join if the wood is flat and straight. If you use Southern yellow pine construction lumber, chances are that it’s neither flat nor straight. Run these pieces through a planer or drum sander before making any further cuts. It’s OK if they end up less than 1- 1/2-in. thick, as specified in the cutting list, as long as they’re all the same thickness.
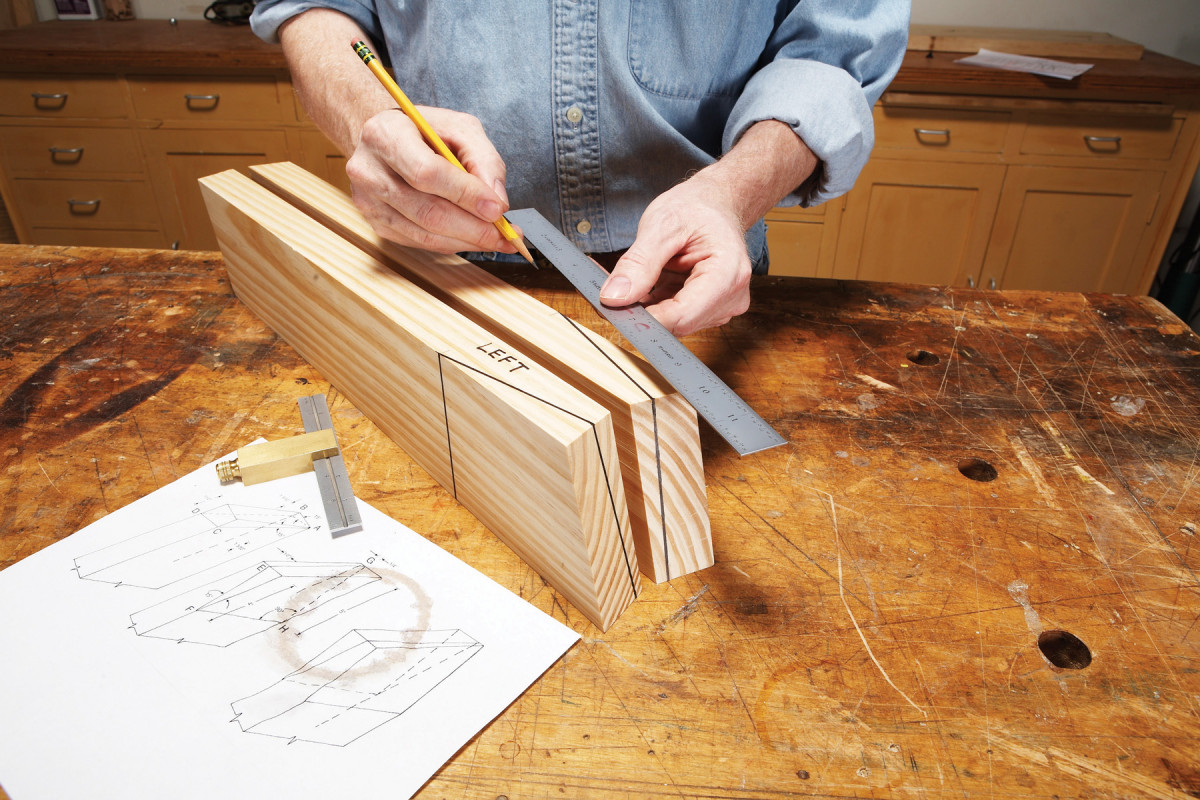
3. Stand the two back legs together as a mating pair, then lay out the same cut on each leg, going in opposite directions.
Lay out and cut all the solid-wood pieces to size (Fig. L). The back legs (C) require special attention. It’s a good idea to make a couple practice ones first to get the hang of it. Make both legs from one blank (Photo 2). On your miter saw, tilt the blade to 15 degrees and rotate the table to 15 degrees (Fig. D). Make three cuts at this setting to obtain both legs.
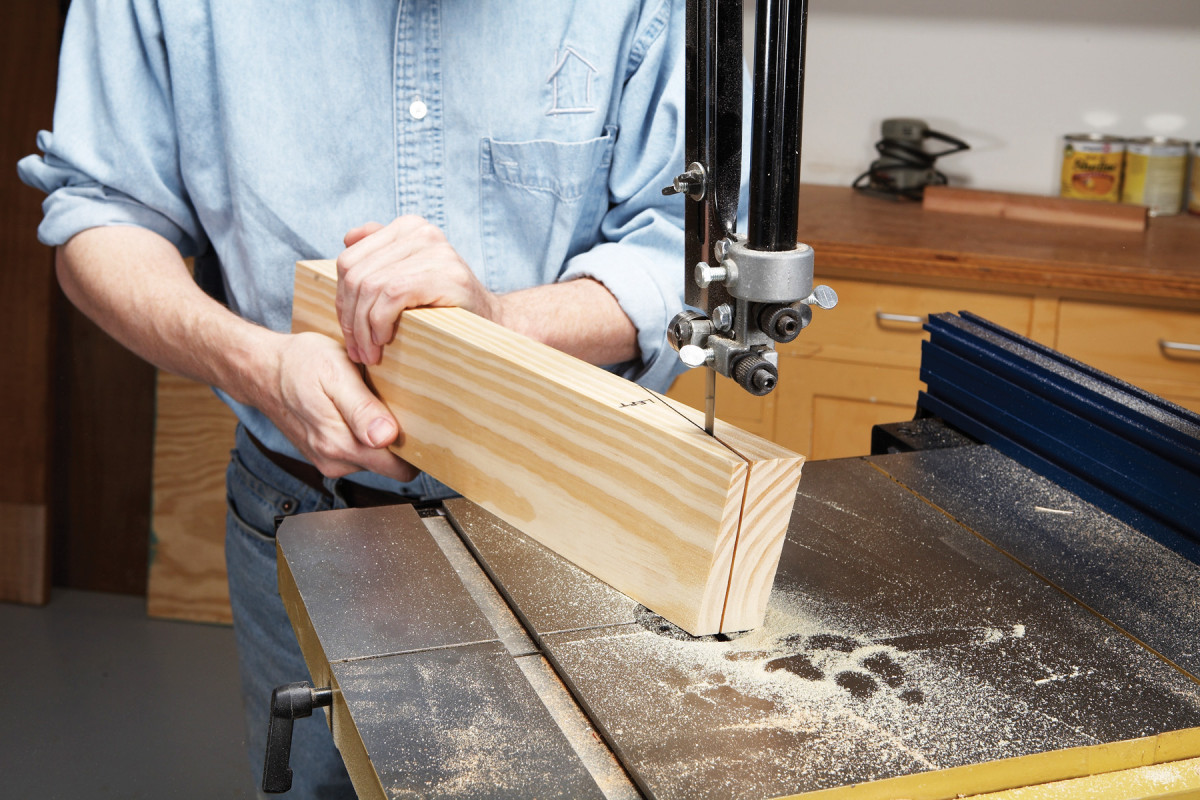
4. Turn over the legs and bandsaw them. This is a simple, straight cut, with the table set at 90 degrees. It looks odd from this angle because the end of the leg is a compound miter.
Stand both of the legs together and orient them so they make a matched pair (Photo 3). In order to make the legs splay out and rake back, you’ll saw off a wedge-shaped piece from one side of a leg and glue it back to the opposite side. The cutting is easy-it’s the layout that’s hard. Draw the wedge all around the left leg, as shown in Fig. D, then draw the right leg as a mirror image.
5. Glue the offcut onto the opposite side of the leg it came from, and you’re all set.
Saw the legs (Photo 4). It’s fast using a bandsaw, but you could also use a handsaw. If you orient each leg so that its angled top end leans forward, all you have to do to make the cut is follow the one line on the top edge of the board. There’s no need to tilt the bandsaw table, even though the layout lines seem to call for it. It’s a 90-degree cut.
If the wedge-shaped cutoffs cup or distort, sand them until they’re flat. Glue the pieces back to the legs they came from (Photo 5). To prevent the pieces from slipping when you clamp, nail some short brads into one piece and clip off their heads near the surface. Press the pieces together by hand, to drive in the brads, before applying clamps.
Drill Holes
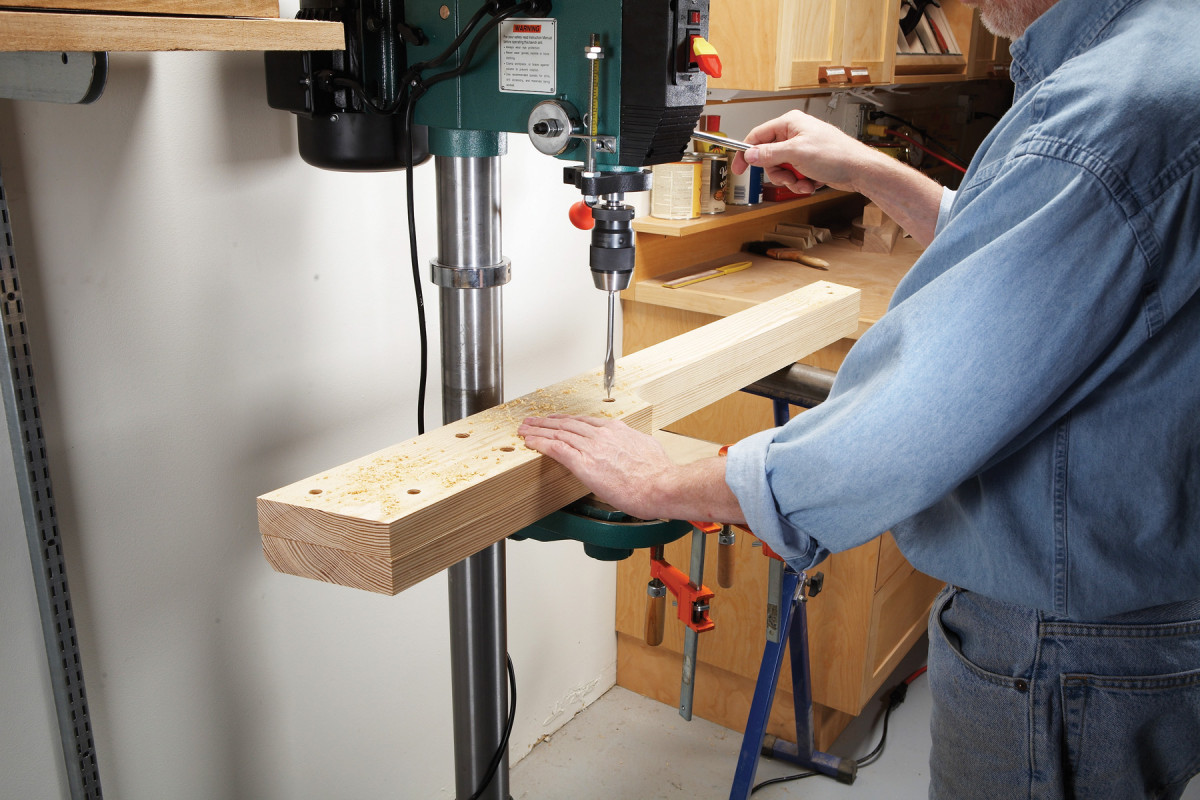
6. The main body of the shaving horse is composed of two rails running side-byside. Temporarily screw these boards together, then drill holes for the leg-mounting bolts and other parts.
Temporarily screw the two rails (A) together. If your stock is a full 1-1/2-in. thick, plan on drilling shallow holes on both rails to accommodate washers for the bolts that hold on the front leg (B, Fig. B). Without these holes, the bolts will be too short to fully thread through the nuts (although you coud use longer bolts and skip the washer holes). Lay out these washer holes on both rails and drill them before drilling the smaller dia. bolt-holes completely through the rails. If, after planing, your stock is 1-3/8-in. thick or so, you can omit the large dia. washer holes. Lay out and drill all the 1/2-in. holes for bolts and 5/8-in. holes for dowels all the way through both rails (Photo 6).
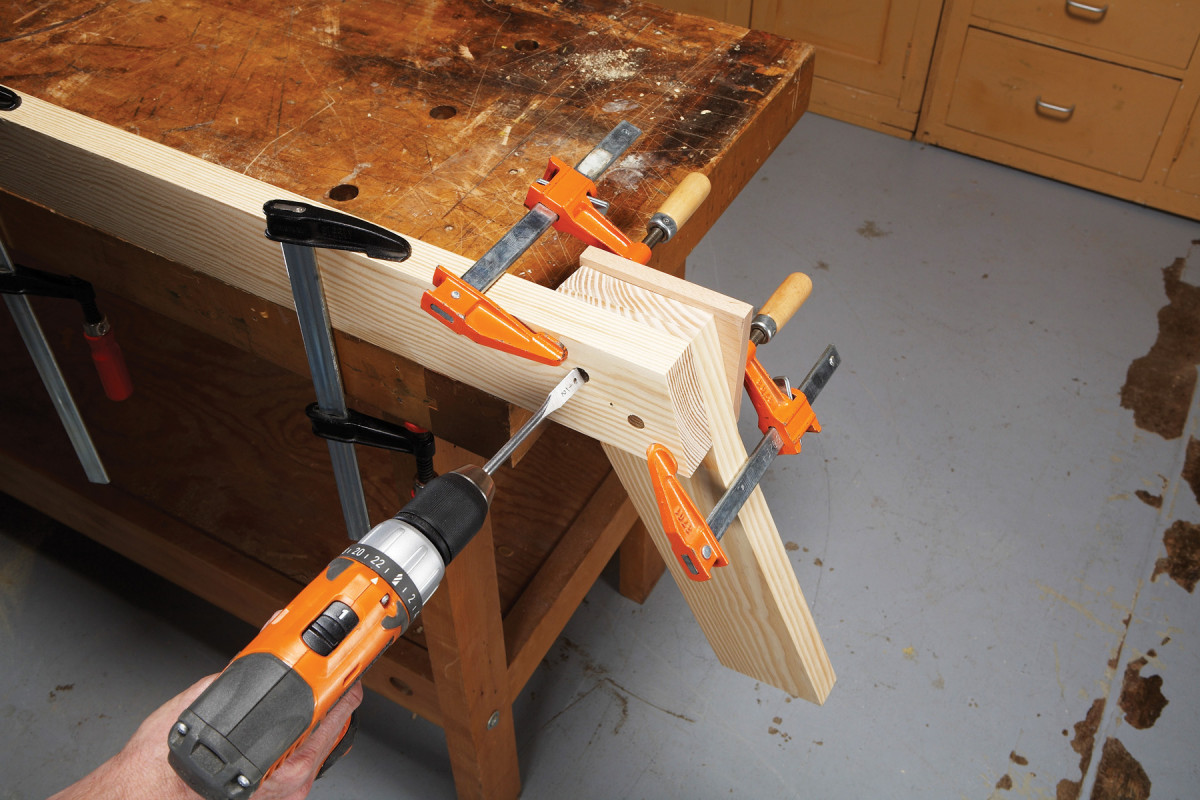
7. Separate the boards, then use the holes as guides. Drill through the rails and into the legs to complete the leg-mounting holes. This horse is easy to disassemble and store when not in use, as all the parts just bolt together.
Separate the rails, then clamp each back leg to the appropriate rail and drill through the leg, using the holes in the rail as a guide (Photo 7). Use the same method to drill holes through the rear spacer (M), and front leg. Temporarily assemble the horse and test the fit of the back-up bar (H) between the rails. Glue the back-up together (H, J, Fig. F), clamp it to one rail, and drill the dowel holes through it. Use a drill press to make the 3/8-in. hole that passes through all three pieces of the back-up.
Rout a chamfer 5/16-in. wide on all the exposed edges of the rails and legs.
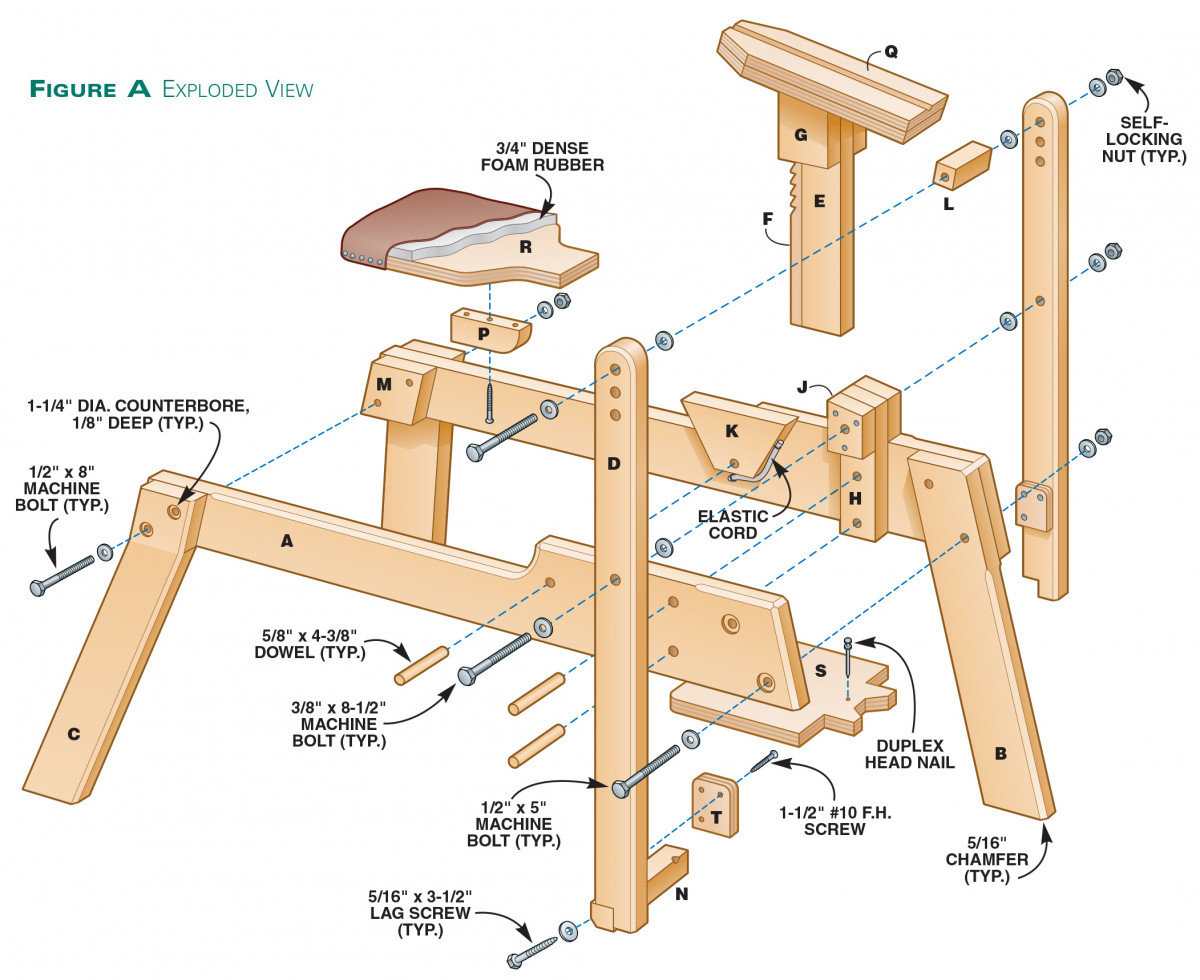
Begin Assembly
8. After attaching the rear legs, install the “backup” piece with large dowels, but no glue. This part prevents the work support from tipping forward when you apply clamping pressure.
Support the rails with boxes or blocks and assemble the rear end of the horse. Install the back-up (Photo 8). Note that it’s not glued, so you may remove it later for modifications, if necessary.
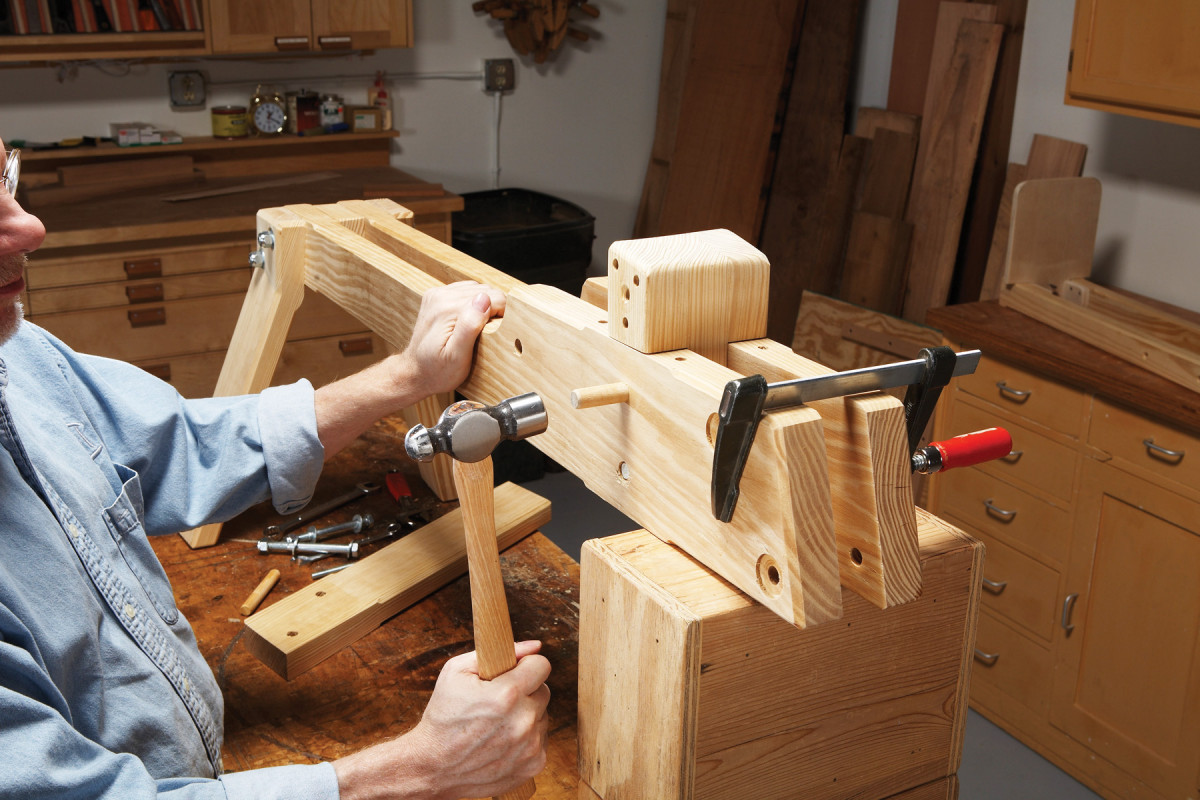
9. Install a wedge-shaped pivot piece behind the backup. It rotates on a dowel passing through the rails; an elastic cord provides spring tension, allowing the pivot to click into the ratchets on the work support column.
Make the pivot (K and Fig. E). It should be 1/8-in. thinner than the front leg and rear spacer, so it may swing freely. Drill its hole using the drill press. The pivot is spring loaded with an elastic shock or bungee cord so that it will automatically tip forward into the ratchets (Photo 9). Attach a 6-in.-long cord half-way up the pivot’s front face using a pair of large staples. Place the pivot between the rails and pound in the dowel on which it rotates. Clamp the pivot in a horizontal position. Grip the free end of the cord and stretch it back underneath the pivot an extra inch or so to some point on the underside of one rail. Mark the point, then release the cord and remove the dowel and pivot. Fasten the other end of the cord to the rail, then re-install the pivot. Make sure the pivot rotates easily; you may have to sand the middle of its dowel to achieve the proper fit.
Make the Lever Arms

10. Install the leverarm assembly. It swings on a bolt that passes through the backup piece. There’s a washer between each lever arm and the backup, so the arms will swing free. Tape these washers in place beforehand.
Drill holes in the levers (D) and notch their bottom ends to receive the treadle support (N). Chamfer all four sides of both levers. Note that the distance between the levers is about 1/4-in. greater than the width of the horse’s body, so the levers are free to swing without binding. In addition, note that the length of the rotating jaw is about 1/4-in. shorter than the distance between the levers, so it, too, is free to swing. Glue a piece of thick leather to one side of the rotating jaw to help it grip a workpiece. The rotating jaw may be placed in one of three positions; install it in the upper position for now. You may move it later, as needed, without taking the horse apart. The treadle (S) slides in between the treadle support (N) and the treadle cleats (T). To fasten the treadle in place, just use a loose-fitting duplex head nail in a pre-drilled hole or a screw (Fig. A). This arrangement makes the treadle easy to remove.
Bolt together the lever arm assembly. There are two washers that act as spacers between the lever arms and the back-up. To install these washers, tape them to the inside faces of the lever arm assembly. Slide the assembly over the horse’s front end (Photo 10). Install the bolt through the levers and backup, then remove the tape. Bolt on the horse’s front leg.
Build the Work Support

11. Saw ratchets on the column that holds the work support. It’s made from two pieces glued together. Use a hardwood that’s hard to split, such as sycamore or hard maple, for the piece that receives the ratchets.
Glue together the ratchet bar (E) and ratchet (F). Plane them 1/8-in. thinner than the space between the horse’s rails. Lay out the ratchets (Fig. G) and cut them on the bandsaw (Photo 11).
Screw and glue the ratchet cheeks (G) to the ratchet bar. Test the fit of this assembly between the horse’s rails. It should easily slide up and down. Glue and screw the lower part of the work support to this assembly. Saw a v-shaped notch in the upper half of the work support, then glue and screw it to the lower half. The notch will help hold rounded workpieces.

12. Assemble the work support, then install it by tipping back the springloaded pivot piece.
To install the work support, tilt the lever arm assembly forward. Push down on the pivot’s back end and slide the support down between the horse’s rails (Photo 12). When you release the pivot, it will spring into one of the ratchets and secure the work support in position.
Add the Seat
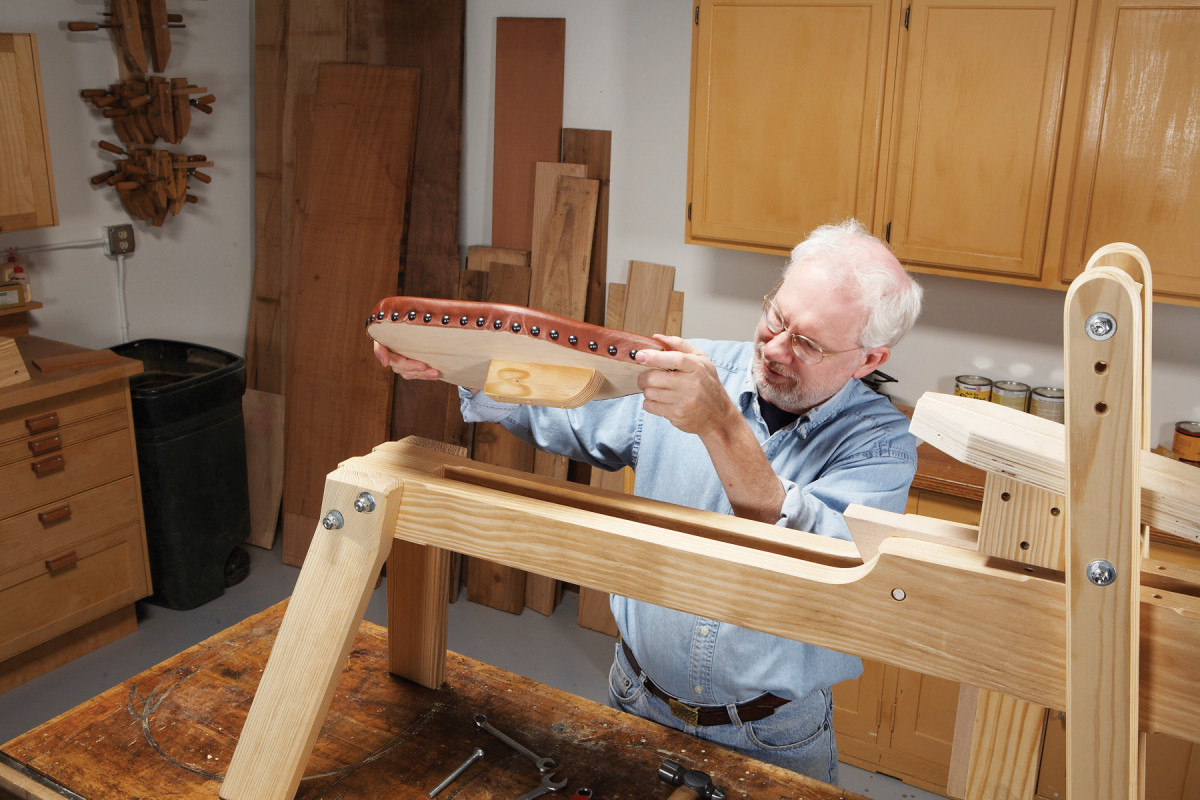
13. When all is assembled, add the seat. It’s not fastened down, but slides between the horse’s rails. This way, you can easily adjust the seat’s position to a comfortable distance from your workpiece.
Build the seat using plywood, foam rubber and leather or other durable upholstery material. Make the cleat (P) 1/16-in. thinner than the distance between the rails, so the seat is free to slide back and forth. You’re ready to make shavings (Photo 13)!
Design Alternatives
These plans are easy to modify to suit your needs or style of work. The seat is about 20-in. high, so you may want to change the length of the legs if you’re tall or short. Tom Donahey uses bolts and dowels to fasten together the major parts of the horse, which allows the user to take it apart for storage, transportation, modification, or maintenance. Alternatively, you could glue the parts together for a classier look, but that would limit your options for making modifications.
Cutlist and Dimensions

Editor’s note: This article was originally published in American Woodworker #135 under the title Hybrid Shaving Horse
Here are some supplies and tools we find essential in our everyday work around the shop. We may receive a commission from sales referred by our links; however, we have carefully selected these products for their usefulness and quality.


