We may receive a commission when you use our affiliate links. However, this does not impact our recommendations.
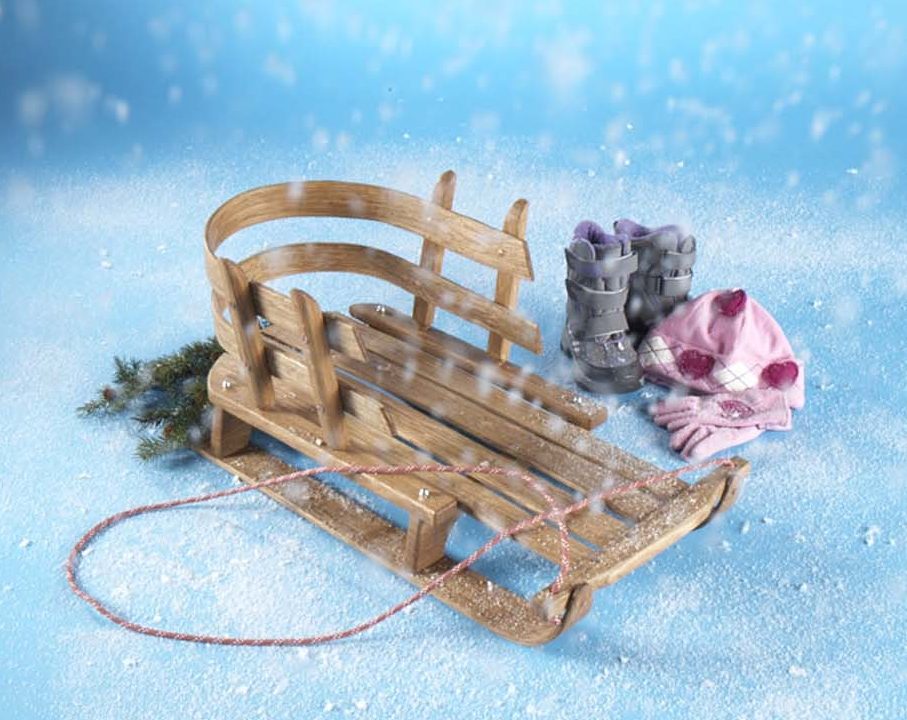
An ideal first project for working with green wood.
This little sled is a perfect introduction to the age-old tradition of working green wood. Building it is a completely satisfying experience, from beginning to end: you start by cutting down a tree and end by playing with kids in the snow.
Along the way, you’ll learn how to split wood along its grain, how to handle a drawknife, how to use a shaving horse, how to steam-bend wood and how to make copper rivets. That’s a lot of new skills to learn in one project, but the sled is so small (it’s sized for a toddler), and has so few parts, that you can easily afford to mess up now and then, pick up the pieces and keep moving on.
To be honest, I’m new to green woodworking. I built a pair of snowshoes last year, and this was my second project. I still have a long ways to go to master the art, but this project really advanced my craftsmanship and taught me a lot about how wood works.
You’ll be shaping all the parts by hand, and that’s probably what I like best about this sled. For once, the parts of a project don’t have to be perfect. On this sled, their surfaces can be uneven, their sides can be square-ish and their lengths only have to be somewhat close to the given dimensions. Now, that’s freedom! When you’re done, your sled will look and feel truly handmade.
Wood and Tools
My source of wood was as local as it gets: a white oak tree that died several years ago on my family’s farm. Its trunk was about 12″ in diameter and quite straight, which is essential for “riving” straight parts.
Riving is a means of breaking down a log into smaller pieces, called billets, by splitting it along its grain. Riven wood is inherently strong and ideal for the thin pieces of this sled, which must be able to withstand a good deal of playful strain.
After cutting your tree into short sections, you’ll need wedges, a sledge hammer, a froe, and a wooden club to split them. To shape the wood, you’ll need a hatchet, a drawknife and a spokeshave. I bought my tools at flea markets for very reasonable prices. You might have trouble finding an old froe and a drawknife in good shape, but these tools are still available new.
You could build most of the parts of this sled from kiln-dried lumber, but there are two important points to consider with this approach. First, kiln-dried wood is much harder to split and shape than green wood with the hand tools I used. If you use kiln-dried wood, work with power tools instead.
Second, the curved pieces should be made in a different way. I’ll be showing you how to steam-bend them, but this process generally only works well with freshly cut wood or, second best, lumber that has been air dried. (The moisture content of air-dried wood is usually about 12%; kiln-dried wood is about 8%.) In my experience, kiln-dried lumber is prone to cracking when it’s bent with steam. If you can’t obtain green or air-dried wood, you can make the curved pieces using a bent-lamination technique, gluing and clamping a stack of thin pieces around a form.
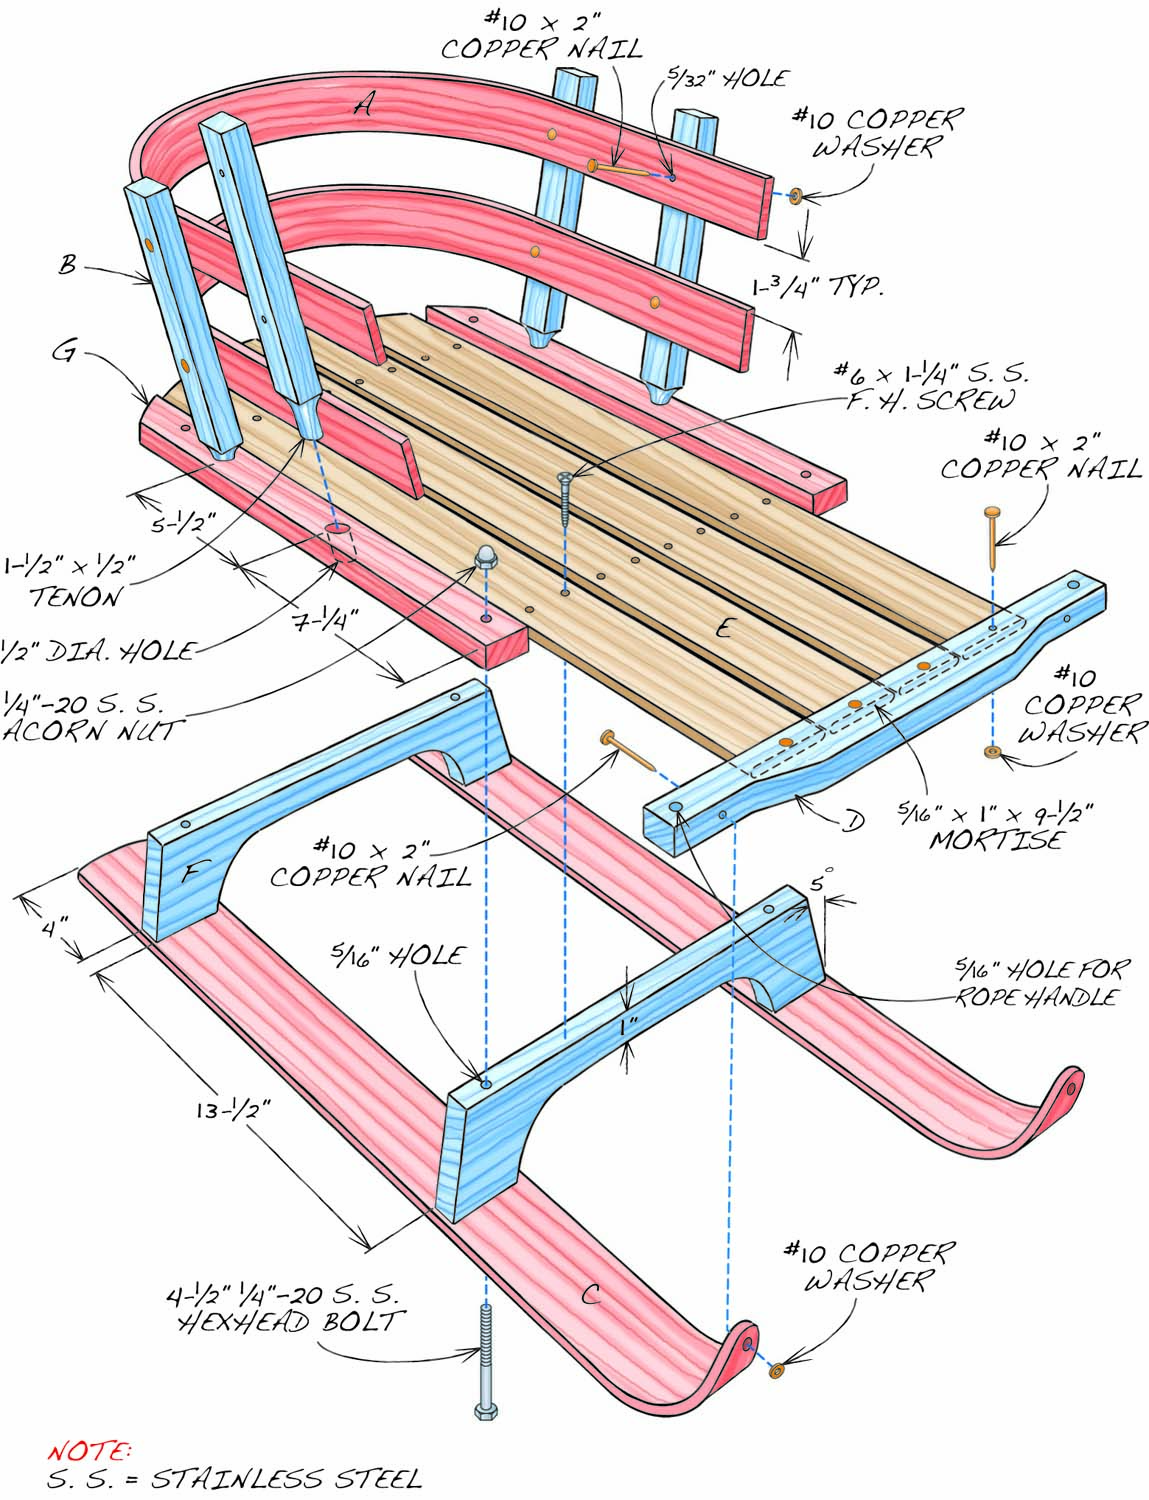
Fig. 01. Exploded View
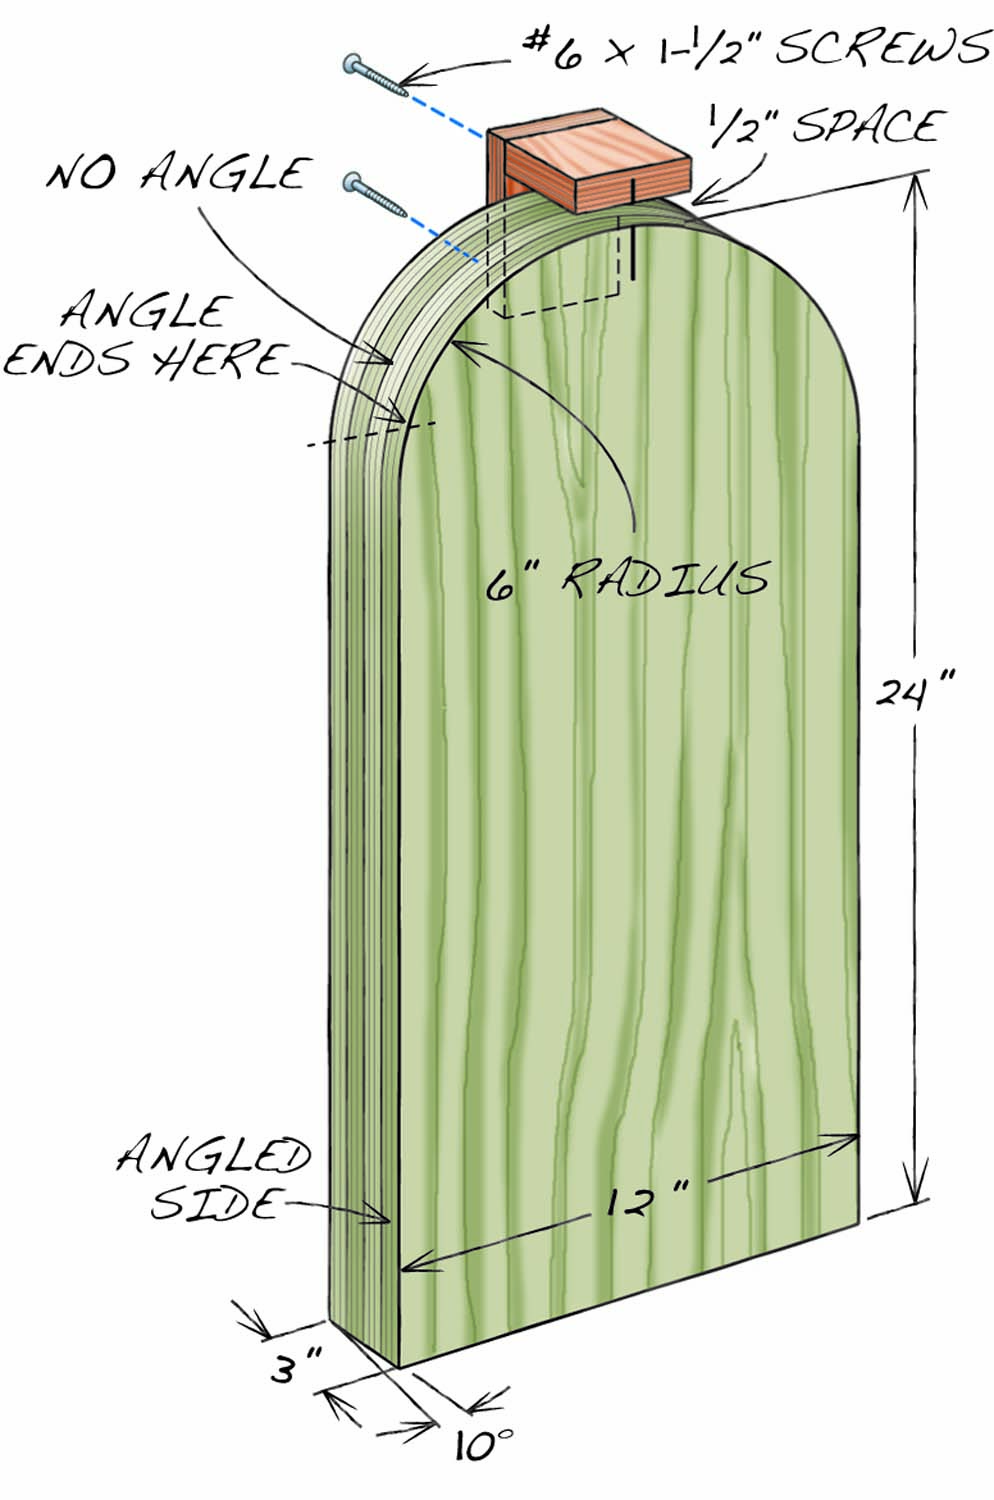
Fig. 02. Slat Bending Form
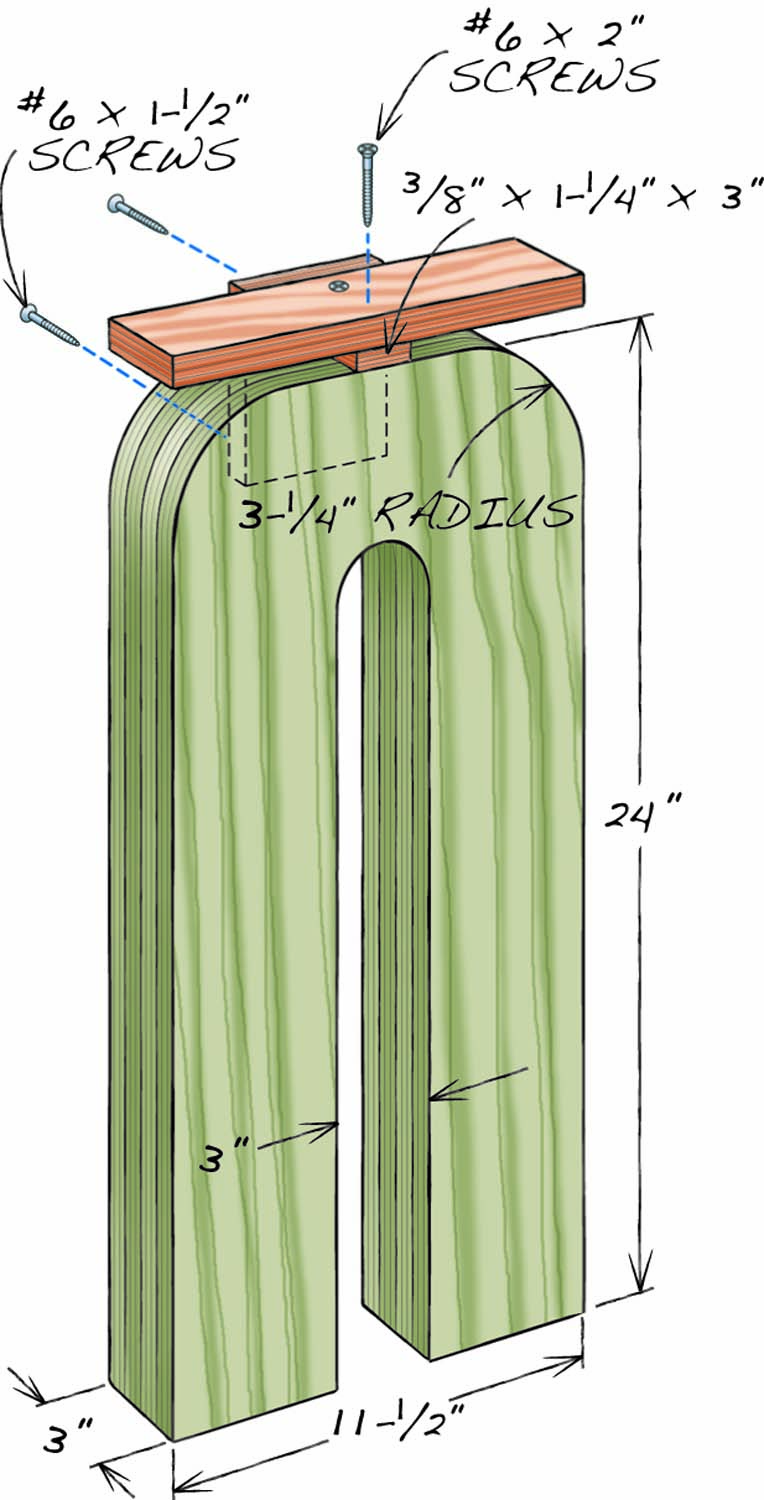
Fig. 03. Runner Bending Form
Cutting List
|
Overall Dimensions 13-1/2″ H x 15-1/2″ W x 28-1/2″ L |
|||
|
Part |
Name |
Qty. |
Th x W x L |
|
A |
Back slat |
2 |
5/16″ x 2″ x 42″ |
|
B |
Post |
4 |
1″ x 1″ x 10″(a) |
|
C |
Runner |
2 |
3/8″ x 2-1/2″ x 31″(b) |
|
D |
Front rail |
1 |
7/8″ x 1-1/2″ x 15-1/2″(c) |
|
E |
Seat slat |
4 |
5/16″ x 2″ x 28″ |
|
F |
Trestle |
2 |
7/8″ x 3″ x 13-3/4″(d) |
|
G |
Side rail |
2 |
7/8″ x 1-5/8″ x 18″ |
|
Notes: a) Form 1/2″ x 1-1/4″ tenons on ends. b) Trim to length after bending. c) Make 3/8″ x 1″ x 9-1/2″ mortise for seat slat ends. d) Angle ends at 5°. |
|||
Splitting and Shaving
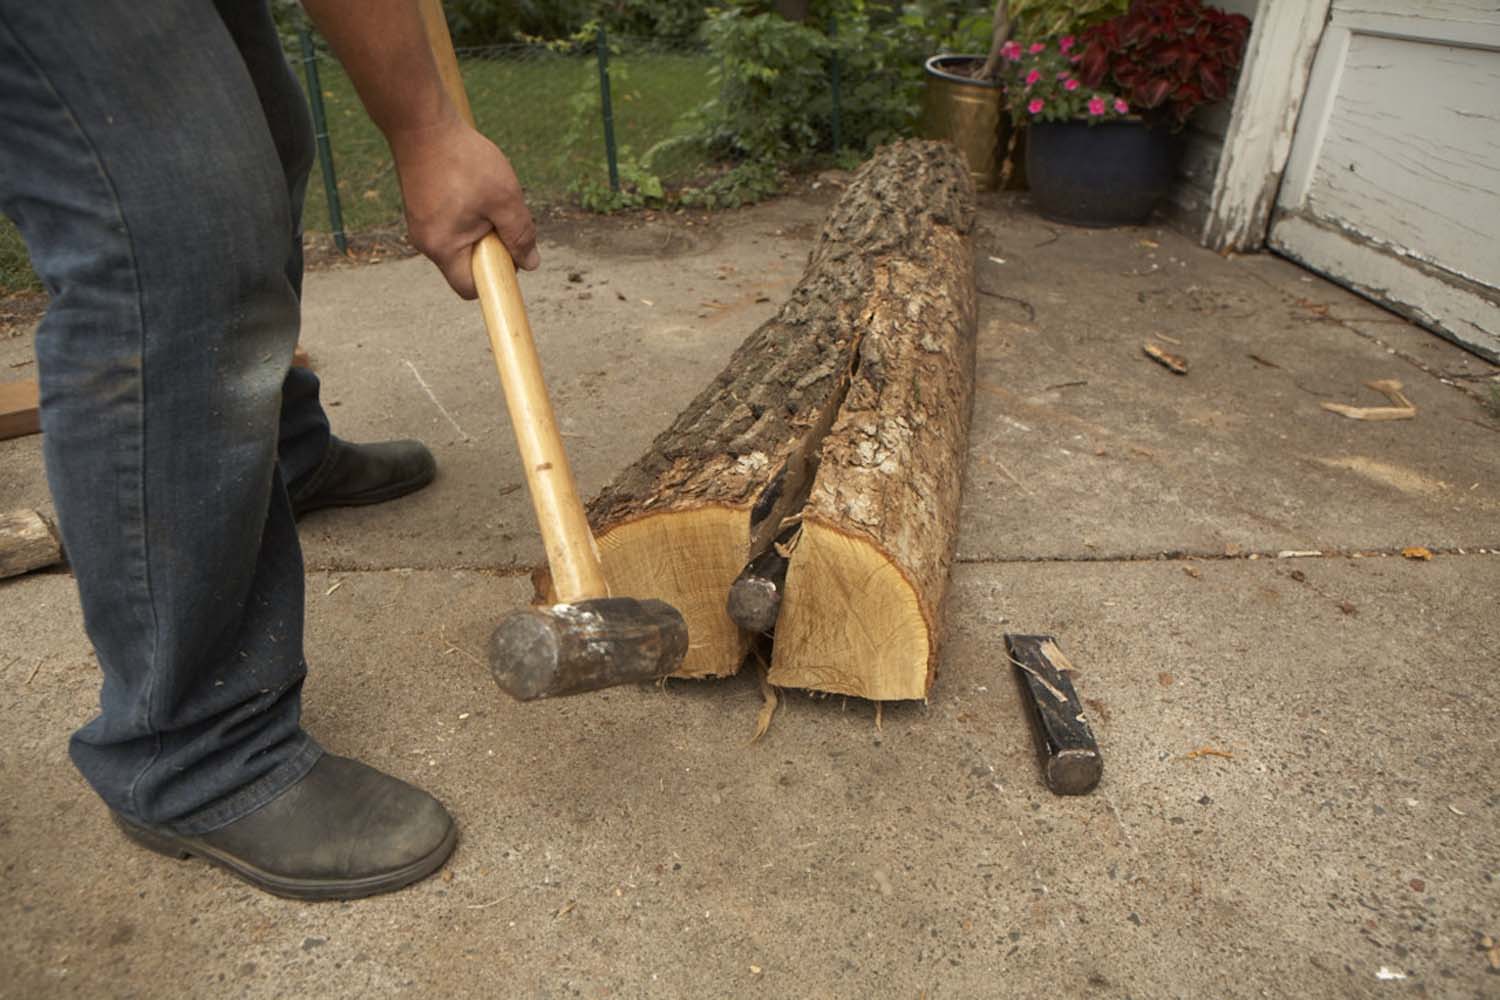
Photo 1. Crack! I built this sled from an oak tree that grew on my family’s farm. The first step is to split the wood while it’s still green. Oak splits best along radial lines into pie-shaped pieces.
Split your log into halves, then quarters, then eighths (Photo 1). Determine which sections of the log to use for each of the sled’s parts (see Cutting List). Cut the sections to rough length, creating a small pile of billets.
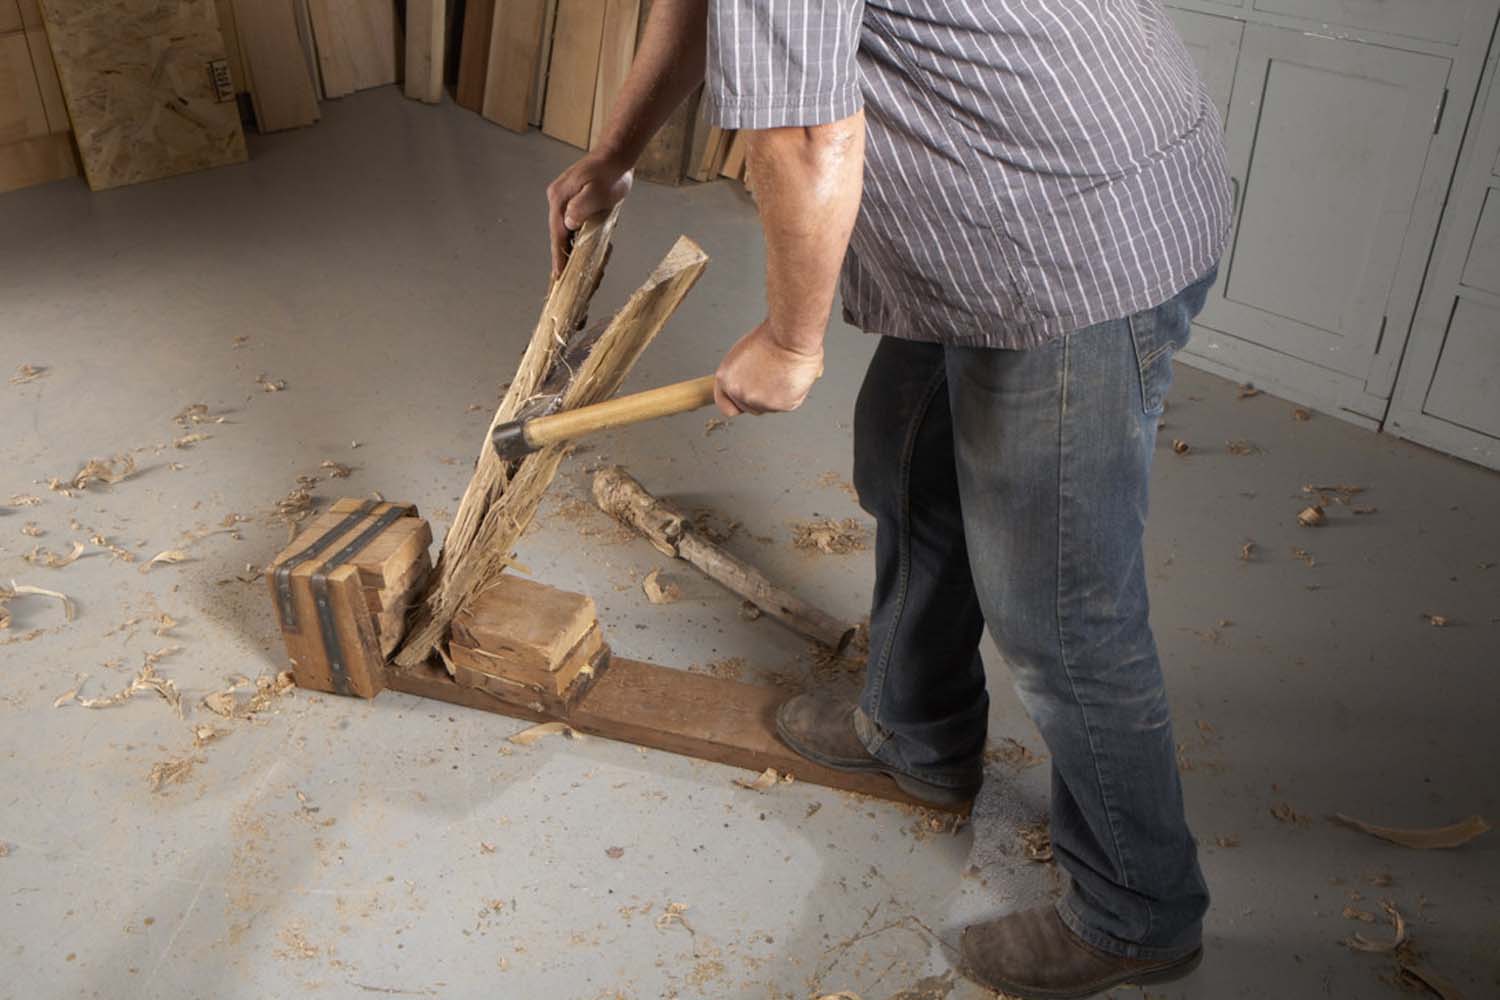
Photo 2. Split each piece into smaller sections using a froe, which is basically a wedge with a handle attached to it. The handle allows you to steer the split—a process called “riving.”
Split the billets with a froe (Photo 2). A froe isn’t sharp, like an axe; it’s just a wedge with a right-angle handle. Start by scribing the desired split line using a hatchet and club. Drive the froe into the line with the club and start levering the billet in two. A “riving brake” is helpful here—it’s just a device that will trap and hold the end of the billet. The brake needn’t be fancy; I made one with 2×6 scraps and plumber’s strap.
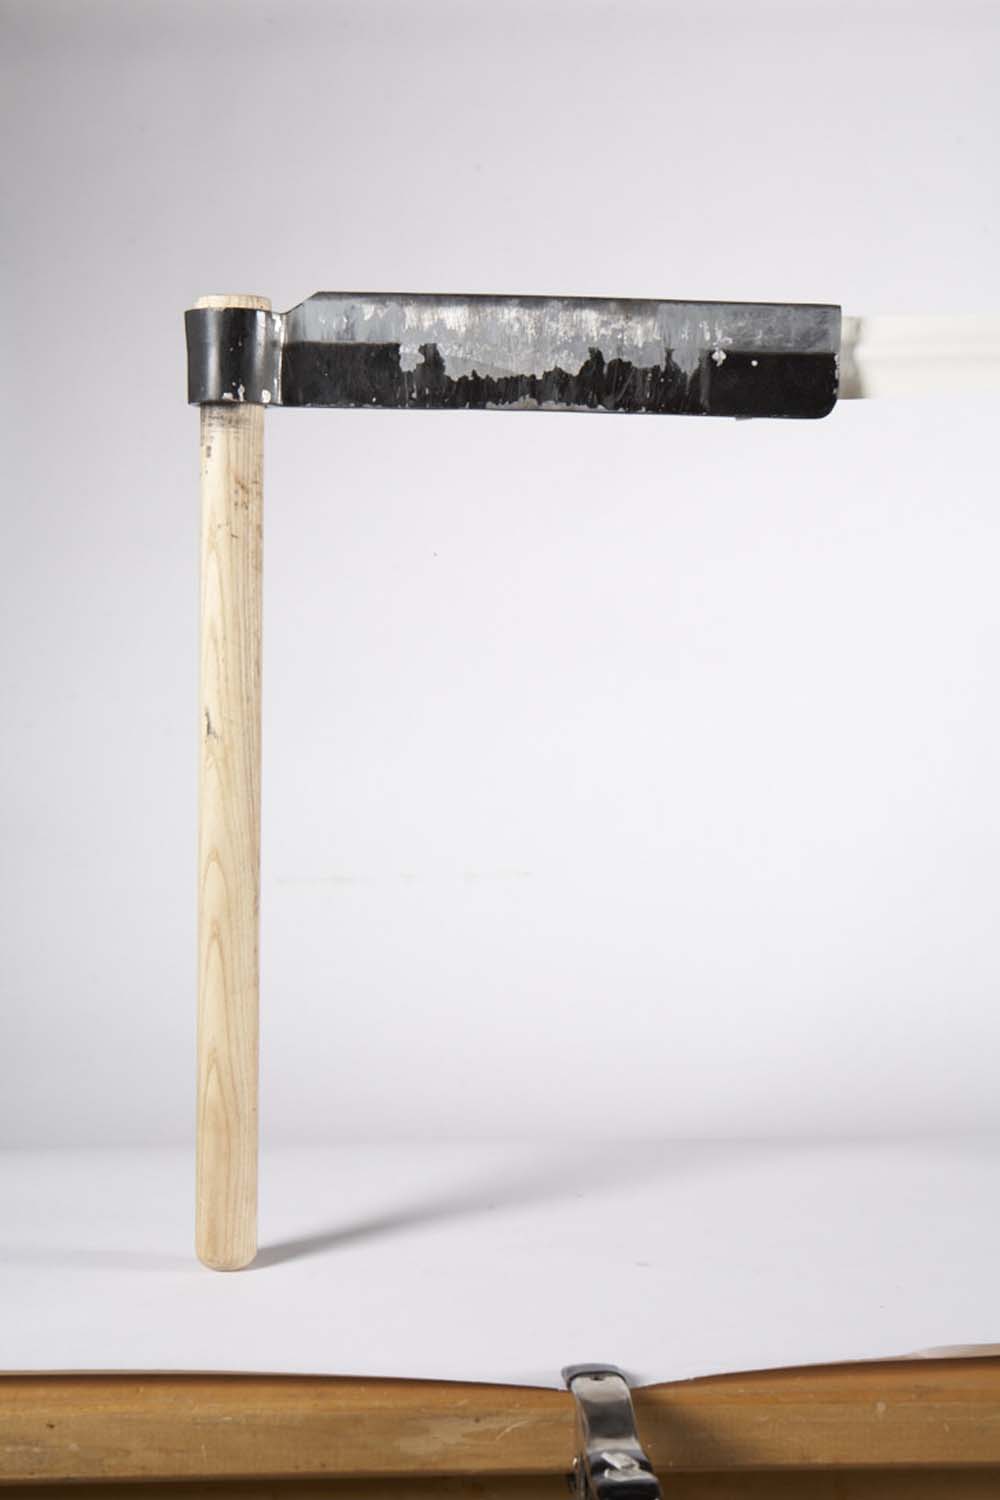
The author’s froe.
As the split increases, slide the froe deeper and apply more leverage. If the split drifts to one side or the other, you can alter its direction by levering the froe’s handle towards the fatter side of the billet.
As you’re riving, visualize—or draw on the end grain—the cross-sections of the parts, so you know when the billets are thin enough. When the billets are close to the finished dimensions of the parts, remove the bark, sapwood and point of the wedge using the hatchet or froe. As you gain experience, you’ll find that it’s best to cut the parts as close to final shape as possible using these tools, because they remove waste so fast.
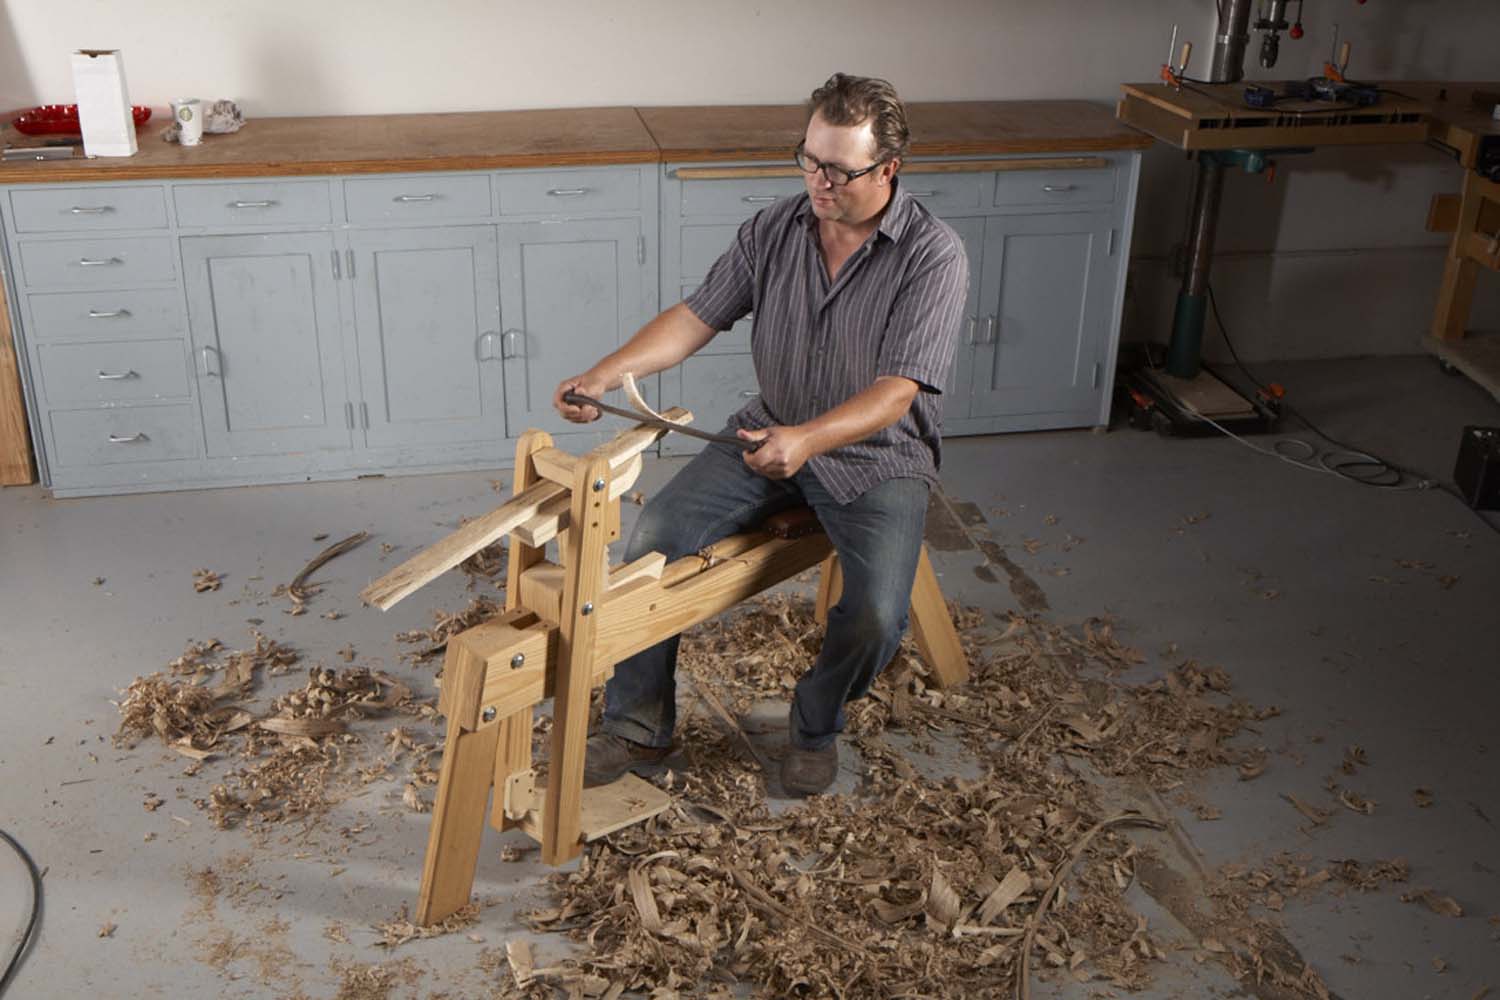
Photo 3. Shape all of the sled’s parts, while the wood is still green, using a small ax, a drawknife and a spokeshave. Green wood is much easier to cut than dry wood. Use a shaving horse to hold the work.
Shape the billets into flat boards using a drawknife and a shaving horse (Photo 3). A shaving horse is one of the most efficient and pleasurable tools I’ve ever used. I could sit in the shade and make shavings all day if only someone would pay me for it! To turn the billet into a flat board, find the best side and shave off the high spots. A drawknife can be used bevel-side up or bevel-side down. You’ll quickly find that bevel-side up is best for removing big chunks; bevel-side down is best for thinner shavings. Check often by eye to make sure the workpiece is reasonably flat. For this project, dead flat isn’t necessary.
Turn the board over and shave the other side until the board is uniform in thickness. Use your fingers as calipers—you’ll be surprised at how accurate they can be. After thicknessing, straighten one edge. A hatchet is often the way to go here. With a little practice, you’ll get good results, fast.
Once you’ve got one straight edge, rive, hew or shave the other edge to the finished width. The amount of material to be removed determines what tool you’ll start with. If I have to remove more than 1″, I’ll start with the froe; from 1/2″ to 1″, the hatchet; 1/2″ or less, the drawknife.
Steam Bending
Bending wood with steam is an inordinately fun experience, like riving billets and riding a shaving horse. You’ll need a shop-made box, a hose, an electric teapot or other device for making steam and two plywood bending forms, one for the slats and one for the runners (Figs. 02 and 03).
Both forms have approximately the same radius, but there’s a major difference between them. The form for bending the back slats (A) has sloped sides, giving the slats a twist. Notice that the sled’s posts (B) lean outward, matching this twist. The form for bending the runners, on the other hand, has square sides. Build both forms by screwing and gluing four layers of 3/4″ plywood. You’ll need a bandsaw to cut them to final shape.
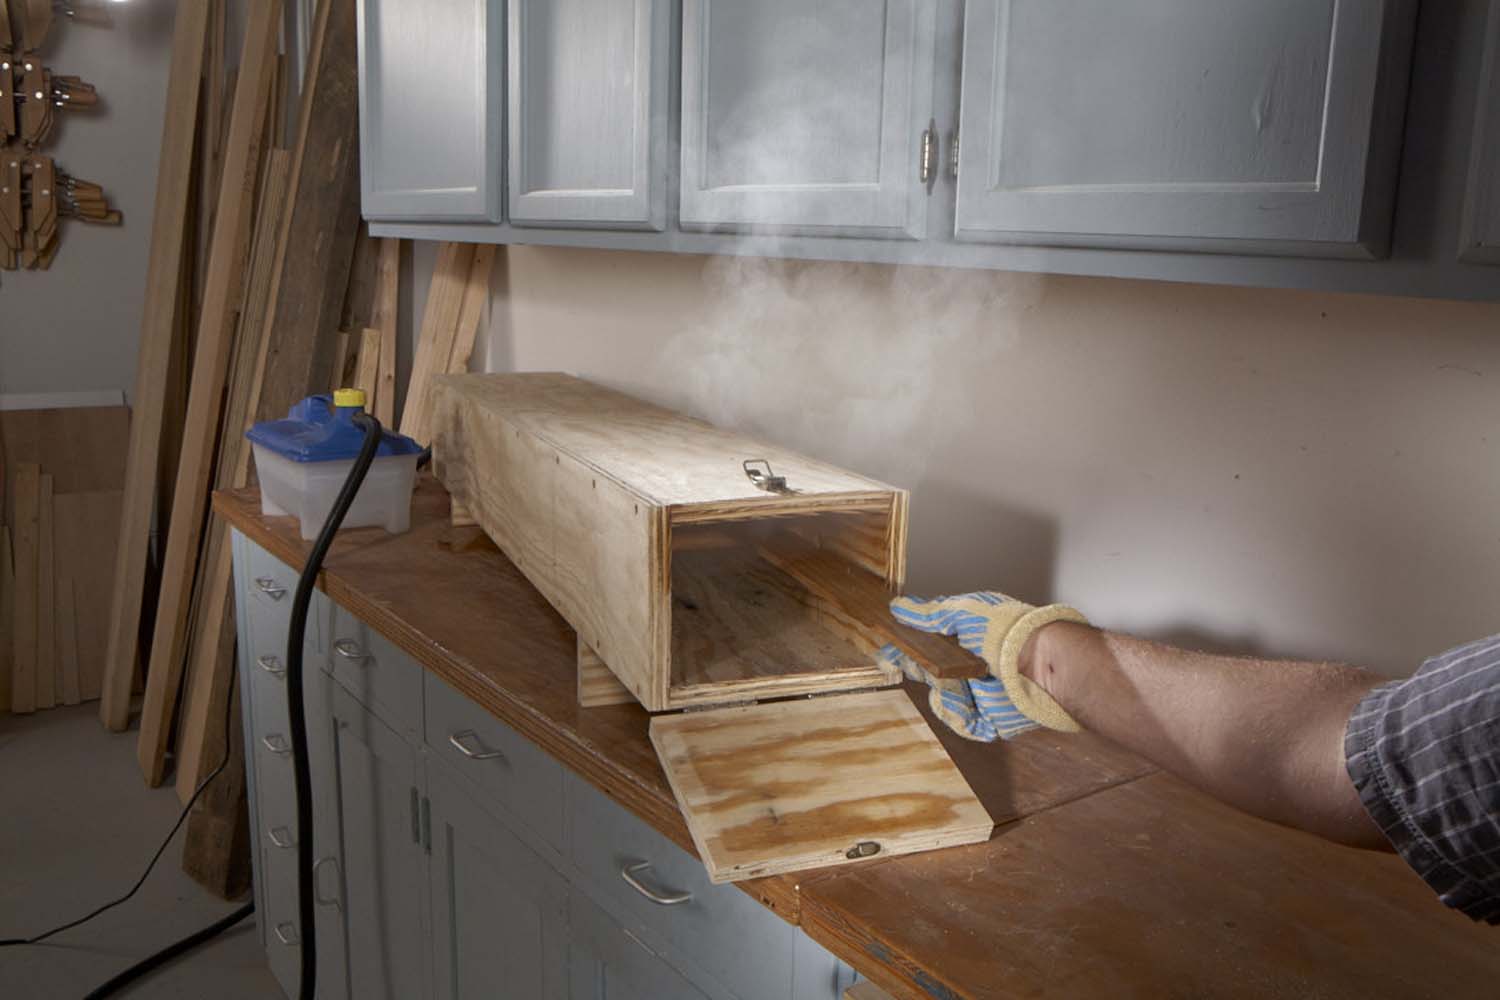
Photo 4. Steam the sled’s back slats in a shop-made box, in preparation for bending. Green wood is much easier to bend than kiln-dried wood, particularly when it’s split along the grain. These thin parts only require about 15 min. of steaming.
Steam the back slats, one at a time (Photo 4). First, mark each slat’s center, so you can quickly center the piece on the form. Heat the water and wait until steam flows out the door when you open it. Leave the slat in the box for 15-20 minutes.
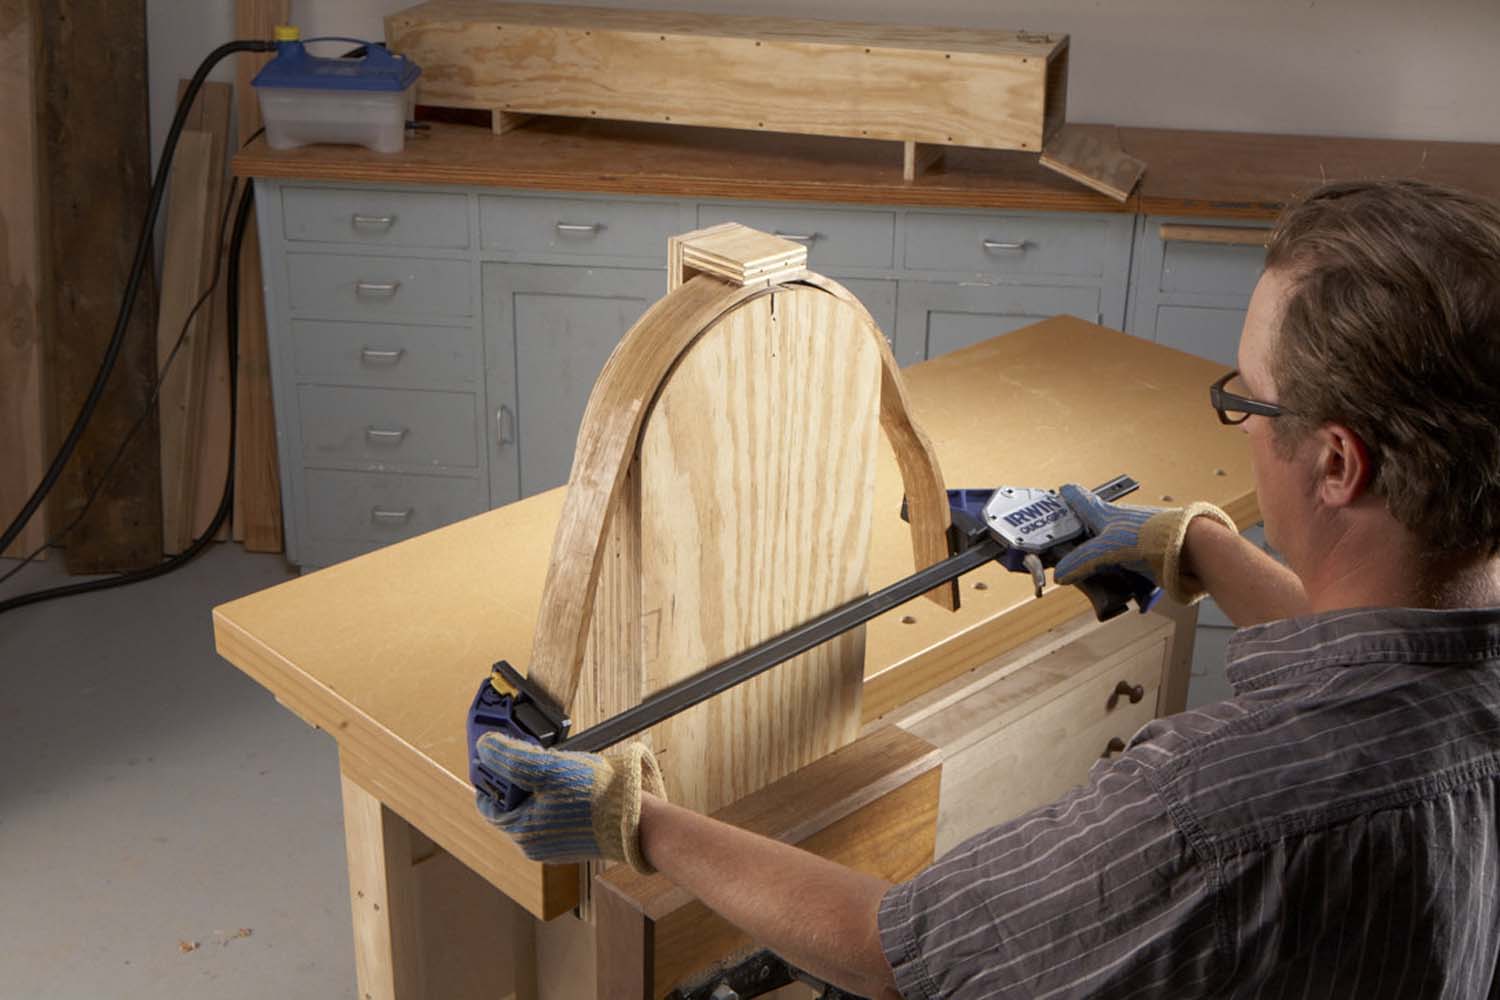
Photo 5. Bend each slat, while it’s still hot, around a plywood form. You have to work fast—this Quick-Grip clamp allows you to squeeze the slat tight to the form in seconds.
Put on some gloves (a must!) to remove the slat from the box—it will be very hot. Work fast to bend the slat around the form (Photo 5). It’s best to have a helper, but I worked alone using a 36″ Quick-Grip clamp. I have a new-style clamp, which has pivoting jaws—perfect for the form’s sloped sides. For all other clamps, make two angled blocks to squeeze the slat flat to the form’s sides. Leave the slat on the form at least twelve hours. Then clamp it onto a 12″ long 2×4 to free up the form for the next slat. (Angle the ends of the 2×4, like the sides of the form.) Let both pieces dry at least 2 days before releasing the clamps.
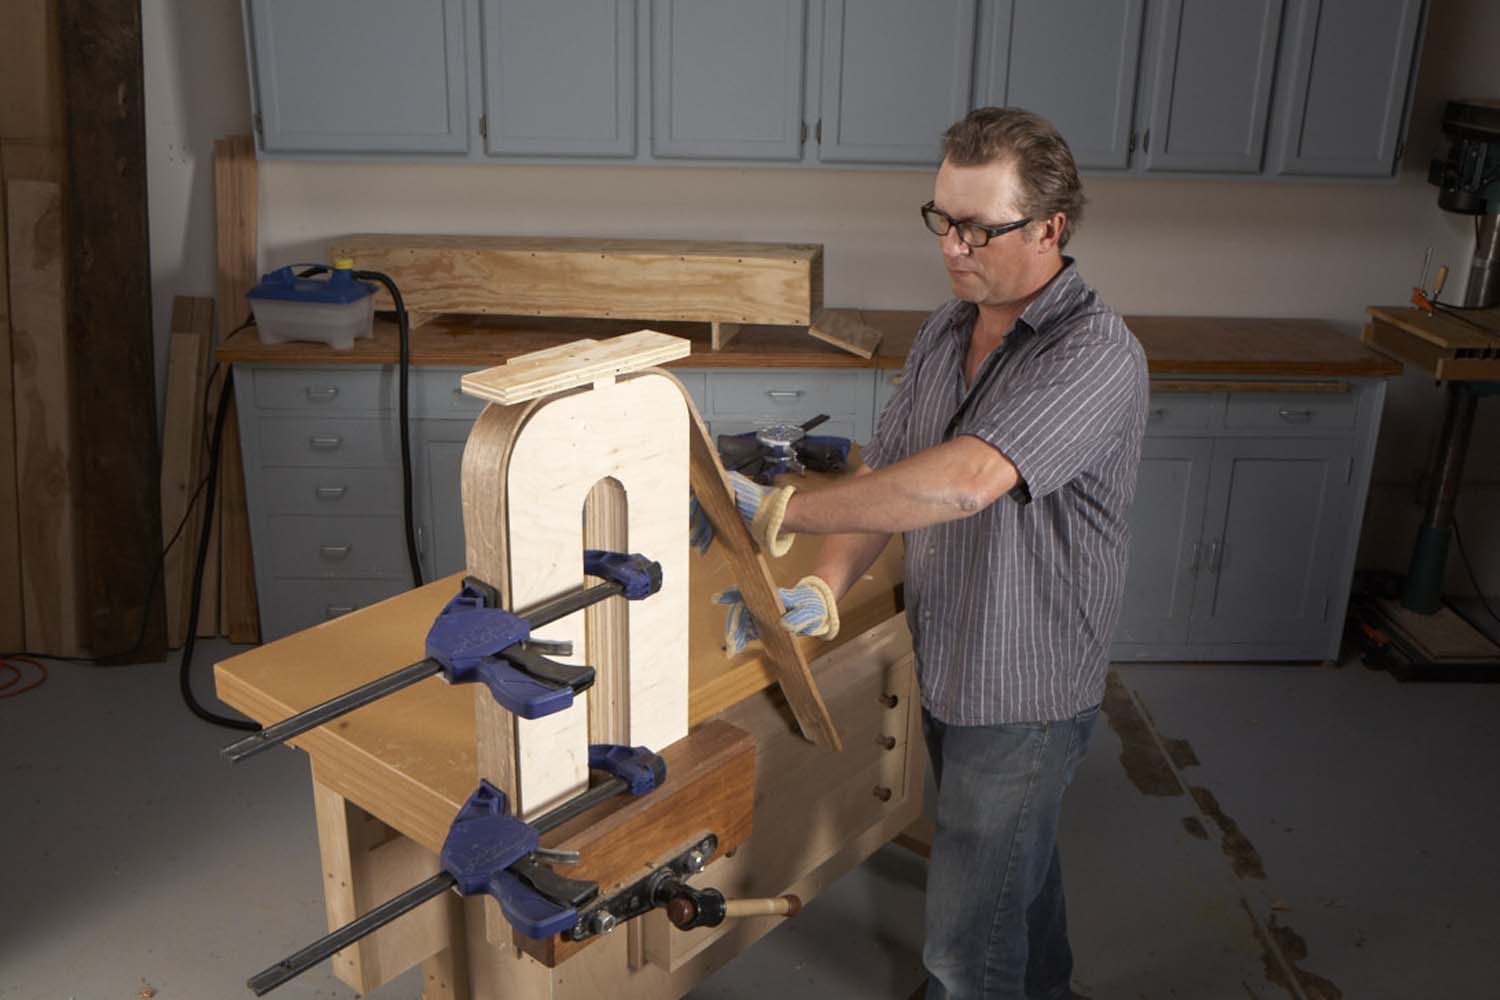
Photo 6. Use a different form to bend the sled’s runners. The slat’s form had sloped sides, which gave the slats a slight twist; this form has square sides. Butt the ends of the runners inside a stop block to hold them in place.
Next, steam the runners (C). You can clamp both runners on this form, so steam them together. After about 25 minutes, remove one runner and shut the door. Push the runner’s tip into the form up to the stop block, bend and clamp (Photo 6). The stop block ensures that the bend will be the same on both runners.
Seat Slats and Posts
While your steamed parts are drying, finish shaving other parts to final shape and size. Begin with the front rail (D). Note that it is mortised to receive the seat slats (E). Make the mortise before you shave down the ends of this piece (I used a plunge router, but you could use a brace and bit to remove most of the waste and chop the rest).
Shave the seat slats to final thickness and width, making sure that their front ends fit into the mortise. Cut the back ends of these pieces so, when assembled, their outline follows the radius of the back slats.
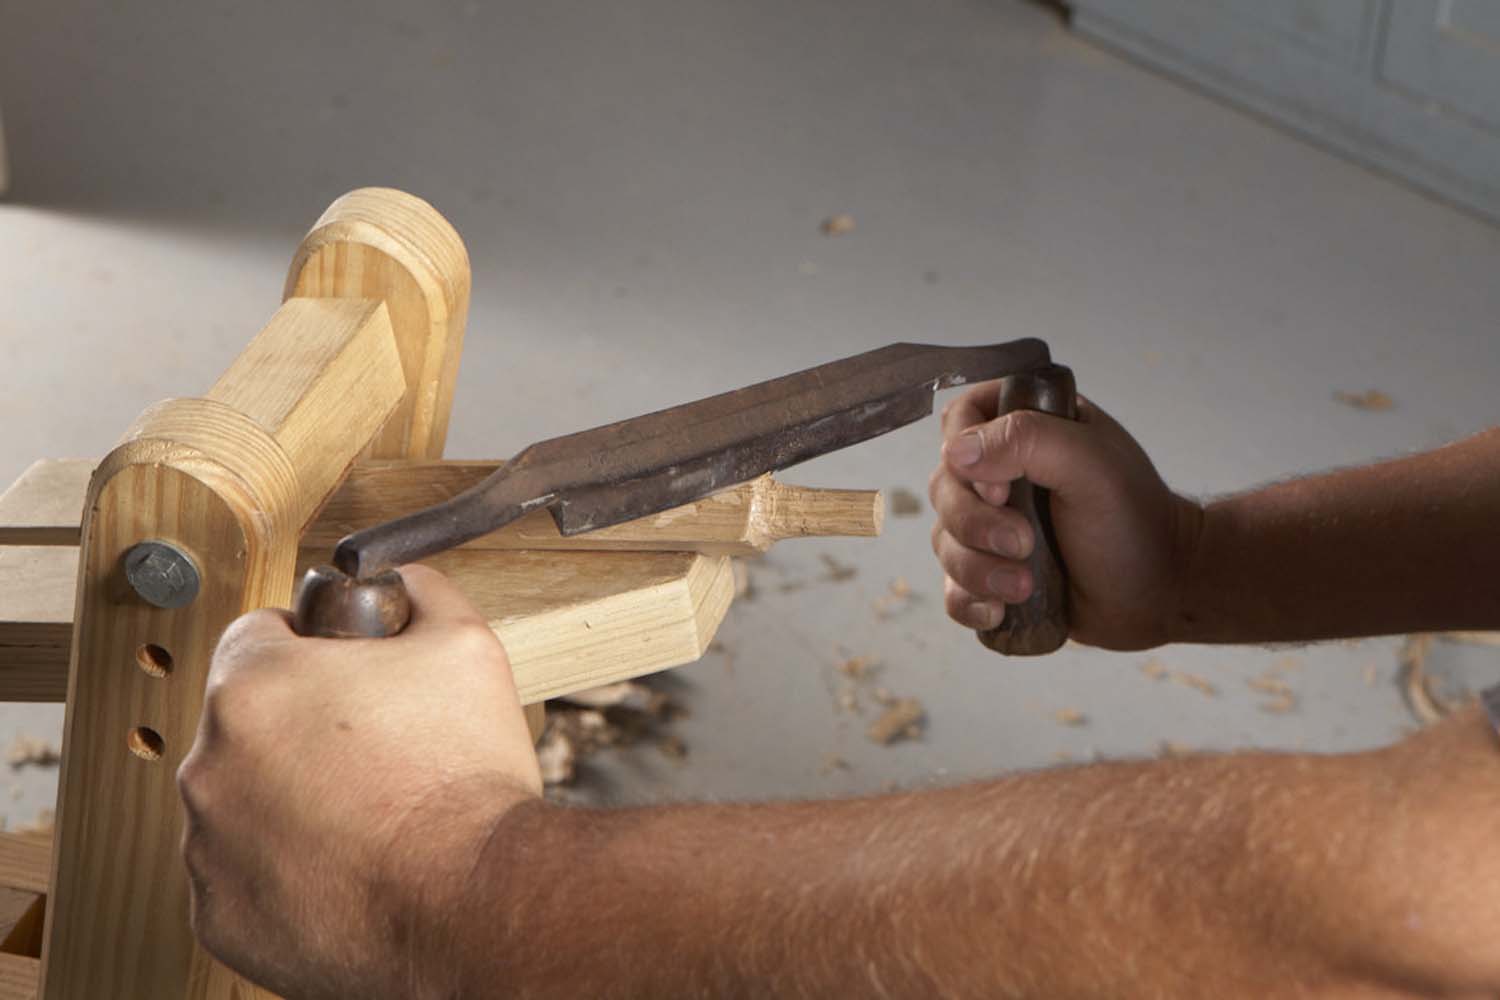
Photo 7. Form round tenons on the ends of the sled’s posts using a drawknife. A shaving horse is ideal for this kind of job—it gives you plenty of room to maneuver the drawknife.
Next, work on the posts. You’ll be shaping 1/2″ round tenons on their ends (Photo 7). This may seem difficult, but it’s not. You just have to proceed in an orderly way. First, mark the tops of the tenon’s shoulders. Start the drawknife on the mark, bevel-side down, and chamfer each corner. Make the same number of cuts on each corner until you’ve made an octagonal tenon. Continue chamfering more corners until the tenon is round. Check its final dimension with a block that has a 1/2″ hole drilled in it. Round the outside surfaces of the posts, but leave an inside surface flat.
Assemble the Base

Photo 8. Drill through the side rails, trestles and runners using an extra-long bit. Clamp the parts to your bench to keep them aligned. Assemble the parts using a bolt and acorn nut.
Finish making the trestles (F) and side rails (G). Once the runners are fully cured, remove them from the bending form and clamp the side rails, trestles and runners to your bench in their assembled position. Drill straight down through the three pieces on one side of the sled (Photo 8). Unclamp the sled, run bolts through the holes and tighten hex nuts on the bolts. Repeat the procedure on the other side of the sled.
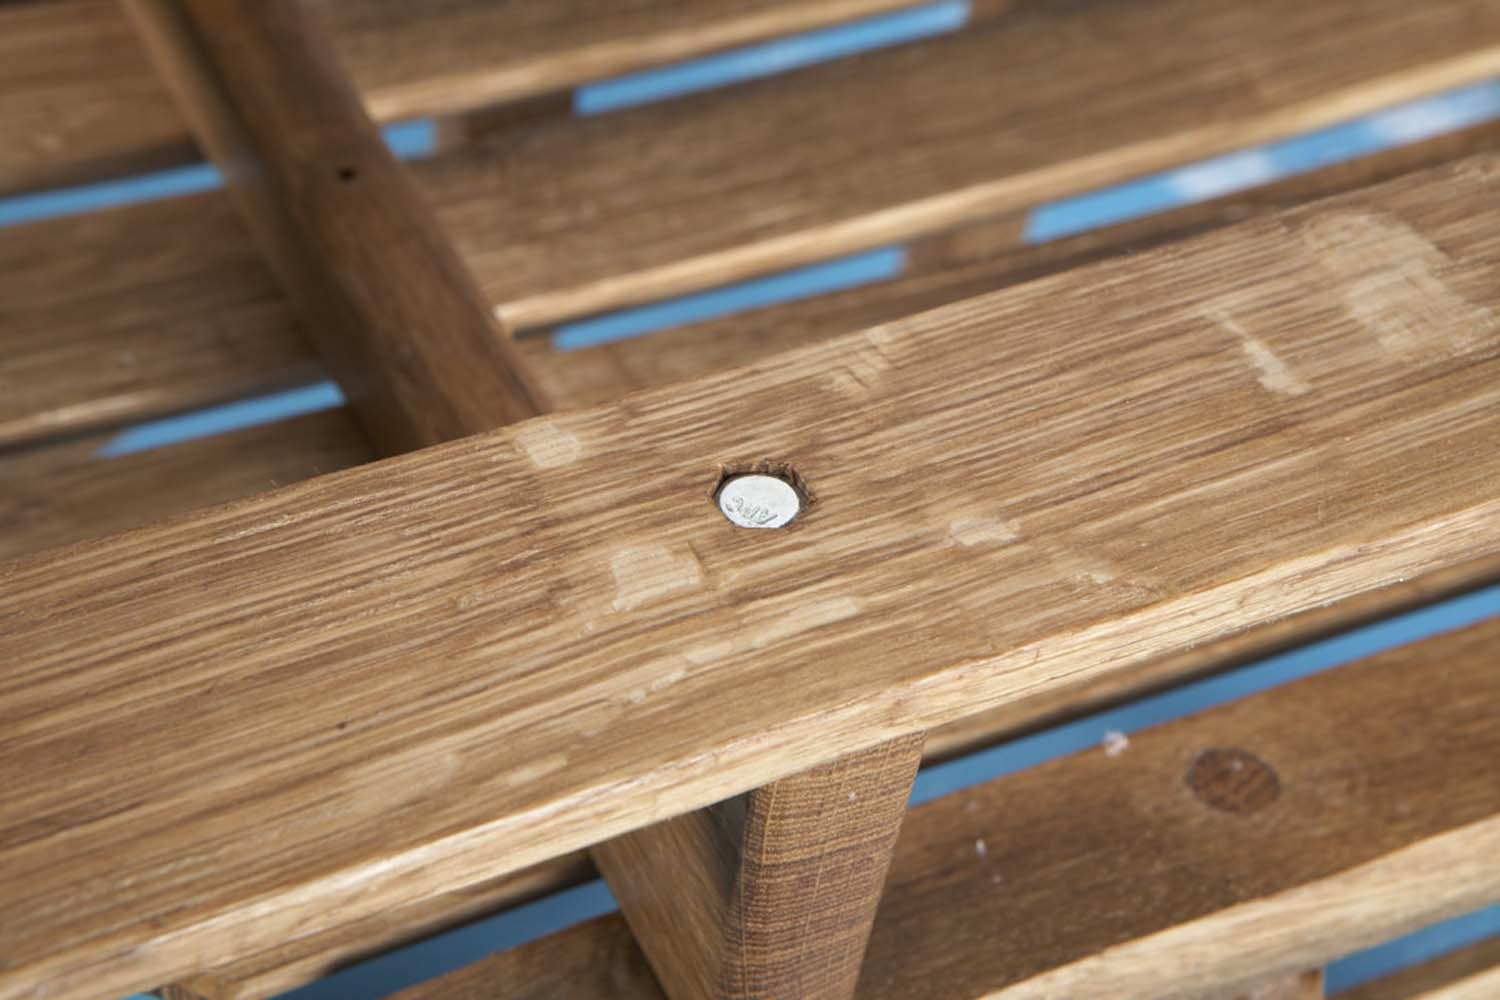
Photo 9. Recess the bolt’s head by scribing around it and chiseling out the waste. The top of the bolt should sit 1/8″ below the surface.
Recess the heads of the bolts into the runners (Photo 9). To do this, turn the sled upside-down and score a line around each bolt’s head. Use a 1/4″ chisel to chop out a recess deep enough to set each bolt’s head 1/8″ below the runner’s surface. Use acorn nuts to fasten the bolts. (Acorn nuts have smooth surfaces; clothing won’t tear on them.) Cut the bolts to the correct length and install them. Green wood will shrink a little within a year, so check the bolts now and then. You may have to re-cut them shorter in order to tighten the nuts.
Attach the Back
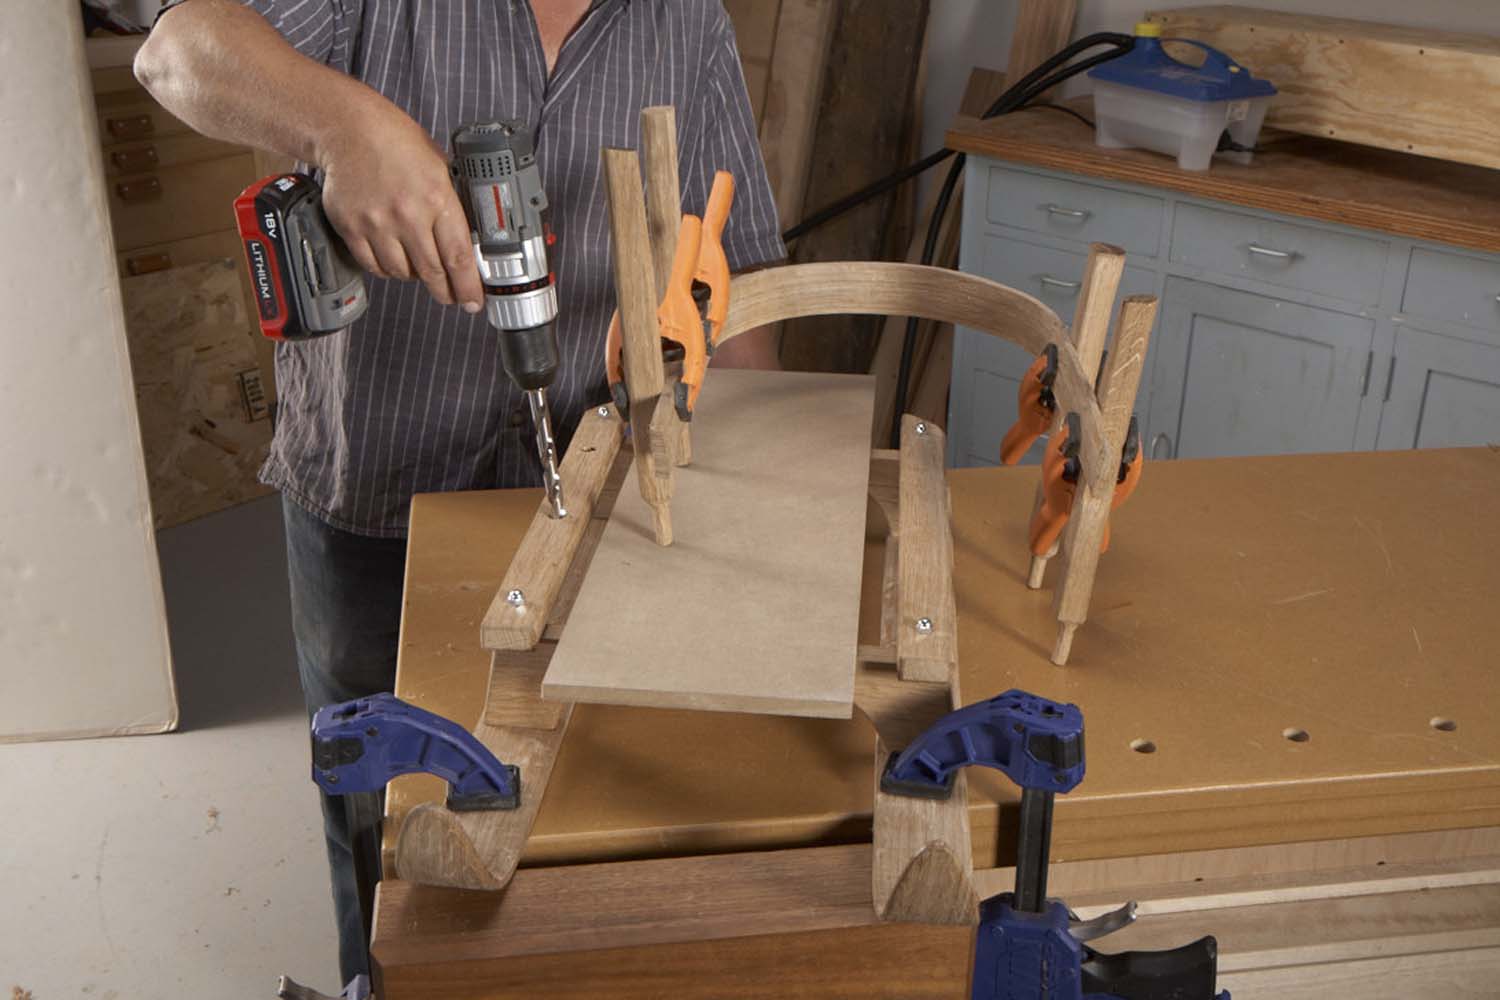
Photo 10. Drill angled holes in the side rails to receive the posts. Clamp the posts to one of the back slats to judge the correct angle.
The posts lean outward, following the angle of the back slats. This means that the holes for the posts in the side rails have to be angled, too. For drilling, I found that the easiest way to sight this angle was to clamp the posts to one of the back slats and line the drill bit up with the post (Photo 10). Start with a 1/4″ bit first—a smaller bit is easier to start at an angle. Follow up with a 1/2″ bit. Epoxy the posts in the holes with their flat sides facing inward.
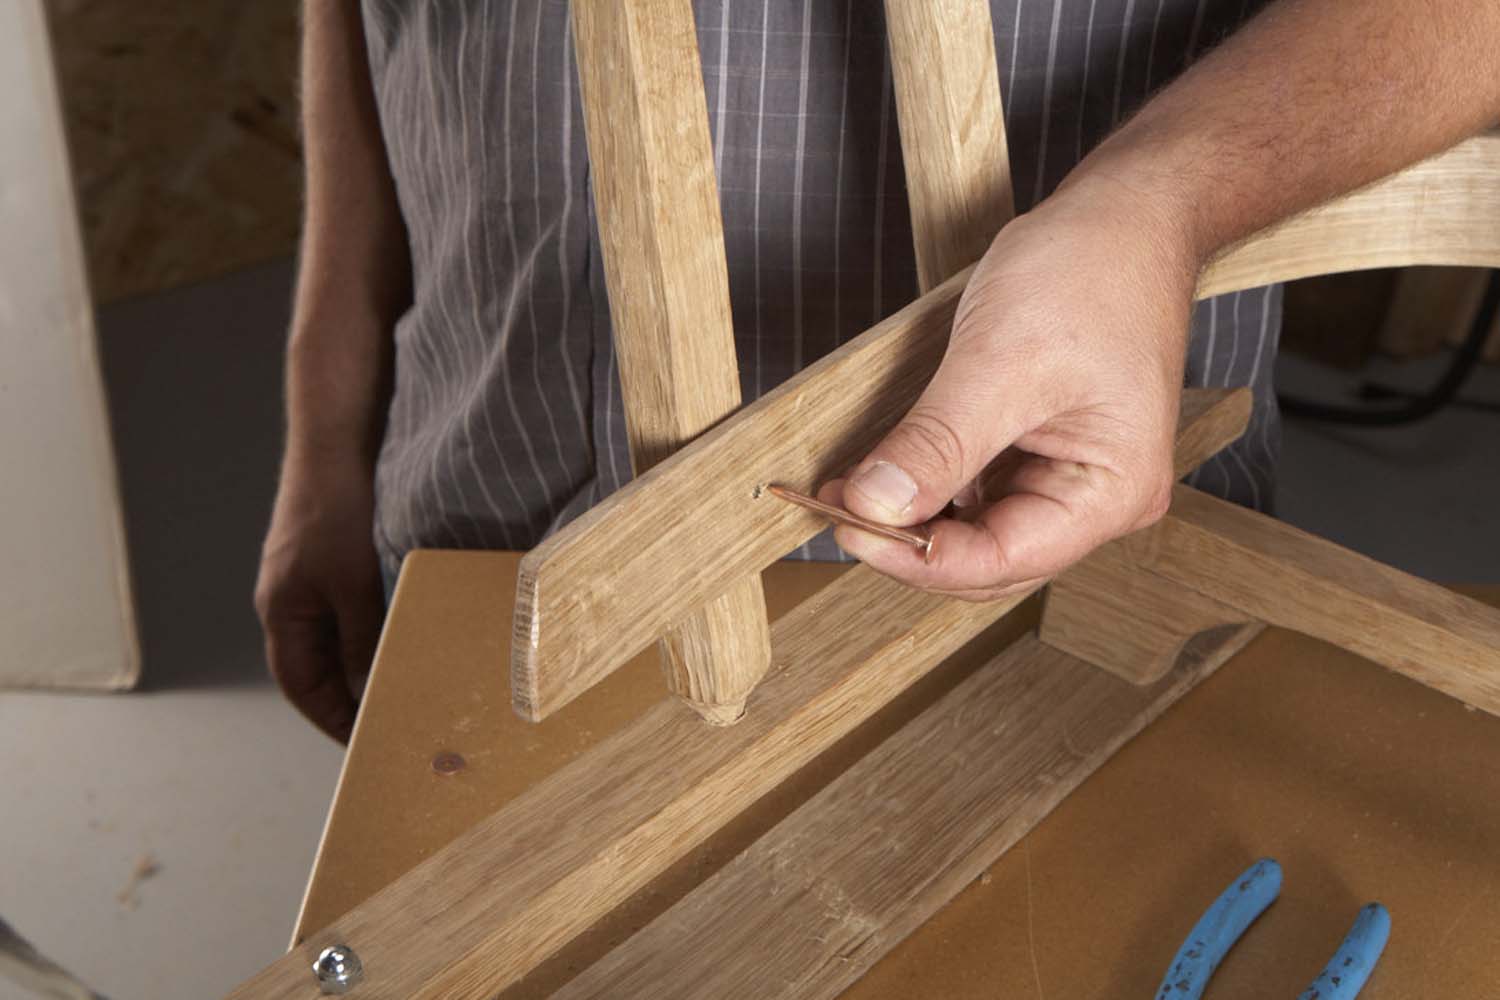
Photo 11. Fasten the back slats to the posts with copper rivets. Drill through each post and slat and insert copper nails through the holes. Slip a copper washer over the end of each nail, then cut the nail to length with a side cutter.
Let’s move on to the rivets that hold the back slats to the posts. Clamp the bottom back slat to the posts, then drill holes through the posts and slat. After drilling each hole, replace the clamp with a copper nail (Photo 11). The nail keeps the slat in the right position.
When all the nails are in place, clamp a hammer in your bench’s vise to use as an anvil. A large hammer with a smooth, slightly domed face is best. Balance the sled with the nail’s head resting on the hammer’s face, then slip a copper washer over the nail.
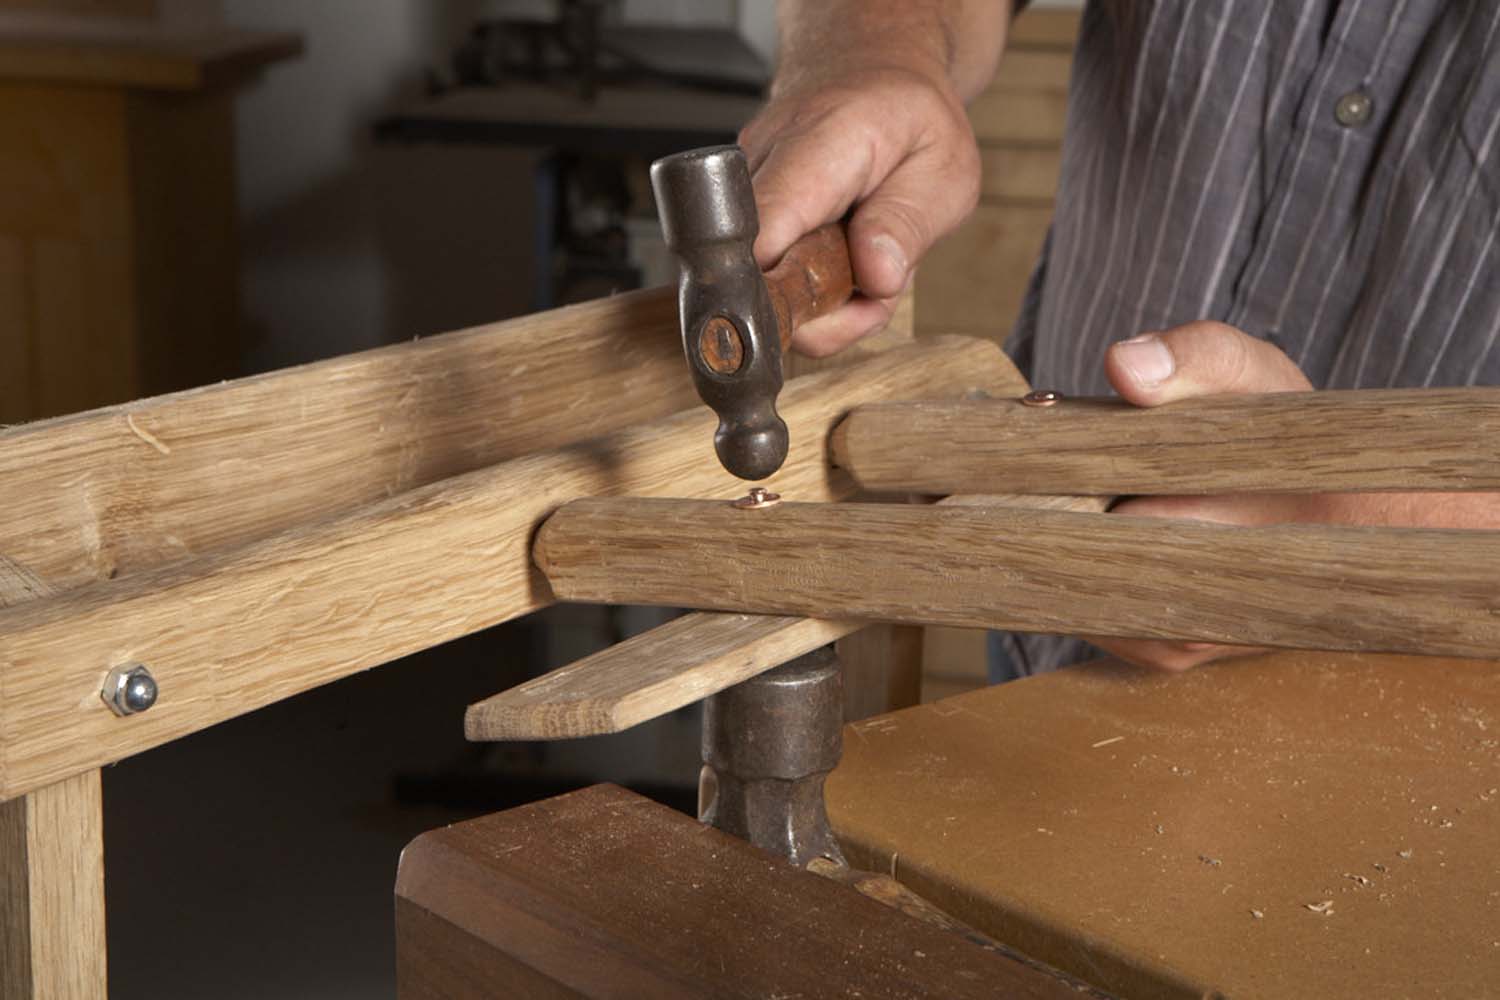
Photo 12. Peen the cut end of the nail over the washer. Clamp a large hammer in your vise to use as an anvil. I used rivets here, rather than screws, because I like their rustic look.
Clamp the post and slat together, then clip the nail with a side cutter, leaving just over 1/16″ above the washer. Mushroom the end of the nail by lightly tapping it with a ball-peen hammer, forming a rivet (Photo 12). This is easy to do, because copper is quite soft. Once the rivet is pretty snug, tighten the joint by giving the end of the nail a few good whacks with the hammer’s flat face. Repeat the process on the other rivets on the lower slat, then fasten the upper slat in the same manner.
Attach the Seat
Insert two seat slats into the front rail’s mortise, then clamp the front rail to the runners. Slide in the rest of the seat slats and space them evenly on the trestles. Mark each slat’s position on the front rail, then remove the whole slat/rail assembly and rivet the slats to the rail. Reposition the assembly on the sled and rivet the front rail to the runners. Check all the rivet heads and peen any raised edges.
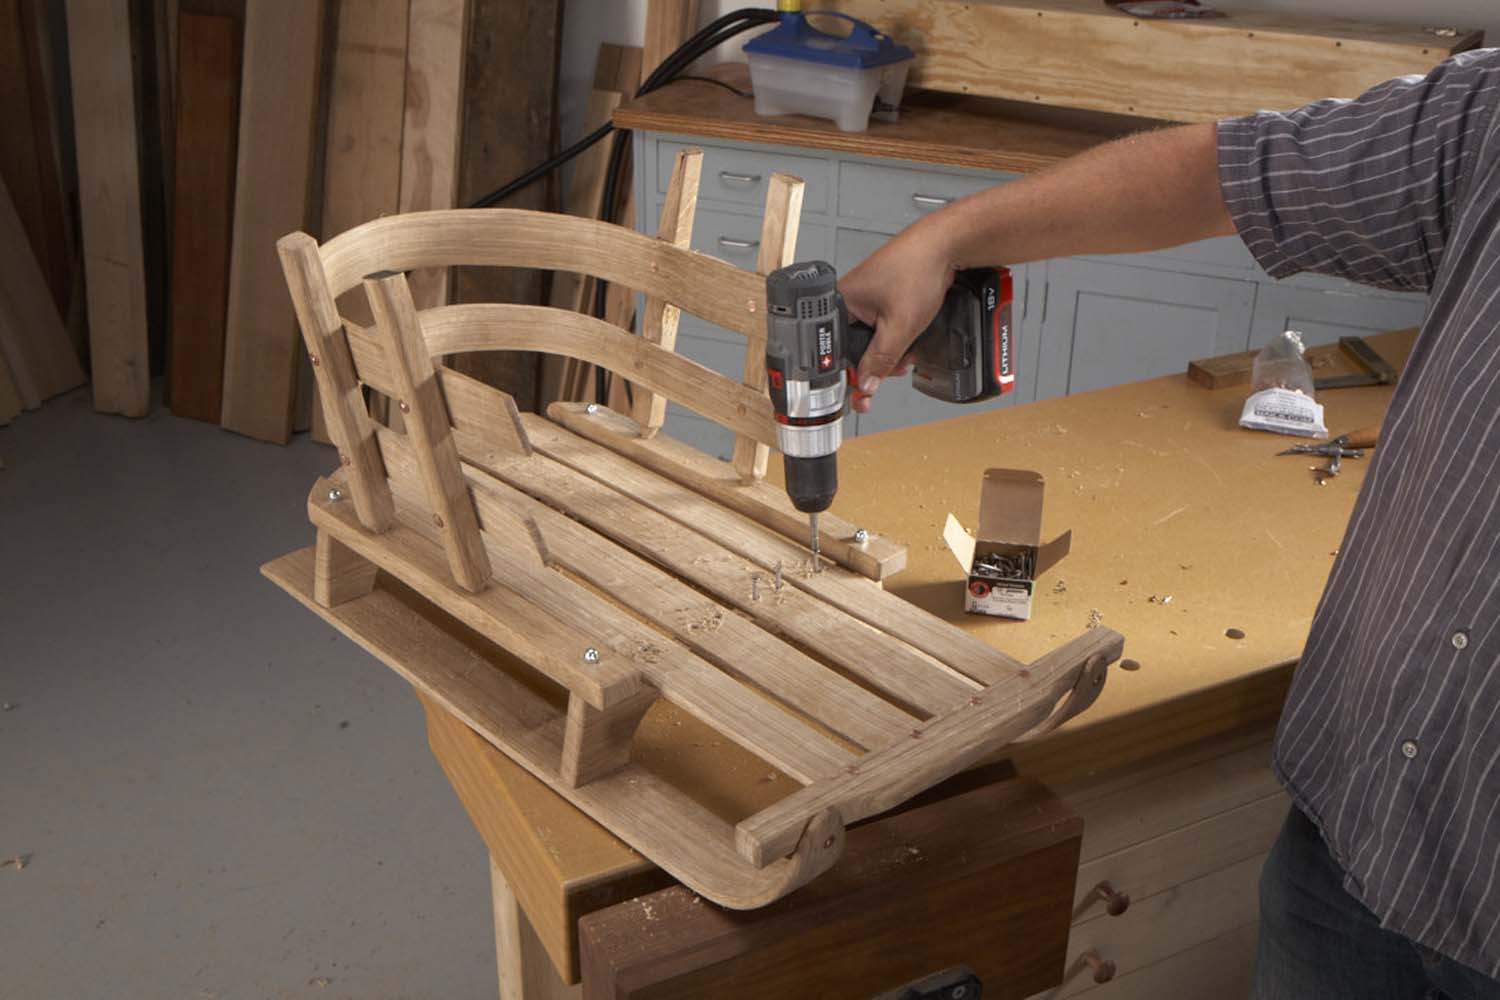
Photo 13. Attach the seat slats to the trestles with stainless steel screws, rather than rivets. The screws are countersunk; their heads sit below the surface, so snow pants won’t catch on them.
Drill and countersink two screws through each seat slat into the trestles (Photo 13). Drill holes for rope in the front rail; chamfer their edges so they won’t abrade the rope. Trim and shape the post ends (Photo 14).
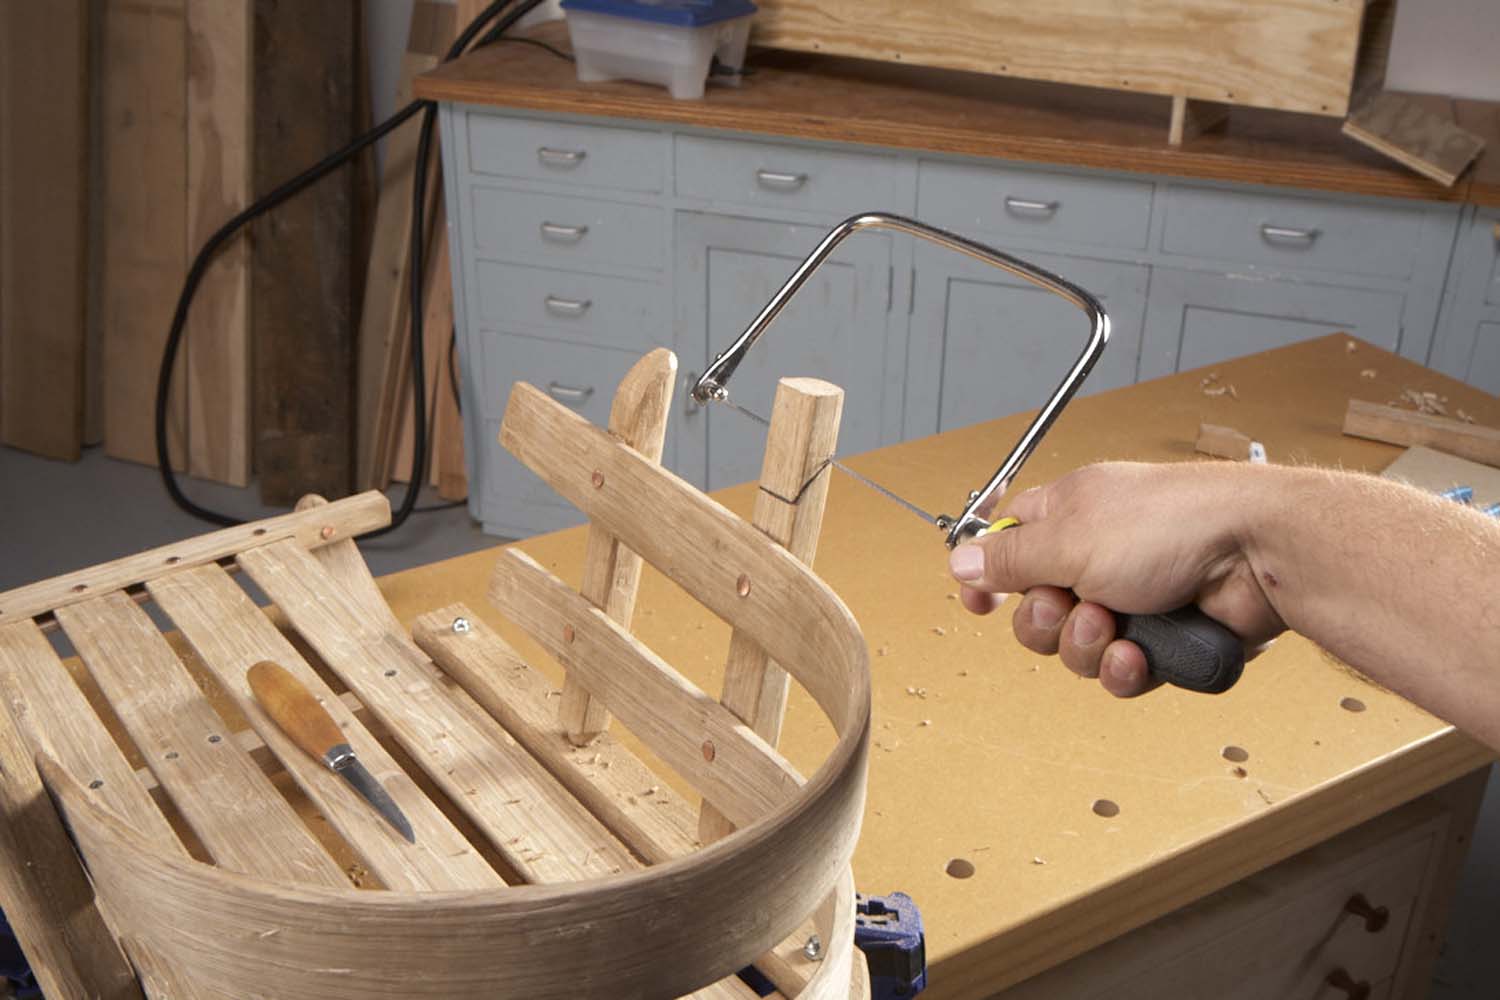
Photo 14. Trim the ends of the posts and shape them however you wish. All the surfaces of this sled are shaped with a drawknife or a spokeshave, so it really has a handmade look!
I didn’t sand any parts of my sled because I liked the look of their uneven surfaces. Apply an exterior finish if you wish, but plan on recoating it every few years. If you make your sled from a rot-resistant wood—like white oak—you can avoid that hassle altogether and leave it unfinished. Now, where are those kids?
Here are some supplies and tools we find essential in our everyday work around the shop. We may receive a commission from sales referred by our links; however, we have carefully selected these products for their usefulness and quality.