


We may receive a commission when you use our affiliate links. However, this does not impact our recommendations.

The headline is a bit misleading – this really took me only about two hours to build, start to finish, including a break to empty the dust collector. But I’m counting the one-and-a-half hours in between when I dropped off the metal bits to be cut to length and when they were ready to be picked up, plus the 20 minutes I had to wait for my neighbor to finish his lunch before helping me hang this thing, the five minutes I searched around for the masonry nails in my mess of a house, and the five minutes it took to drill pilot holes and drive the nails into the wall.
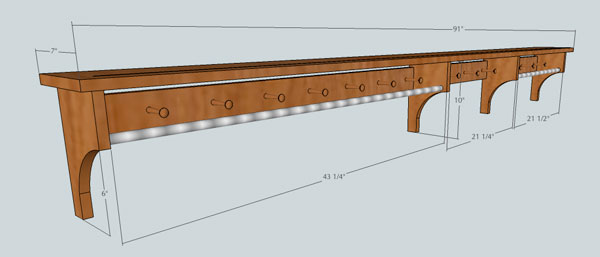
This is a traditional Shaker peg shelf (though super-sized), but for the addition of the two stainless steel bars that I added both to modernize the look a bit and to pick up on my stainless appliances. I considered using a wood dowel in place of the metal, but decided a 43-3/4″-long, 3/4″-diameter dowel (the size of the only hooks I could find) wasn’t going to be strong enough, even without grain runout. But that’s merely speculative rationalization; really, I just liked the look of stainless better.
The 304 stainless steel is from MSC Industrial Supply; a 6′-long bar is around $50, including shipping; it cost me $24 to have it cut to length. The wood is hard maple, and cost around $30. The maple pegs are from Shaker Workshops, and cost $15 for a bag of 50, plus $7 shipping*.
So for $126 and a few hours’ time, I have a pot rack that I like and is custom-fit for the space. (And I have enough extra pegs to last me for a while, plus a bit of stainless steel left over…for whacking things?)
The build was dirt-simple. After taking careful measurements of the counter and sink placement, I drew the rack in SketchUp (see below) – but when I got into the shop and sketched the first upright on the wood, I decided what I’d modeled were too short, and the peg rails were too wide; I increased the upright length from 10″ to 15″, and narrowed the rails to 2-1/2″. And I added a few more pegs.
1 Shelf: 3/4″ x 7″ x 91″
4 Uprights: 3/4″ x 6″ x 15″
1 Long peg rail: 3/4″ x 43-1/4″ x 2-1/2″
1 Sink peg rail: 3/4″ x 21-1/4″ x 2-1/2″
1 Short peg rail” 3/4″ x 21-1/2″ x 2-1/2″
1 Stainless long rail: 3/4″-dia. x 43-3/4″
1 Stainless short rail: 3/4″-dia. x 22″
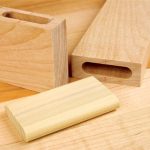
19 Pegs: 3-1/2″ long (includes 5/8″ long, 1/2″-dia. tenon)
After surfacing all my lumber, I ripped the shelf and uprights to width and crosscut them to length at the table saw (I’m in love with the Hammer K3 Winner saw we have in the shop right now for testing – I’m using it every chance I get).
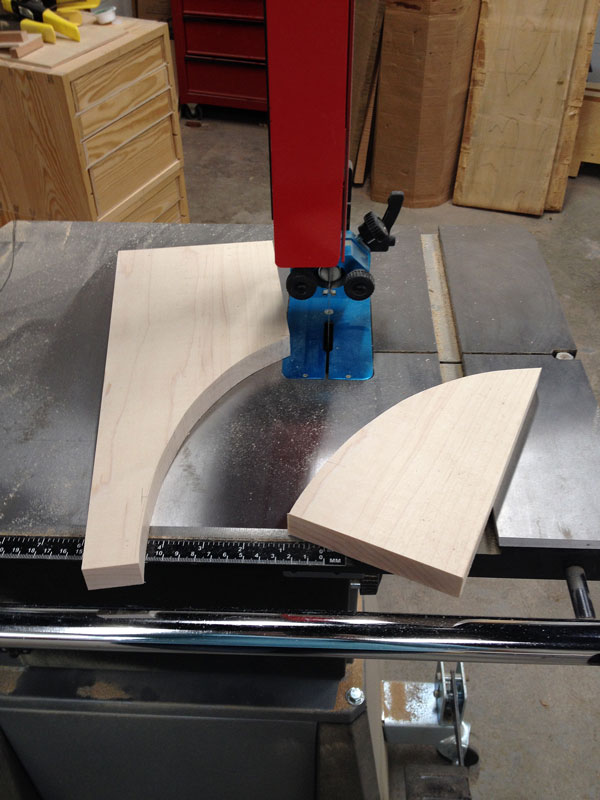 Then I sketched out the curve on one upright, dropping down 5″ from the top and coming in 1-1/4″ from the back edge for the endpoints of the curve. Once I was happy with how it looked (that took a few iterations), I cut it at the band saw, faired the curve on a spindle sander, used the first upright to mark the rest, and repeated the cutting and fairing steps on the remaining three pieces.
With all the uprights done, I stacked them to compare the curve, and made adjustments as necessary using the spindle sander. Note that, like table legs, these don’t end up right next to one another, so it’s OK if there’s just a little bit of variation, as long as it’s not too glaring. In other words, they have to be close enough – but perfect is the enemy of good enough.
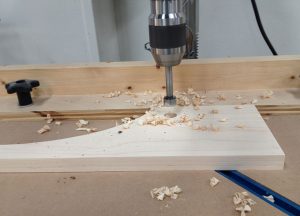
Then I headed to the drill press to drill with a Forstner bit the four 1/4″-deep, 3/4″-diameter holes for the steel rods (and I triple checked to make sure I was drilling on the correct side of each piece). Whatever depth of mortise you drill, double that and add it to the length of your rod when you go to get it cut. (Of course, if you’re a masochist, feel free to cut the stainless yourself using a hacksaw; it can be done…but I didn’t have the time or energy. Or a fresh hacksaw blade. We had some discussion in the office of using a chop saw to cut it…but I wasn’t willing to give that a go.)
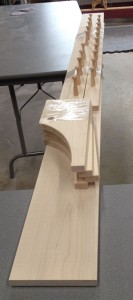
 I did a dry-fit of sorts (the pieces are just screwed together, so “dry-fit” is a bit of a joke) at my bench, so I could decide on the width of the peg rails by eye. I wanted to make sure the pegs would be above the steel bar so that one could see them, but with a sufficient gap in between the bottom of the shelf and the peg rail. What looked right to my eye was 2-1/2″ wide; your eye may vary.
I ripped those pieces to width and crosscut them over-long by about 1″ (again, at the table saw), marked what would become the ends, then laid out the peg locations using a pair of dividers. Because I’d be using the divider marks to align the bit at the drill press, I made sure to press the points in hard at leach location. I used a 1/2″-diameter Forstner bit to match the tenon diameter of the pegs, and drilled 11/16″-deep holes. The pegs took some coaxing to get fully seated in the holes – which is good. Too loose, and they’d wobble about and fall out. Unfortunately, my dead-blow mallet left a few dents on the peg heads; ah well. I sanded them out as best I could.
 Then I packed everything up and headed home.
Working on a pair of sawbenches in my kitchen, I laid out the upright locations, then clamped blocks on either side up each upright one by one so things didn’t move while I drilled countersink holes through the top and into the vertical pieces. Then, I screwed the two end uprights in place.
After polishing the steel with a maroon Scotch-Brite pad and a bit of polishing goop that came with my stove, I inserted the first piece of metal rod in an end upright, inserted the second end into the matching upright mortise and made sure it was fully to depth before screwing that upright in place. The same operation, of course, was repeated at the other end.
This all would have been easier to do at the bench – access to much better clamping, for one – but making-do in the kitchen meant I didn’t have to haul everything upstairs and work my way over bannisters and around walls with that long shelf. I just finished patching and painting those walls last year. Too risky.
Next was the peg rails, for which I marked the ends off the actual locations rather than my initial measurements (they were off by maybe 1/16″), cut them using a handsaw at my bench hook (hooked over the edge of the kitchen counter), then pocket-screwed them in place between the uprights, using two offcuts of 3/4″-thick maple to locate them a consistent 1-1/2″ from the underside of the shelf.
When/if the rack gets loaded with pots, the pegs – with the exception of those over the sink – may be superfluous. But the rail acts as a stretcher and helps to hold the piece together, so I needed it for structural reasons…so why not add pegs? Plus, I plan to use some of the remaining pegs to make a simple rail behind the door for coats, so together, along with the other Shaker elements in the kitchen, that will help aesthetically tie things together.
The finish is three coats of natural Watco Danish Oil…because that’s what I had in the basement. (If you plan to hang wet towels on the pegs, I’d recommend a coat or two of poly.)
The biggest challenge was how to hang the piece. The wall is plaster over soft brick, with no furring strips. I thought about Tapcon screws, but they rely on the strength of the brick or concrete to work well, and I had recommendations for Red Head anchors and various other sleeved anchors. But in the end, I decided on a D-hanger screwed to the back of each upright and shelf, and one slightly right of center on the long run (because it had to clear the chimney bump-out), hung on five masonry nails. Why? Because masonry nails are what kept the cabinets that used to be there in place for at least 25 years; I had a devil of a time getting those out, so I knew they’d stay secure and support a lot of weight.
I got my neighbor to help me hold the piece in place while I marked the locations for the nails, then drilled pilots using a masonry bit. I pounded the 3″ wedged nails in place (OK, my strong neighbor helped to seat a few of them), leaving about 3/8″ protruding, and hung the piece in place.
Simple, quick and custom-fit, for less than a commercial rack would cost.
Now I’m on the hunt for some affordable swags of dried herbs to hang from a peg or three (yeah, I could make those, too…but I don’t have time to wait for my herbs to grow). I think I’ll head down to Findlay Market Saturday morning and see what I can find.
By the way, the flat-faced, stainless steel S-hooks? Here’s some irony for you: “Grundtal,” from Ikea ($2.99 for a pack of five).
— Megan Fitzpatrick
Follow me @1snugthejoiner on Twitter
* NB: A well-known maker of Shaker furniture (who wishes to remain anonymous) highly recommends the pegs from Smith Woodworks. I haven’t tried them, but I will say that while the ones I bought are well proportioned and nicely sanded, the tenon sizes weren’t identical between pieces; some took a little more whacking to seat than others.
• If you like the look of Shaker, check out our new compilation book, “Shaker Furniture Projects,” by Glen D. Huey and the editors of Popular Woodworking Magazine (which includes 31 projects that originally appeared in the pages of the magazine).
Here are some supplies and tools we find essential in our everyday work around the shop. We may receive a commission from sales referred by our links; however, we have carefully selected these products for their usefulness and quality.


Very nice. But there’s no place for the lids. Before I learned this trick http://redecorate.com/storing-pots-and-lids-time-to-pot-tay/ I was always shuffling about trying to find the lid that goes with the two-quart pot or the frying pan. My lids have hoop handles, though, so now I just slide the hoop handle through the handle on the pot or frying pan and hang them together.
Looks good – I hope the house sells! This project is my speed. I dream of making a Maloof-ish dining table and chairs… but a 4-hour pot rack more closely matches both my skills and free time.
Not a woodworking question… but where did you get that clock with the color swatches? It looks totally awesome. Did you just cover up the numbers with pantone color chips?
Great minds…
Looks great Megan and cool choice given the constraints of your project and space.
We did something similar at our NorthCoast Community Woodshop here in the Cleveland area. I started with Chris’ Roubo tool rack from the ICDT site and then we made it into a coat rack. In the end your rack and ours look quite similar.
http://nccwoodshop.org/2014/04/22/a-place-to-hang-your-hat/
Shameless plug: if you’re in the Cleveland, OH area we’d love to have you come by the shop and check it out. We just got a new 8″ jointer and 15″ planer we’d love to show off. Ok, shameless plug over (thanks for indulging).
-Shawn