


We may receive a commission when you use our affiliate links. However, this does not impact our recommendations.

Extra-large finger joints add a distinctive touch to any project. Every woodworker is going to ask, “How did you do that?”
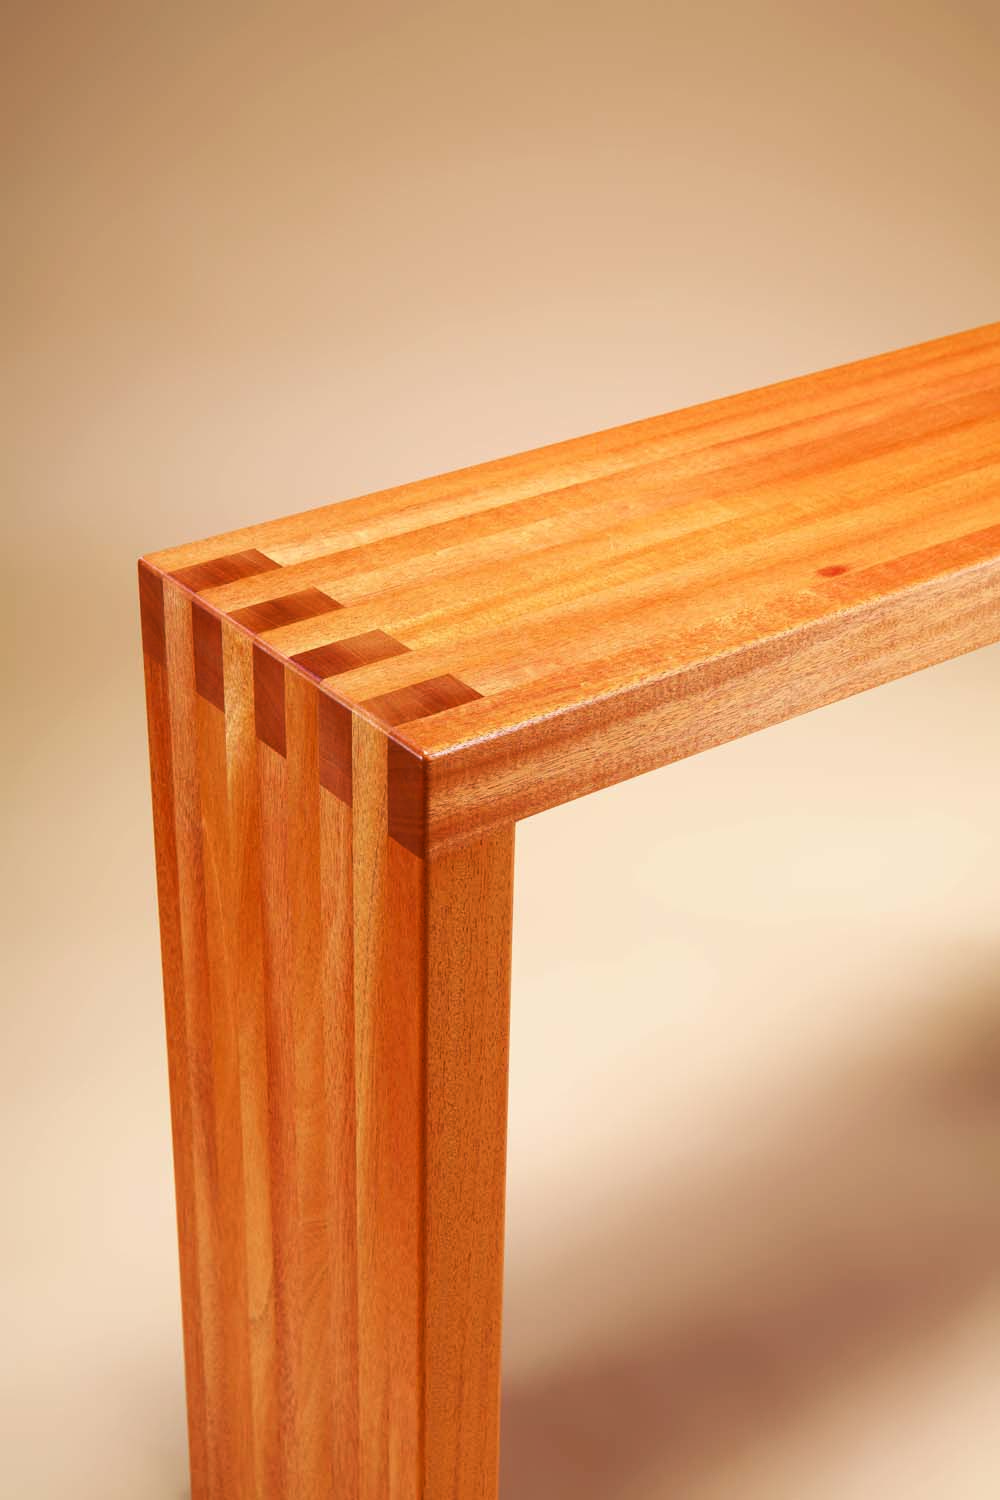 Most finger joints are pretty small in scale and easy to cut on a tablesaw or router table. But what if you want really, really big finger joints? Can you imagine making accurate cuts that big? Nope. Standard methods won’t work.
Here’s a strategy that does work, and it can be used on any number of projects. I built a long, narrow table to showcase these joints, but I can also see them being used to make a bench or a desk. Or whatever.
The first trick to making the joints is to think of the project’s parts as a set of three butcherblock tops—thick boards composed of large laminations. Now imagine those laminations as having staggered ends, like the crenellations on a castle wall (Fig. A). Once you’ve got this image fixed in your head, following the process of making the joints will be much easier.
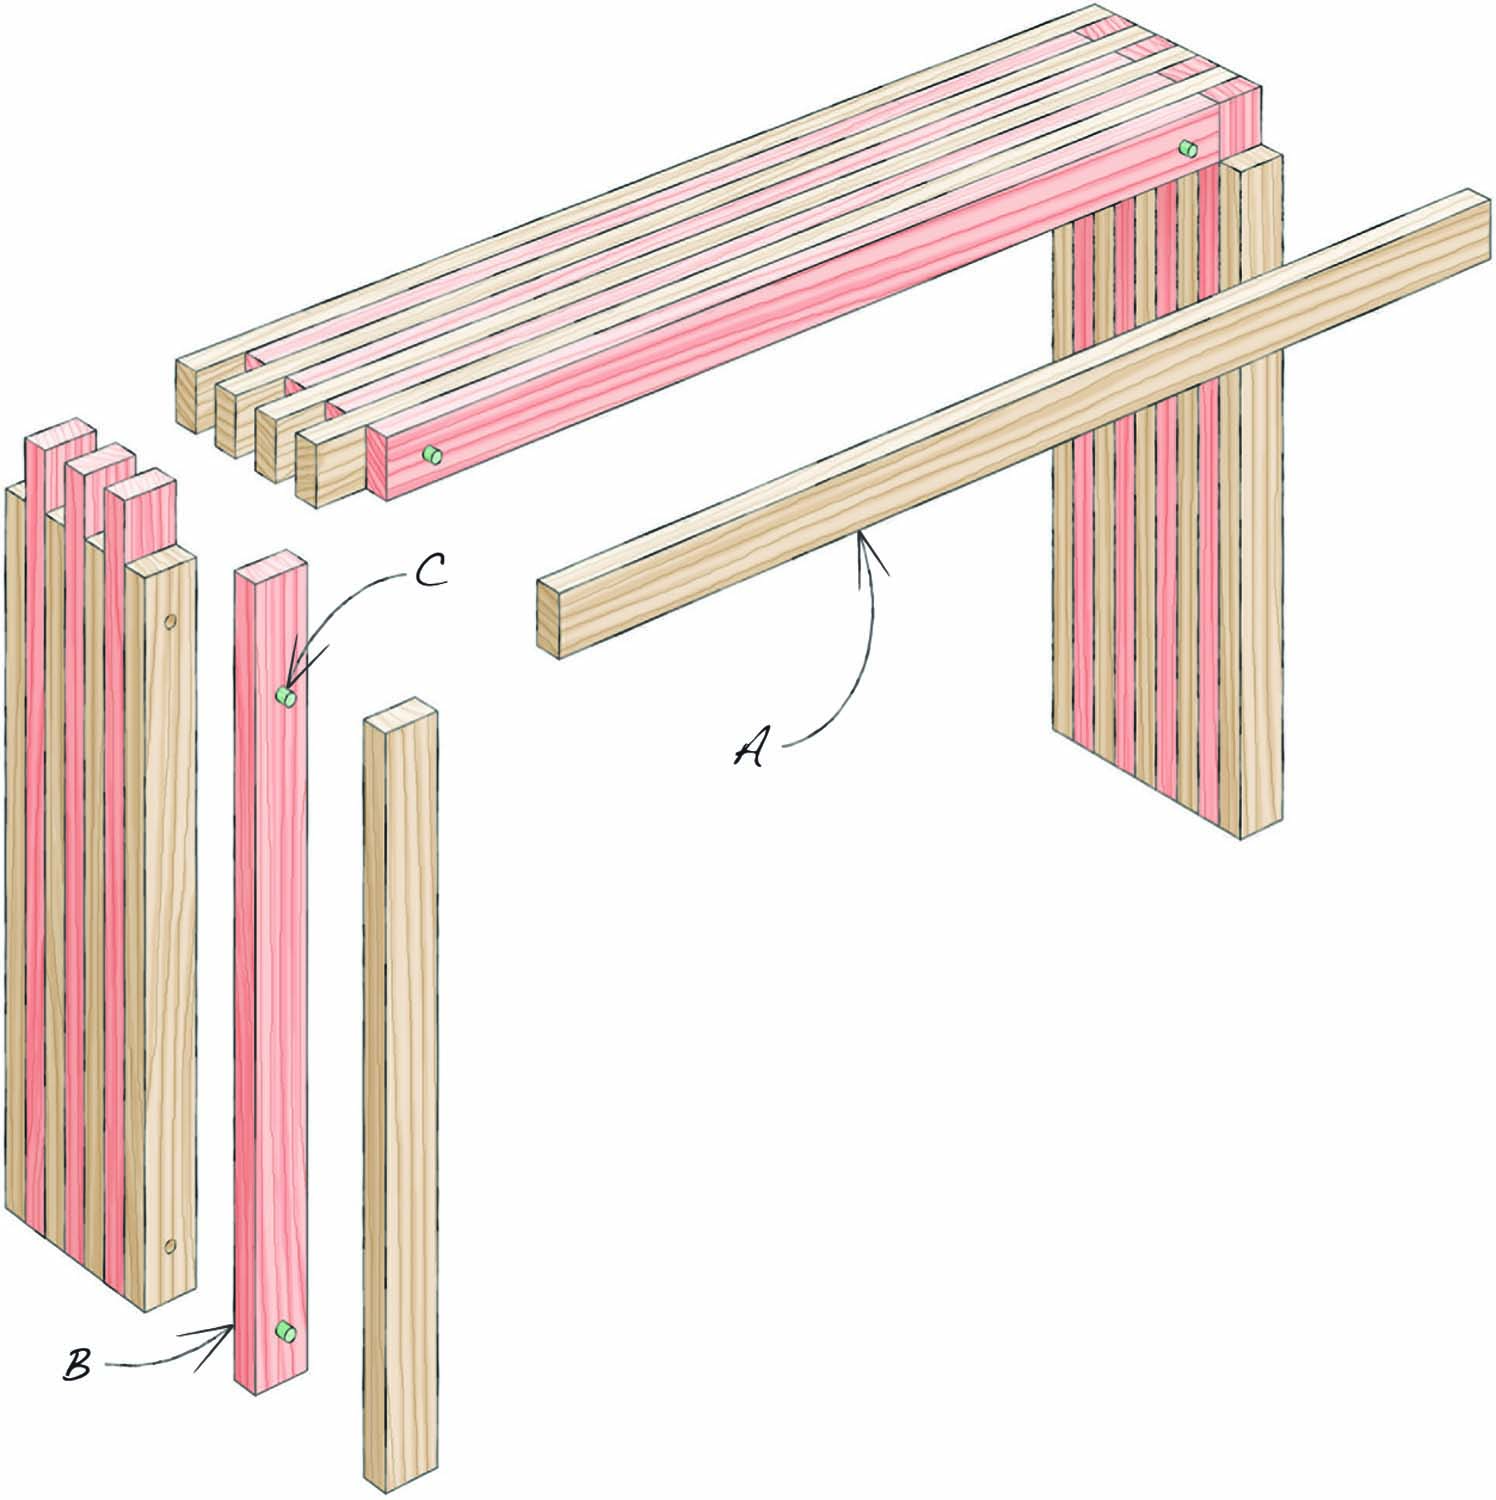
Fig. A. Exploded View

Fig. B. Doweling Details
 Snipe matters
Before we get going, let’s take a detour into the ugly world of snipe. As you know, many planers tend to cut a slight depression at the beginning or end of a board, and that depression is called “snipe.” Usually, a little snipe isn’t a big deal. But in this project, snipe can be a real problem. Let me explain.
Say you’re making a 3/4″ thick top from several boards. After planing the boards to thickness, you joint their edges and glue them together. If your planer sniped, the problem only shows on the surface of the top. To fix the problem, you just plane, scrape or sand the ends of the sniped boards until they’re even.
In this project, you’ll be making a much thicker top (Fig. 03). Some of the edges to be glued together will be jointed, while others will be planed—unlike the 3/4″ top, where every edge to be glued is run over the jointer. On the thicker top, if the planed edges are sniped you’ll get small gaps between your glue joints. And in this particular project, you’ll also get finger joints that are too loose. Clearly, you can’t fix the snipe problem after the pieces are glued together. You have to address it earlier, when you’re milling the wood.
The easiest solution to eliminating snipe works every time, but it comes at a price. First, you must crosscut your rough lumber into pieces that are about 6″ extra-long. If you see any snipe after jointing and planing, cut it off. (Snipe is usually no more than 3″ long.) You may not be able to see the snipe, however. It can be very subtle, so the safest approach is to just whack off both ends of every board and have done with it. Frankly, I hate doing this, because it wastes a lot of wood. But, as I said, it works.
Alternate strategies for minimizing snipe don’t waste as much wood. The most obvious, I suppose, is to simply joint every surface after it has been planed. (Assuming your jointer doesn’t snipe!) On a regular butcherblock top, this method would work fine. But I’d hesitate to do it when building this table, because the finger joints require every piece to be exactly the same thickness from end to end. When you joint an edge, you may take off more wood at the beginning of the cut than at the end of the cut, or the other way around. You just can’t be sure. The theory is good, but it may not work in practice.
There are yet more ways to deal with snipe, but they’re not 100% effective. I used the “butt the pieces end-to-end” method when building this table, and ran all my pieces through a drum sander as well. When all was done, I still had a small amount of snipe. In retrospect, I wish I had used the “whack off the ends” method instead, or tried the “joint every planed surface” solution.
Milling and marking
Start with 6/4 (1-1/2″ thick) rough lumber (I used African mahogany). Mill all the pieces for the top (A) and legs (B) at the same time, so they will be exactly the same width and the same thickness.
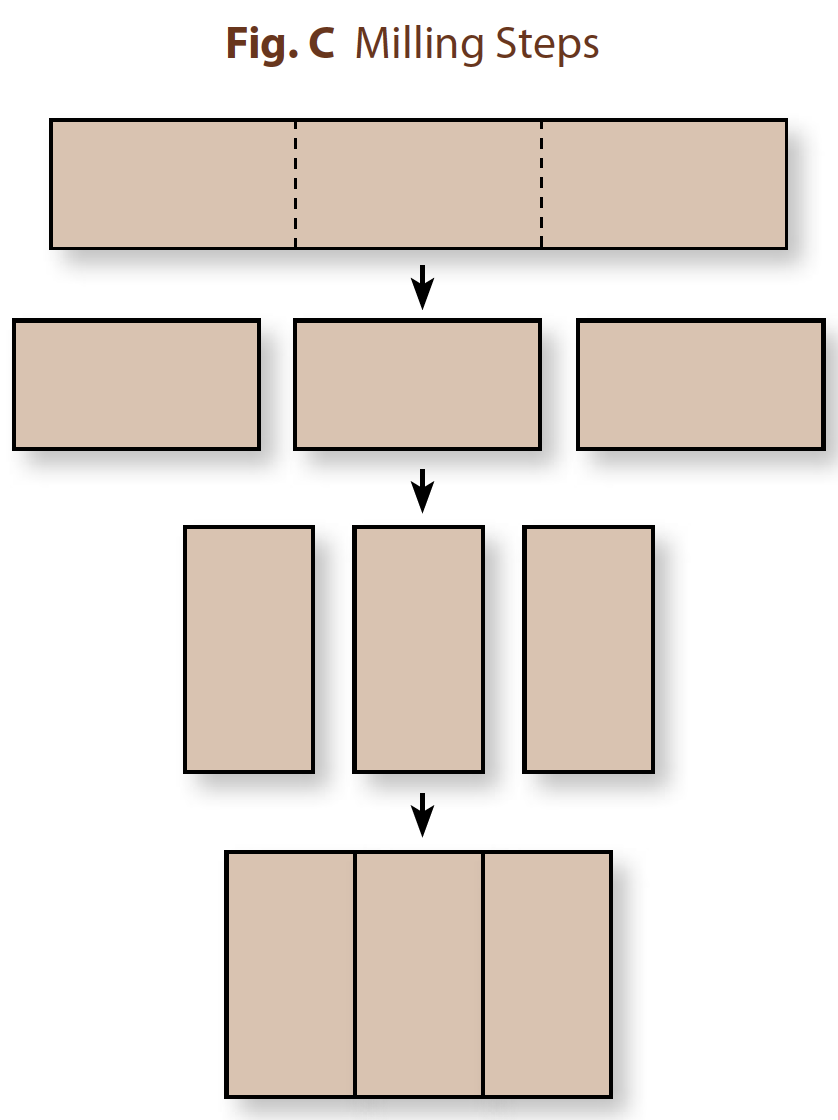
After crosscutting your rough lumber, rip the pieces 2-5/8″ wide (1/4″ wider than the final dimension, which is the thickness of the top and legs). Joint one face of each piece, then plane the opposite sides until the pieces are 1-1/4″ thick. These are the surfaces that will be glued together later on.
Next, joint one edge of each piece. Plane the opposite edge so the pieces are 2-1/2″ thick (1/8″ more than the final dimension). These surfaces will be the inside and outside faces of the table’s top and legs.
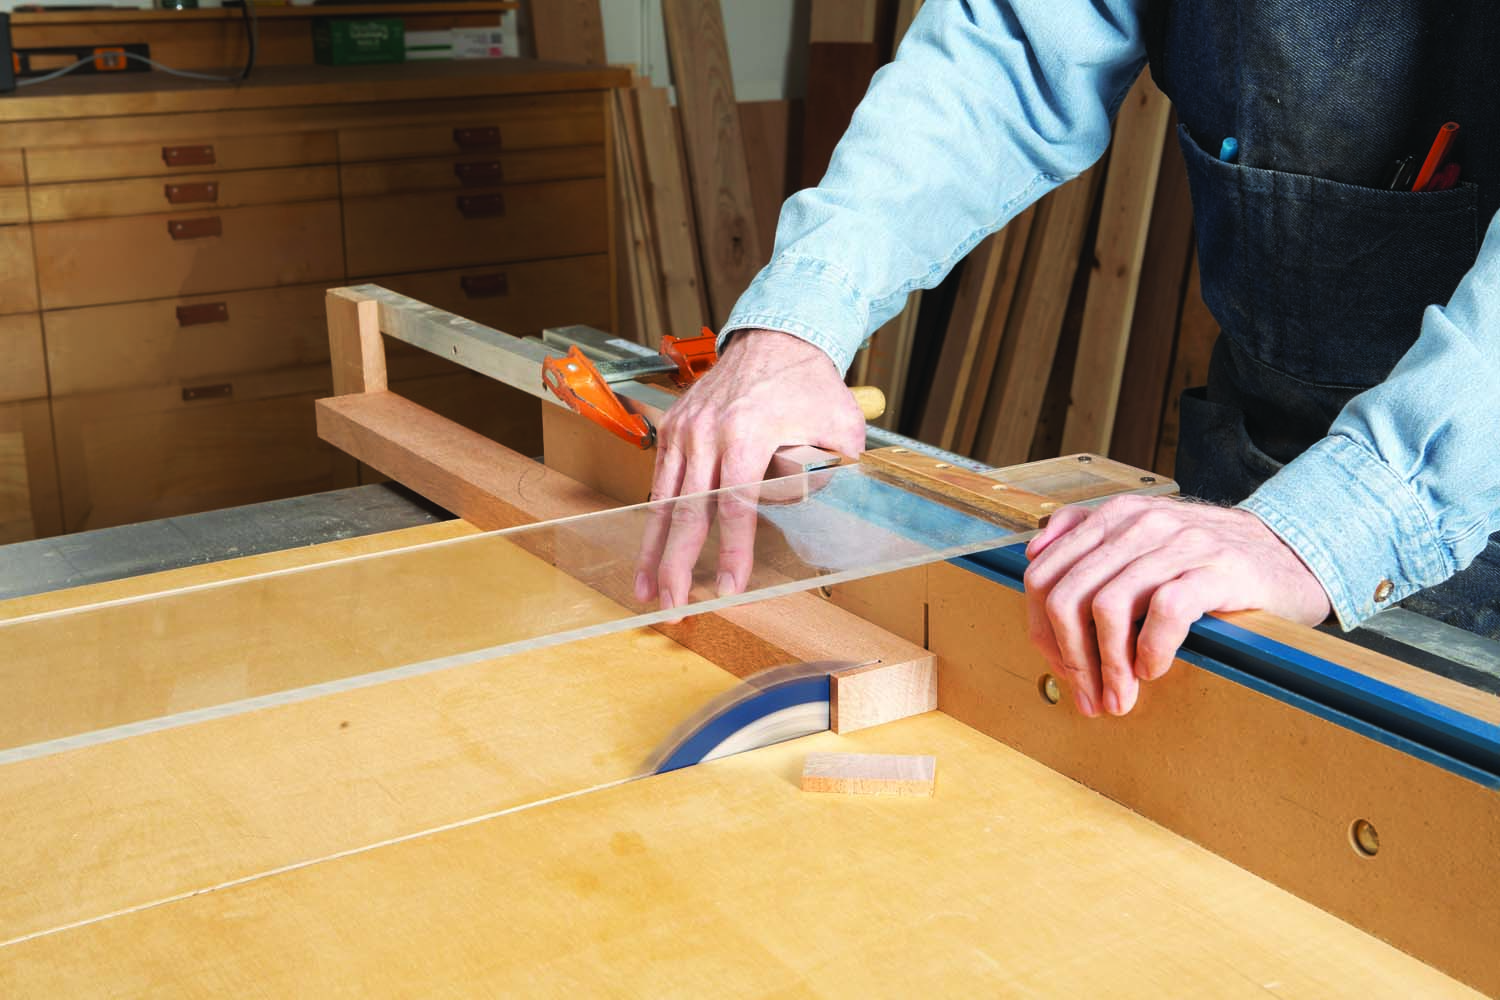
Photo 1. Begin by cutting all of the pieces to an oversize width. Trim all of the pieces for the legs about 1/4″ extra-long. Trim all of the pieces for the top extra-long, too.
As you are planing, mark the grain direction of each piece on both of its ends. Trim one end of each piece and redraw its grain direction mark. Set up a long-armed stop block for cutting all of the pieces 1/4″ extra long, then trim the other end of each one (Photo 1).
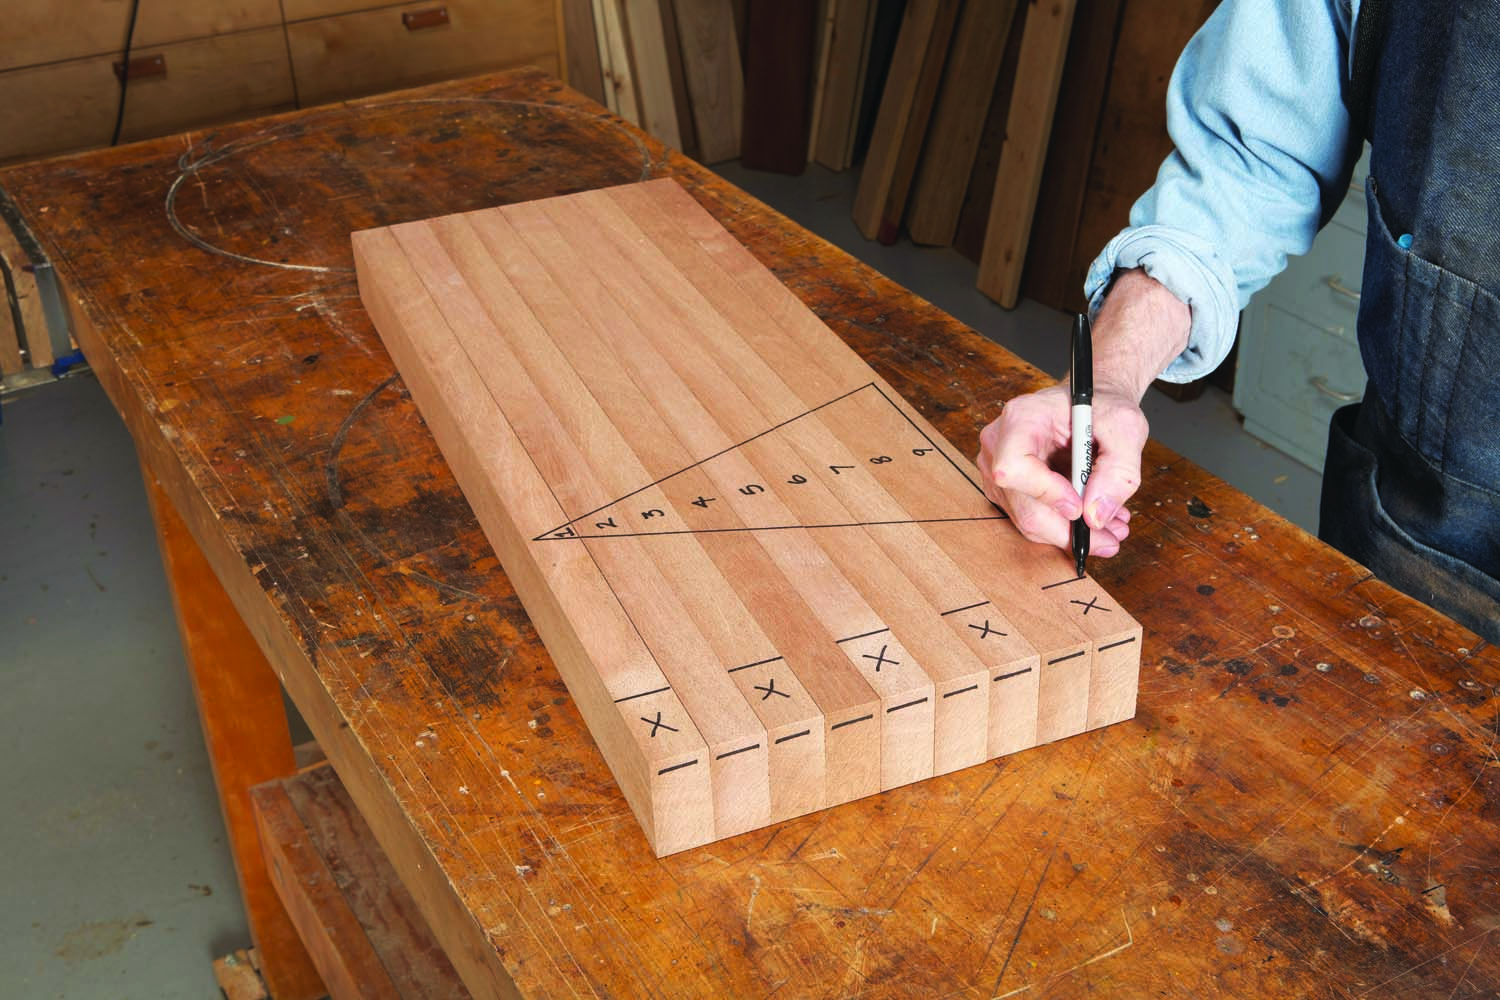
Photo 2. Arrange the pieces for one leg. Number them in order, then mark alternating pieces with an “X”. You’ll cut these pieces shorter, later on, to form the table’s finger joints.
Arrange the pieces to form the table’s top and legs (Photo 2). All of these pieces will be planed as a unit after they’re glued up. To minimize tearout, position the pieces so that their grain all runs the same way. In addition, draw a large triangle across the assembly and number each piece. Alternating pieces will get cut shorter later on, forming fingers—mark these pieces with a big X. On the table’s top, the even-numbered pieces get an X, on both ends. On the table’s legs, the odd-numbered pieces get an X, but only on one end.
Register with dowels
Next, before making any cuts to form the fingers, you’ll join the pieces with dowels. The dowels aren’t intended to strengthen the joints—they’re registration pins. From here on out, they’ll keep everything in alignment, and that will be crucial to making tight joints.
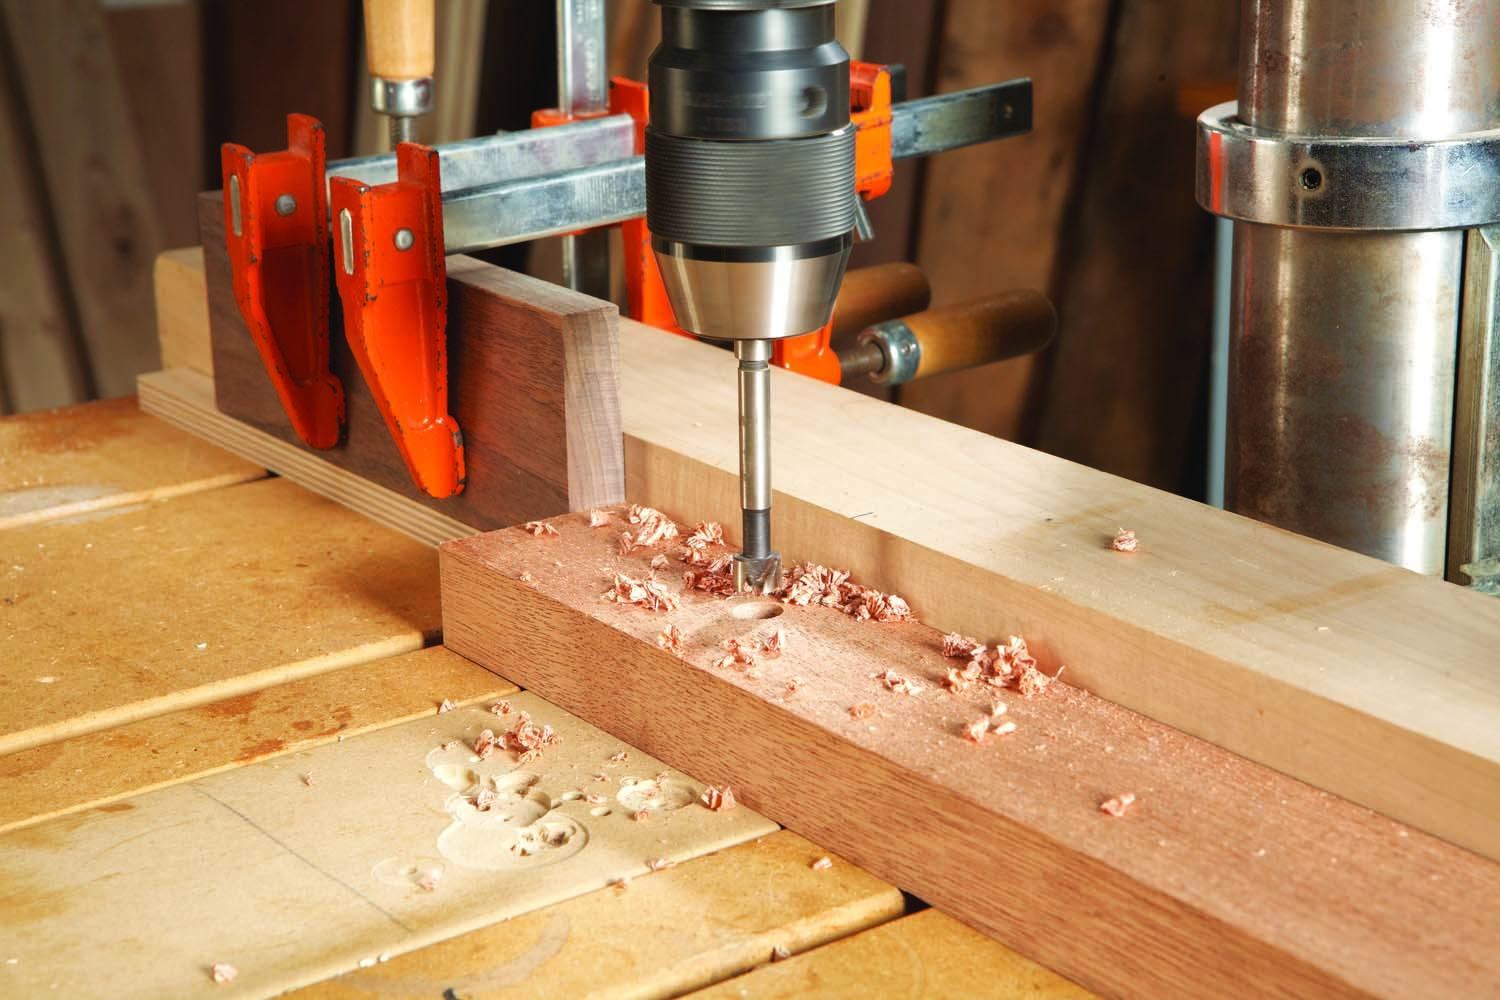
Photo 3. Drill a 1/2″ dia. hole near both ends of each piece. Use a fence and a stop block to make sure that all of the holes are in the same position.
Drill 1/2″ dia. dowel holes through both ends of each piece of the top and legs using a Forstner bit (Photo 3 and Fig. 02). Note, however, that the holes don’t go all the way through the outside pieces (#1 and #9)—just halfway. You’ll be able to drill most of the holes using the setup shown in the photo. However, for two of the “halfway” holes, you’ll need to reposition the stop block on the opposite side of the drill bit. Countersink both sides of each hole.
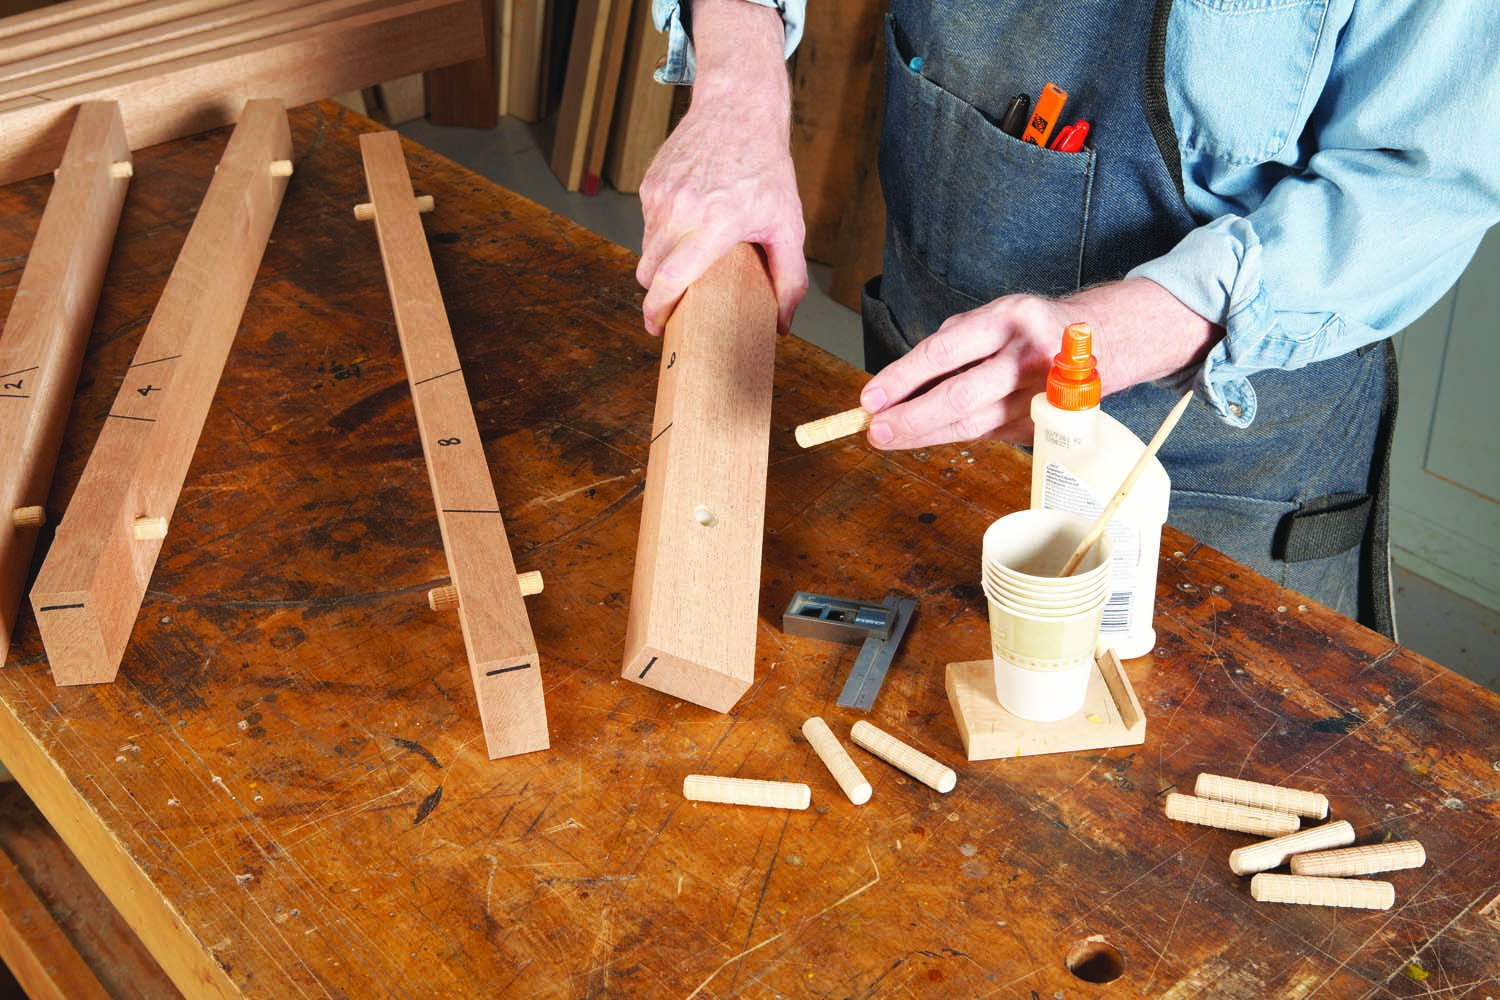
Photo 4. Glue 1/2″ dowels into the holes of the even–numbered pieces. Repeat the same process for the second table leg and the top.
Glue dowels through both ends of all the even-numbered pieces of the top and legs (Photo 4). The dowels should fit snug, but not too tight. For the best fit, use factory-made fluted dowels (see Sources). (Note—the dowels must be at least 2-1/2″ long; many commercial dowels are shorter.) Position the dowels so they stick out approximately the same amount on both sides each piece, then wipe off all excess glue. Cut the dowels to final length on the bandsaw (Photo 5). They should stick out less than half the thickness of each piece—9/16″ is about right.
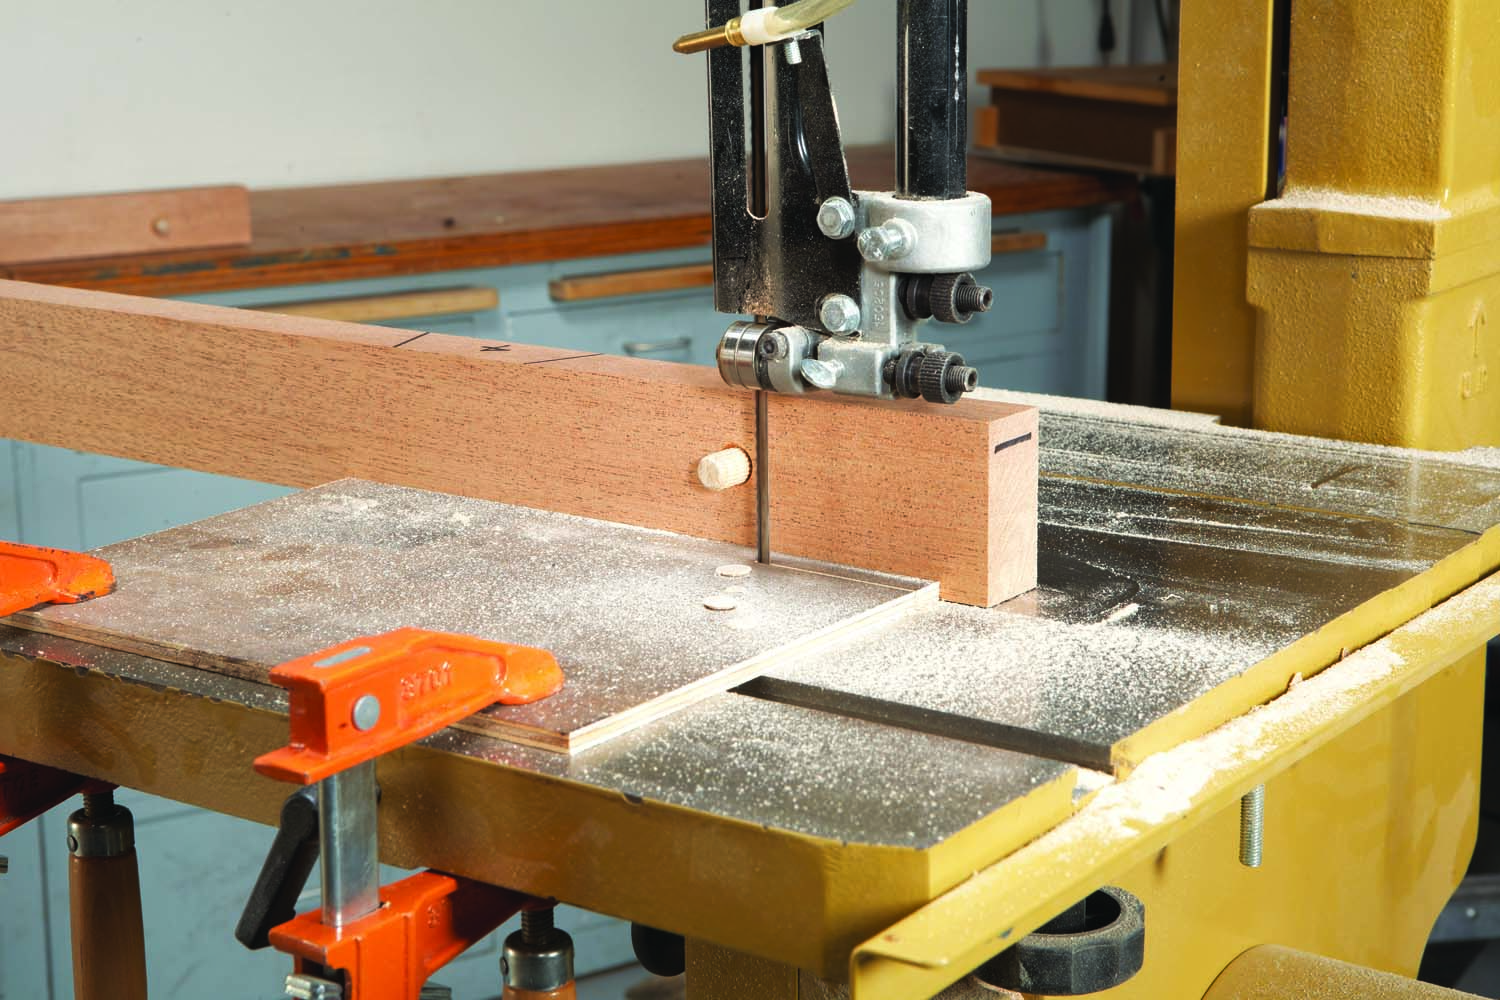
Photo 5. Cut the dowels so they only stick out 9/16″ (less than half the thickness of the stock) using a fence. The fence is a board with a slot cut into it 9/16″ from an edge.
Make the joints

Photo 6. Assemble each part of the table, without glue, and trim both ends. The dowels serve to register all the pieces together; this step ensures they’ll be flush. Take apart each assembly after cutting.
Reassemble the top and both legs, then cut these parts to final length, trimming both ends (Photo 6). Make sure your blade is set at exactly 90°. This step ensures that all the ends of the top and legs are perfectly flush with each other.
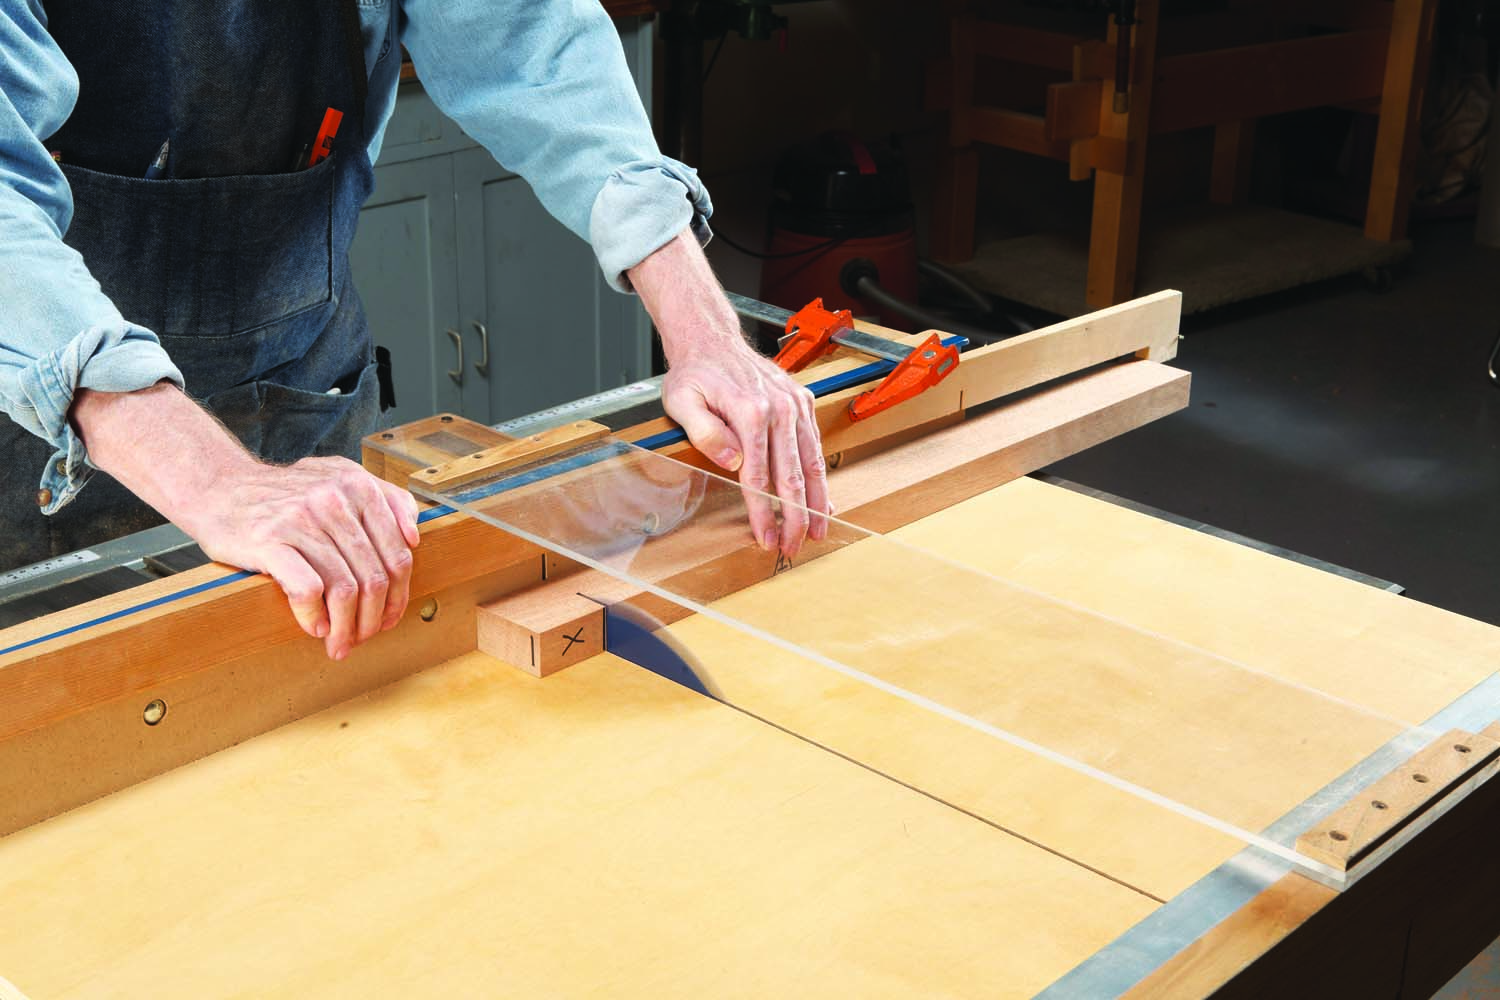
Photo 7. Trim one end of all the odd-numbered pieces from the table’s legs. Trim both ends of all the even-numbered pieces from the table’s top.
Take apart the assemblies and trim the pieces marked with an X (Photo 7). Set up a stop so you remove exactly 2-3/8″ (including the kerf cut by the blade). It’s best to put the stop at the far end of each piece, as shown in the photo, so the offcut won’t be trapped.
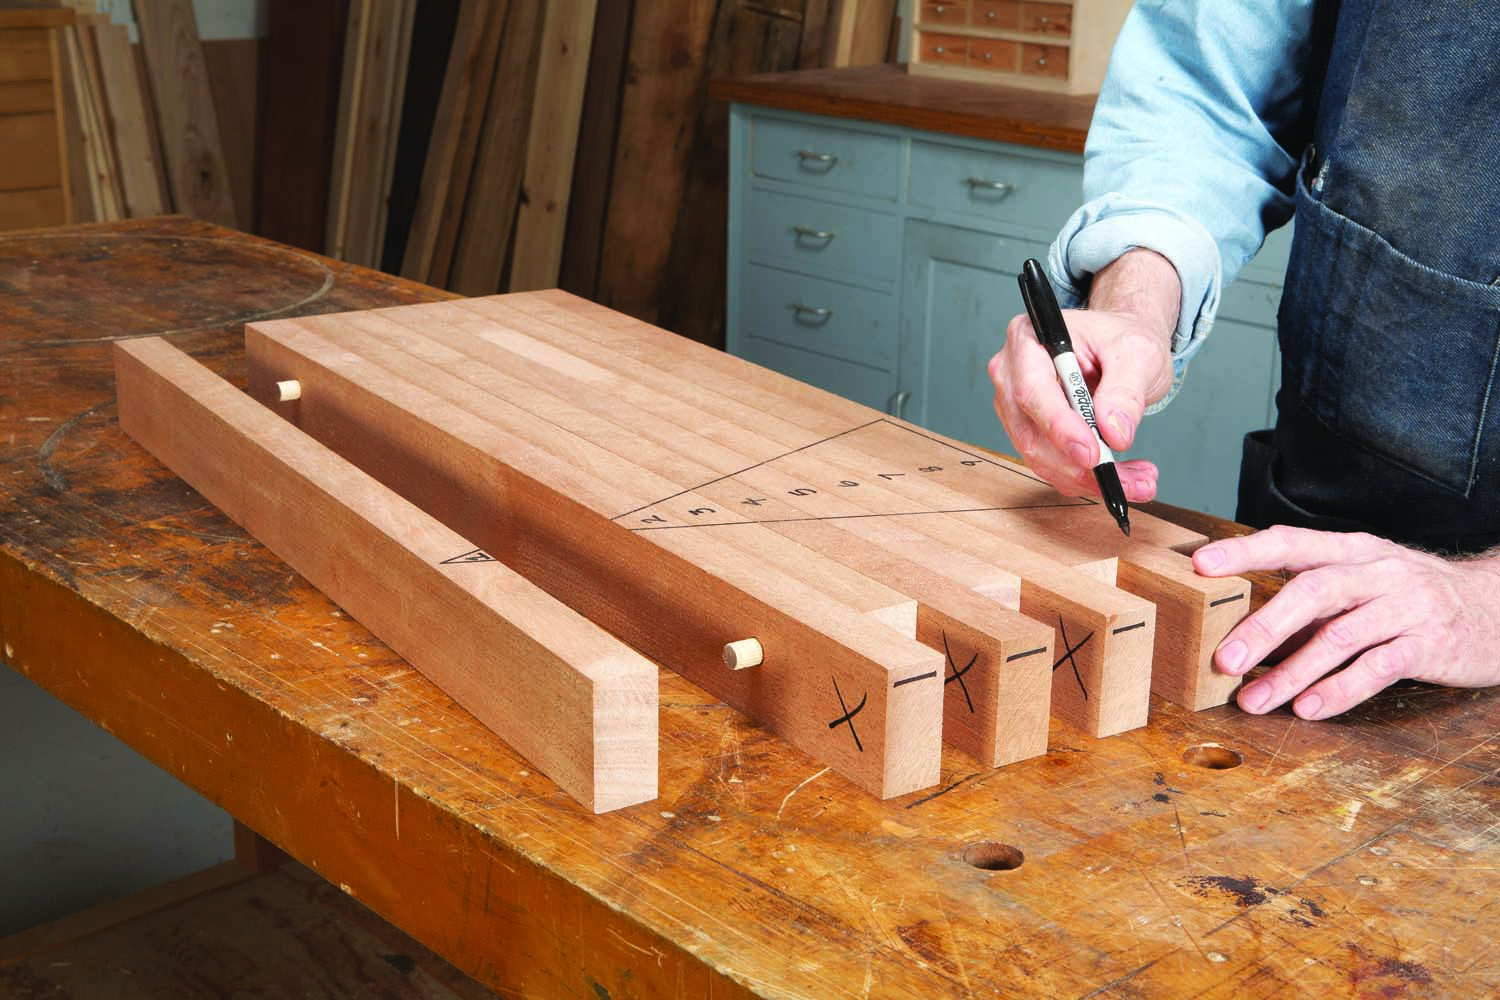
Photo 8. Reassemble both of the table’s legs. Mark one face of each “finger”.
Reassemble the top and legs (Photo 8). You’ll see, of course, that trimming the X pieces has now created notches for the finger joints. The fingers should fit nice and tight in the notches, right? Yes, they will—but nice and tight doesn’t leave any room for glue. In fact, the joints may be so tight that you won’t be able to assemble them. Not good!
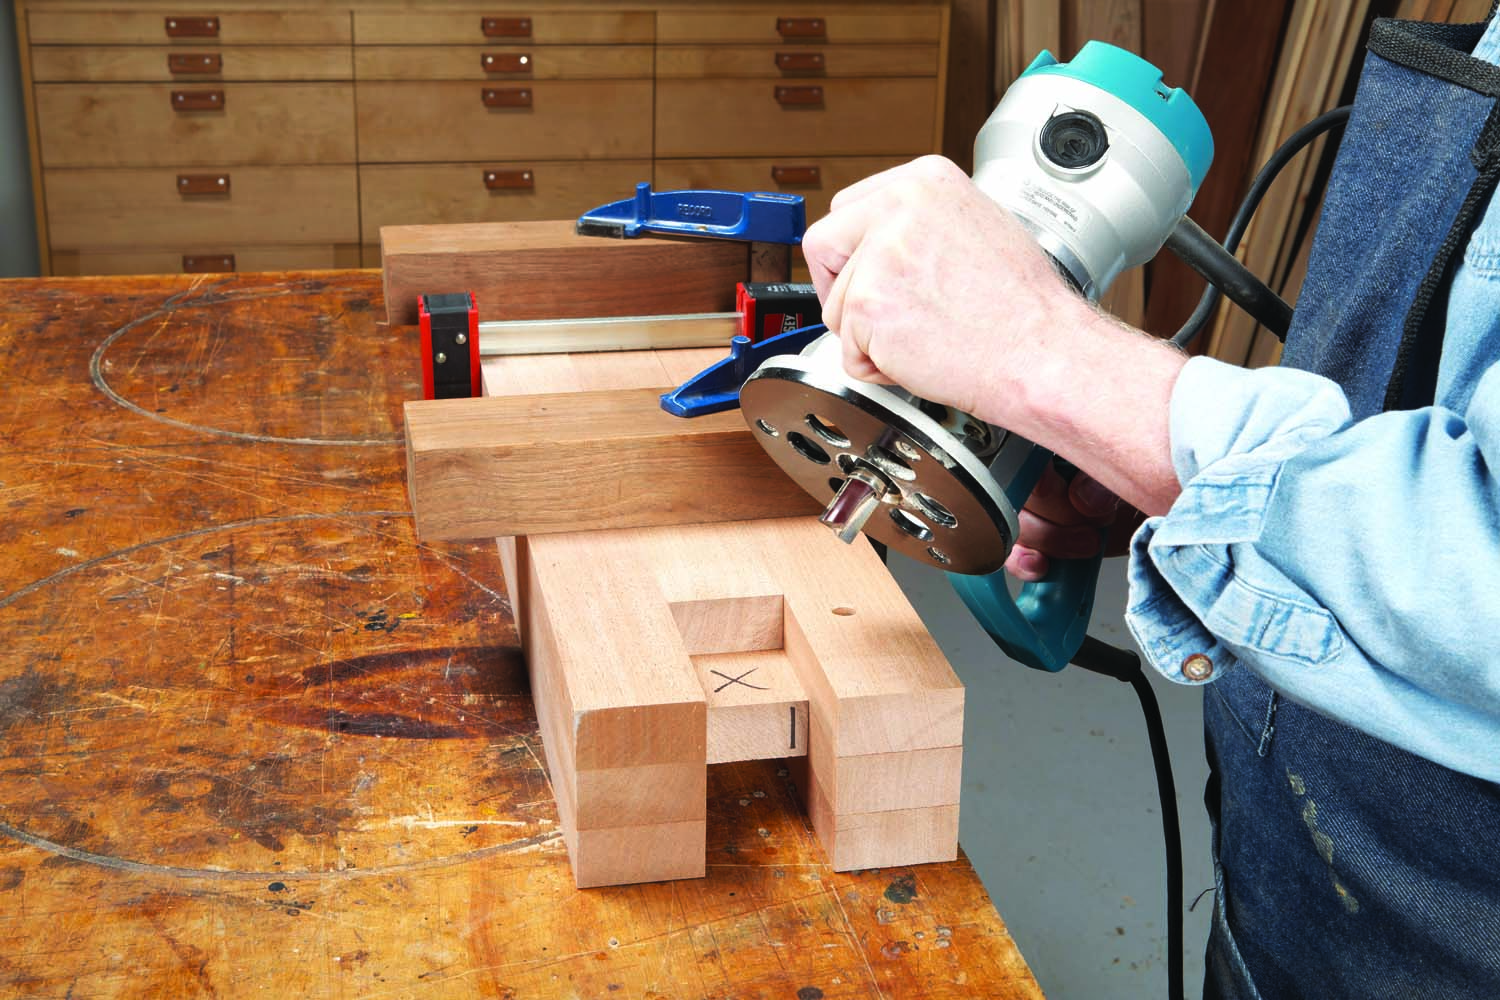
Photo 9. Rout the marked faces. Make a flat bearing surface by stacking other pieces alongside.
I chose to head off this problem by making the leg fingers a few thousandths of an inch thinner. Here’s how to do it. Set aside the top assembly—it’s fine as it is. On each leg assembly, mark one face of each finger with an X. Take apart each leg assembly and rout the marked faces with a top-bearing mortising bit (Photo 9). Stack other pieces around the finger to be routed in order to guide the bit (the bearing ensures that you won’t cut into them), then adjust the router’s depth of cut to remove only about .003″—the thickness of a piece of notebook paper.
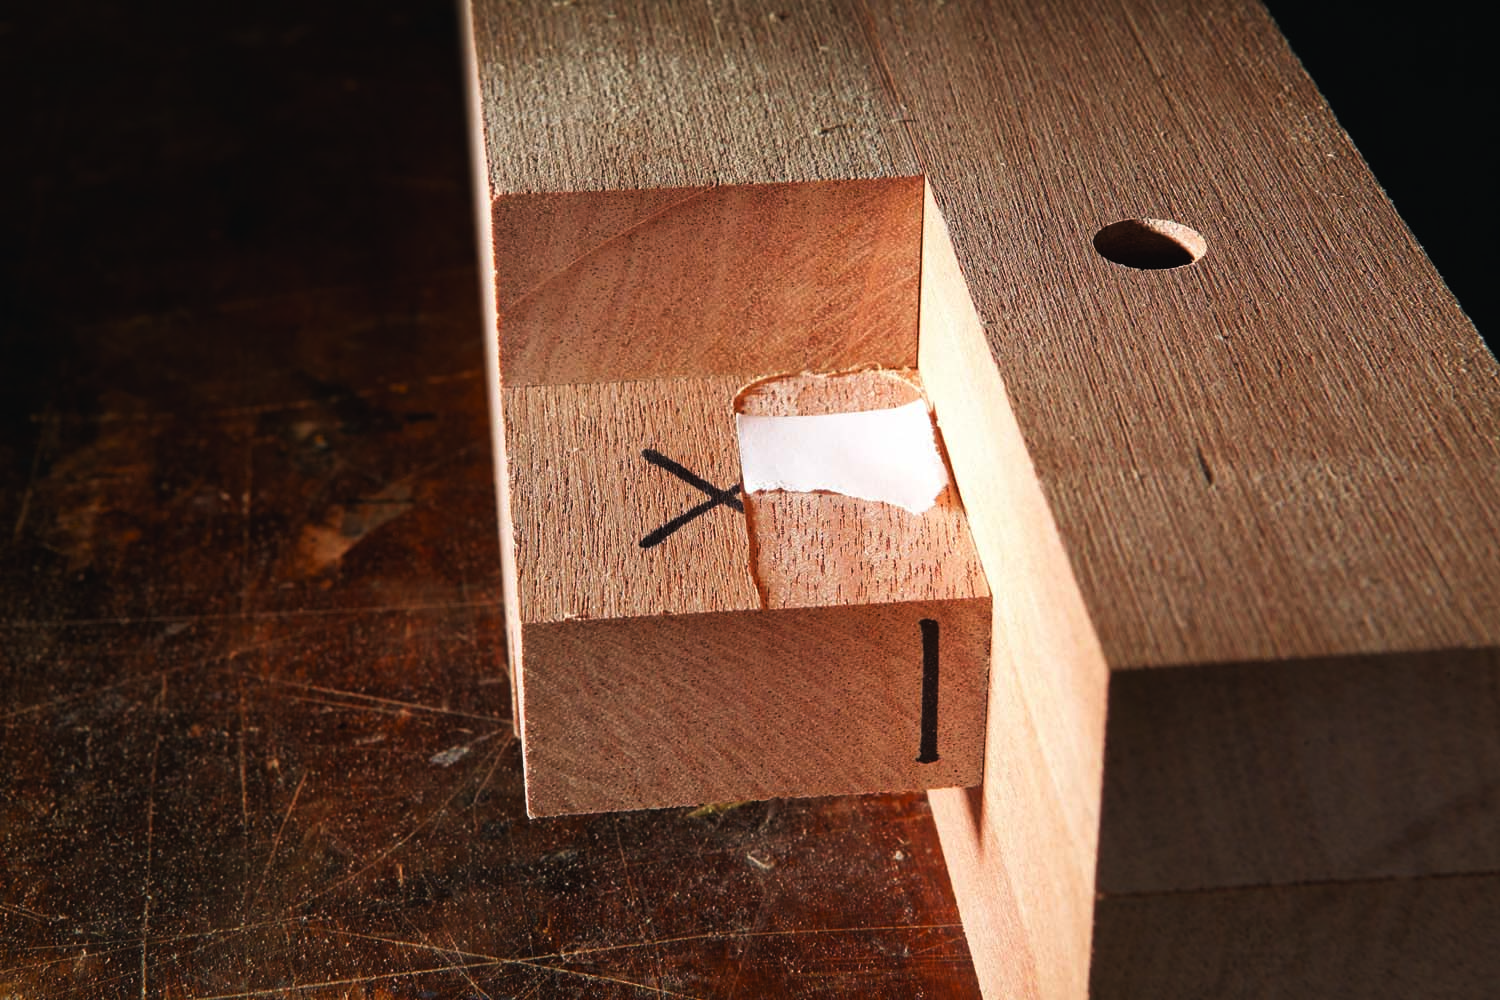
Photo 9.5. The cut is only a paper-thickness deep. Reducing the thickness of the fingers will make assembly much easier.
Reassemble the legs and clamp them together. Clamp the top assembly together, too, and try fitting the joints together. You should be able to push them home by hand or with light taps of a mallet. If you need to use more force, the joints are too tight. If that’s the case, disassemble the legs and rout the leg fingers a little bit deeper.
Glue up each section
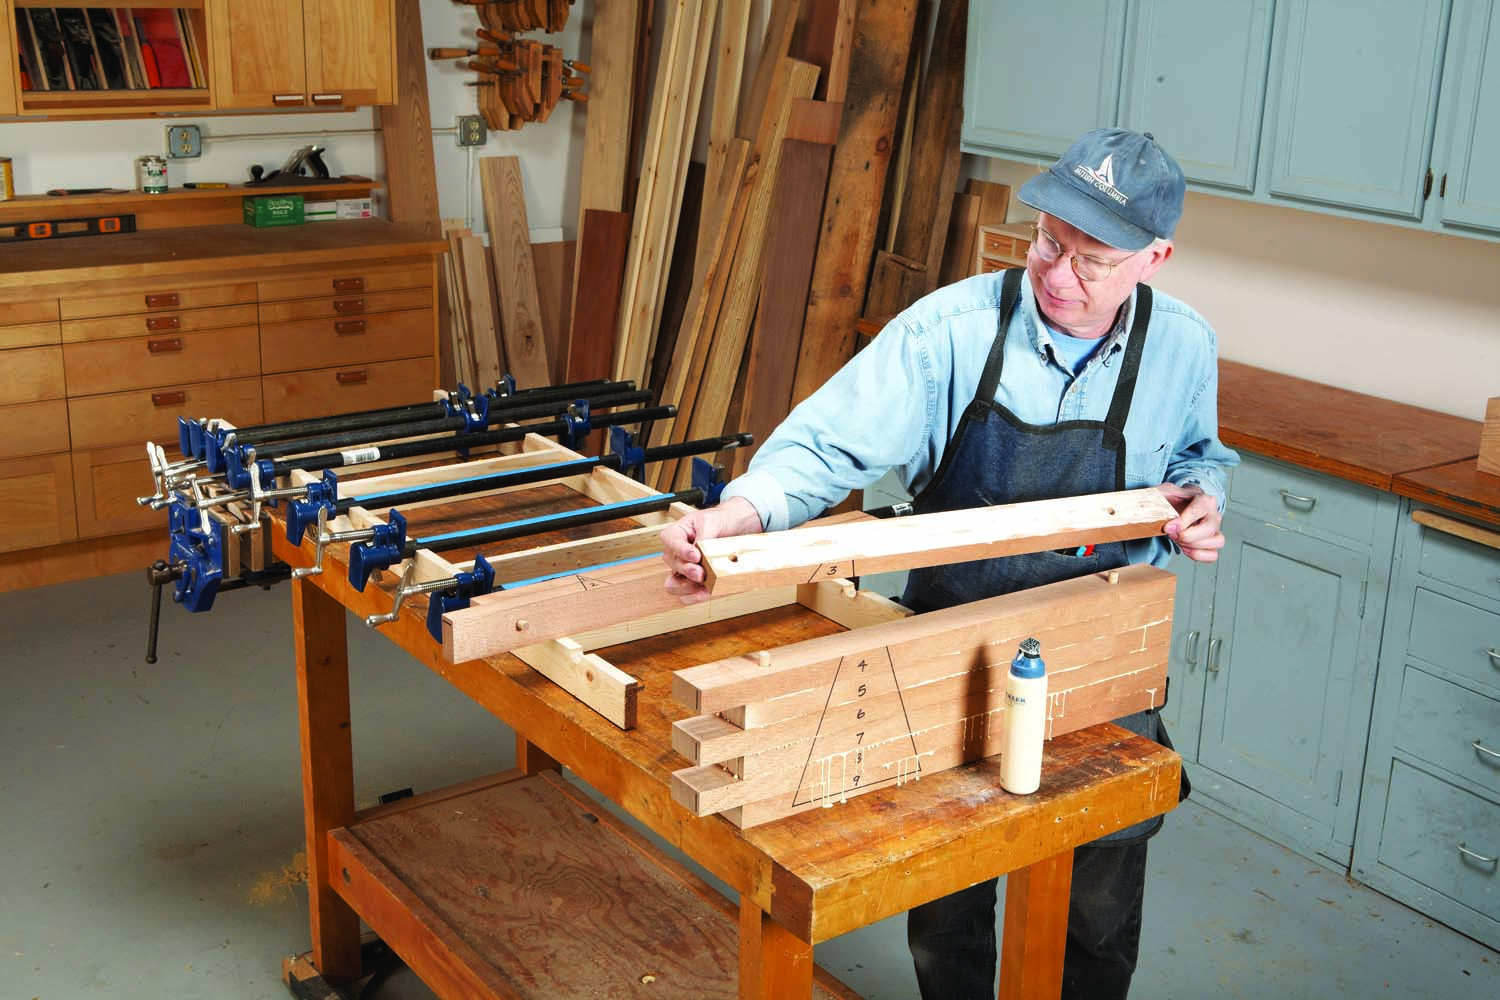
Photo 10. Glue all of the leg pieces in one shot. Apply the glue to one piece at a time, then stack them one on top of another, following the numbered order.
Let’s start with the legs. If you’ve got everything planned out, you can glue all nine pieces at the same time (Photo 10). Stack the pieces in order. Remove piece #1, then use a small paint roller or equivalent to apply glue to its inside face. Place it nearby, outside face down, starting a new pile.
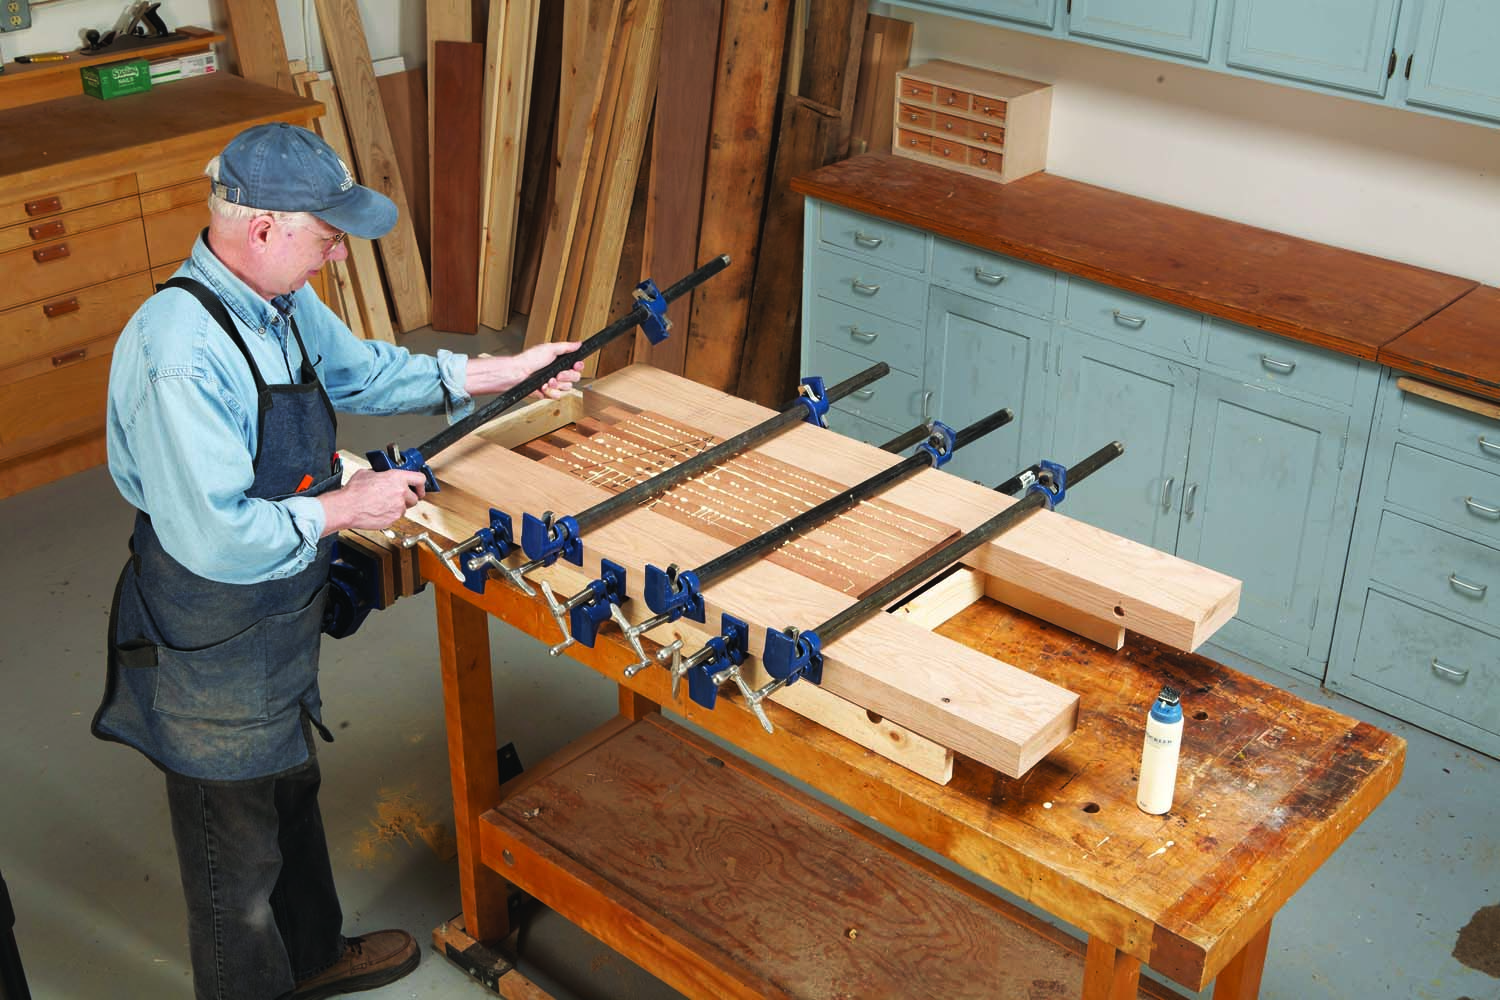
Photo 11. Clamp the leg pieces between stout cauls. Place the clamps above and below the cauls to apply even pressure. Repeat the procedure for the other leg and the top.
Stack piece #2 on top of piece #1 (You only have to apply glue to one side of the joint. And you don’t have to put any glue in the dowel holes.) Pick up piece #3, apply glue to both sides and add it to the stack. Keep on going in this manner, then place the complete stack on a row of pipe clamps. Put cauls alongside the glue-up, then add more clamps on top (Photo 11). Scrape off all the excess glue before it hardens.
The cauls should be as thick as the pieces you’re gluing up. The wider they are, the better. Each of my cauls were composed of three pieces of 3/4″ x 6″ x 48″ red oak glue together and jointed. Boy, are they stiff! They really came in handy for gluing the top.
Here’s why: It’s best to glue the top in stages, one half at a time. If you work really fast and have an assistant, you could glue the top all in one shot. But if you work alone, you may run out of time. The glue may start to set up before you get the assembly in the clamps. Big, stiff cauls ensure that the sides of each half remain absolutely straight, which is essential for the final glue-up.
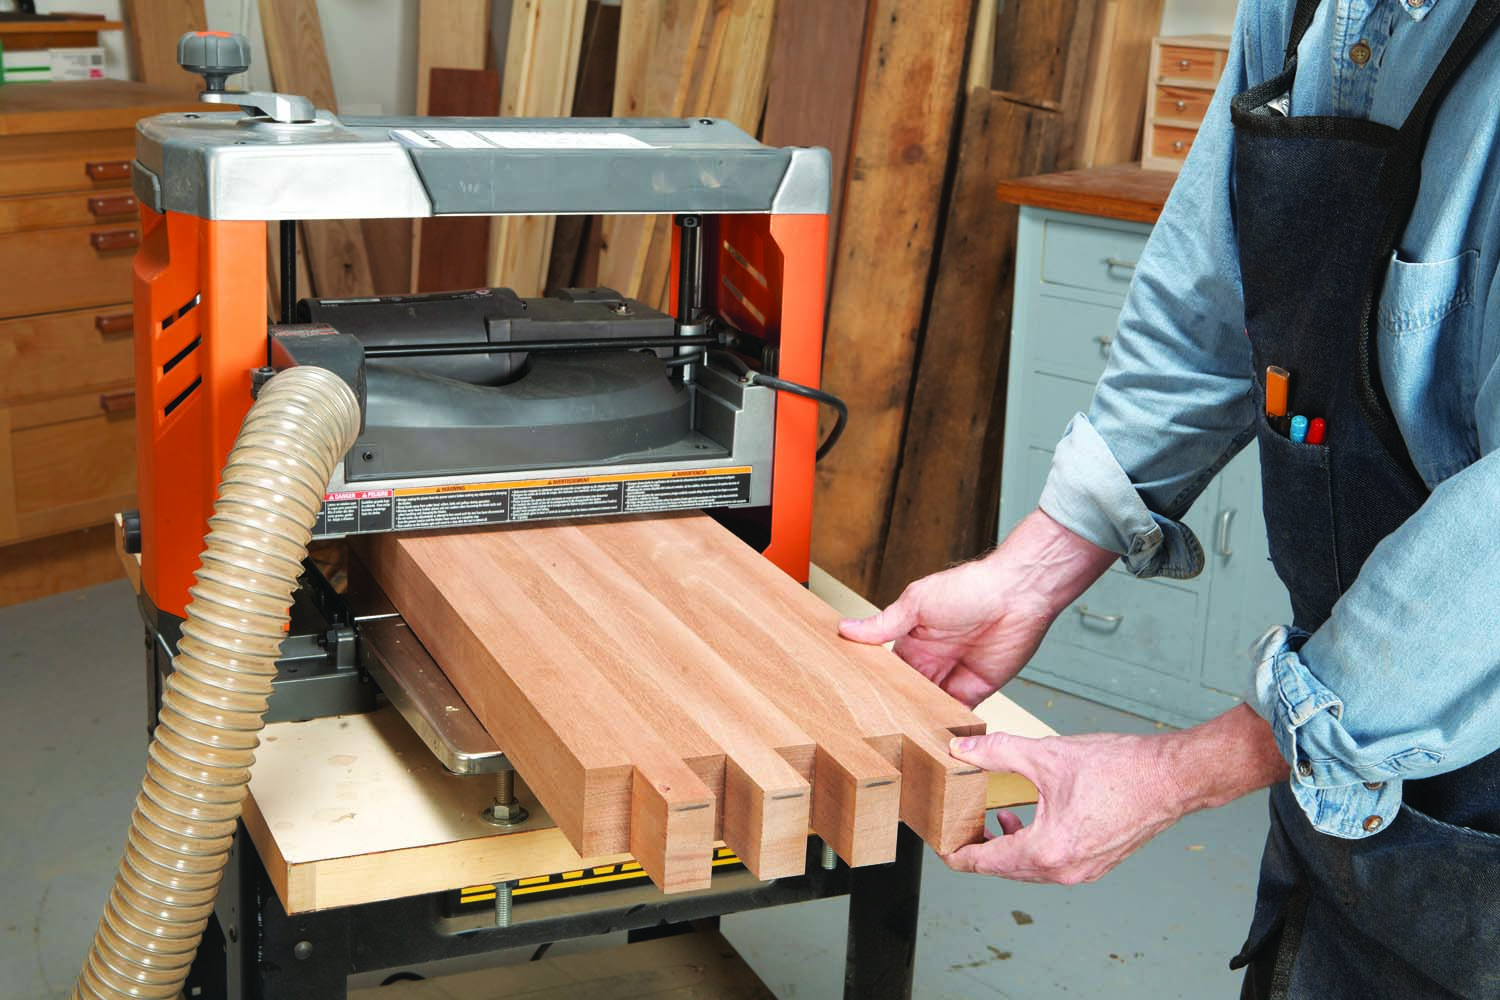
Photo 12. Plane both sides of each piece you’ve glued up. They’ll come out smooth and even, with no tearout.
Plane both sides of the legs and top (Photo 12). Reduce them from 2-1/2″ thick to 2-3/8″ thick (or better yet, 1/32″ thinner than 2-3/8″, so the fingers will stand 1/32″ proud).
Glue the finger joints
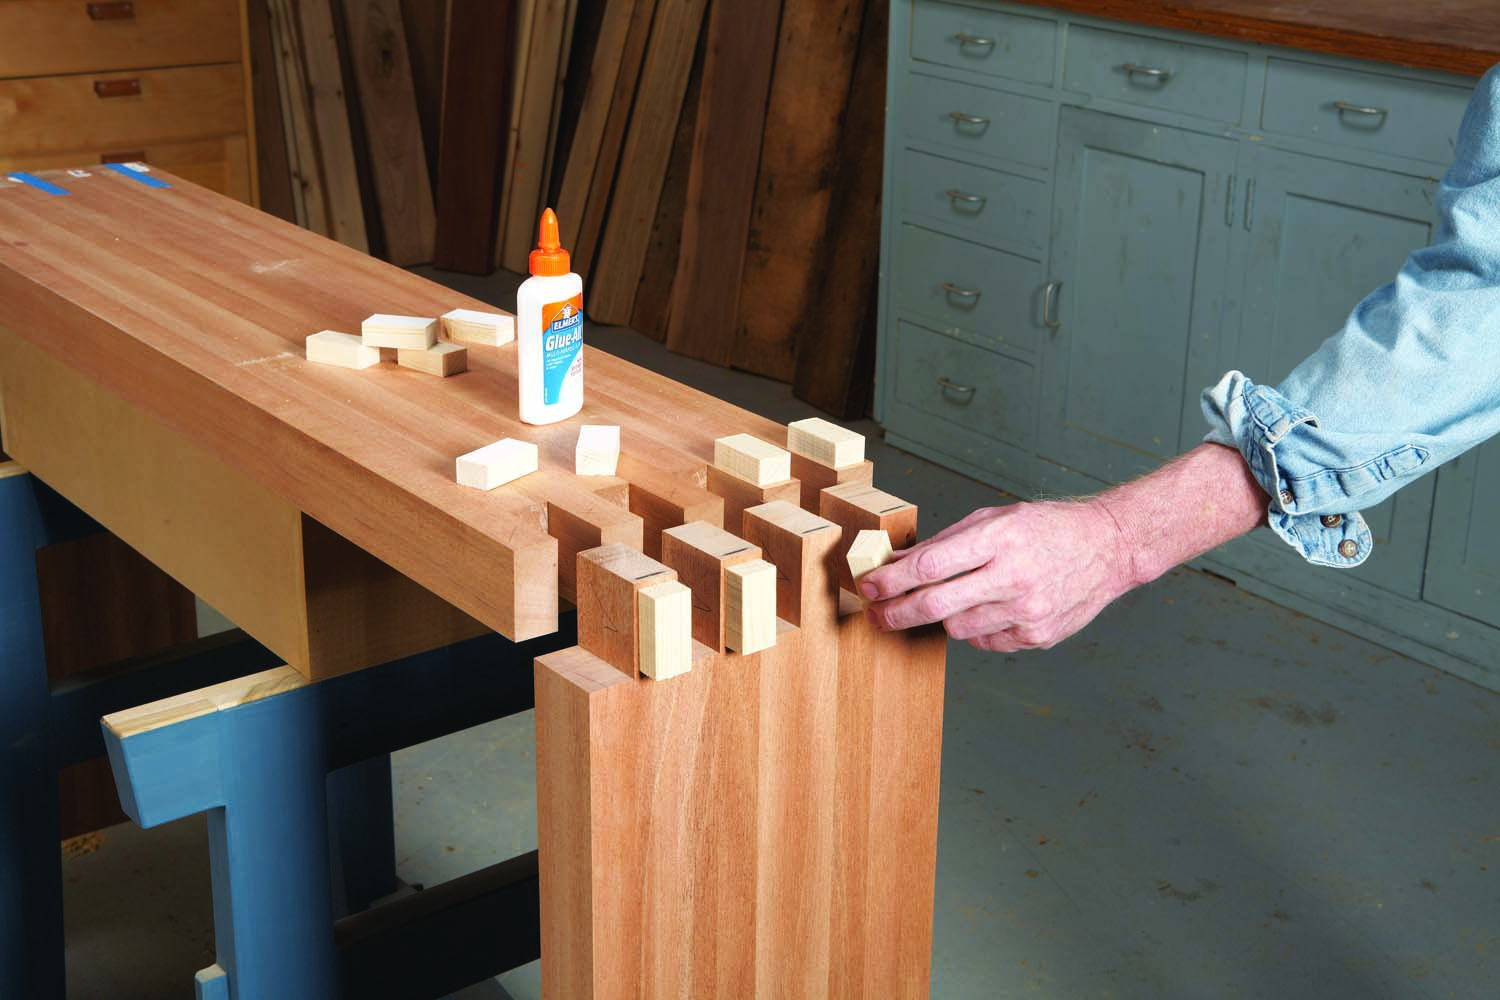
Photo 13. Prepare to glue the table together, one corner at a time. Glue small softwood blocks on each finger—wherever you may need to apply clamping pressure.
To avoid denting the wood, prepare some softwood blocks that are slightly smaller than each finger (Photo 13). Glue a piece of notebook paper to one face of each block, then glue the blocks in position, paper face in. Rubbing them in place is sufficient; clamps aren’t necessary.
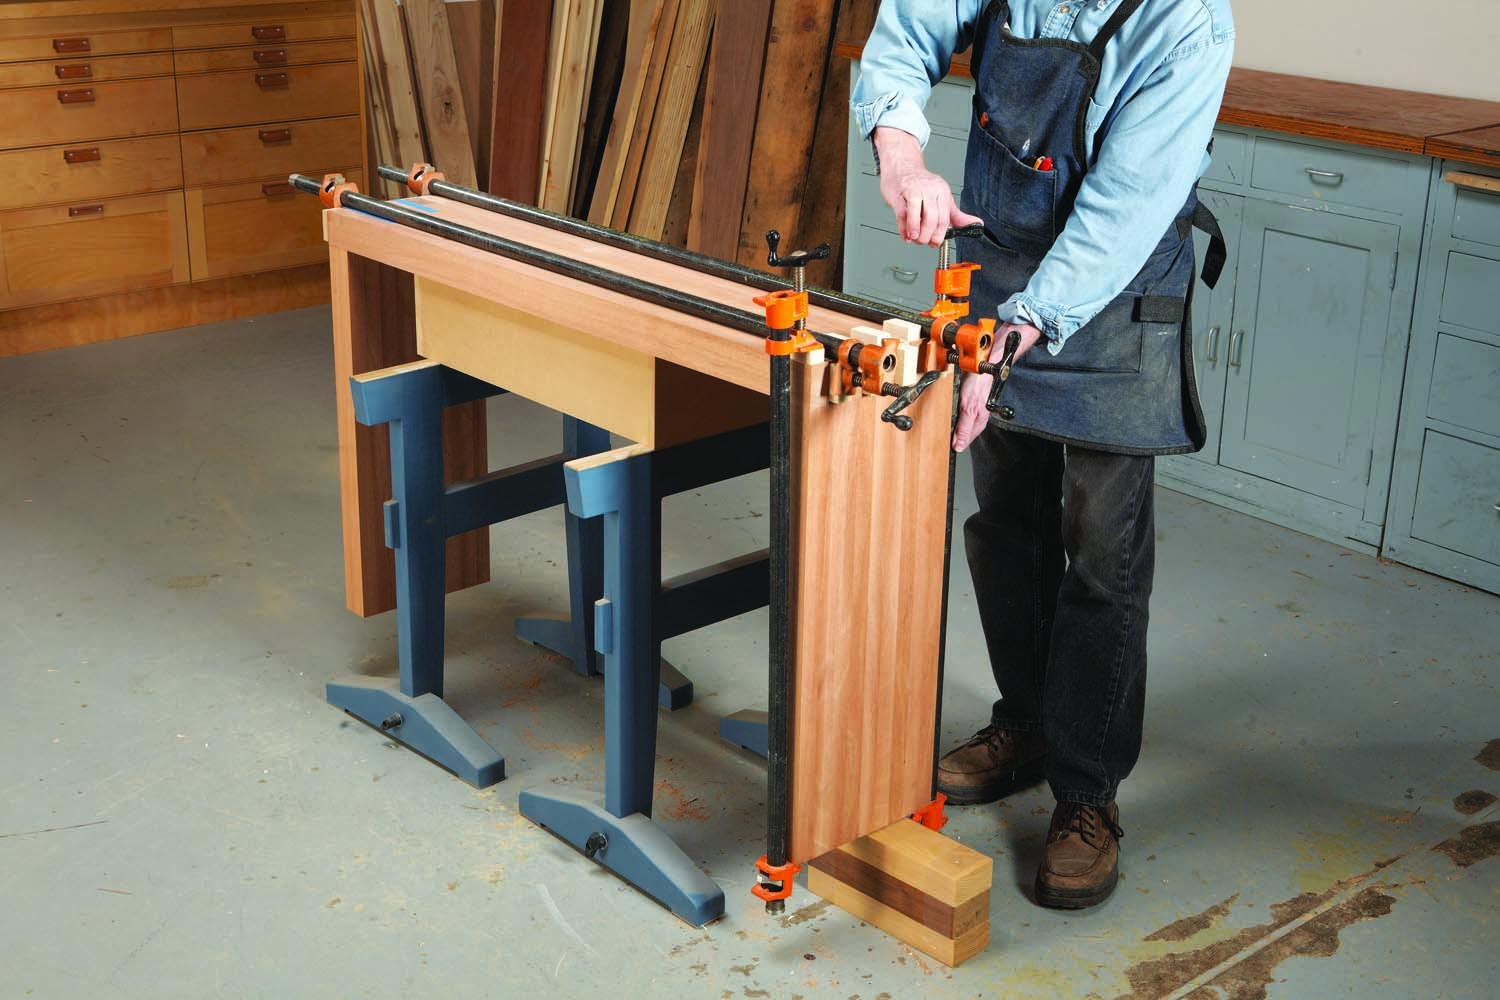
Photo 14. Apply glue and clamp in both directions.
Glue one corner of the table at a time (Photo 14). To make this easy, devise a method for holding the top and legs in position, so you can just slide them together. I taped together some blocks to elevate the legs off the floor (allowing room for the ends of the pipe clamps), then supported the top with a box placed on sawhorses. After you apply the glue, smack the joint together with a mallet. Draw the joint tight with clamps.
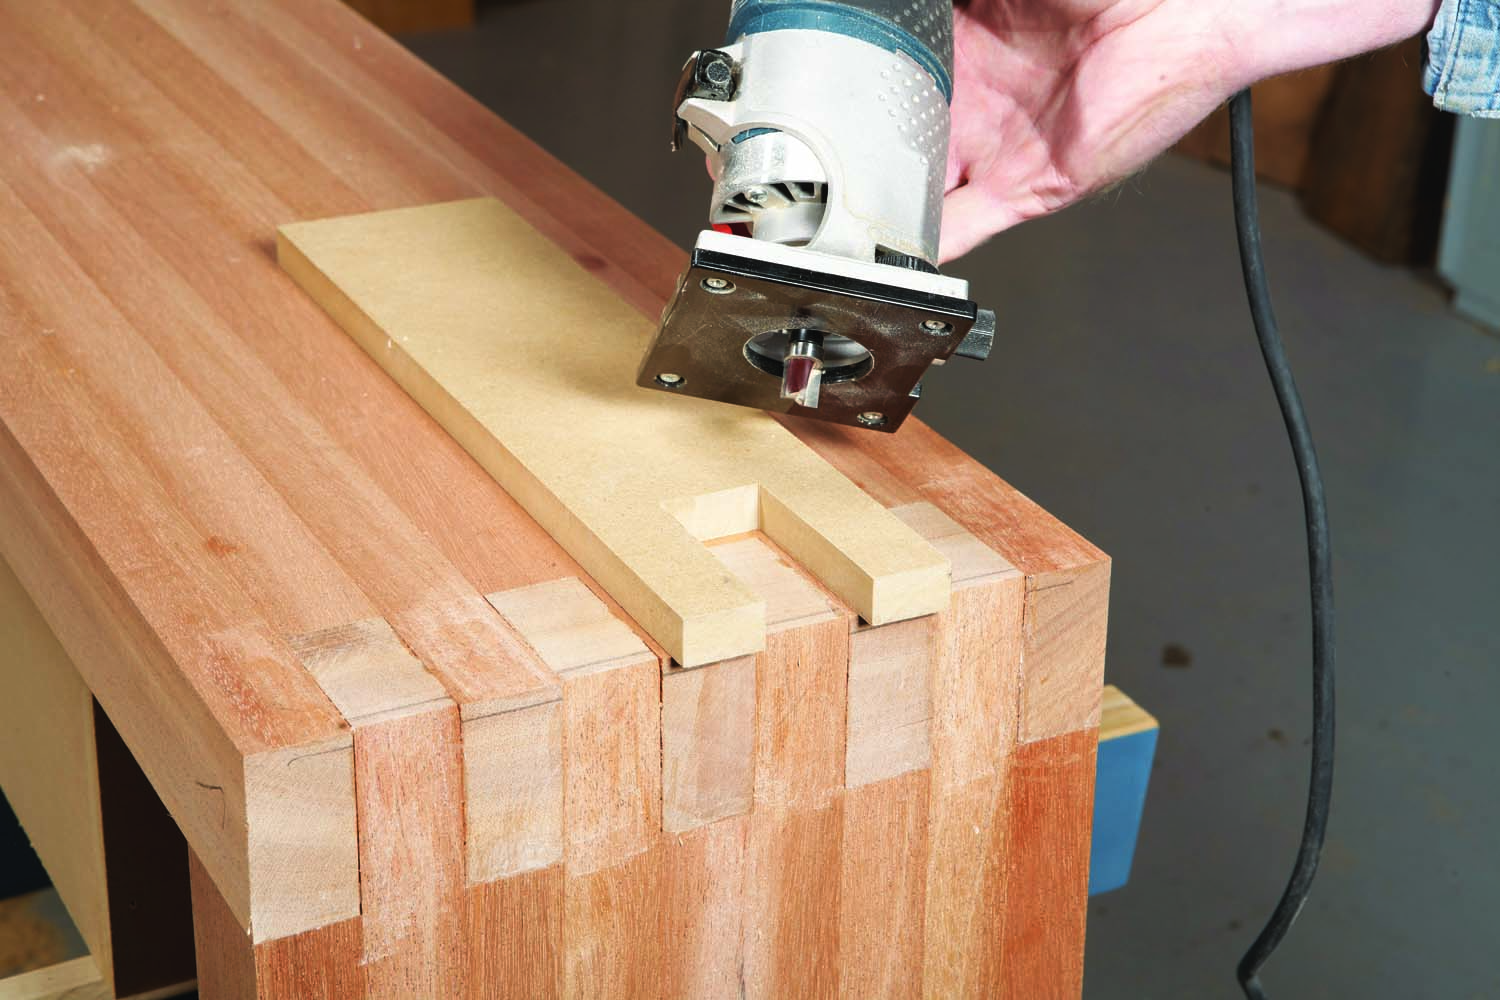
Photo 15. Level the fingers, if they’re proud, with a router and top-bearing mortising bit.
If the fingers are proud, level them with a router (Photo 15). Routing should leave them just a hair proud; finish the job with sandpaper. Level the areas where the legs meet the top, then rout every edge with a 3/16″ roundover. I finished the table with Minwax Antique Oil, an oil/varnish mixture. It darkened the end grain of the finger joints, making a pleasing contrast.
Sculpted Finger Joints
 Large finger joints can be shaped in any number of ways after they’ve been glued together. This stool, for example, features a concave top and convex legs.
I made both of these shapes on the tablesaw, using a series of angled cuts with a dado set. The secret to making the convex cut was to leave a 1/4″ wide portion uncut, at either side, so the stool wouldn’t tip. Smoothing the surfaces required a fair amount of sanding, but it wasn’t hard.
I made stool from 6/4 yellow poplar, which is relatively inexpensive, as a dry run for making the larger table in this article. To finish the piece, I bleached the wood, applied Behlen’s Med. Red Mahogany Non-Grain Raising Stain and brushed on a 1-lb. shellac seal coat. This was followed by a coat of Varathane Cabernet gel stain, which deepened the red color, and three coats of Varathane water-based poly.
Here are some supplies and tools we find essential in our everyday work around the shop. We may receive a commission from sales referred by our links; however, we have carefully selected these products for their usefulness and quality.


Well written article. It has been written so that it is easy to understand even for a beginner such as I am.
Thanks.
Frank