We may receive a commission when you use our affiliate links. However, this does not impact our recommendations.
 Before we start carving, here are a few basic carving principles. Stop cuts are cuts that protect areas you don’t want to remove. These simply sever the fibers and define shapes, allowing you to make cuts into them without cutting past them. Next, remember you can always take more off but not add it back. Finally, work with sharp tools. Sharpen your tools with a good stone and keep a strop handy so that dull tools turn you into a Scrooge.
Begin by penciling in a few guidelines to help proportion Santa’s face using the diagram at the bottom of this article. You can start on a flat side or take advantage of a corner to help guide you. I found working on the flat face resulted in a Lego-like Santa. Now, carve out the shaded areas as noted. The upper area tapers the face, while the lower taper will transition from the bottom of the nose to the mustache. By removing these two areas, you are defining the nose, which you want to be the proudest feature of the face.

Pencil in basic guidelines and carve the shaded areas.
With the block prepped, draw in the eye sockets, nose, mustache, and cheeks. This is a great time to change Santa’s facial features to how you imagine this jolly fellow to be. For me, that’s a bulbous nose, handlebar mustache, and a wide-open smile.
Begin With the Face
If you’ve never carved or haven’t tried faces yet, check out the Carving Faces Workbook by Harold Enlow. As you can see in the photos, I still reference it when I work. Start with a gouge to deepen the eye sockets and reduce the thickness of the bridge of the nose. Then use a carving knife to stop-cut along the lines of the nose and cut each line to separate the cheeks from the nose. As you work, refine the bottom of the nose and cheeks before thinning the bridge of the nose to look reminiscent of a ski slope. Now it’s time to switch to a small gouge to stop cut up to the sides of the nose back into the plane of the face. Lastly, use a v-gouge to add the nostrils.

Use a gouge to separate the cheeks from the nose.
Moving down the face, redraw Santa’s mustache and lips if needed. Use a carving knife to make stop cuts along the bottom half of the mustache. Then make slicing cuts into the stopped cut to begin shaping it. Use your carving knife to shape the mustache, and finish up with a v-gouge to re-define its shape if necessary.
Working lower, make a deep stop cut into the corners of the mouth with a small veiner, and cut the chips free with a knife. Use a gouge to round the mouth area and a knife to deepen the mouth cavity. Pencil in the bottom lips and grab your smallest v-gouge to begin carving along the bottom pencil line. A word of caution—start at the bottom of the bottom lip. Starting at the top will have a tendency to chip out. If it chips, simply make the mouth bigger. To finalize Santa’s mouth, carve a deep gouge at the top of the tongue, so it looks as if the tongue extends down the throat and a smaller gouge at the bottom of the tongue to separate it from the lips.

Deepen the eye the eye sockets.
The last facial feature is Santa’s eyes. Many carvers agree that this is the hardest part to carve and may choose to paint them on instead. If you are up to the challenge, be sure to practice first and simply think of the eyes as a series of cuts that together form an eye. Start by removing a triangular chip of wood to form the corners of the eye. Then complete a series of 4 v-cuts with a gouge: the first defines the top of the upper eyelid, the next is the bottom of the lower eyelid. Finally, the last cuts form the opposite sides of each eyelids to separate it from the eye. Round the eyeball by making cuts along the edge of the eyelids. Since I planned to paint Santa, I chose to paint the iris and pupal.

Make stop cuts along the bottom edges of the mustache.
Lastly, the Beard & Hat
With Santa’s face established, round out the block. Pencil in the hat, pom-pom, and beard. Start with the hat by making stop cuts at the top and bottom edge of the trim, along with the pom-pom. Round the hat making sure to separate the tail of the hat as you go. Taper the forehead up and “tuck” it under the fur trim, so the hat looks like it is sitting on his head. This is also a good time to further round the sides of his face and add a small furrow between the eyebrows.

Pencil in the guides for the beard and hat.
To carve the beard, make deep stop cuts defining the beard. Now, use the gouge from the back of the head toward the beard to define the bushiness. Next, soften the edges of the beard with a small gouge. Lastly, use various size gouges to break the beard up into large locks of hair. Gently round out the back of the head, adding wisps of hair with a v-gouge.

Use a large gouge to remove wood from the back of Santa’s head to define the sides of the beard.

Use a small v-tool to carve details in the eyebrows. Then move onto the details in the mustache and beard.
Final Details
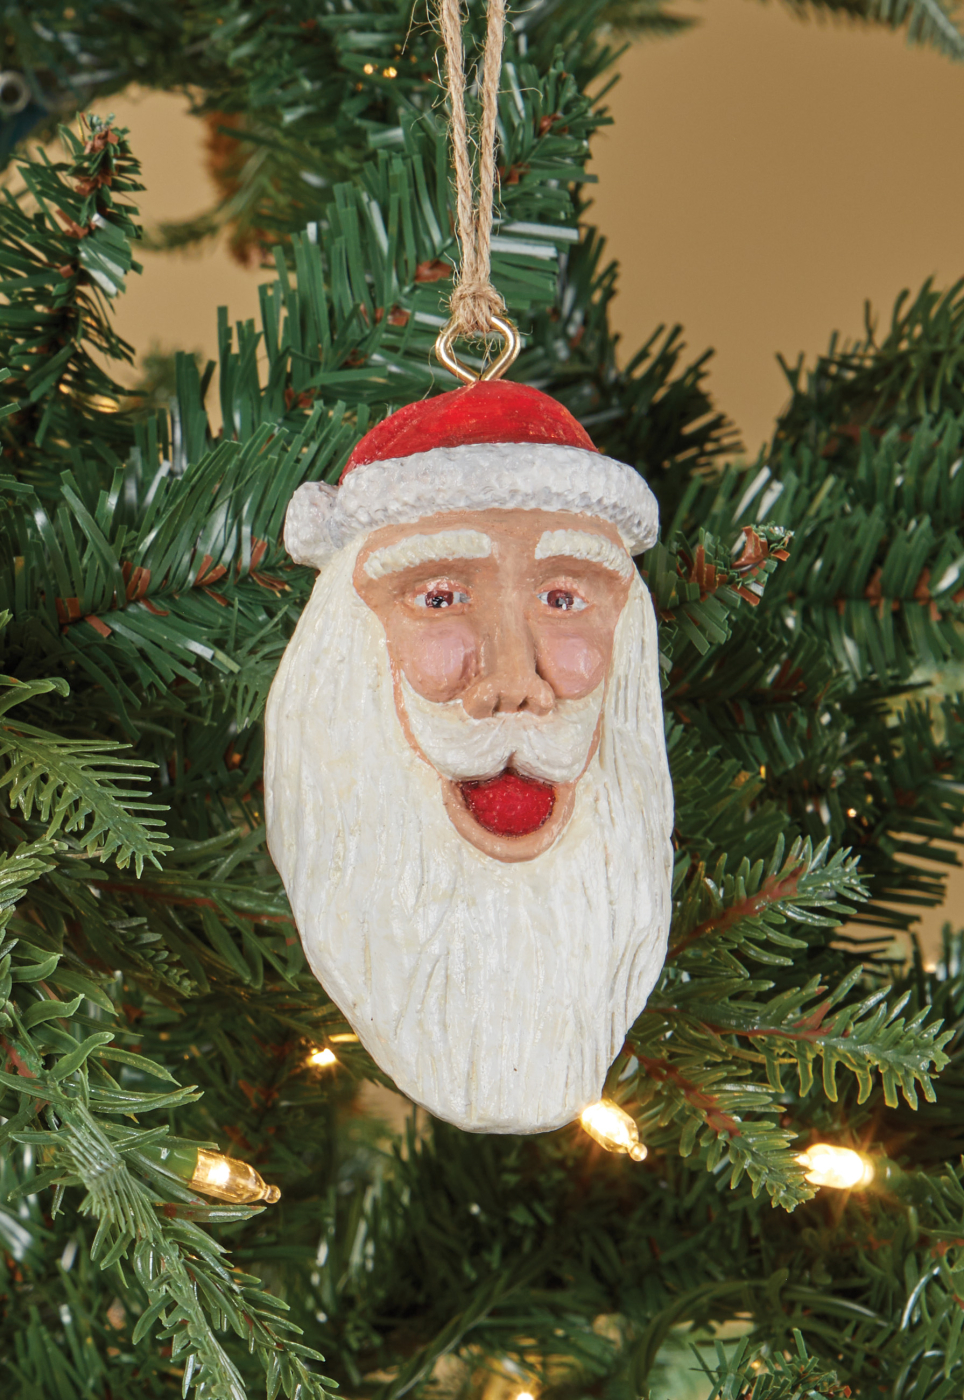
Use sandpaper to smooth any rough edges and prepare for finishing. The final details can be cut in with a very small v-gouge. Carve along the lines on the eyebrows and mustache. Free-hand in curving lines of hair in the beard. I chose to use a Dremel to stipple the fur on his hat, but a small gouge would also work. After painting, add a small eye hook on the top to hang the ornament.

I highly recommend picking up a copy of the Carving Faces Workbook by Harold Enlow. He does a fantastic job of walking through the each facial feature one at a time.


Here are some supplies and tools we find essential in our everyday work around the shop. We may receive a commission from sales referred by our links; however, we have carefully selected these products for their usefulness and quality.