We may receive a commission when you use our affiliate links. However, this does not impact our recommendations.
Whether I’m working in the shop, remodeling or performing routine maintenance around the house, I am in constant need of a sturdy, lightweight worktable. The most popular one for, oh, the past 2,000 years, has been a pair of sawhorses with a board on top. But the older I get, the shorter the fuse on my patience gets, and while I have sawhorses aplenty, my general dissatisfaction with them grows.
Fixed-leg horses are heavy and clumsy to move around. The plastic folding ones are easier to use, but far less stable and sturdy. Some of my small trestle horses are better, but the stinking feet get snagged on anything and everything as I move them about, so I just leave them in the shop.
And for a lot of tasks two sawhorses are too many, and one is too few. But what if we had a sawhorse-and-a-half? A Workmate suffices sometimes, but it still is not exactly what I want.
With those limitations roiling my creative juices, I embarked on a path that eventually found me designing and building the “Butterfly” – a sturdy, lightweight, flexible and folding workholding option that is almost exactly the dreamt-of one-and-a-half sawhorses. I created my first prototype several years ago, and have tinkered with the concept and execution ever since to the point where I have it just where I want it.
Imagine a folding sawhorse, which is fine as far as it goes. But what if that single sawhorse had a pair of outriggers and could be transformed into two sawhorses on the same footprint? The Butterfly does exactly that.
As with most of my shop-accessory projects, this design is simple to construct with readily available materials and minimal tools. For the one built for this article, I used one sheet of 1⁄2“-thick Baltic birch plywood (my favorite sheet stock, and it should be yours too!), a circular saw, drill and a small handsaw to finish off the cuts, along with some ordinary hinges and metal stock from the local hardware store.
For the fabrication of the folding braces that hold the folding/expanding parts in place, I used metal bar stock, copper rivets (available at your local hardware store or online), a ball-peen hammer and a piece of railroad rail as my anvil when cold riveting the hinge pins on the folding braces.
As with most of these types of projects, you can tailor the dimensions and features to fit your own preferences. This Butterfly is simply one of several I have built to varying specifications.
Four Squares to Start

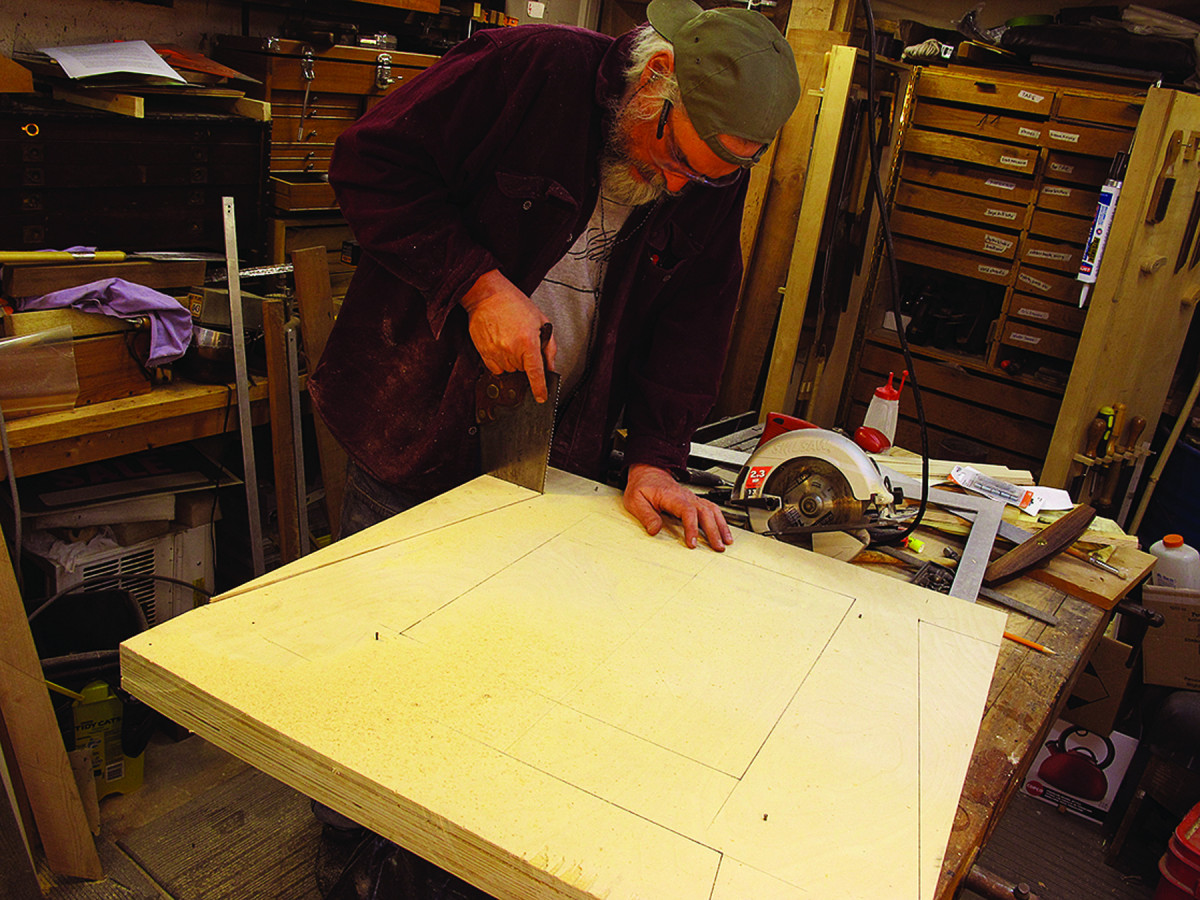
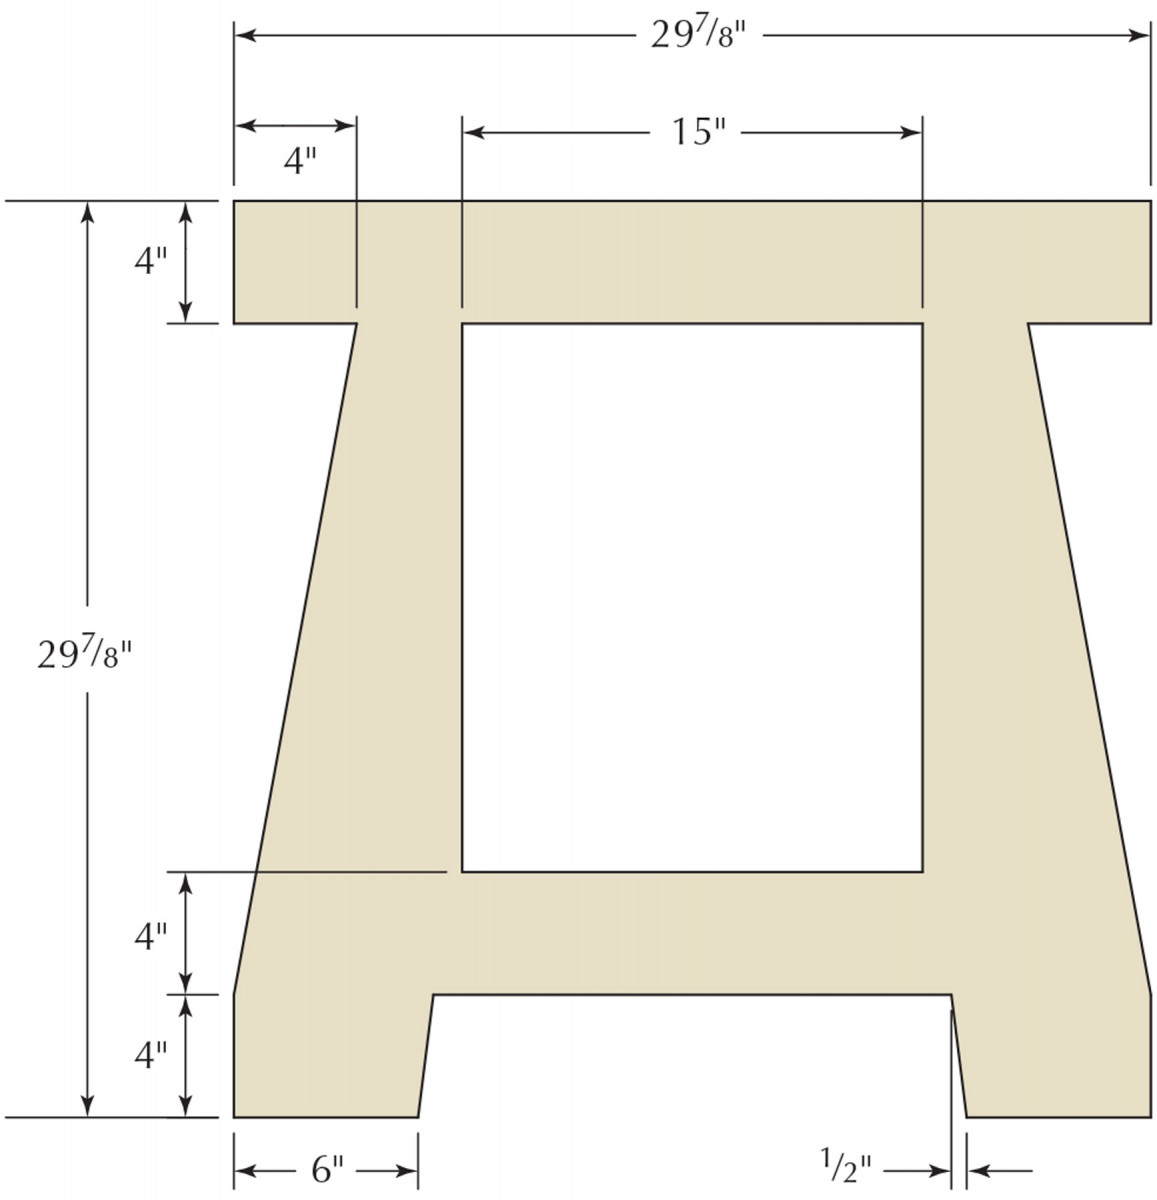
Identical quads. It’s critical that the four panels be identical. These four stacked pieces are each 30″ x 30″, minus the saw kerf. Each corner is simply tacked with a finishing nail to keep them together during the cuts.
The starting point for this project was a full sheet of 60″ x 60″ plywood. Because the Butterfly requires four identical pieces of material, you could simply cut the sheet into quarters like I did here and proceed just fine, yielding a unit that is about 30″ high, 30″ wide and 30″ deep.
As a group. Most of the cuts can be made with a circular saw and a straightedge. Large holes reduce the weight by a considerable amount, but keep in mind that removing material reduces the strength of the unit.
Once the four identical pieces are cut, tack them together for the second phase of the project as you lay out and cut vertical and horizontal cross members, and the attendant center cutout. This is a bit of a fussy part, because the cutout for the center yields panels that I use on top as a working surface. I wanted panels the width of the horses, so I needed two 15″-wide pieces for each wing of my Butterfly.
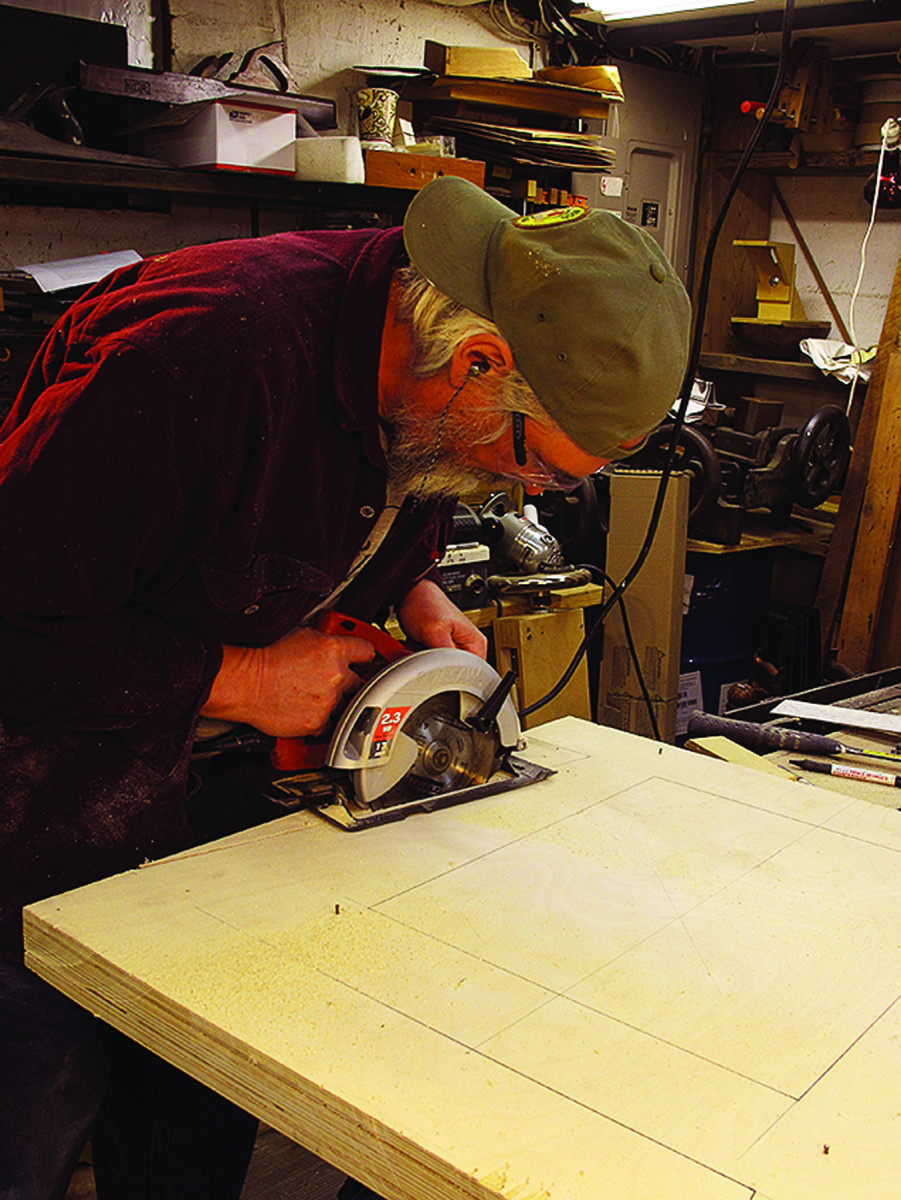
In this corner. Finish the cuts with a handsaw. (You could, of course, use a jigsaw or reciprocating saw instead. )
Using a clamped-on straightedge to guide the circular saw, followed by a handsaw, I cut the perimeter of the center void for each of the leg units. If you wanted, you could skip this step and leave each 30″ x 30″ piece whole. That results in a much stronger but much heavier Butterfly.
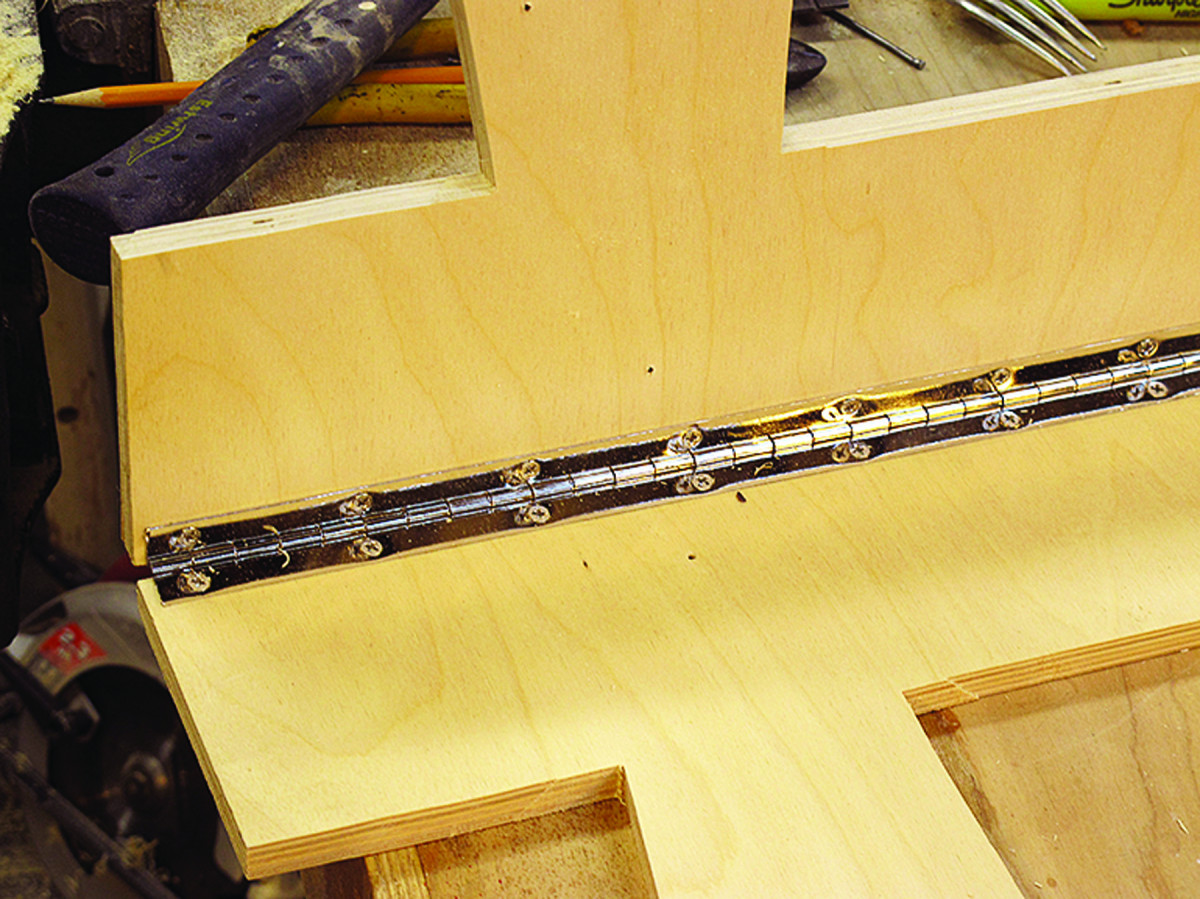
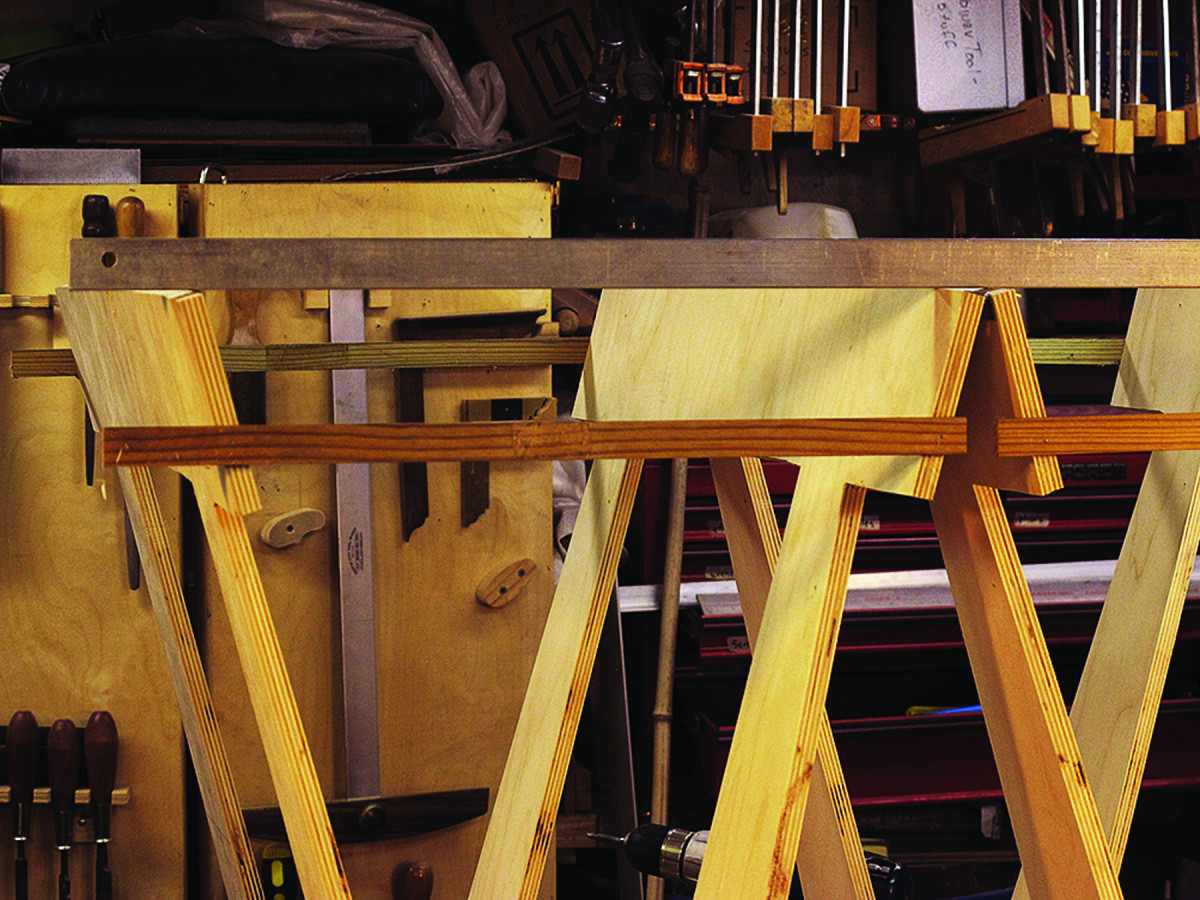
In the center. A piano hinge inside the middle section allows the horse to open without any play.
With the center panels cut out, lift the unit to decide how much more material – if any – you want to remove to achieve a desired weight. I made tapered cutouts along the vertical edges and foot cutouts at the bottom of all four elements to get a weight that suited my desires. If you want to remove even more weight, you can do as I did on an early prototype and remove stock along the edges using a hole saw.
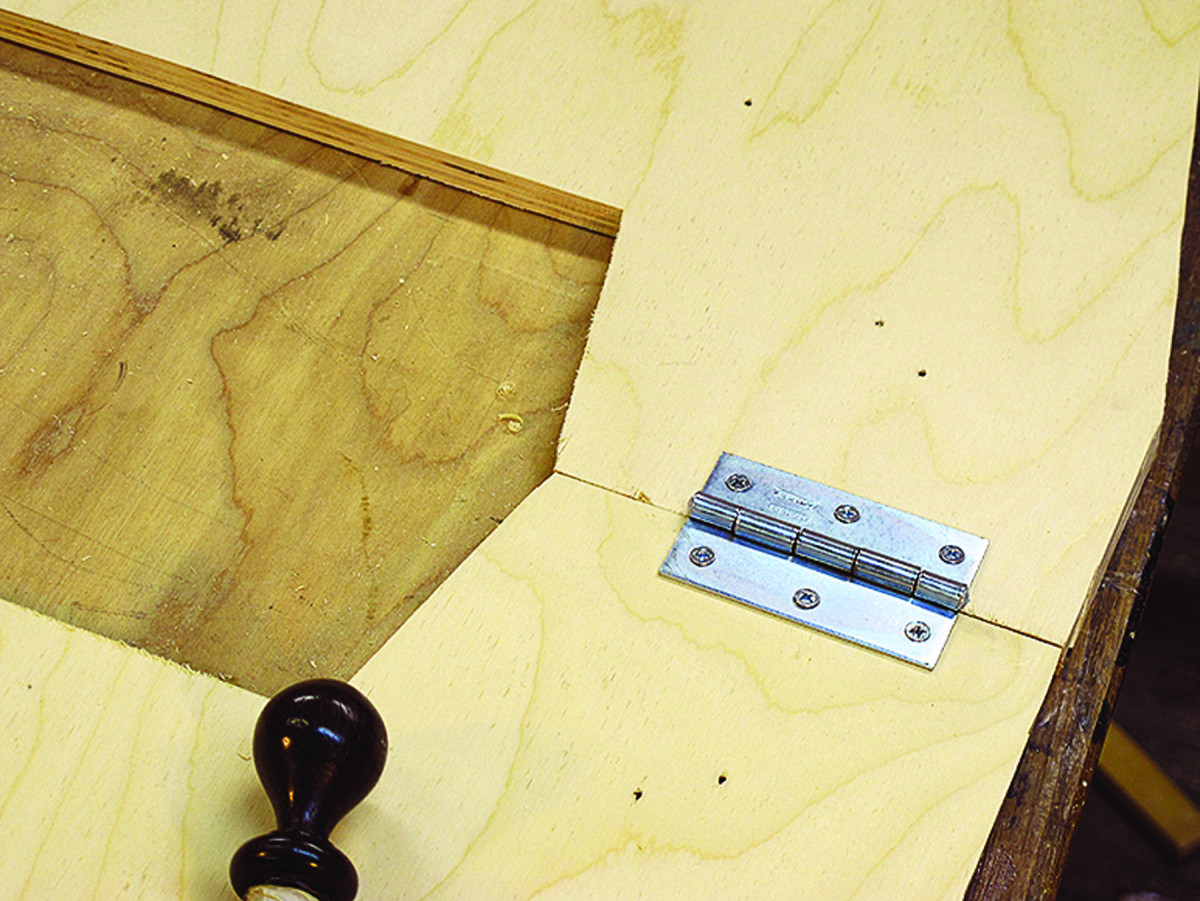
On the outs. Surface-mounted butt hinges allow the outer leaves to swing open. Gravity keeps the leaves in place when the Butterfly is used as a standard horse.
With each of the four elements cut out, they are ready for the initial assembly. The tops of the two center pieces are joined with a piano hinge to make sure there is no racking in the finished unit. The two outside units are attached to the adjacent center sections at the feet with standard butt hinges.
Cold Riveting
 Cold riveting is a near-perfect and simple way to join two pieces of flat metal. Simply put, a rivet is a metal rod inserted into a same-sized hole that penetrates both pieces to be joined. The rod protrudes a little on each end (the protrusion should, ideally, be equal to half the diameter of the rivet), then the protruding rod ends are hammered into mushrooms, locking the assembly together.
 If you do not have copper or brass rivets on hand, you can use either brass rod or brass machine screws from the hardware store. If you use machine screws, make sure to file the threads off or the rivet will bind the brace pieces too tightly for them to fold easily. Cut the braces to the proper length with a hacksaw.
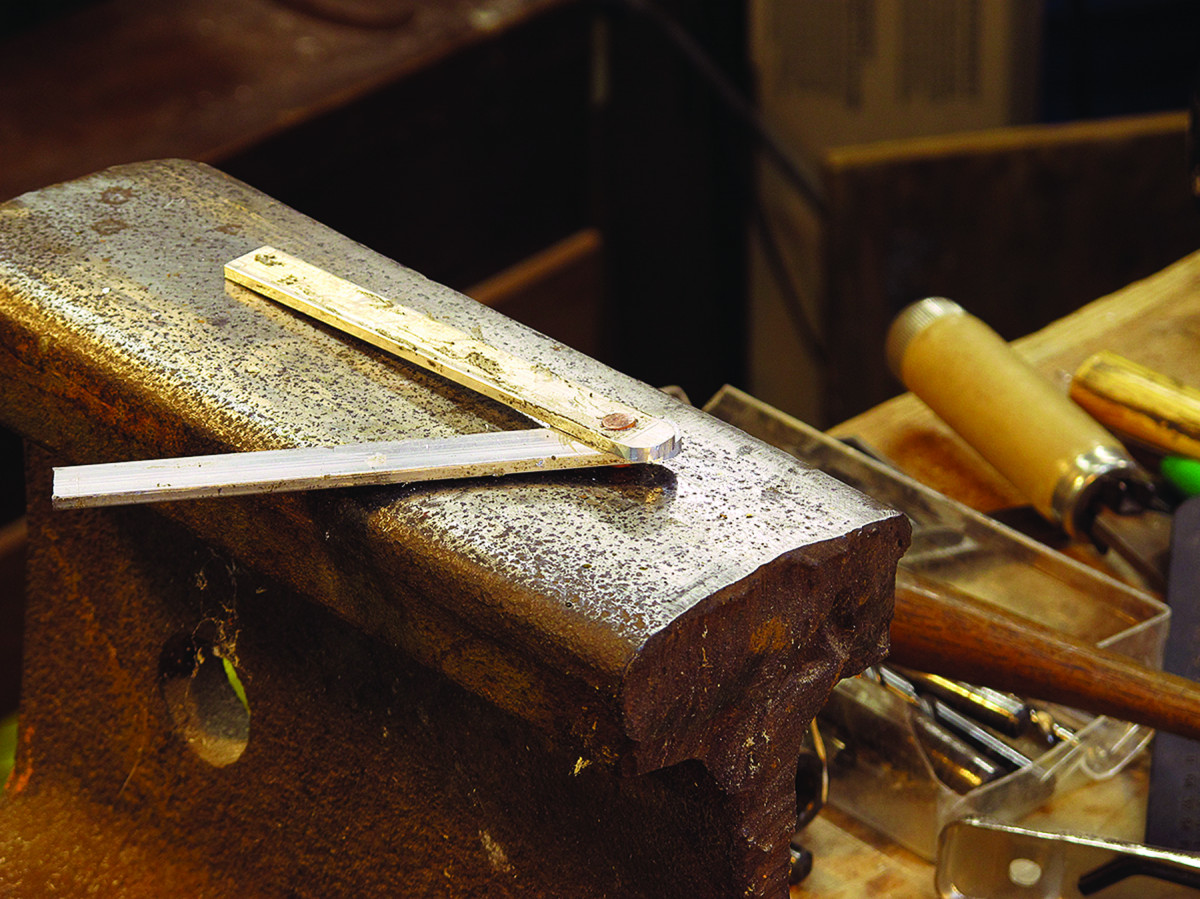 Before hammering the rivets, you should anneal them. Simply put them on a hot plate, turn it as hot as it can get and wait for the pieces to completely discolor to blue-grey. Let them cool before you use them. Insert the rivet into the drilled hole and using a hammer on an anvil, pound each end into a mushroom and you are done.
— DW
Keep Your Distance
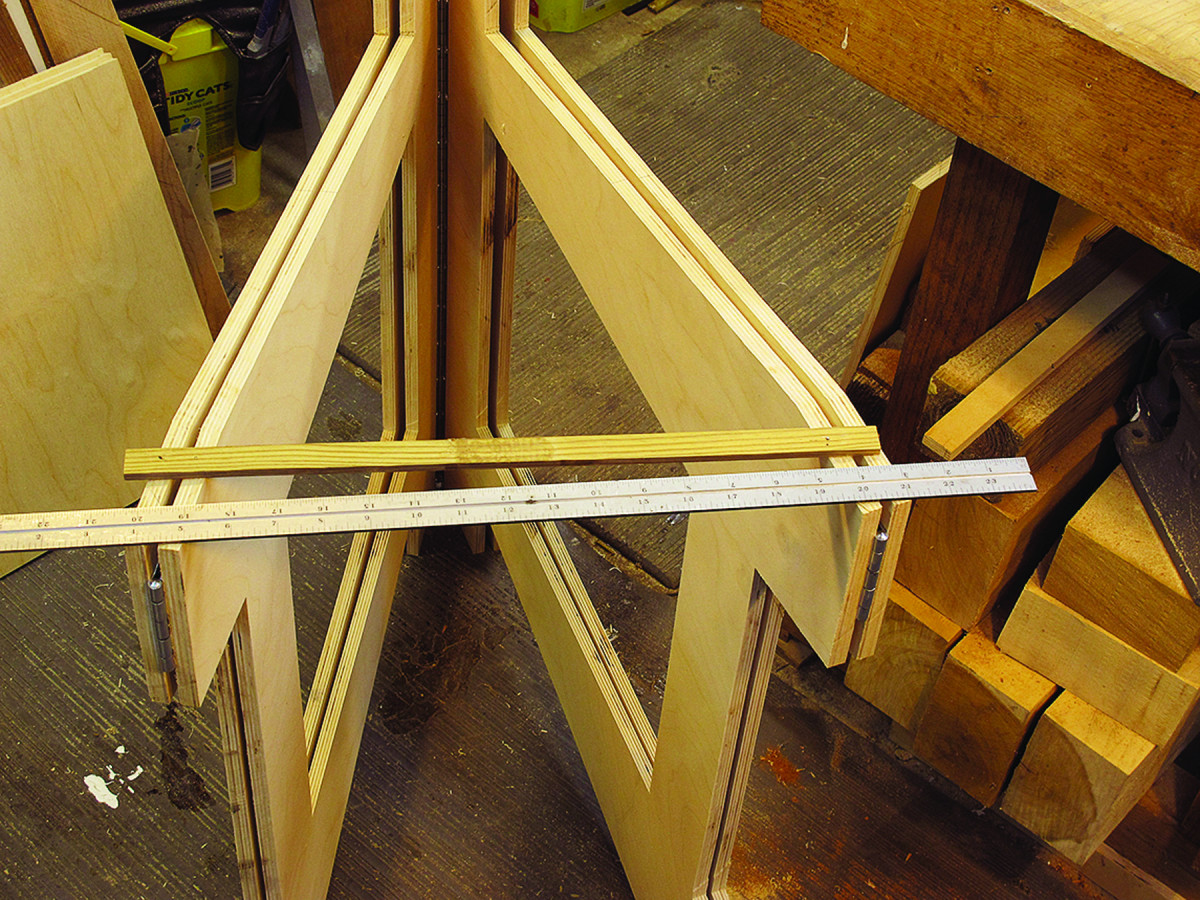
Stay put. After opening, the center section is splayed 15″ and a piece of scrap is tacked in place to maintain that distance.
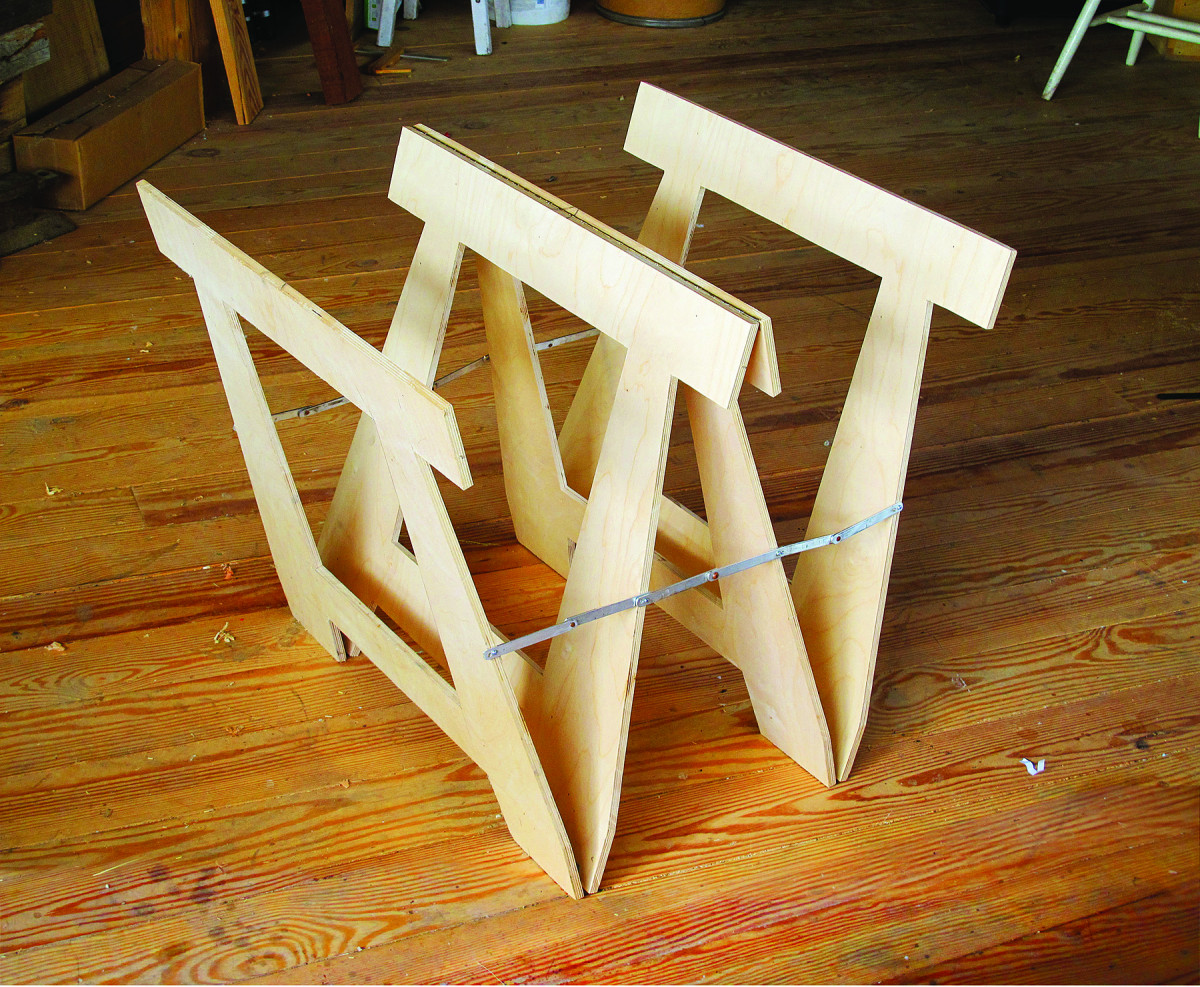
At this point you have a rough-assembled complete Butterfly. Fold it flat and on both front and rear edges, mark the halfway height; this is a critical measurement to fabricate and attach the folding braces.
Next, tack wooden strips to the center pair so the feet are splayed at your desired dimension. Flip the entire unit upside down on a flat surface, and splay the outside sections exactly the same as the feet. It is critical that you check the mock-up upside-down on a perfectly flat surface to make sure you have everything exactly configured.
Tried & true. The whole assembly is placed on a flat surface and the upper edges are aligned to a single plane. With the pieces tacked together, the sizes of the brace parts can be determined.
Using the previously marked half-height dimension, measure and cut the necessary metal bar stock for making the folding braces. I prefer cold riveting for making the hinge pins of the folding braces.
Elevation
Braces & Tops
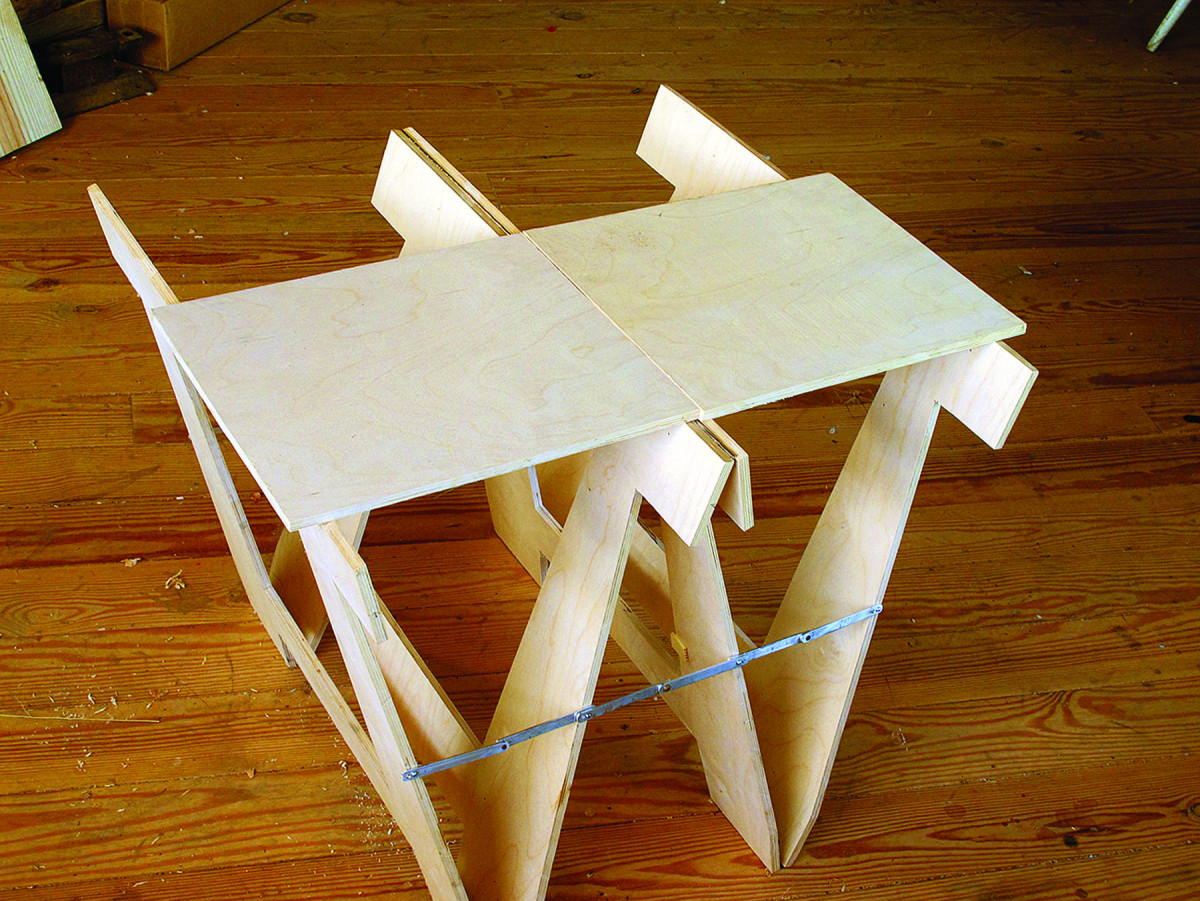
Repurposed. Use the cut-outs from the wings as a quick work surface when the need arises.
I take precise measurements with dividers to get the construction of the braces exact, mark the hole locations with a punch, then drill them out. The two holes that will be joined with a rivet are left unmodified; the other two holes (the ends) can be countersunk for flathead screws or left unchanged if you use roundhead screws.
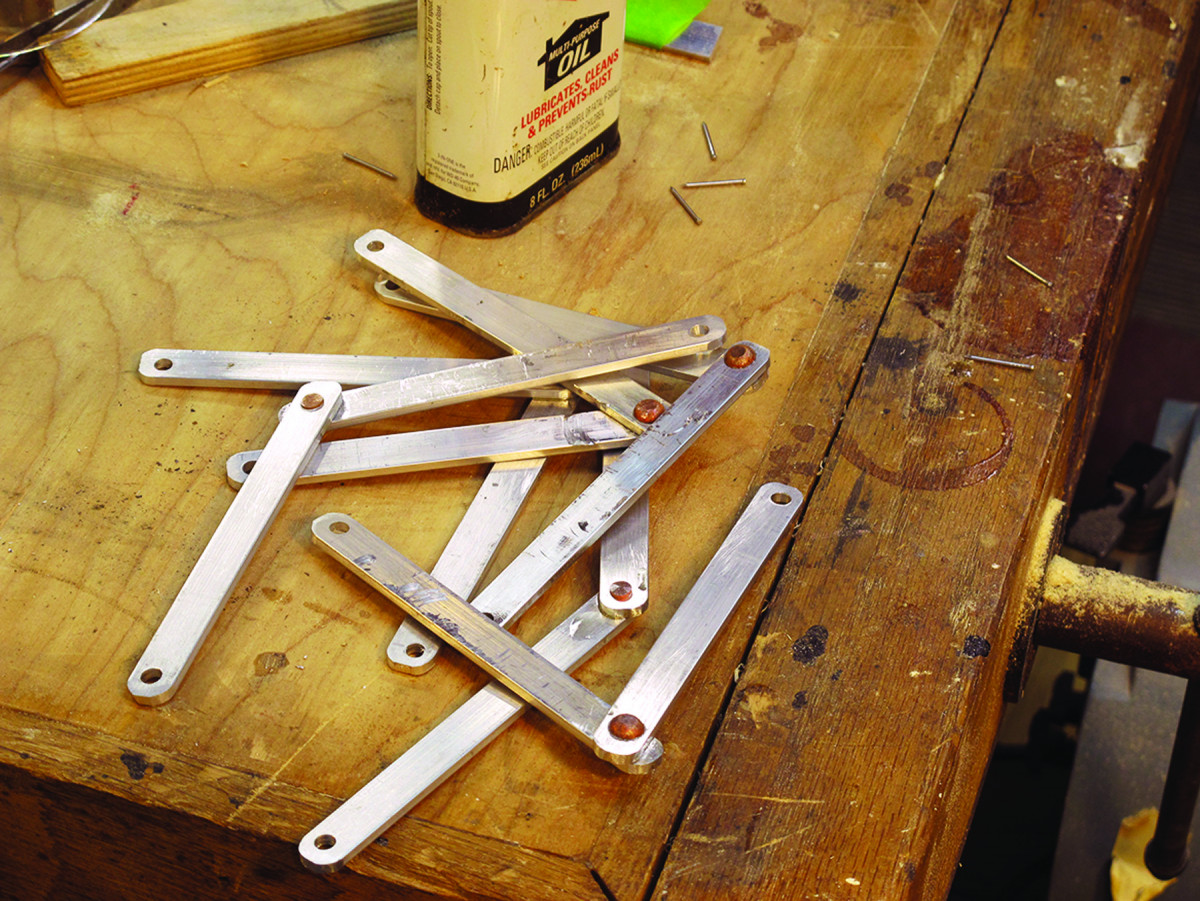
Riveted braces. The braces are made of 1⁄8″-thick x 1⁄2″-wide aluminum bar stock (or similar material) held together with rivets.
Once the braces are finished, you can simply screw them into the edges of the four folding units at the half-height mark. I like to screw the outermost brace ends first, then assemble the other end of the outer-unit braces and the end of the center-unit brace into the same hole, with the center brace on top of the outer brace.
You are now done building the basic Butterfly. The completed appliance is amazingly strong; this one holds several hundred pounds, as long as the weight is centered on the unit overall. I once loaded an early prototype with more than 1,000 pounds; it stood strong.
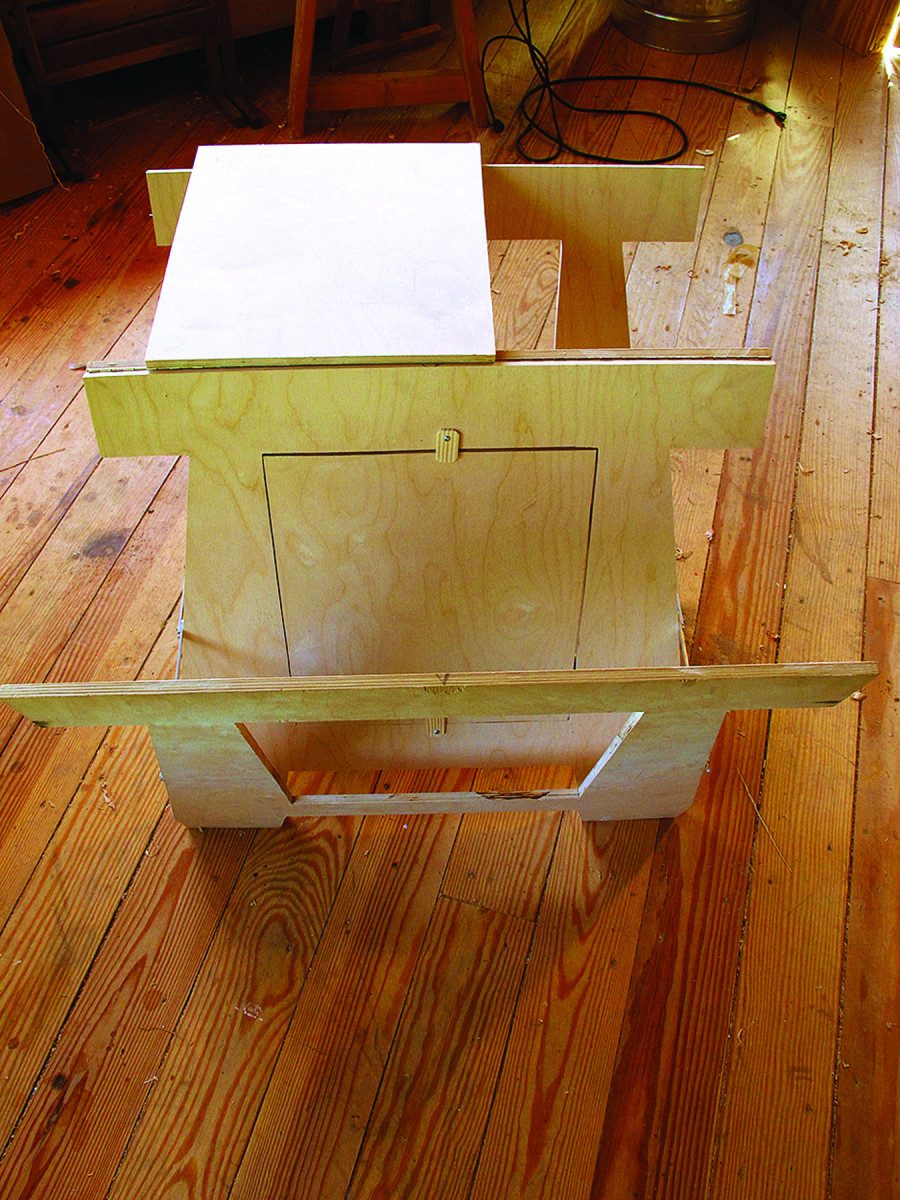
Keeping tabs. The top panels are stored in the open area of the legs, retained by tabs that pivot on screws.
But for this iteration, I wanted to include a semi-integral “tabletop” to place on the unfolded unit for a more solid working surface. My center cutouts worked great for this purpose, and they are easy to store. Using wooden tabs, the top panels are held in the voids of the four sections and, with the turn of the tabs, are easily removed to be used as needed.
Article: Read about Don’s shop-made tail vise in the April 2014 issue (#210).
Plan: Download a free SketchUp model of this project.
Here are some supplies and tools we find essential in our everyday work around the shop. We may receive a commission from sales referred by our links; however, we have carefully selected these products for their usefulness and quality.