


We may receive a commission when you use our affiliate links. However, this does not impact our recommendations.
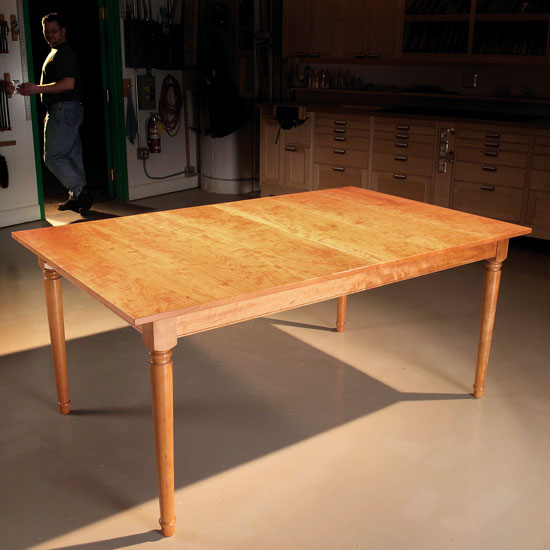
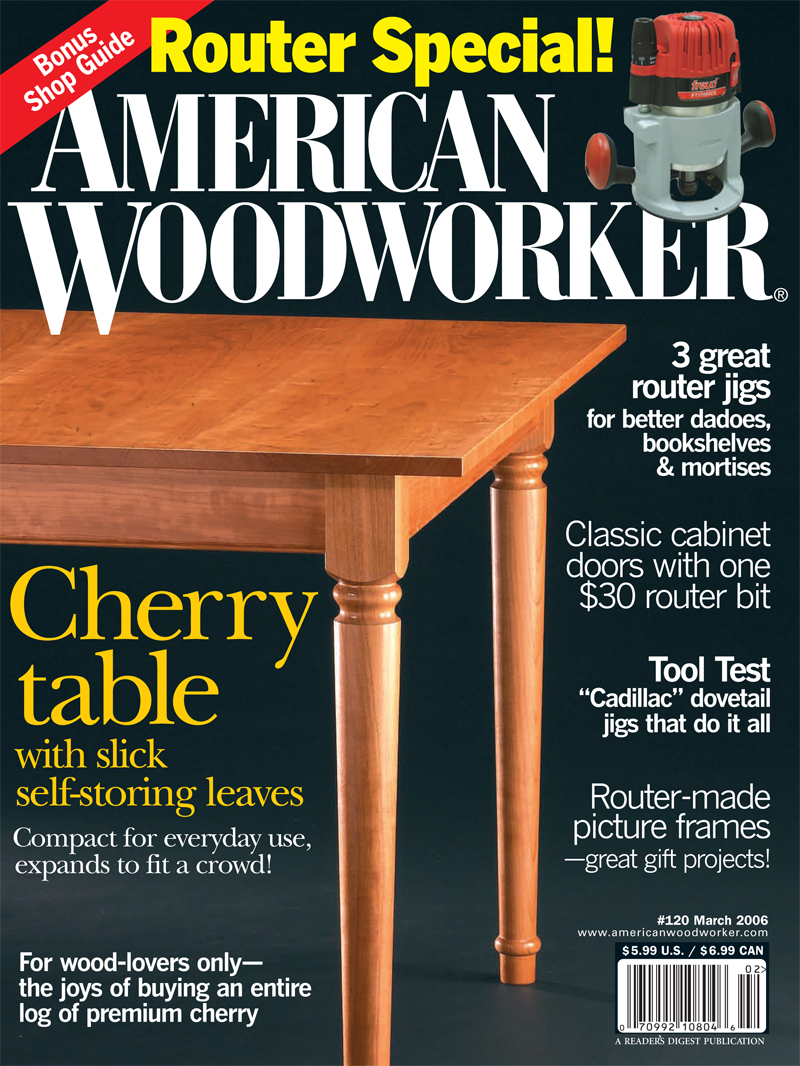
Extending Dining Table
Storing the leaves is a snap–they tuck away under the top.
By Joe Gohman
|
Have you ever seen wood glow? That’s what happened when I finished I had always wanted a turned-leg dining table, especially one that Adding two leaves, as I did, extends the table to seat eight people.
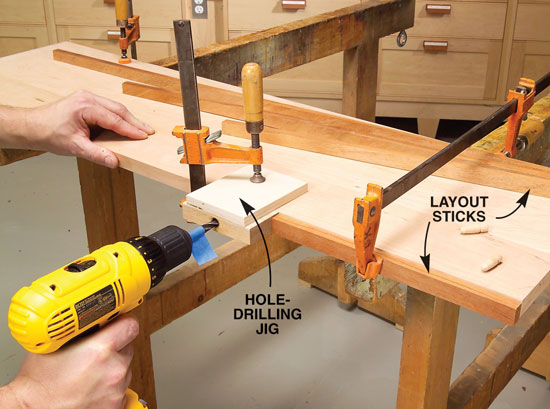
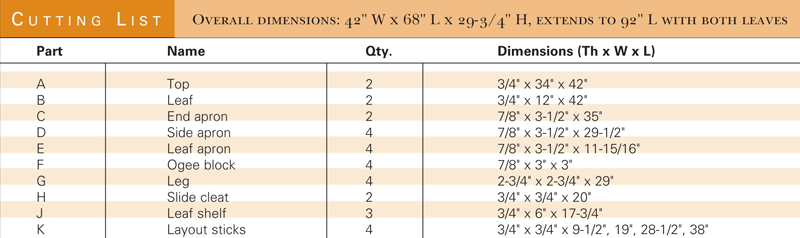
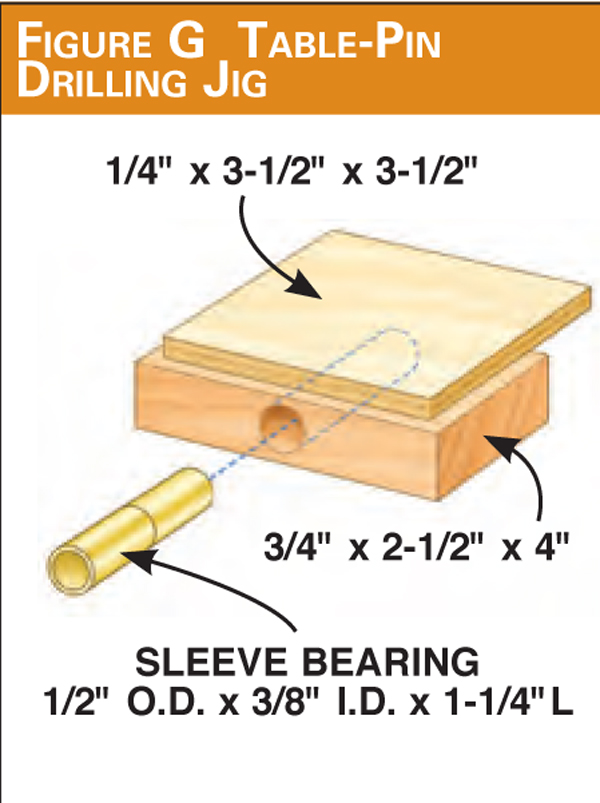
Make tops and leaves1. The tops may be made from pieces of any width. I selected wide matched boards (A, Fig. A, below). The top’s thickness is only 3/4 in., but I played it safe and used 5/4 (1-1/4 in. thick) lumber to allow for cup or twist in 12-in.-wide pieces. If you use 4- to 6-in.-wide top boards, 4/4 lumber is fine. I don’t have a monster 12-in. jointer, so I used my planer and a carrier board to flatten the top’s boards (Photo 1). The carrier board has a stop screwed to one end to prevent the planed wood from slipping backward. Every gap under the planed board has to be shimmed. I used tape to hold the shims in place. When the top surface became flat, I flipped the board over, removed the carrier and continued planing. I used narrower boards for the leaves (B) to lessen the chance that they may cup. The tops are restrained from cupping by the aprons screwed underneath, but the leaves’ aprons aren’t fastened the same way. 2. Glue the tops and leaves 1/4 in. wider and 1/4 in. longer than final size (Photo 2). Use biscuits or splines for alignment. Sand the tops and leaves to make the joints flush (Photo 3). 3. Trim the tops and leaves to size (Photo 4). I made two router templates, one for the tops and one for the leaves. These templates ensure that the tops and leaves are exactly the same length, so their ends line up when the table is assembled. Make the templates the final size of a top and a leaf. To avoid router blowout, cut the end grain first, then the long grain. 4. Build the jig for drilling alignment-pin holes in the tops and leaves (Fig. G, below). Position the jig for the first hole by butting its block to the end of the workpiece. For registering subsequent holes, use a series of layout sticks (K) (Photo 5; Cutting List, below). Register the sticks from the same ends of the tops and leaves. Drill the holes using a brad-point drill, and tap alignment pins into the holes.
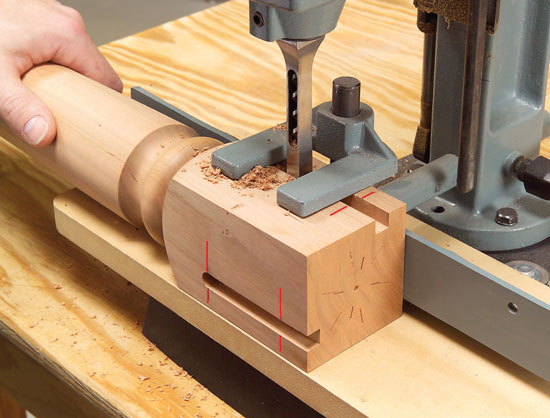
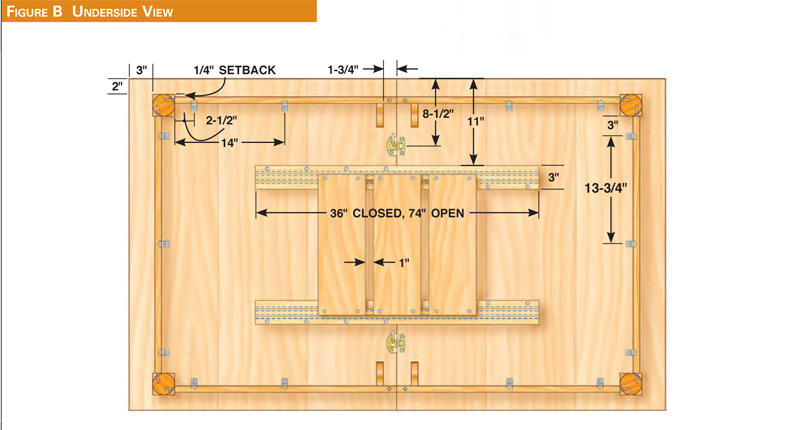
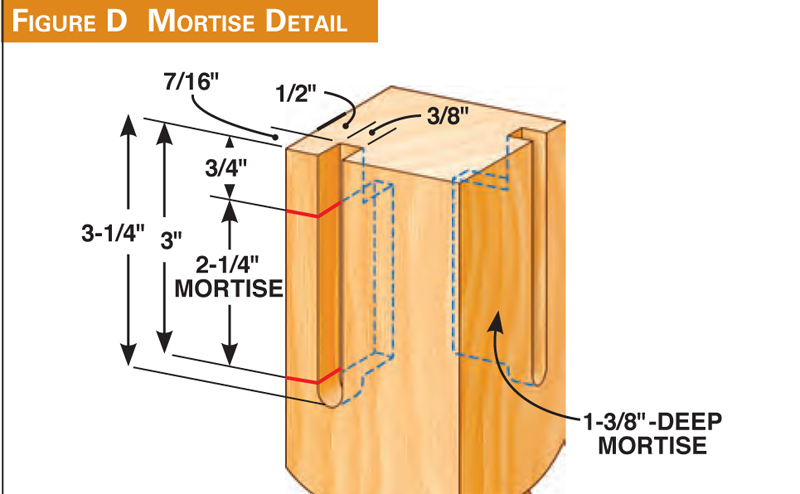
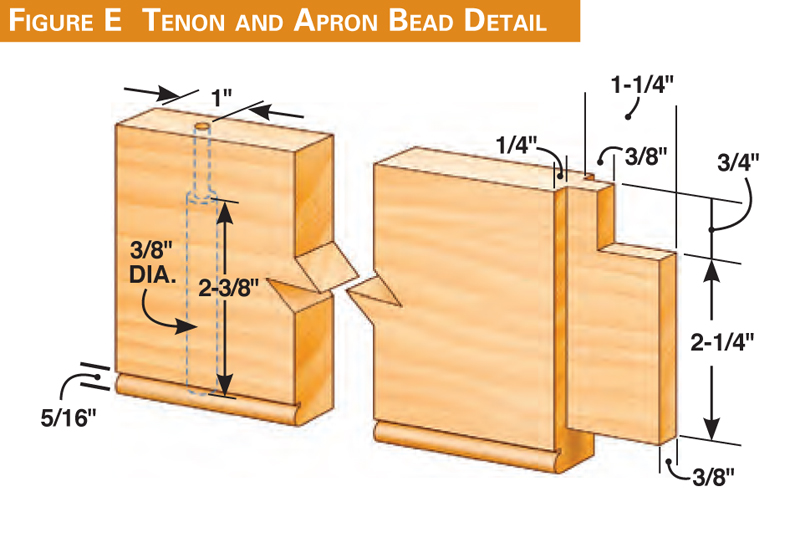
Make the base5. Rout shallow grooves in the legs on the router table (Photo 6, Fig. D, below). This starts the mortises. Finish the mortises using a mortising machine (Photo 7). 6. Mill the apron pieces (C, D, E). I used straight-grained boards for these pieces to complement the table’s straight lines. Make one or two extra pieces for testing the tenoning setup. Note that the leaf aprons are 1/16 in. shorter than a leaf’s width. If the leaf shrinks in width, the apron won’t protrude. A protruding apron would create a gap between the leaf and the tops. 7. Saw the tenon’s cheeks (Photo 8, Fig. E). The spacer’s thickness is 1/2 in., which equals the 3/8-in. width of the tenon plus the 1/8-in. width of a saw cut. Cut the tenon’s side shoulders using a miter gauge. Cut the haunch and bottom shoulder by hand or using a bandsaw. 8. Cut grooves in the rails for tabletop fasteners using a plate joiner or router (Fig. B, below). Drill screw holes in the end of the side aprons (D). 9. Sand the aprons. Rout a bead on the aprons’ lower edges (Fig. E). Sand the beads. 10. Glue the legs and end aprons (C). Then add the side aprons (D).
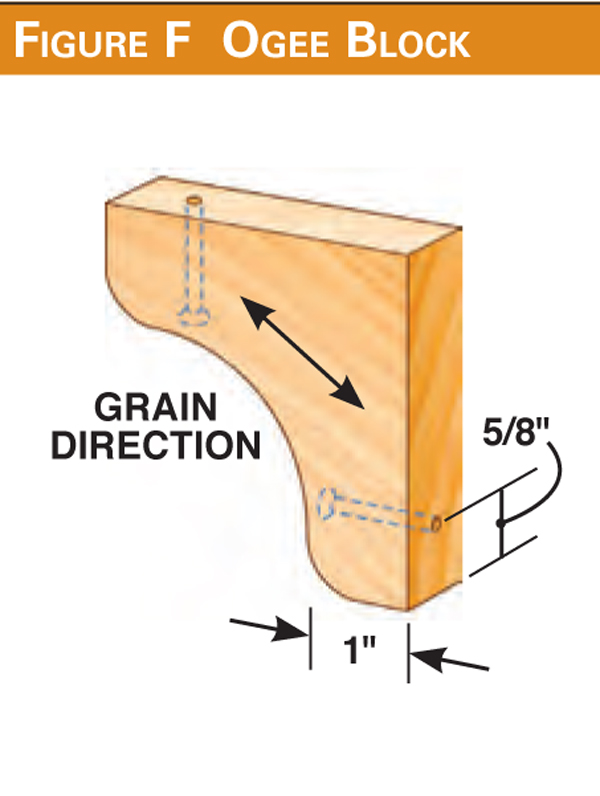
Assemble the table11. Fasten the extension slides to the tops (Fig. B). Make sure the slides are square to the tops and parallel to each other. 12. Make the slide cleats (H) and leaf shelves (K). Fasten the cleats, centered on the slides’ middle sections. Fasten the shelves to the cleats. 13. Screw two table locks to the tops. Fasten them together to draw the tops tight. 14. Attach the leg and apron assemblies to the tops. Make sure the apron’s ends line up with the joint between the tops and with each other. Install the screws at the aprons’ ends. These screws lock the aprons in place, while tabletop fasteners allow the tops to expand and contract. Install the tabletop fasteners. 15. Make the ogee blocks (F, Fig. F) and screw them in place. These blocks keep the rails aligned and square to the tops.
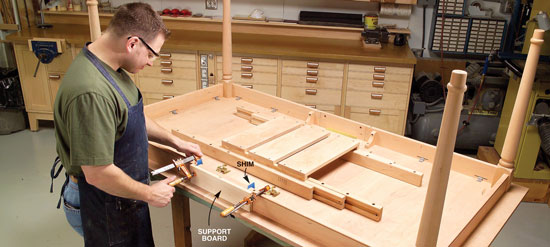
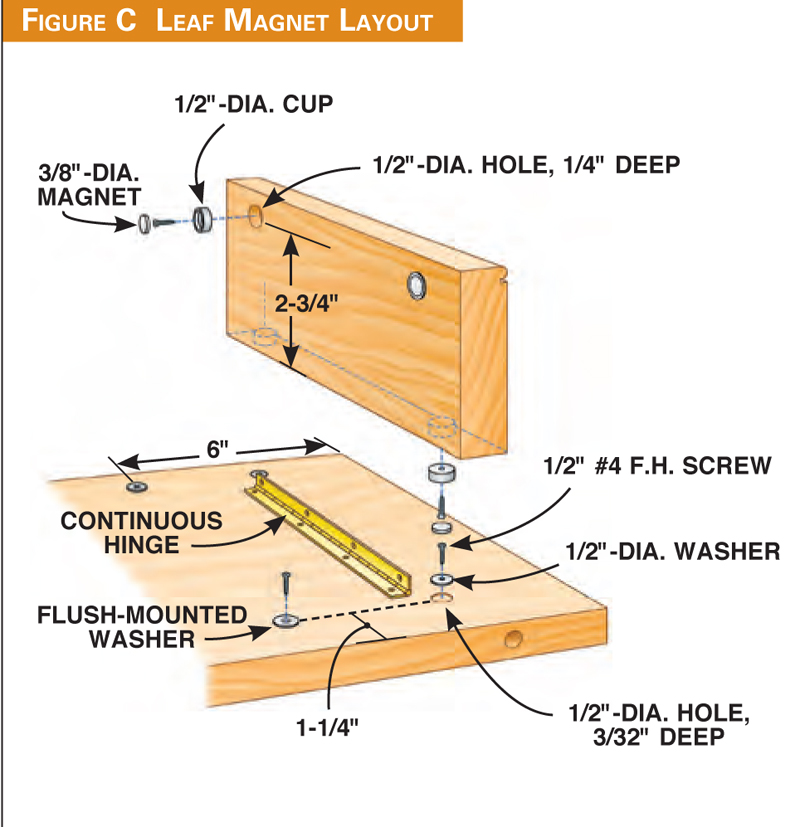
Assemble the leaves16. Drill holes for the magnet cups and washers in the leaves and aprons (Fig. C). Mount the hinges to the aprons. 17. To install the aprons on the leaves, open the table upside down and place one leaf between the tops (Photo 9). Align the leaf’s aprons to the tabletop aprons. Insert shims at both ends of each leaf apron to make up the difference between the apron’s length and the leaf’s width. Fasten the apron’s hinges to the leaf. Add the table locks to the leaf. Repeat the process on the second leaf.
Final touches and finishing18. Remove the leaves and turn the table upright. Round the tops’ corners with coarse and then fine sandpaper. Slightly round the edges of the tops and leaves with sandpaper, too, as well as the aprons’ bottom edges. As you sit at the table, every edge you touch should be soft and smooth. 19. Break down the table into smaller pieces for finishing. Remove the rail-and-leg assemblies and the extension slides. To equalize the absorbency of my figured wood, I applied SealCoat shellac to all the table parts (see Sources, below). SealCoat is essentially clear, dewaxed shellac in a 2-lb. cut. Apply two coats of varnish. To protect the finish, put a large piece of felt between the leaves when you store them, face to face, inside the table.
Folding leaf apronsOur family rarely uses a tablecloth when our table is fully opened, so I added aprons to the leaves. Leaf aprons make the table look uniform. If you routinely use a tablecloth, however, you don’t need them. I hinged the aprons so the leaves would fit under the table’s top. Two pairs of rare earth magnets hold each apron in place. One set of magnets (see photo, right) holds the apron flat for storage. Another set, behind the hinge, holds the apron perpendicular when in use. |
Click any image to view a larger version.
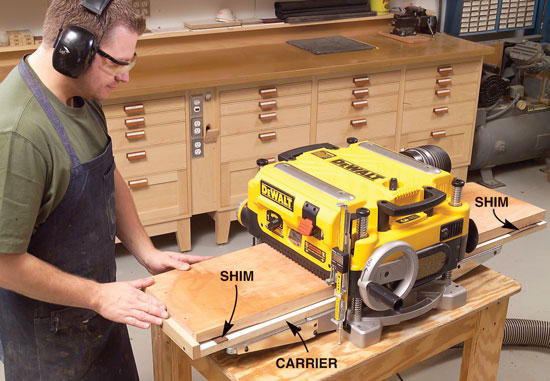
1. I used wide, roughsawn boards for my tabletop and flattened them with my planer. Place each board on a MDF or melamine carrier and stick shims under the board’s high spots. This prevents the board from rocking or bending as it’s planed.
2. The table’s top is made in two pieces; the grain runs the short way. Each piece consists of three or more boards. Use biscuits and glue one joint at a time to make the joints as even as possible. Keep the top flat with cauls. Make the tops slightly oversize.
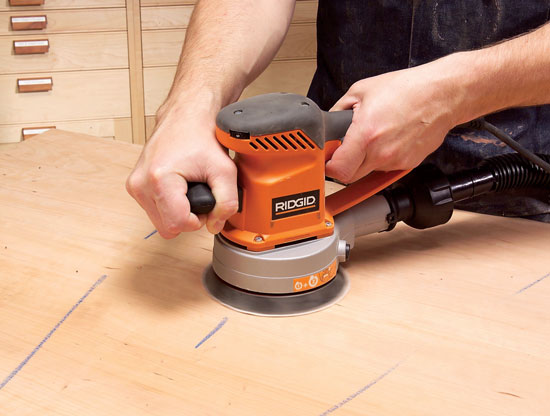
3. Sand the top’s glue joints until the pieces are flush. My favorite tool for this job is a 6-in. random-orbit sander. It removes material much faster and more evenly than a standard 5-in. machine can.
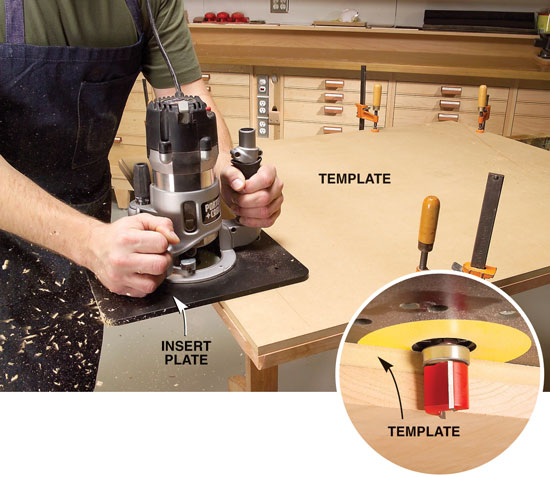
4. Trim both tops to final size with a large template and a pattern bit (see inset photo). This ensures that the tops are exactly the same width and length. I left my router table’s insert plate attached to the router to help steady it.
5. Drill holes in the leaves for alignment pins. These holes must be spaced exactly the same on each leaf and both tops. I used a shop-made jig and a series of layout sticks to position each hole.
6. Rout a groove in the legs to start the mortises. This step is not strictly necessary, but it improves the joint’s accuracy. The groove’s purpose is to guide a mortising machine’s chisel.
7. Cut the mortises using a hollow-chisel mortiser. The routed grooves automatically align the chisel, so you won’t get holes that are slightly offset in an irregular line. This method produces deep mortises with very straight, even sides.
8. Saw tenons on the aprons. There are many ways to do this, but I like to use a tenoning jig. It cuts the tenon’s cheeks with only one setup. The spacer goes inside the apron for the first cut, outside for the second.
9. Install aprons on the leaves after the whole table is assembled. Clamp a support board to the table to ensure that the leaf apron is flush with the table aprons. Then fasten the apron to the leaf. |


Folding Leaf ApronsOur family rarely uses a tablecloth when our table is fully opened, so I added aprons to the leaves. Leaf aprons make the table look uniform. If you routinely use a tablecloth, however, you don’t need them. I hinged the aprons so the leaves would fit under the table’s top. Two pairs of rare earth magnets hold each apron in place. One set of magnets (see photo, right) holds the apron flat for storage. Another set, behind the hinge, holds the apron perpendicular when in use. |
|

|
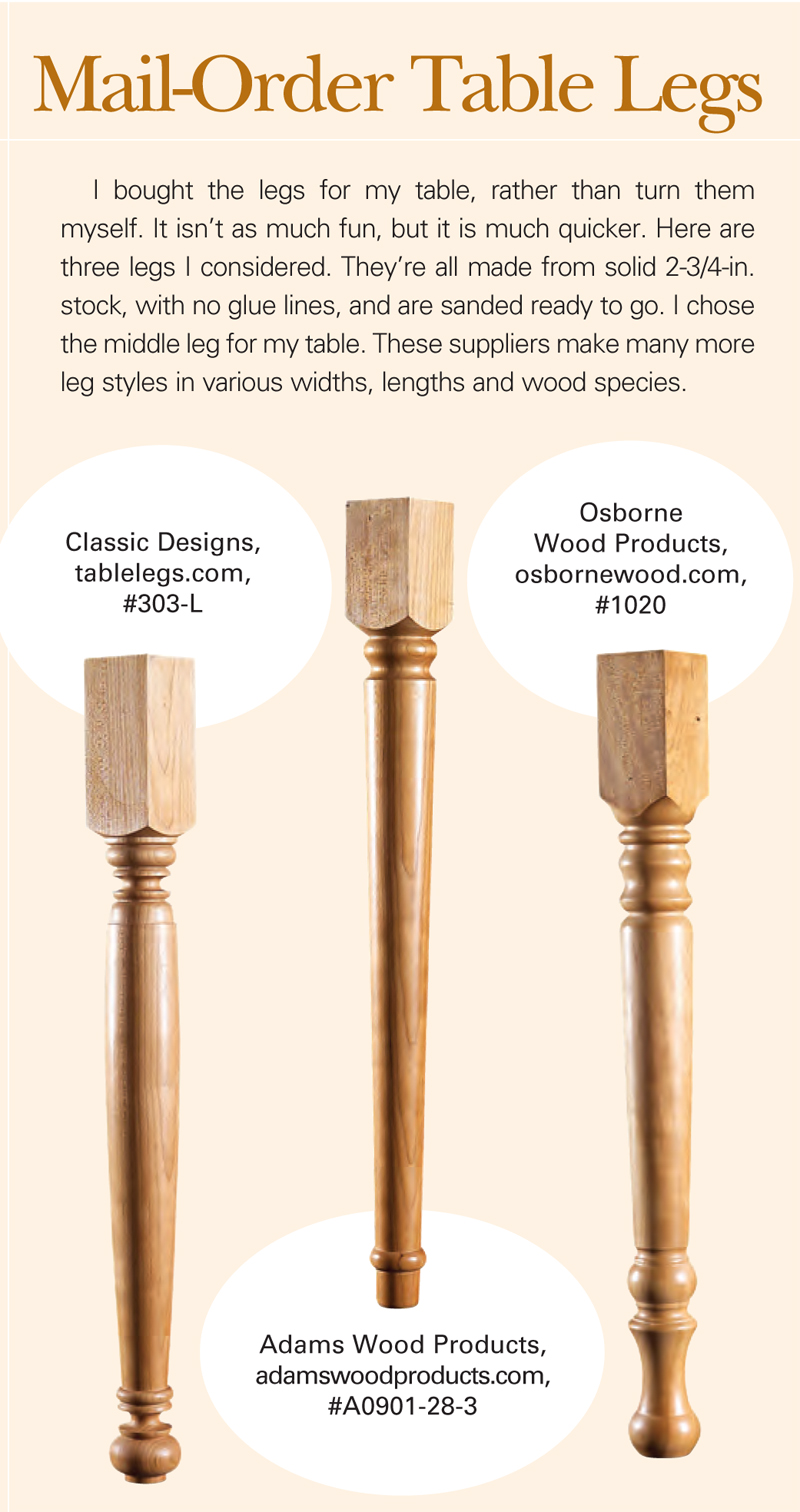
I bought the legs for my table, rather than turn them myself. It isn’t as much fun, but it is much quicker. Here are three legs I considered. They’re all made from solid 2-3/4-in. stock, with no glue lines, and are sanded ready to go. I chose the middle leg for my table. These suppliers make many more leg styles in various widths, lengths and wood species. Cutting List
Project Requirements
Fig. A: Exploded View
Fig. B: Underside View
Fig. C: Leaf Magnet Layout
Fig. D: Mortise Detail
Fig. E: Tenon and Apron Bead Detail
Fig. F: Ogee Block
Fig. G: Table-Pin Drilling Jig
This story originally appeared in American Woodworker March 2006, issue #120.
|
|


Here are some supplies and tools we find essential in our everyday work around the shop. We may receive a commission from sales referred by our links; however, we have carefully selected these products for their usefulness and quality.


