|
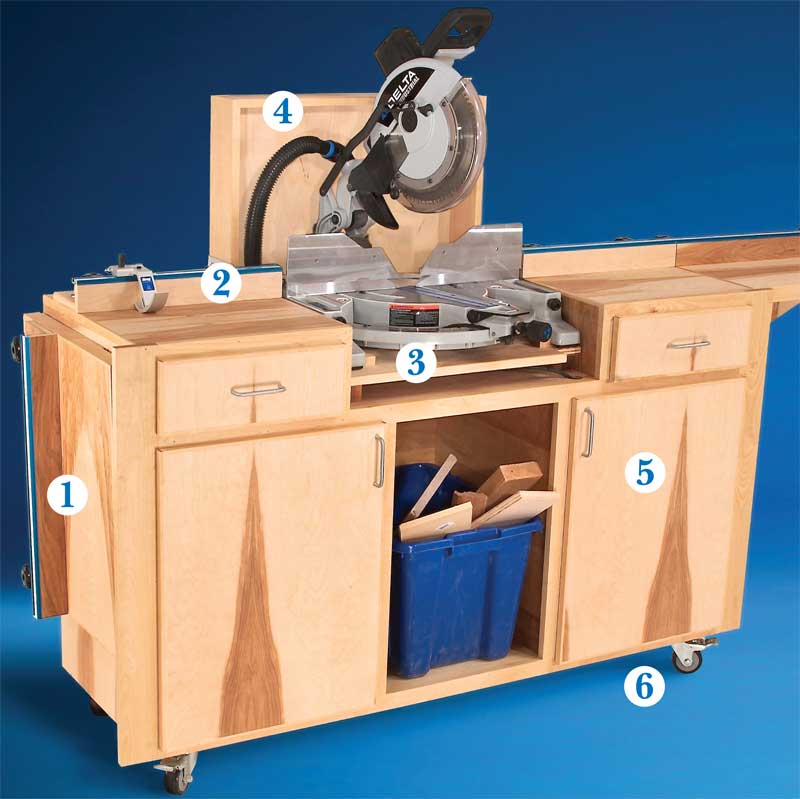
This stand has everything you could want. With the
wings up, it can handle 8-ft.-long boards on either
side. With wings down, the stand is only 5-1/2 ft.
long. It’s on casters, so you can move it anywhere. When
the casters are locked, the stand won’t budge.
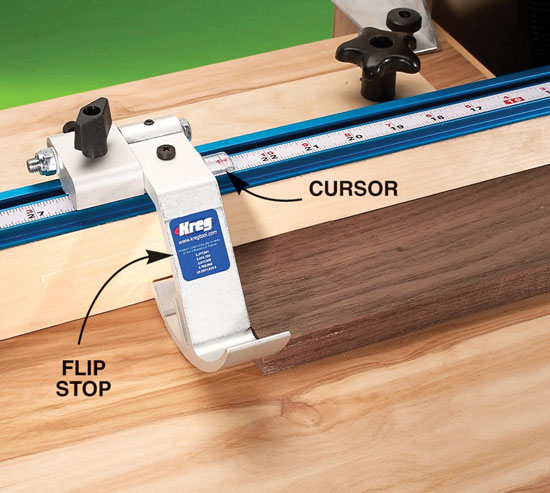
You can make exact, repeatable cuts with a cursor
mounted on a flip stop. For jobs outside the shop, just
pick up the saw and go. It’s mounted to a notched plywood
platform that automatically aligns with the fence.
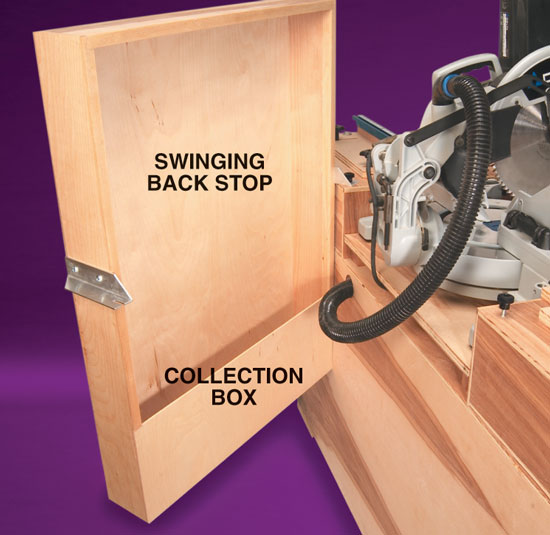
Most sawdust goes through a hose connected to an onboard
vacuum. Dust missed by the vacuum bounces
against a back stop and drops into a collection box. The
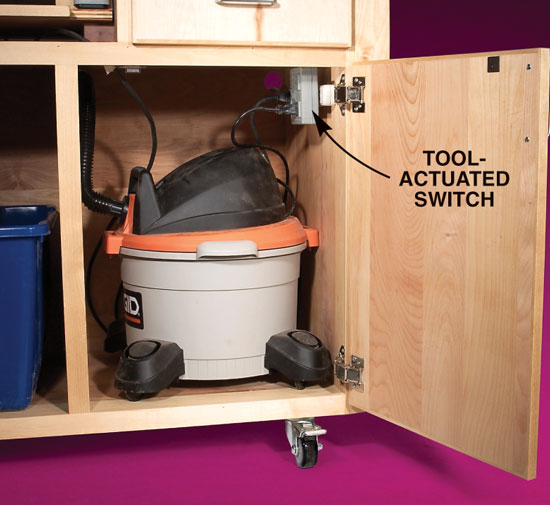
vacuum is plugged into a tool-actuated switch. When you
turn the saw on, the vacuum comes on, too. When you’re
done sawing, the vacuum automatically stops.
Custom-fit your saw
As designed, this stand should be large enough for
most compound miter saws. The Cutting List’s dimensions
accommodate my saw, a 12-in. Delta 36-412 which
measures 25 in. wide and 17-in. deep with a 4-3/8-in.-
high saw table.
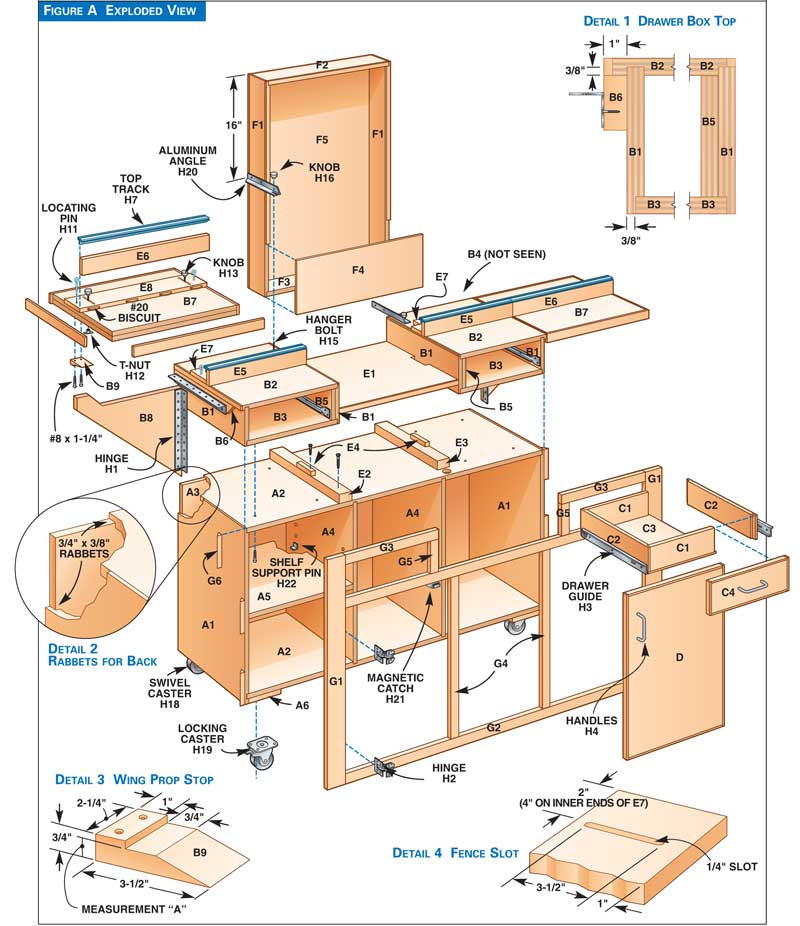
Altering this stand to fit your saw is easy. The saw sits in
a well that’s formed by two drawer boxes sitting on top of
a base cabinet (Fig. A, below). Custom-fitting simply
means changing the well’s width so there’s a minimal gap
between your saw’s table and each box. To change the
well’s width, make the boxes narrower or wider.
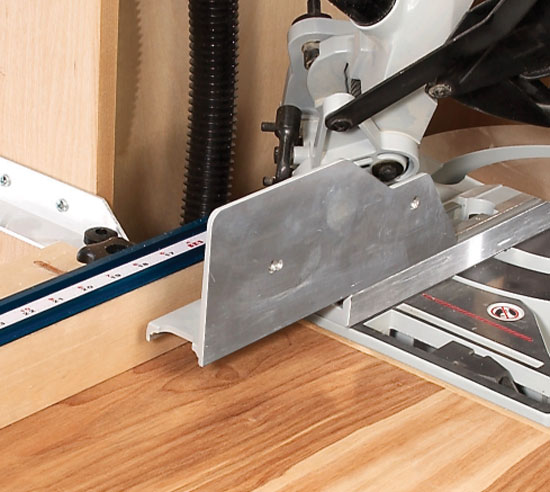
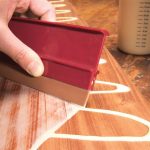
You shouldn’t have to change the boxes’ height. Two
supports under the saw platform raise the saw level with the
boxes’ tops (see photo, at right). Change the thickness of
these supports to accommodate your saw’s table height.
The dust hood’s depth may have to be altered to fit
your saw. I made the hood as shallow as possible so the
stand takes less floor space. When I need more depth for
a 45-degree compound miter cut, I remove the hood.
If you have a sliding compound miter saw, you’ll probably
have to increase the depth of the base cabinet, drawer
boxes and dust hood.
A less-expensive version
I went all-out on my stand, adding my favorite bells and
whistles. The cost is about $500 without the saw or vacuum.
That’s a lot of dough, but you can slash the cost to
$210 by eliminating the commercial fence parts, using
less expensive plywood with no edge-banding, dropping
the drawers, doors and dust hood and doing without the
tool-actuated switch.
Make the boxes, cabinet, and wings
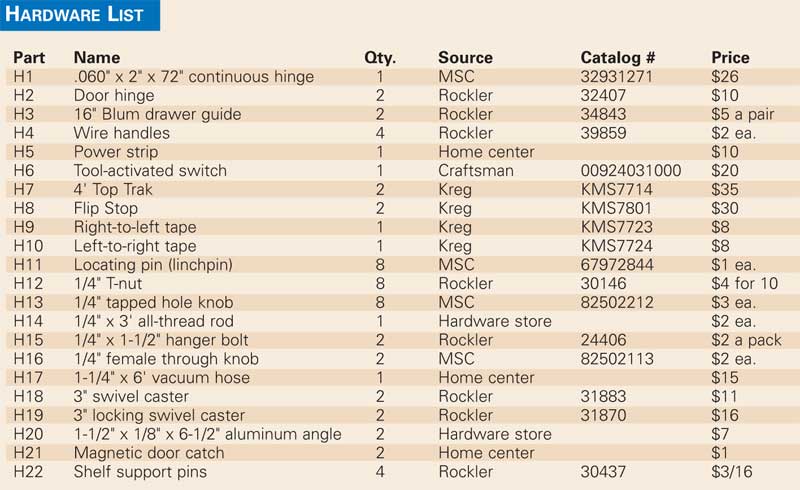
1. Measure your saw to determine the size of the stand’s
well. If needed, adjust the sizes of the drawer boxes and cabinet
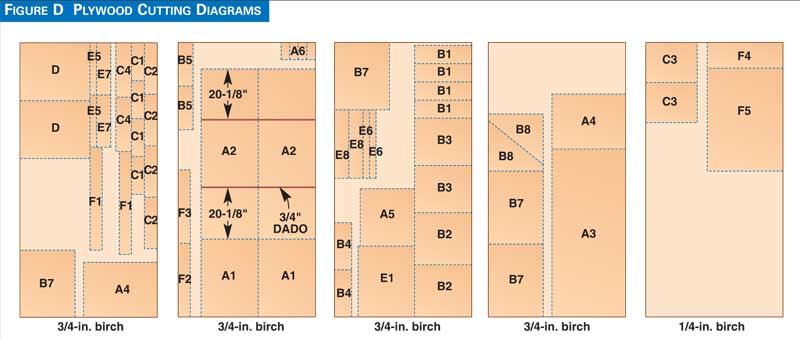
in the Cutting List (below). Cut all the plywood
pieces to size (Fig. D, below).
2. Cut 1/4-in. strips of solid wood to edge-band the sides
of the boxes’ tops (B2). Glue on the banding.
3. Cut dados and rabbets in the parts for the boxes and
cabinet (A1, A2, B1, B2, B3, B4) (Detail 2, below). Note
that a drawer box’s top (B2) overhangs its sides (B1, Detail 1, below). This overhang provides clearance for the wing’s
prop (B8) to fold against the cabinet’s side. Assemble the
boxes and cabinet. Glue and screw the spacers (B5) to the
boxes. The spacers bring the inside of the drawer box flush
to the face frame, which will be attached later.
4. Glue the double-thickness wings (B7). Lay the parts on
your tablesaw’s top and weight them with cinder blocks to
apply clamping pressure. Trim the wings to final size.
5. Cut strips to band the wings, doors (D), drawer faces
(C4), saw platform (E1), shelf (A5), dust-hood sides (F1)
and dust-hood top (F2). Glue on the banding.
6. Cut out the wing props (B8, Fig. B, below). Glue material
to make the hinge spacers (B6). Cut them to final size
and glue and screw them to the boxes.
7. Cut the continuous hinge into four 14-in. lengths.
Place the boxes upside down on a flat surface. Attach the
wings to the hinge spacers flush with the back of the boxes.
8. Screw the upper boxes to the cabinet.
9. Drill holes in the back of the vacuum-cleaner storage
area for the vacuum hose and the power strip cord. Drill a
hole in the well for the saw’s power cord.
10. Attach the casters to blocks (A6). Screw and glue the
blocks to the cabinet.
Make the face frame
11. Cut solid-wood strips (G1 through G5) for the face
frame. Assemble the face frame with pocket screws, dowels
or biscuits.
12. Glue the face frame to the box and cabinet assembly.
Install the glue blocks (G6) behind the wing covers (G1).
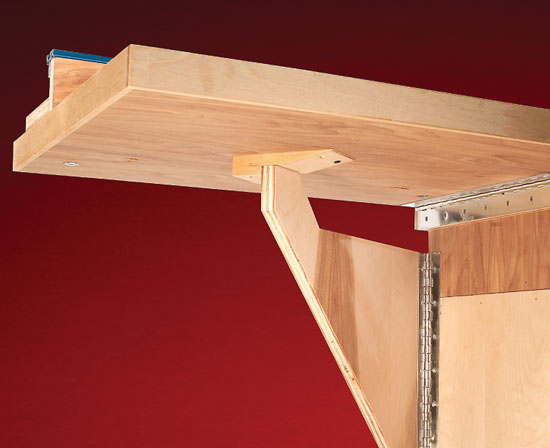
Add the wing props
13. Clamp the wings so they’re level with the boxes’ tops.
Attach the props to the cabinet so there is about 1/2 in. of
clearance between the prop’s top and the wing’s bottom.
14. Measure the gap between the prop and the wing
(Measurement “A,” Detail 3, below). Make a ramp-shaped
prop stop (B9) to fit each side. Attach the stops.
Make the dust hood and drawers
15. Cut rabbets on the drawer sides (C2) and dust-hood
sides (F1). Assemble the dust hood.
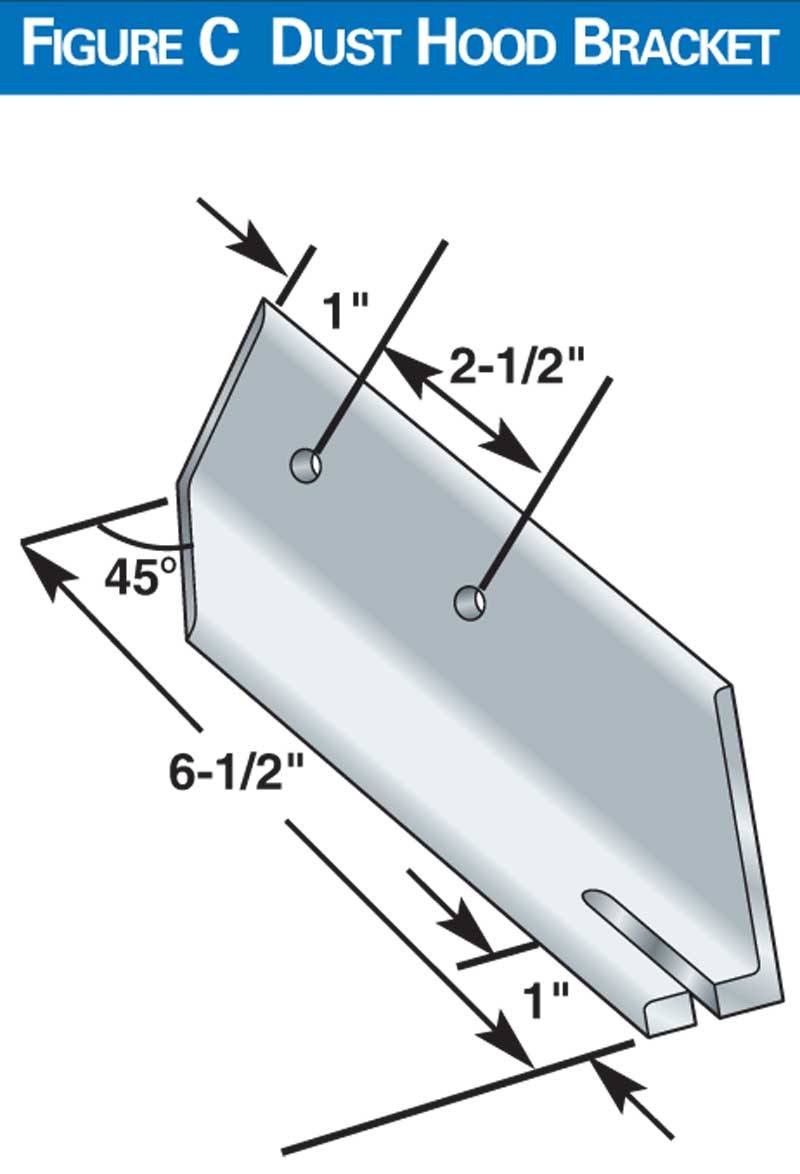
16. Cut two brackets (H20) from aluminum angle stock.
Drill holes in both brackets. Use a hacksaw to cut a notch
in the left-hand bracket (Fig. C, below). This notch allows
the hood to rotate outwardly for cleaning. Attach the brackets
to the dust hood. Place the dust hood in position and
mark holes for the hanger bolts on the drawer boxes’ tops.
Drill holes and insert hanger bolts (H15).
17. Assemble the drawers. Attach the drawer guides to
the drawers and boxes (H3).
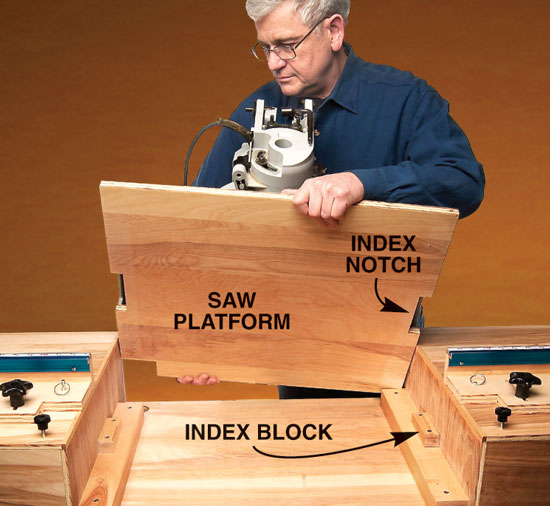
Mount the platform and saw
18. Use a dado set to cut notches in the platform’s sides
for the index blocks (E4) and power cord.
19. Place the platform on top of the cabinet. (Note: The
platform is 1/4 in. shorter than the space between the drawer
boxes. This space is necessary for easy removal of the
platform and saw.) Place your miter saw on the platform.
Measure the distance between the saw’s table and the box’s
top. Plane or rip the two height spacers (E2, E3) so each
one’s thickness equals this distance. Place the spacers under
the saw platform. Adjust each spacer’s thickness by removing
more wood or adding paper shims until the saw’s table
is exactly level with the boxes. Remove the saw and attach
the spacers to the cabinet. Replace the saw platform.
20. Center the platform in the well. Cut index blocks
(E4) to tightly fit the platform’s notches. Bevel the block’s
tops to make it easier to install the platform. Screw the
blocks to the spacers with the platform in place. Place the
saw square on the platform and attach it.
Make and install the fences
21. Cut slots on the box and wing fence bases (E7, E8) by
drilling 1/4-in. holes at the end of each slot and routing
between the holes (Detail 4, below). Cut notches on the
box fence bases (E7) to accommodate the dust hood’s
brackets. Cut #20 biscuit slots in the bases (E7, E8) and the
fence faces (E5, E6) and glue the fences together. Make
sure each face is square to its base.
22. Cut the Kreg Top Trak to the length of each fence.
Drill holes in the back of the Top Trak and attach the pieces
to the top of the fence faces with the screws provided.
23. Clamp a 3/4-in.-thick sacrificial board to the saw’s
fence and place a 3-ft. straightedge against it. Slide the box
fence against the straightedge. Drill 1/4-in.-dia. holes into
the top of the box at the slots’ rear. Remove the fence and
redrill the holes to 5/16 in. dia. Install T-nuts in the holes.
24. Cut two pieces from a 1/4-in.-20 all-thread rod. They
should be long enough to leave 1-1/2-in. of thread sticking
out of the knobs (H13). Glue the rods into the knobs with
epoxy or other adhesive. Reposition the box fence against
the straightedge and fasten it with the knobs.
25. Raise the wings and support them with the props.
Align the wing and box fences with a straightedge. Drill
holes into the wing at the rear of the slots and repeat the
installation procedure for the T-nuts (see Step 23). Cut two
new all-thread pieces so 2-1/4 in. sticks out of the knobs.
Glue the rods into the knobs. Clamp the fence in place
using the knobs. Repeat for the other wing.
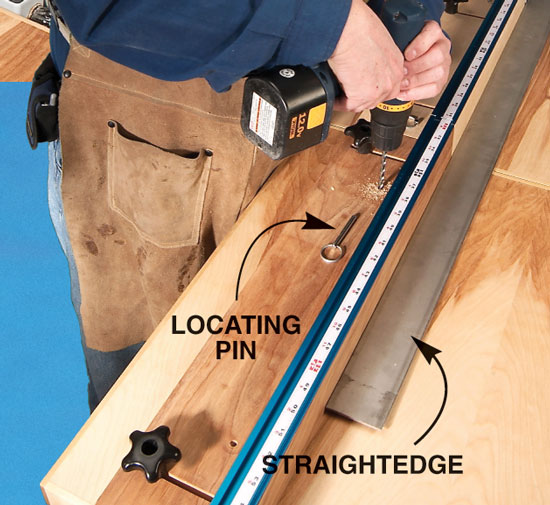
26. With all the fences clamped even with the sacrificial
board, drill 1/4-in. holes for locating pins (H11), which
index the fences (see “Multi-Position Fences,” at right).
Drill the holes all the way through the fence and at least
1 in. into the boxes and wings.
27. Remove the sacrificial board and reposition all the
wooden fences so they’re even with the saw’s fence. Use the
knobs to clamp the fences in place. Drill through the locating pin
holes into the boxes and wings. Install the locating pins.
Add the doors
28. The doors are full-overlay
style. Attach the door
hinges to the cabinet and
doors. Install the door pulls
and magnetic catches.
29. Attach the drawer faces
to the drawer boxes.
30. Sand and finish.
|