We may receive a commission when you use our affiliate links. However, this does not impact our recommendations.
Restore a Chest of Drawers
Make broken-down drawers fit and work like new
By Tim Johnson
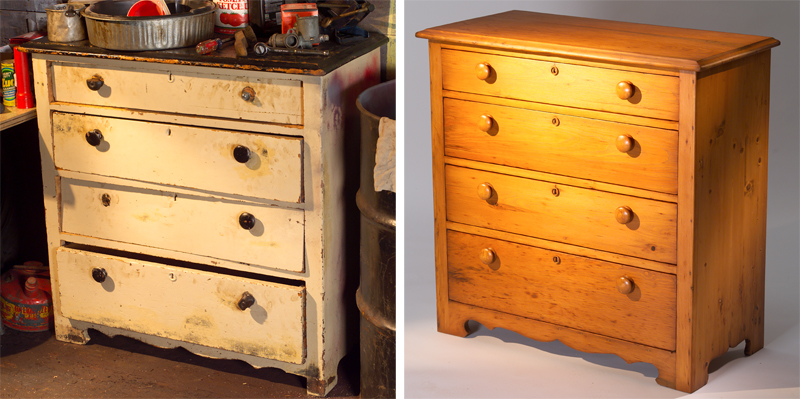
At first glance, the broken-down chest of drawers looks like a lost cause—a wreck even by garage-sale standards. After all, it’s been sitting out in Uncle Ed’s garage forever, and the drawers haven’t budged for years.
Surprise! A closer look indicates that this chest is a perfect candidate for rescue. Its solid wood case is sound.The joints are still tight and there’s no sign of dry rot. The top isn’t badly warped or split. It needs cosmetic repairs, but more than anything, the drawers need rebuilding,and you can do that.
Wooden Drawers Wear Out
Lots of great old dressers are available at reduced prices, just because the drawers don’t work. Knowing how to make repairs makes it possible for you to get a fantastic piece at a bargain price.
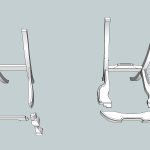
Although they may look quite a bit different than the dresser shown here,most old chests of drawers share similar simple construction on the inside. All of the parts (drawer sides, runners, guides and stops) are wood.
On 19th-century American pieces, these hidden parts are usually made from woods chosen for economy or workability, rather than durability. Even when the cases are made of hardwoods like walnut and cherry, the secondary woods are almost always pine, poplar or basswood—lightweight woods that wear down with use.
Rebuilding Drawers is Satisfying
Rebuilding four worn-out drawers is a time-consuming project. But making those cantankerous old drawers open and close effortlessly is highly satisfying. So is rescuing an heirloom-quality piece of furniture.
Drawer-rebuilding and problem-solving go hand in hand. Be prepared to do things a bit differently than we show, depending on how your chest of drawers is constructed. First, we’ll rebuild the inside of the chest (Photos 1 through 7). Next, we’ll repair the drawers (Photos 8 through 13). Finally,we’ll fit the repaired drawers into the rebuilt chest (Photos 14 through 20).
We’ll use a combination of hand and power tools to do the job, including a tablesaw and a Japanese-style pull saw, a plunge router, a hand plane and sharp chisels.A carpenter’s square, a try square and a sliding-bevel square are necessary for layout. Our replacement pieces are made from straight-grained hard maple, so they’ll last much longer than the original components.
First, Remove the Top and Back
Repairing the drawer runners and guides is much easier when the chest’s top and back are removed. Tops are usually fastened with screws through the chest’s top rails (front and back). You may also find screws pocket-holed through the sides. If nails have been added, you’ll have to pry the top loose after you’ve removed the screws. Once you’ve gotten the top off, pull the nails out through its bottom side. Don’t try to back them out through the top. Their heads are likely to blow out the surrounding wood.
Opening the back of the chest can be as easy as knocking off nailed-on boards. Be sure to mark them first, for reassembly.
If the back is glued to the sides, the joints may not break cleanly. Gently pry each joint apart, while soaking it with hot water to soften the glue. Take your time.
Remove Worn Interior Parts
Many old pieces are made with simple internal joinery that’s fairly easy to knock apart. Most often the rail is glued at the front and nailed at the back (Photo 1). It may help to remove the drawer guide that sits atop the runner first. Make repairs if the tongue-and-groove joint doesn’t break cleanly.
Next, remove the old support blocks. You can usually knock them off with a hammer, but if they’re firmly attached, it’s better to saw them off. Once they’re gone, remove the glue and flatten the surface by planing or sanding.
Repair the Drawer Dividers
The drawer dividers take a beating from use, which shows as worn-in grooves.A new,more durable wear surface is a must. Hard maple is the best choice for longevity, even if your chest is made of cherry, walnut or mahogany. However, when you apply finish, you’ll have to disguise the maple by adding color.
With a square, mark the divider for a dado that’s wider than the groove, and as wide as your chisel (usually 3/4 in. to 1 in.). Saw the inner shoulder while holding the blade flush against a clamped-on guide block (Photo 2). Hold the blade against the face frame as you cut the outer shoulder. Here, the unbacked portion of your Japanese saw works best.
Once the shoulders are cut, create the dado with a sharp chisel (Photo 3). Then, glue in a hard-maple patch, cut so its grain direction matches the divider. After the glue has dried, pare the patch flush (Photo 4).
Rebuild and Install the Runners
Examine the runners to decide whether to repair or replace them. If the wear isn’t severe, the runner can be repaired (Photo 5). However, if the wear on the runner’s top extends below the tongue on its front, the runner needs to be replaced. When making new runners, cut the tongues on the tablesaw, using a miter gauge and a stop block.
Fabricate, locate and fasten new support blocks for the runners inside the chest (Photo 6). Thick blocks are best—just make sure they don’t interfere with the drawer opening. Once the support blocks are in place, install the new or repaired runners (Photo 7).
Repair the Drawer Sides
Breakage often occurs at the drawer-bottom dado,because it creates a weak spot in the drawer side. The best repair reinforces the drawer side with stronger wood on both sides of this dado.
Rout a clean, straight edge,parallel to the top of the drawer side and at least 3/8-in. above the drawer-bottom dado. Set the router’s plunge depth to match the thickness of the drawer side and rout to full depth in several shallow passes (Photo 8).
Cut your hard-maple replacement pieces extra wide and mill them slightly thicker than the drawer sides. They’ll be cut down and planed flush after installation. If you’re restoring a handmade drawer, check the thickness of every side. They’ll probably vary.
Before marking each replacement piece (Photo 9), orient it so the grain runs from front to back on the outer face and also on the bottom edge. This makes final hand planing easier and safer. Planing from front-to-back (with the grain), you won’t risk blowing out the drawer front.
Cut and dry-fit the replacement piece. Then, from inside the drawer,mark the location of the drawer-bottom dado (Photo 10). Remove the replacement piece and extend the marks indicating the dado to its front and back edges. Use these marks to set the tablesaw fence. At the back, the top of the dado aligns with the notch. Your reference lines may not be parallel to the edge of the replacement piece. If they aren’t, use a shim to align the dado correctly before cutting (Photo 11).
Handmade drawer bottoms may be different thicknesses, so don’t use your dado set to cut the dado. Instead,use a regular blade and cut the top edge of the dado first. Then reset the fence and make additional passes to widen it, using the drawer bottom itself to test the width.
After gluing on the replacement pieces (Photo 12), plane them flush (Photo 13).
Level the Chest
It’s common for an old chest to sit crooked, because its feet have worn down unevenly. For the drawers to operate smoothly, the chest has to sit level. Before fitting the drawers, set your chest on a flat surface. Gluing shims under the worn feet is the easiest way to level it.
Fit the Drawers
Cut the drawer sides down in width so they’ll just fit inside their openings (Photo 14). Leaving the sides a bit wide has two advantages. First, it lifts the drawer front off the divider, for smoother operation. Second, it allows finetuning of the drawer’s position in the opening, so you can reduce the gap at the top. (Old drawers, especially wide ones, often have shrunk, leaving an unsightly space.)
Add Drawer Guides and Stop Blocks
Clamp a couple boards across the drawer opening, one at each end. Install the drawer and mark the runner (Photo 15). Remove the drawer and draw a line from your mark to the edge of the face frame. Use this line to locate the guide (Photo 16).
You’ll find drawer stops in different places on old chests, but usually they’re mounted on the divider, behind the drawer fronts.
Make sure your replacement stops are thin enough for the drawer bottoms to clear. Don’t try to clamp right away—clamp pressure will cause the stop to skate around on the wet glue. A “rub” joint is better. Apply glue and seat the block, rubbing it side-to-side a couple of times, while holding it snug against the back of the drawer front (Photo 17). Let it sit for about five minutes (until the glue tacks) and then add a clamp. Check again to make sure there hasn’t been any movement.
Extend the Drawer Bottoms
Widening the shrunken drawer bottoms is easy (Photo 18). Use screws to fasten the bottom to the drawer back, so it’s easy to remove. The tongue-and-groove joint at the front allows the bottom to expand and contract. It’s best to do your final fitting with the drawer bottoms installed,but not fastened, so they’re still easy to remove.
Final Fitting
First,make adjustments so the drawer fronts fit well in their openings. If you live where there are seasonal changes in humidity, plan to leave at least a 3/32-in. gap at the top, for expansion. Super-wide drawers may need more space.You may also have to make this top gap wider to balance the gap at the bottom. If these situations require additional tablesaw cuts, you’ll have to remove the drawer bottoms.
Next, check from the back of the chest to see if both sides of the drawers (with the bottoms installed) rest on the runners. If all the drawers are off by similar amounts, the chest is probably the culprit, so re-level it. If only one or two drawers are off, they’re probably a bit twisted. Hand planing solves the problem (Photo 19).
When the drawers fit well, smooth the drawer-side bottoms with a hand plane or by sanding. Chamfer the sharp edges and put a big chamfer on the back ends, so it’s easier to slip the drawers in the chest.
Finally, shellac and wax all of the runners, guides and drawer-side bottoms (Photo 20).
Get Rid of that Musty Smell

The sour smell that often accompanies an old chest of drawers is enough to make one hesitate to use it for clothes. But you needn’t worry—there’s a simple fix.
That bad odor isn’t anything inherently nasty, like mold or mildew. It’s the smell of basswood, which was frequently used for drawer parts 100 years ago.
To get rid of the smell, brush a coat of shellac on the drawers, inside and out, including both sides of the drawer bottoms. The shellac will seal the basswood and eliminate the odor. Check the cabinet back, too, and give it a good shellacking if it’s made of the same smelly stuff.
The New Finish
The paint adorning Uncle Ed’s chest of drawers wasn’t worth saving. The topcoats were latex paint, neither old, nor patinated; just crummy. A little sleuthing indicated that the chest is made of pine and that original finish, an opaque brown color hidden underneath the paint, was also badly deteriorated. Clearly, the best course of action was to remove the paint so we could apply a fresh finish. Because the lower paint layers almost certainly contained lead, we took this chest to a professional for stripping.
After stripping, we let the chest dry completely before making repairs.We re-glued a couple of minor cracks and replaced a couple of broken-off pieces, including the broken escutcheons (key hole covers). We also bought pine replacement knobs. We chipped all the old white putty (which doesn’t stain well) from the nail holes. Then we filled all the holes and crevices with pine-colored plastic wood filler.
We sanded everything thoroughly with a random-orbit sander, starting with 80-grit paper and working up to 180 grit. Then we sanded by hand with 150 grit, to remove any machine-made sanding marks. Sanding lightened the pine noticeably.
Our “professional’s secret” finish is nothing more than a couple coats of Zar “Provincial” oil-based wood stain (it’s pigmented, just like glaze), applied over a coat of Zinsser’s SealCoat universal sealer (which is de-waxed shellac).
This off-the-shelf shellac-and-glaze method is foolproof. The stain goes on evenly, and you can blend areas that don’t match. If something goes wrong, you can remove the stain with mineral spirits and try again.
After sanding the SealCoat with 280-grit paper,we applied the first coat of stain, wiped it off uniformly and let it dry overnight. We applied the second coat of stain judiciously, using a combination of wiping, stippling and dry-brushing, to blend uneven spots, including our new-wood repairs and replacement pieces.
After the stain was thoroughly dry, we brushed-on two coats of Zar’s antique flat oil-based polyurethane. We sanded the first coat with 280-grit paper before applying the final coat.
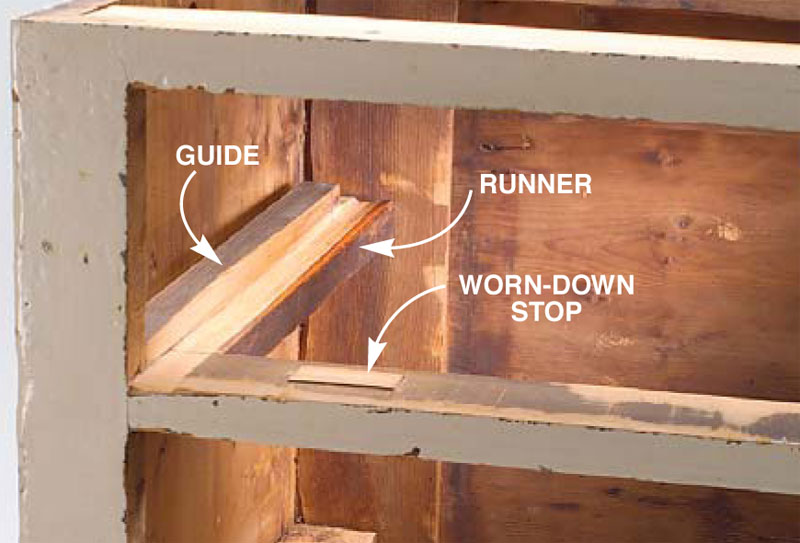
Before they were worn out, wooden runners bore the weight of the drawers. Guides mounted atop the runners controlled side-to-side movement and glued-on blocks stopped the drawers flush with the front.

Broken-off drawer sides make drawers hard to open and close,wear down the stop blocks and damage the drawer bottoms.

1. Remove the runners. First, use a hammer and chisel to break the runner from the support block.Then, break the tongue-and-groove joint at the front by prying the runner away at the back, where it’s probably just nailed to the case.

2. Saw square shoulders on both sides of the groove worn into the drawer divider. Use a squarely cut block to guide the saw.

3. Chisel out the waste, to create a flat-bottomed dado.Then glue in a patch, with the grain direction of the patch the same as the divider.

4. Pare the patch flush with the divider, using sweeping strokes with a sharp chisel held flat on the divider.
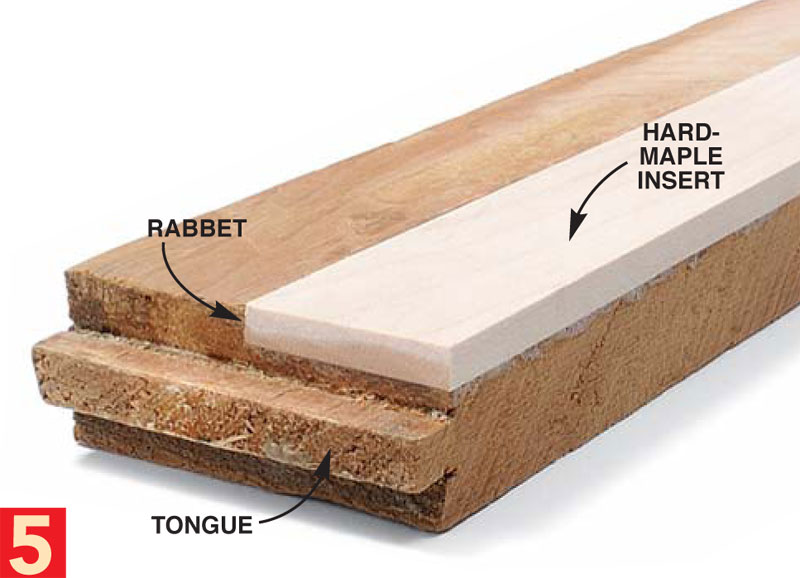
5. Renew worn runners with hard-maple inserts. First, cut rabbets wide and deep enough to remove the wear.Then, glue in the inserts and plane them flush with the remaining original surface. If the runners are too far gone, make new ones.

6. Glue blocks to the cabinet to support the runners. First, install the runner, without glue, and square it, using a carpenter’s square clamped to the face frame. Orient the block’s grain direction so it matches the side of the case.

7. Install the runner. Glue and clamp the joint at the front. At the back, don’t use glue. Just screw the runner to the cabinet, toenailing it against the support block through an angled, oversize hole.This construction allows the chest’s solidwood side to expand and contract.

8. Remove the broken edge of the drawer side, using a plunge router and a clamped-on straightedge. Start behind the drawer front and stop before you cut into the back. Remove the remaining waste with a sharp chisel.

9. Cut a replacement piece to fit. Mark the front dovetail and back corner on the extra-wide replacement piece, using a square and a sliding bevel to transfer the angle. Then, cut to the lines, using a bandsaw or handsaw.

10. Mark the dado for the drawer bottom, using a straightedge. At the back, the top of the dado aligns with the bottom of the drawer. Your second mark indicates the dado’s width.

11. Cut the dado for the drawer bottom using a regular blade. If the dado needs to run at a slight angle to the edge, shim the replacement piece. Adjust the angle by sliding the shim toward the front or the back. When you make the cut, both the shim and the back corner of the workpiece must ride against the fence. If your saw’s fence is too short (in front of the blade or behind it), clamp on a long-enough subfence. CAUTION:The blade guard must be removed for this cut.

12. Glue on the replacement pieces. Make sure that their inside faces are flush with the drawer sides.

13. Plane the replacement flush. Skewing your plane so it rides on the drawer side keeps the planed surface flat.Work from front to back, with the grain.

14. Trim the drawer sides to fit, about 1/16-in. narrower than their openings in the chest. These initial cuts should leave the sides extending below the drawer front. This extra width leaves enough material for fine-tuning the drawer’s fit in the opening. CAUTION: The blade guard must be removed for this cut.

15. Mark the drawer’s width on the runner, so you can install the guides. Hold the drawer flush across the front, using blocks clamped to the dividers, and snug against the side of the opening. Move the drawer against the opposite side to mark the other runner.

16. Mount the drawer guides flush at the front, but leave the lines showing at the back, so the drawer won’t bind.

17. Glue drawer stops to the front dividers.With the bottomless drawers held flush with the front of the face frame, simply butt the stops behind the drawer fronts.

18. Eliminate a shrinkage-caused gap by adding a piece to the drawer bottom. Plane it flush and rabbet the ends after the glue dries.

19. Fine-tune the drawer sides. It’s not unusual for old drawers to be slightly twisted. If the back end of one side is high, plane down the back end of the other side until they both rest on the runners.

20. Brush a coat of shellac on the runners and guides. Then sand with 280-grit sandpaper and apply a coat of paste wax. Do the same to the sides and bottom edges of the drawers, and they’ll slide like glass.
Sources
Note: Product availability and prices are subject to change.
Van Dykes’s Restorers, vandykes.com, 800-787-3355, 2-in. pine knobs, #02001844; 1-in.-round maple escutcheon, #02289083.
Wm. Zinsser and Co., zinsser.com, 800-899-1211, SealCoat Universal Sanding Sealer.
United Gilsonite Laboratories, ugl.com, 800-845-5227, Zar Oil-Based Stain, “Provincial” color; Zar Interior Polyurethane, “Antique Flat” sheen.
This story originally appeared in American Woodworker October 2002, issue #96.

Here are some supplies and tools we find essential in our everyday work around the shop. We may receive a commission from sales referred by our links; however, we have carefully selected these products for their usefulness and quality.