


We may receive a commission when you use our affiliate links. However, this does not impact our recommendations.

Kitchen Stool
Make round legs without using a lathe.
By Seth Keller
|
Few stools are as clean and elegant as this one. I built it with This project will keep your router humming and uses There will be a lot of parts floating around your shop as
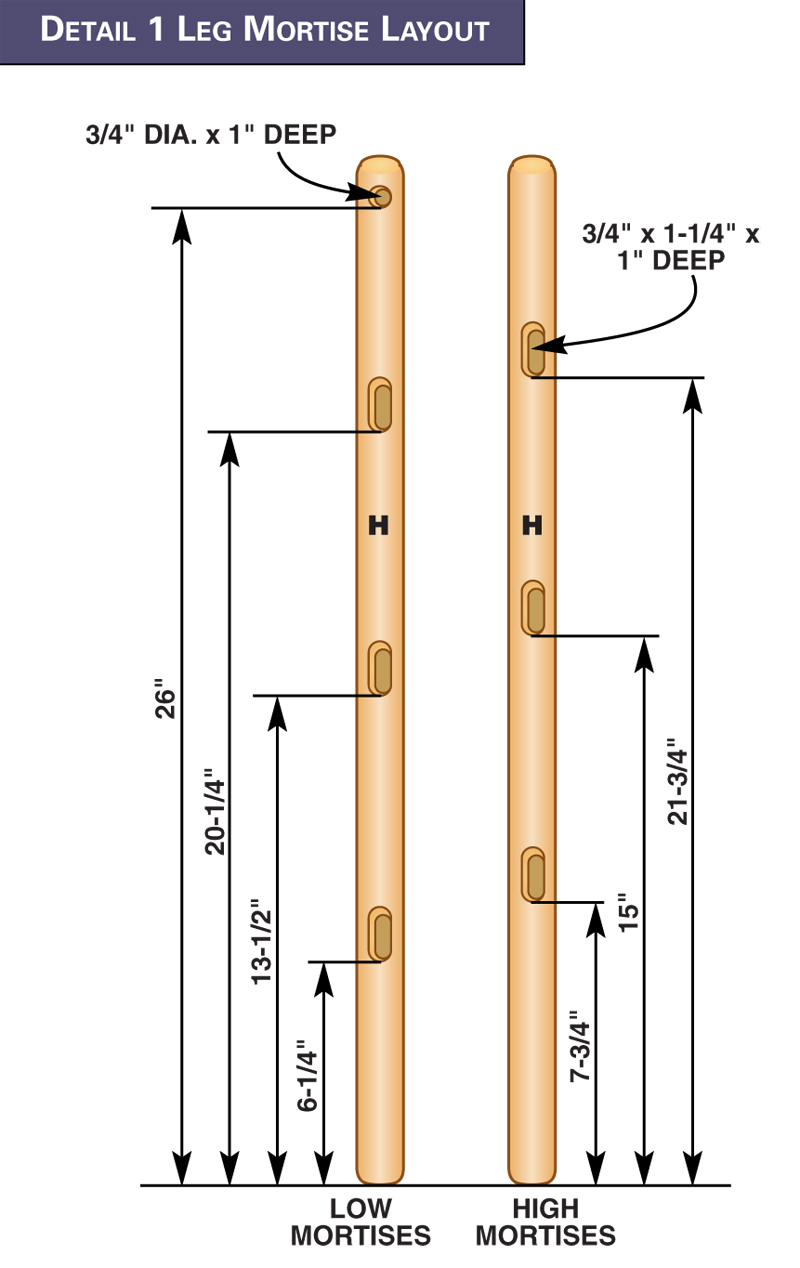
Mortise the Legs1. Mill the leg blanks (H) and cut them to length. 2. Lay out the mortises (Fig. A, above)(Photo 1). The 3. Rout the mortises using a jig and a 3/4-in. plunge 4. Roundover the edges of the legs with a 3/4-in.
Rungs and Stretchers5. Round over four 5- foot long pieces of rung stock with a 3/8-in. roundover (Photo 6). The ends of each 6. Cut the rungs and seat stretchers to length and label 7. Create the 3/4-in. round tenons on the seat stretchers
Assemble the Base8. Dry fit all of the base parts. 9. Glue up the base in stages (Photo 9). Place a straightedge on the seat stretchers to make sure they lay flat
Make the Seat10. Glue up a cherry blank. When the glue is dry, trim 11. Draw diagonal lines from each corner on the underside 12. Lay out the top of the seat blank (Fig. C, p. 59). 13. Drill the leg holes in the seat blank (Photo 11). 14. Cut the seat to shape on the bandsaw: sand it smooth. 15. Place the seat blank in the seat-scooping jig (Fig. D) 16. Scoop out the seat using a long straight bit (Photo 17. Round over the edges of the seat around the leg 18. Sand the entire stool to 180-grit if you’ll be finishing 19. Attach the seat to the base (Photo 13).
SourcesSource information may have changed since the original publication date. Woodcraft Supply, woodcraft.com, 800-225-1153, 1/2” x 4-1/8" Straight Cut Double Flute Bit, #815761, $25.00. MLCS, mlcswoodworking.com, 800-553-9298, 3/4” Plunge Router
Cutting Lists
Fig. A: Exploded View
Fig. A, Detail 1: Leg Mortise Layout
Fig. B: Mortising Jig
Fig. C: Seat Blank Layout
Fig. D: Scooping Jig
This story originally appeared in
|
Click on any image to view a larger version.
1. Begin building the stool by laying out mortises on the legs. The mortises are offset with one set higher than the other. Clamp the legs together and lay out all the high mortises first. I like to shade each mortise to avoid mistakes.
2. To layout the lower mortises, rotate the two outside legs 90-degrees away from the center. Then roll the two center legs away from the center as well. This automatically positions the correct face of each leg.
3. Cut the angled mortises with a jig and a plunge router. To position the leg, line up the top of the mortise with the top of the index notch on the jig.
4. Round over all four corners on the legs. When you’re done, they’ll almost look like they were turned. A featherboard maintains consistent pressure against the fence.
5. Round over the ends of each leg. Hold the leg tight against a stop block as you feed it into the bit. When the leg contacts the bearing, rotate it slowly to complete the roundover.
6. Mill roundovers on long lengths of rung stock. Cut the rungs and seat stretchers to length afterward. This is more efficient and safer than shaping short lengths. Featherboards produce a clean, consistent cut.
7. Shape the seat stretchers on the bandsaw. It’s best to make two cuts. Cut the short angle first, then make the long straight cut.
8. Cut the round tenons on the seat stretchers. When the cut hits the wide part of the stretcher, let it ride on the bearing until it contacts the fence on the outfeed side.
9. Glue up the base in sections. Have all of your parts labeled and laid out in sequence. Glue up the two halves with the three mortises first. When they’re dry, glue the whole stool together with the seat stretcher and remaining rungs.
10. Clamp up the base on a flat surface. Angled blocks will prevent the clamps from slipping. Use a straightedge to make sure the wide section on the seat stretchers lies flat.
11. Bore leg holes through the seat blank. Clamp the blank to a sacrificial table to prevent blow out. Cut the curved sides on the bandsaw after drilling the holes.
12. Scoop the seat with a router and a simple jig. Slide your router across the curved ramp. Rotate the seat a router bit’s worth after each pass. Keep the cuts shallow.
13. It’s best to pre-finish the seat and base before final assembly. Then simply attach the seat to the stretchers with screws. |


Here are some supplies and tools we find essential in our everyday work around the shop. We may receive a commission from sales referred by our links; however, we have carefully selected these products for their usefulness and quality.


