


We may receive a commission when you use our affiliate links. However, this does not impact our recommendations.
Showcase
View your treasures from every angle.
By Luke Hartle
|
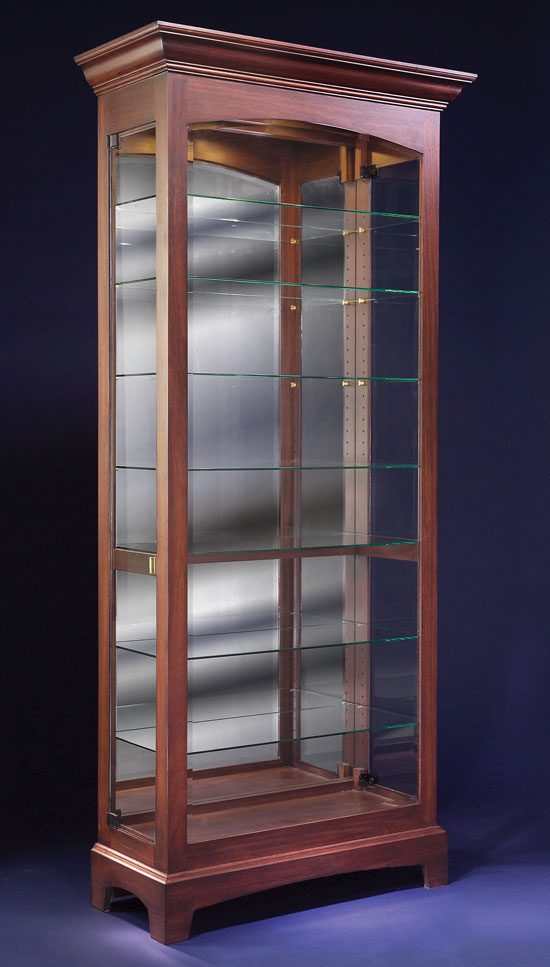
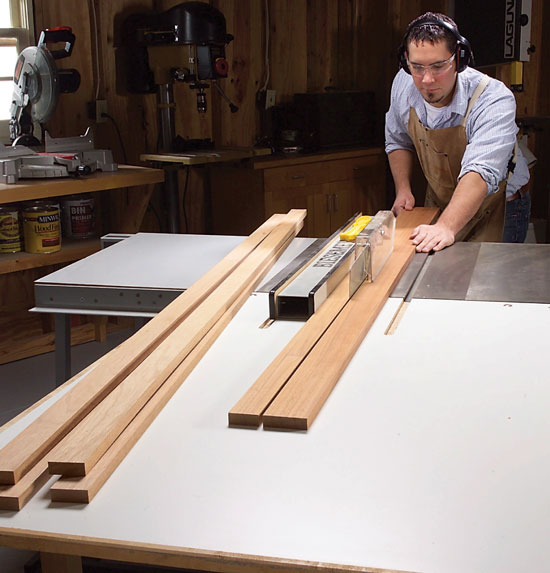
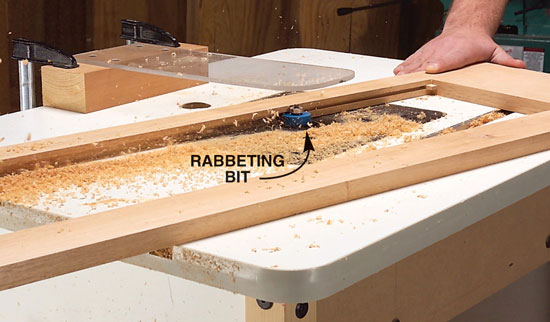
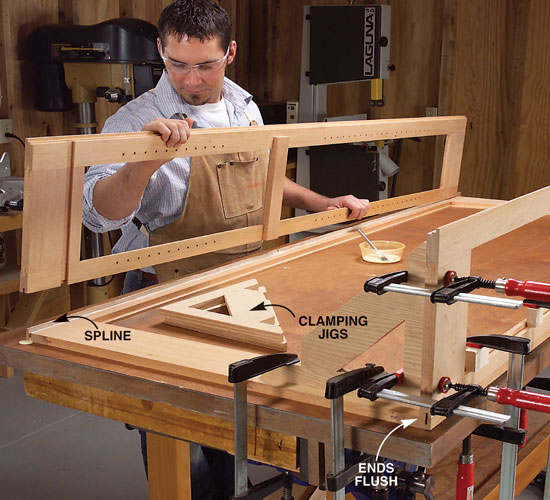
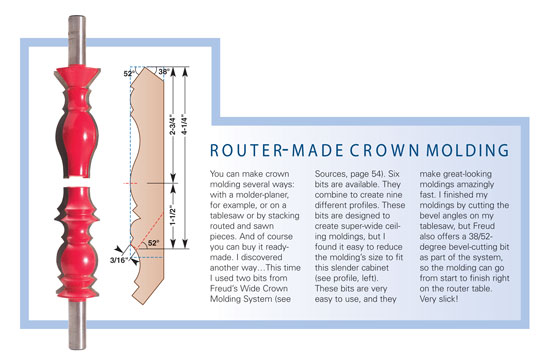
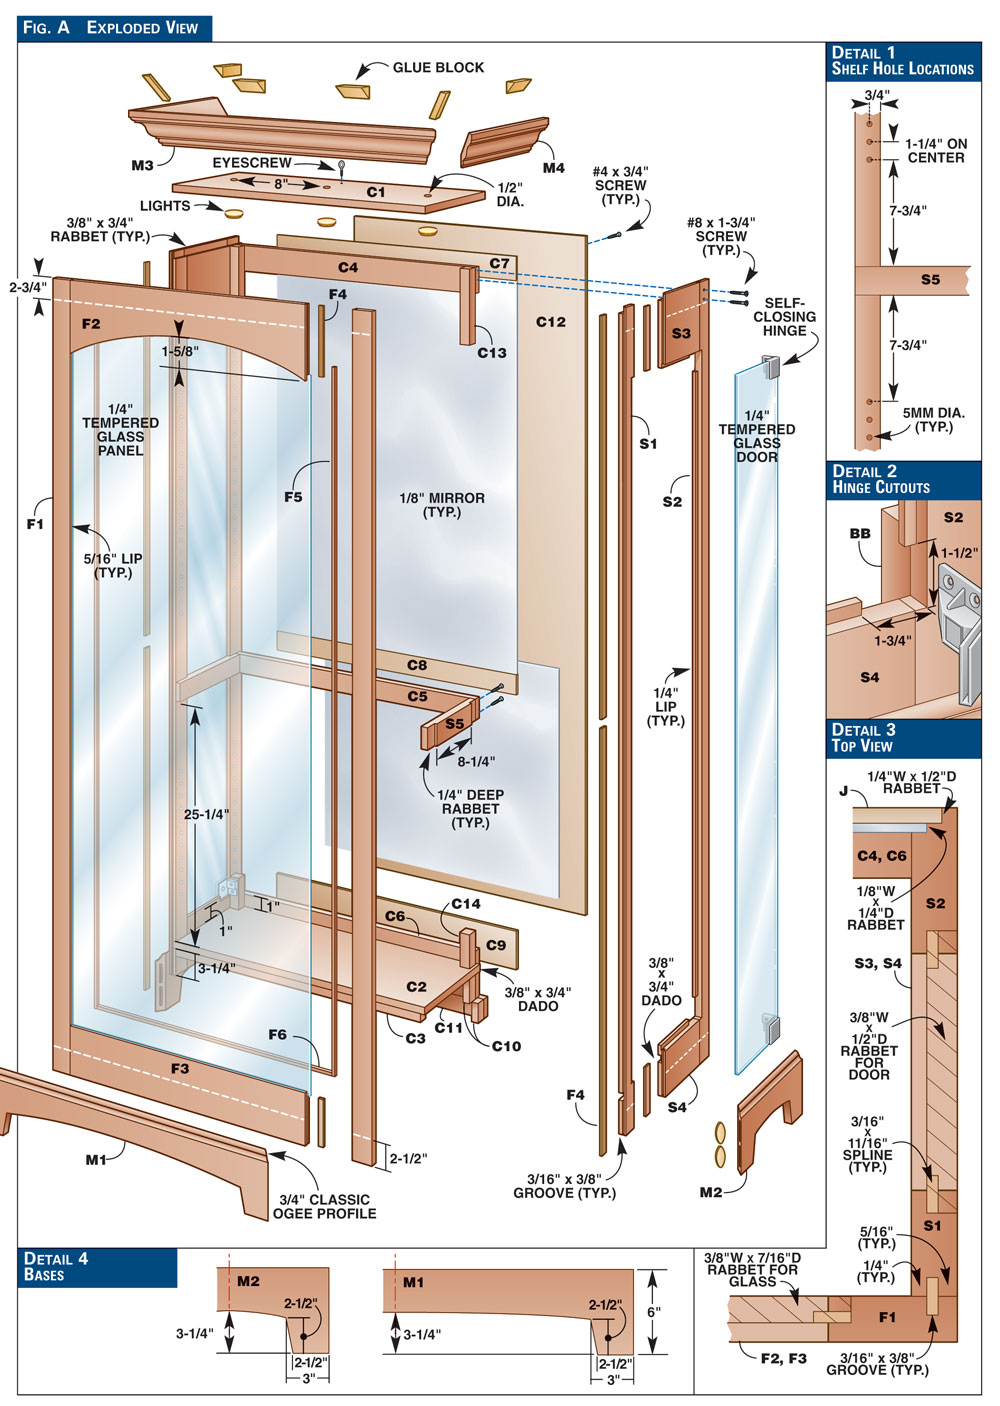
Any collection you want to display, from fish fossils to Baccarat crystal will look great inside this cabinet. It allows unobstructed viewing from the front because the doors are on the sides. The doors themselves are frameless glass to maximize the side views. Inside, the mirrored back presents views from still another perspective, and glass shelves allow the built-in lighting to filter throughout the cabinet. This showcase features 12-in.-deep shelves, graceful proportions and slender stiles and rails that elegantly frame the display area. It’s built with spline joinery that’s both simple and strong. I made the crown molding with new dedicated router bits that do an impressive job. Glass is easily the most expensive component of this project—I spent about $625, including $40 to bevel the arched front panel. This piece and the side doors are tempered glass, for safety. The seven glass shelves aren’t tempered. The cabinet requires only 25 bd. ft. of 4/4 lumber, so I splurged on genuine mahogany. My total cost, including the hardware and lighting, was about $1000. Build the framesThe cabinet’s basic structure consists of three frames joined together. The frames and the cabinet must all be square so the glass will fit. 1. Rip the boards for the frame stiles about 1/4-in. oversize in width (Photo 1). To prevent headaches when installing the glass it’s important for all the stiles to be straight and flat. Let these pieces sit overnight to stabilize. Then joint and gang-plane them to final width. 2. Using a 3/16-in. slot-cutting bit, rout grooves for splines in all the stiles and rails (Photo 2, Fig. A, Parts F1-F3 and S1-S4). All the grooves have the same offset, a 5/16-in. lip at the front and a 1/4-in. lip at the back (Fig. A, Detail 3). The front frame stiles (F1) and the front side frame stiles (S1) receive two slots. 3. Cut the arch on the front frame top rail (F2) and sand it smooth. 4. Cut the splines (F4) by ripping pieces slightly oversize in thickness and then planing them to fit the grooves. 5. Assemble the front and side frames. After the glue is dry, trim flush any splines that protrude. 6. Rout rabbets in the frames for the glass (Photo 3 and Fig. A, Detail 3). The rabbets go on the back of the front frame and on the front of the side frames. The spline grooves that you’ve routed automatically define the depths of all the rabbets: Because the splines aren’t centered, the rabbets in the side frames are 1/16-in. deeper than the rabbet in the front frame. 7. Rout rabbets in both side frames for the top (C1). Rout dadoes for the fixed shelf (C2) in both the side frames and the bottom rail (C6). 8. Cut stepped rabbets in the back of the side frames for the mirrors and the back. (Fig. A, Detail 3). 9. Use a dado set to cut rabbets in the side frame center rails (S5). Glue these rails to the side frames, making sure they are parallel to and exactly the same height from the fixed shelf dado on each frame. 10. Drill holes for the shelf supports in the side frames (Fig. A, Detail 1). I made a drilling template and used my cordless drill and a self-centering drill bit (see Sources). 11. Measure for the glass after the frames are completed. Measure for the mirrors after the cabinet is assembled. Ask your glass supplier to recommend how much to reduce the dimensions to make sure the front glass panel fits the opening. I made this panel 1/8-in. smaller than the opening in both length and width. I also gave my supplier a full size template of the arched top. Another, even safer option would be to provide your supplier with a full-size plywood or hardboard template (if this template fits the front opening, the glass will surely fit). To work with the hinges, the sides’ glass doors must be 1/4-in. smaller than their openings in both length and width. Assemble the cabinet12. Glue the frames together (Photo 4). The splines perfectly align the edges. To ensure a square glue-up, I made 90-degree plywood clamping jigs for each corner and went crazy with the clamps. 13. Glue on the top (C1) after drilling 1/2-in.-dia. access holes for the lights. Install an eyescrew for tethering the cabinet to the wall, so there’s no chance it can tip over. 14. Glue in the fixed shelf (C2). Then glue the cleat (C3) that supports the shelf’s front edge. 15. Glue and screw the top and bottom cabinet rails (C4 and C6) flush with the inside edges of the stepped rabbets—make sure the crown molding will hide the top rail’s screws. Fasten the bottom cabinet rail to the fixed shelf and to blocks (C10) glued to the side frames. Don’t install the middle cabinet rail (C5) yet. 16. Affix spacers (C7-C9) to all three back rails. They create the top and bottom rabbets for the mirrors. 17. Cut blanks for the base molding pieces (M1 and M2) oversize in length. Then rout the top edges with a Classic Ogee router bit (see Sources, below). 18. Cut miters on the side molding pieces, trim them to length and clamp them in position. Then miter the front piece to fit (Photo 5). 19. Remove the base pieces and cut slots in their miters for biscuits. 20. Use the patterns (Fig. A, Detail 4) to create the legs and arches on the base pieces. Cut the profiles on the bandsaw and then sand them smooth. 21. Install the biscuits and then glue and clamp the base moldings to the cabinet. 22. Install the back cabinet rail (C11) after fastening blocks (C10) inside the base moldings. 23. Remove the lips from the side frame corners to make room for the door hinges (Fig. A, Detail 2). Install the hinge mounting blocks (C13 and C14) flush with the stiles’ edges. Make the crown moldingI used specialized router bits to make the crown molding (M3 and M4, see “Router-Made Crown Molding). These bits must be used in a router table. 23. Mill the crown molding blanks 1/4-in. wider than their final width. Make extra blanks for test cutting, to get the hang of using the bits. Install a tall fence on your router table to fully support the blank and a featherboard to hold it securely against the fence during each routing pass. 24. Use one bit to rout the top half of the molding profile and the other bit to rout the bottom half (Photo 6). The bits are designed so their profiles overlap. To shorten the molding’s width, I lowered the bottom bit below the table, so I didn’t use its full profile. 25. Using the table saw, rip the molding to final width. Then install a tall fence and tilt the blade away from it at 38 degrees to cut the bottom bevel. Stand the molding on edge, with its face against the fence to make this cut. 26. Attach the crown molding in stages. First, tack everything in position (Photo 7). Then install glue blocks to fortify the joints (Photo 8). Calculating perfect angles for the corner blocks can be a nightmare; they’re easier to fit by hand. Apply finish before you install the glass27. Finish the cabinet now. Don’t forget to finish the back middle rail, which is added after the glass and mirrors are installed. My mahogany wasn’t a uniform color, so I chose a dark gel stain to minimize the differences and applied two coats. Then I wiped on three satin varnish topcoats. Install the lights, glass and mirrors28. Install the lights. I chose xenon lights because they produce bright, warm light similar to halogen bulbs, without generating nearly as much heat. 29. Install the front glass through the back of the cabinet (Photo 9). Because of the weight and size of the glass, this is a two-person job. 30. Nail in the retainer strips (F5 and F6) with 1/2-in.-long 20-ga. wire brads. Be careful: The edges of tempered glass panels are fragile. One nail nick and there goes a very expensive piece of glass. To avoid disaster, pre-drill the holes in the support strips and install the brads, then position the strips. Lay a piece of cloth on the glass. Slide the hammer back and forth on the cloth to drive the brads home. 31. Screw the middle cabinet rail (C5) to the side frame center rails (S5). Don’t glue this piece. If the front glass panel ever breaks, this rail will need to be removed. 32. Install the mirrors (Photo 10). Secure them with dabs of silicone caulk. 33. Screw on the back (C12) after carefully pre-drilling holes on the edges of both sides and across the three rails. 34. Stand the cabinet upright to install the self-closing hinges. Position the hinges so that the backs of the glass doors close flush against the top and bottom rail lips. 35. Install the glass shelves. Each shelf can support about 15 lbs. Sources(Note: Product availability and costs are subject to change since original publication date.) Rockler, rockler.com, 800-279-4441, Brass no-bore glass door pull, #29140; Self closing glass door hinges, #37228; 5mm brass shelf supports, #22252; 5mm self-centering bit, #22575; 3/16" 3-wing slotting cutter, #92189; Classic Ogee Router bit, #91680. Pegasus Associates, pegasusassociates.com, 800-392-4818, Xenon low voltage puck light kit (3 lights), #PALPX-60-BK-PALTR60. Freud Tools, freudtools.com, 800-334-4107, Wide Crown Molding System Bits: Upper profile #3, #99-416; Lower profile #2, #99-415. Van ***’s Restorers, vandykes.com, 800-558-1234, Bartley Gel Stain, Jet Mahogany, #02236854. The Glass Man Inc., 877-636-9080, 1/4-in. clear tempered front glass panel with arched top and 1-in. bevel, approx. 28-3/8 in. x 67-3/4 in.; Two 1/4-in. clear tempered glass side door panels with flat-polished edges, approx. 8-3/4 in. x 66-in.; Seven 1/4-in. clear glass shelves with flat polished edges, approx. 12-in. x 30-3/8-in.; One 1/8-in. mirror, approx. 30-7/8 in. x 42-3/8 in.; One 1/8-in. mirror, approx. 24-3/4 in. x 30-7/8 in. This story originally appeared in American Woodworker April/May 2007, issue #128.
|
Click any image to view a larger version.
1. Start by cutting the stiles for the three frames that form the cabinet. Rip these pieces oversize in width. The extra width allows you to straighten pieces that develop a crook.
2. Rout grooves for splines in the stiles and rails. Most of the stiles have more than one groove. All the grooves are routed from the same setting.
3. Rout rabbets for glass in the frames. The rabbets go on the front faces of the side frames, but on the back face of the front frame.
4. Glue the frames together after installing the splines. Work on a flat surface and make sure the ends of the frames are flush. Shop-made 90 degree clamping jigs keep the corners square.
5. Cut and fit the miters on the base pieces before you lay out the arches. First, miter the side pieces and clamp them in place. Then miter the front piece to fit between the side miters.
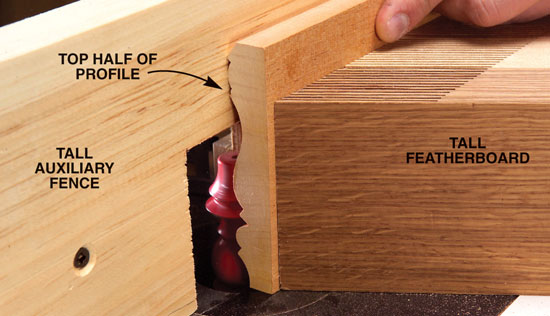
6. Rout the crown molding with dedicated crown molding bits. First rout the top half with one bit. Then install the second bit and flip the workpiece to finish the job. A tall fence and featherboard securely hold the workpiece while using these tall bits.
7. Glue on the crown molding after dry-fitting the miters. Brad nails in the corners pin each piece in position before you apply the clamps. Fasten the top of each mitered corner with a single brad.
8. Reinforce the crown molding with glue blocks. Cut the wedged blocks on your tablesaw. The wide-angled corner blocks are hard to cut precisely. It’s easier to sand or hand-plane these blocks to fit.
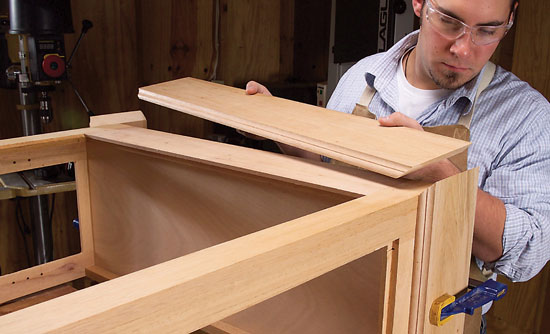
9. Lower the front glass panel through the back. This large tempered piece of glass is heavy and awkward to maneuver, so get help.
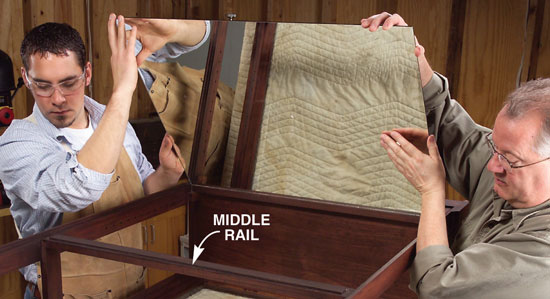
10. Install the mirrors after attaching the middle rail and spacer. Then install the back to protect the mirrors. The cabinet sides have two stepped rabbets, one for the mirrors and one for the back.
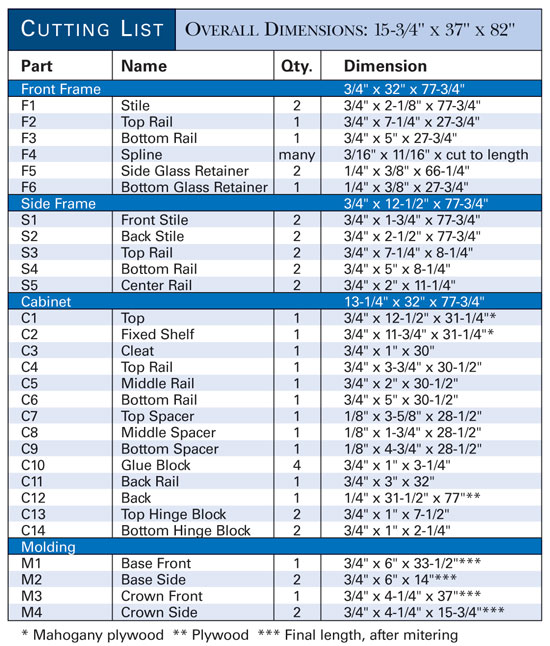
Cutting List
Fig. A: Exploded View
|


Here are some supplies and tools we find essential in our everyday work around the shop. We may receive a commission from sales referred by our links; however, we have carefully selected these products for their usefulness and quality.


