


We may receive a commission when you use our affiliate links. However, this does not impact our recommendations.
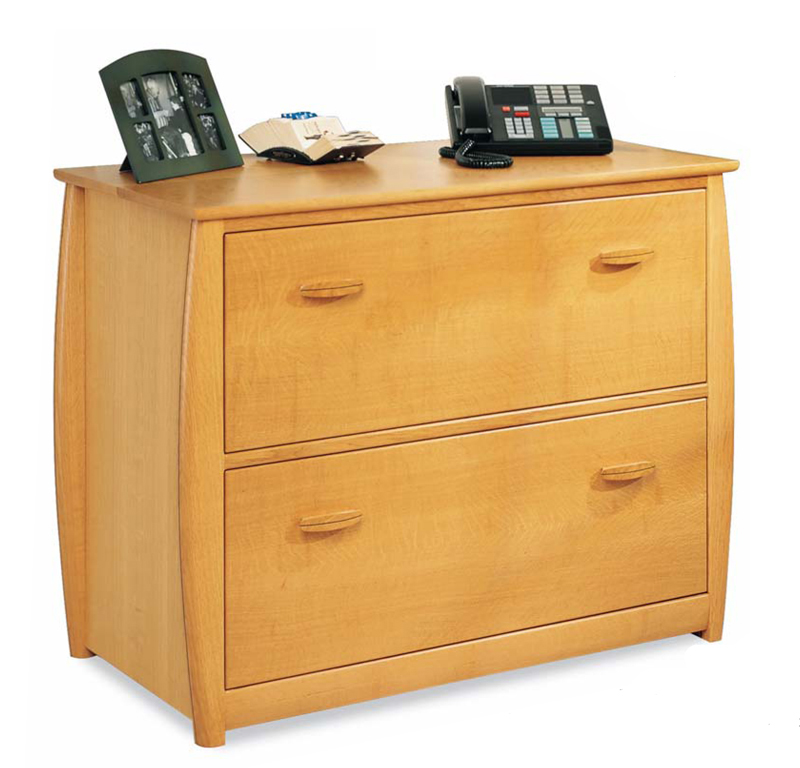
4-Way File Cabinet
Arrange your files any way you want!
By Andy Rae
| Imagine the ultimate home office: an executive desk, a comfy swivel chair, your computer and phone within easy reach, pens and pencils ready to go, books and reference materials neatly arranged on a shelf. The only thing missing is a place to store your files and paperwork.
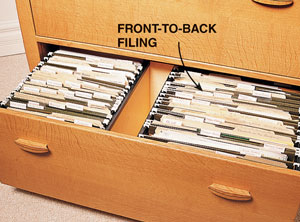
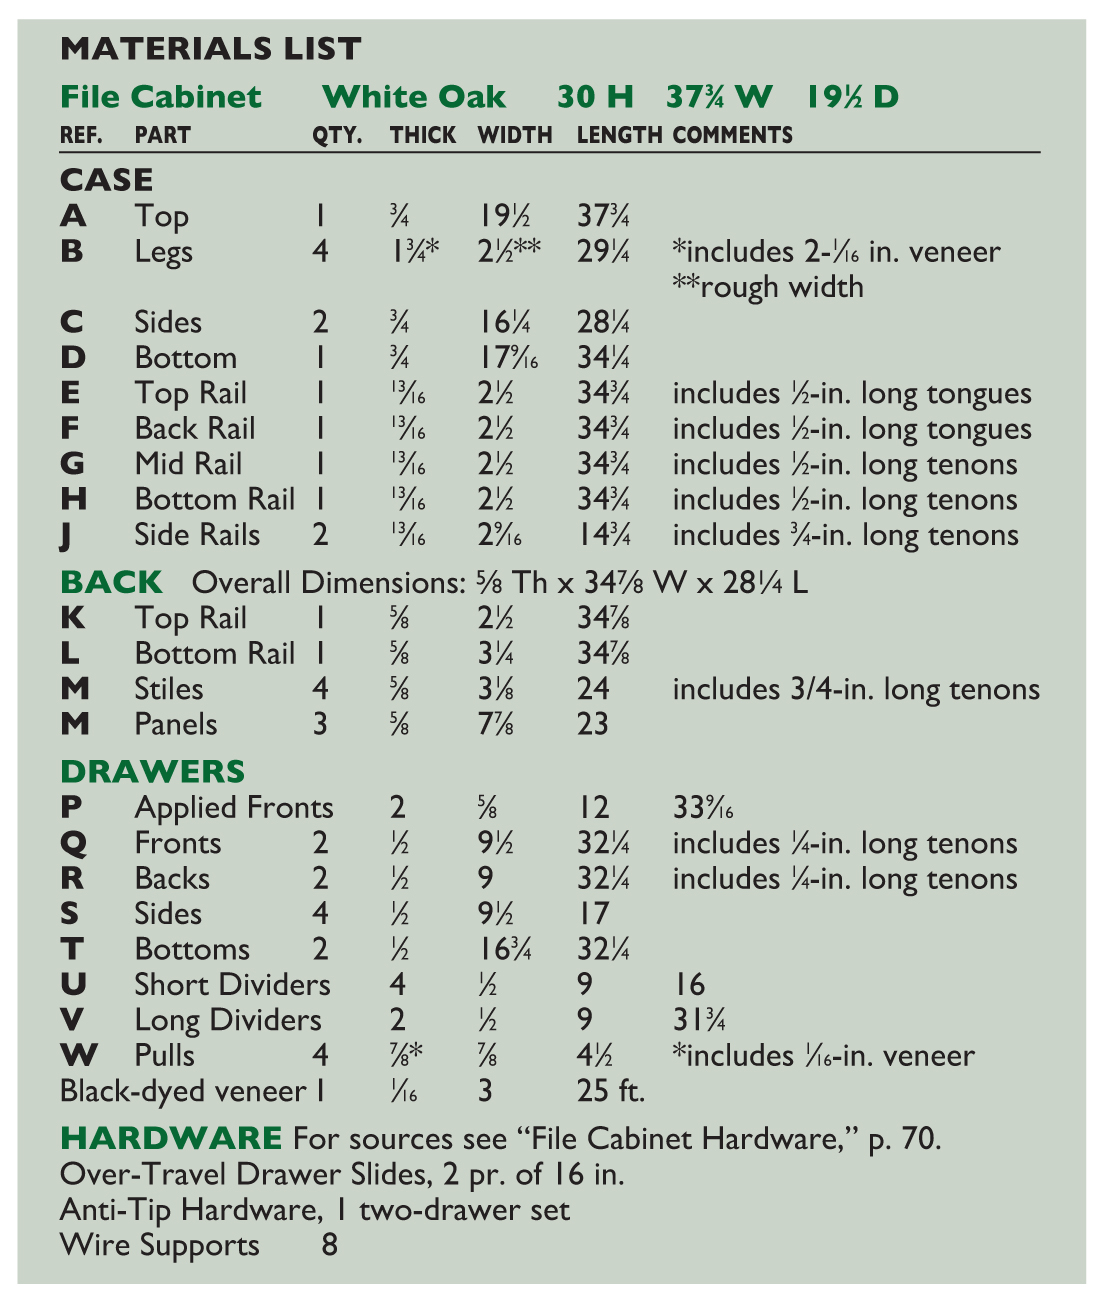
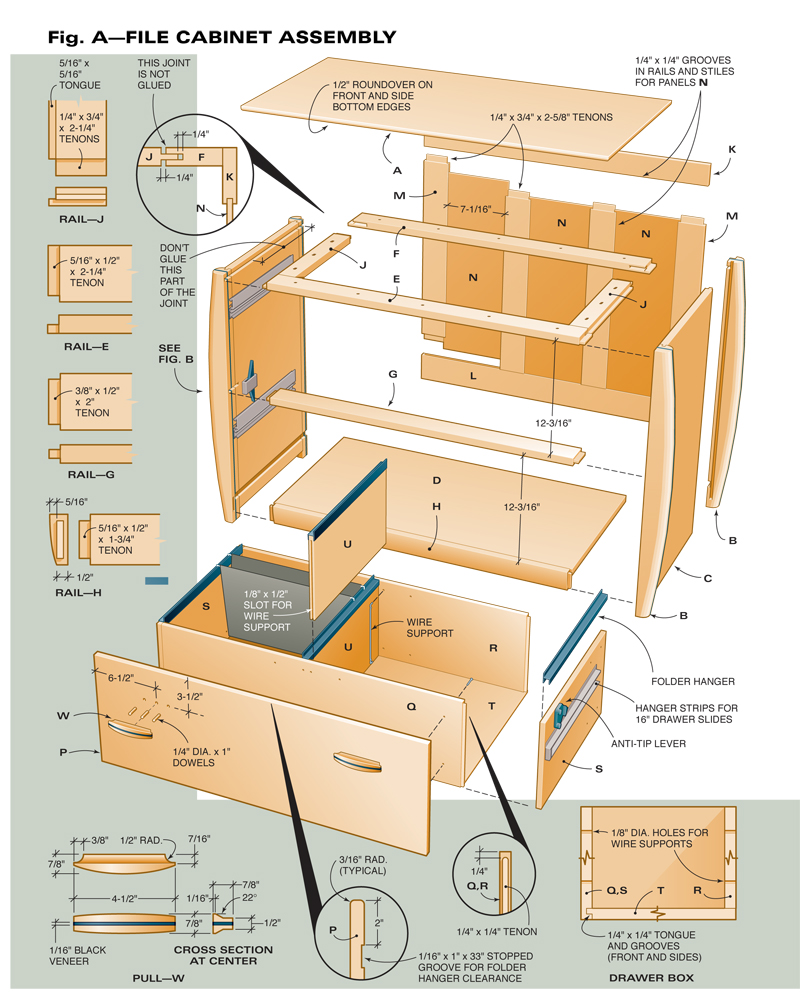
This file cabinet offers four ways to arrange your papers. You can set up each drawer for letter or legal size papers. You can arrange them side-to-side or front-to-back (photos below). This first-rate system came from Robbi Staples of North Dartmouth, Mass., who designed and built this cabinet. It’s made from quartersawn white oak, a wood Robbi prefers for its look and feel as well as stability. With a frame-and-panel back this cabinet requires about 55 bd. ft. of lumber (see the Materials List at the end of the story). The cabinet’s sides are solid wood, so it’s important to select well-seasoned boards that won’t cup. The drawers are made from 1⁄2-in. Baltic birch. An alternative is ApplePly plywood. Both are very strong, with nine layers of plies, and are ideal for drawer joinery. The edges look clean because they’re free of the voids common in standard hardwood plywood. You can buy Baltic birch plywood from specialty dealers or order it from larger home centers. A list of ApplePly distributors is available from States Industries, www. statesind.com, 800-626-1981. The cabinet consists of four major assemblies: the sides, the rails and bottom, the frame and panel back, and the two drawers (Fig. A). We’ll start with the sides. Making The Sides and Legs
Tackle the legs next. They’re a sandwich of solid wood and veneer. Make each leg from two pieces of wood cut a bit wider than their final size and two pieces of 1⁄16-in.-thick black veneer (available from Constantine’s, www.constantines.com, 800-443-9667, #DV13315, $3.95/sq. ft.). Glue the sandwich together, mill it to final size, and rout a stopped groove in each leg. Saw each leg’s curve on the bandsaw (Photo 1). Glue up the side assembly. Place the work on a flat surface to avoid twist, and join each pair of legs to a side panel. (Photo 2). Make two simple jigs from medium-density fiberboard (MDF) for the mortises and dadoes that will join the sides to the rails (Fig. B). The large jig to cut dadoes for the top rails and the bottom has a 3⁄4-in. wide slot (Photo 3). The smaller jig, to cut the short mortises for the mid rail, has a 3⁄8-in. slot. Align the center of the slots over your layout marks. Switch from jigs to a simple edge guide to cut the mortise for the bottom rail and the rabbet that will receive the back. Assembling the CaseGlue up and mill the case bottom to size. It’s made of solid wood instead of plywood so it can be glued to the sides and expand and contract along with them. The case’s joinery will accommodate this wood movement. While the width of the top and sides will change with the seasons, the length of the side rail will not. Therefore, most of this rail is not glued to the case side, nor is its tenon glued into the back rail. In fact, there’s a space between the two (Fig. A). Drill oval holes in the side rail to allow the screws that hold down the top to move back and forth. Cut tenons on all the rails. Rabbet the side rails. Mortise the back rails to receive the side rails. Shape the curved face of the bottom rail with a plane (Fig. A and Photo 4). Now you’re ready to glue up the case. To simplify assembly, glue only the front rails and the bottom to the side assemblies (Photo 5). After the case is dry, slip the side rails in from the rear but don’t push them all the way home. Stop 2 in. from the front rail. Spread glue into the front rail’s mortise and into the side’s dado. Push the side rail home and clamp it to the sides. Then glue the back rail to the case side. Don’t glue it to the side rail. Making the Back
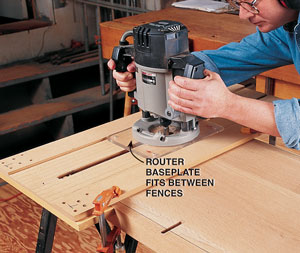
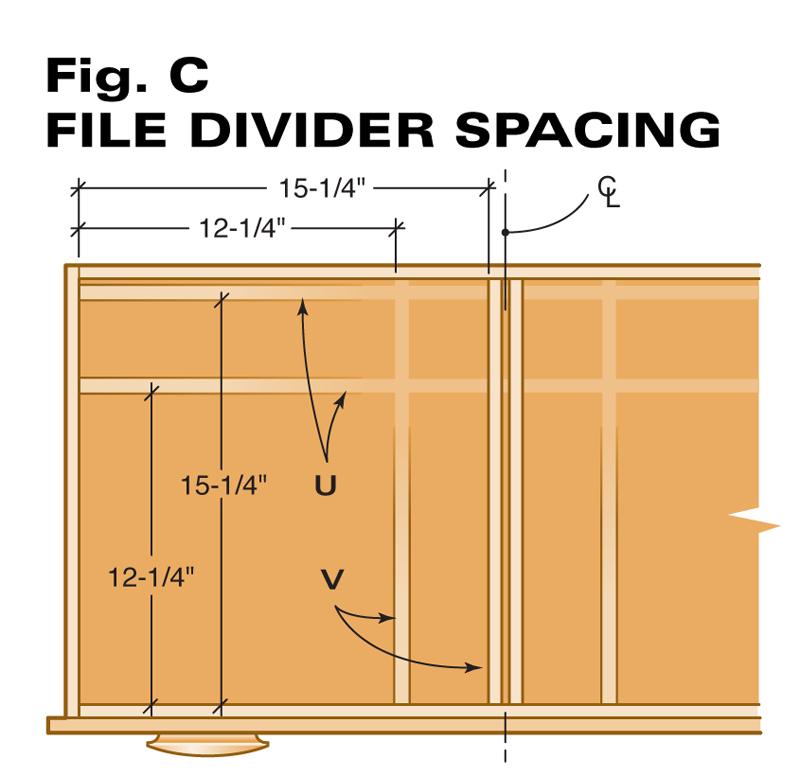
Substitute a 1⁄2-in.-thick plywood back if the cabinet will sit against a wall. Making Filing DrawersThe drawers are the heart of this filing cabinet. Begin by cutting all the drawer parts to size, including the solid fronts. Cut grooves for the drawer bottom into the plywood fronts and sides with a router and edge guide (Photo 6) or on the tablesaw. Next, rabbet the plywood bottoms to fit the grooves. Rout a shallow stopped dado on the back side of each solid drawer front. This creates a pocket for the slip-on folder hanger you’ll use with lateral files. The drawers are held together with stopped tongue and groove joints. They’re strong enough to withstand the enormous weight that a filing drawer is asked to hold. Only Baltic birch and ApplePly plywood are appropriate for this joinery. Rout the stopped grooves in the ends of the sides with a plunge router and an edge guide (Photo 6). Then saw the tongues on the fronts and backs with a dado blade. Round over the top end of each tongue (Photo 7). Drill pairs of holes for the wire supports. Lay out the hole locations, as shown in (Fig. C), then use a jig made from clear plastic to aid in drilling each pair (Photo 8). Glue up each drawer box. Leave the bottom off and clamp all four corner joints. Ensure accuracy by assembling the parts on a plywood gluing fixture that has two 90-degree fences (Photo 9). Put in the drawer bottom after the glue has set. Cut the dividers to size. Cut stopped grooves for the wire supports in the ends of the dividers. Use a router table and a 1⁄8-in. slot cutter. You can also cut the grooves on the tablesaw with a standard saw blade. Stand the dividers upright against a tall auxiliary fence. Clamp a stop block to the fence. Make or buy the drawer pulls. The pulls Robbi made for this cabinet have a dark accent line, like the legs. Glue up two pieces of stock with a single strip of veneer in between. Drill dowel holes in the pulls while the stock is square. Then rough out the pulls’ contours with a combination of bevel cuts on the tablesaw. Shape the curves with a stationary belt sander. Install the pulls after you’re done fitting the drawer fronts. Installing the Top and Drawer BoxesPosition the top so it’s centered over the cabinet’s width and even with the back legs. Secure the top by screwing up through the front rail, back rail and side rails. Use a shop-made alignment jig to mark the positions of the drawer slide screw holes (Photo 10). Follow the layout instructions that come with the slides to locate the holes in the jig. Screw the slides to the drawer case. Then screw the hanger strips to the drawers and install the drawers into the case. To prevent the cabinet from tipping forward should both drawers be opened at once, install anti-tip hardware that allows only one drawer to open at a time. (See File Cabinet Hardware.) Fit the oak drawer fronts to the case opening. Aim for an even gap all around. Place 3⁄32-in.-thick shims on a drawer rail and rest the front on top of them. Check to see that the gap between the front and the opening is even at the top. If it isn’t, plane the shims and check again. Installing the Drawer FrontsHere are three steps to fine-tuning the fit of a drawer front: 1. Apply small strips of double-faced tape to the front of the drawer box. Leave the shims in place. Stick the drawer front to the box by tapping it a few times over the tape (Photo 11). 2. Gently pull the drawer out of the cabinet. Clamp the front to the box and drive two screws through the box into the front (Photo 12). Remove the clamps, close the drawer and check the fit. 3. If the gap isn’t even, scribe around the drawer front. Remove the front from the box and take off the tape. Trim the front to your scribe marks with a hand plane or belt sander. Once the fit is correct, drive the remaining screws to permanently secure the front to the back. The Final Touches
Once you’ve applied a finish, put your new cabinet to work. Add the accessories and hardware to the drawers, gather your files and arrange them to suit your fancy. Sources(Note: Source information may have changed since the original publication date.) Woodworker’s Hardware, wwhardware.com, 800-383-0130, Over-travel drawer slides, KV8505 P16, $23 for a pair of 16-in. slides; Hanging File Rails, available in black or white for 1/2”, 5/8” and 3/4” drawer sides; File follower, KV0476F ZC, $15; File follower track, KV0476T, $5. Timberline Lock, compx.com, 800-562-5227, Anti-tip hardware, System 400, $6. Constantine’s, constantines.com, 800-443-9667, Single drawer lock, 32H14, $3.75. Lee Valley, leevalley.com, 800-871-8158, Wire supports, 61⁄4 in., 00S05.06, $2.60 for 10; Single brass pull, 00G18.01, $5.20. Rockler, rockler.com, 800-279-4441, Double drawer lock, 17823, $10; Combined pull and card holder, 70755, $20; Single card holder, 27953, $2.59. Materials List
This story originally appeared in American Woodworker December 1999, Issue #77.
|
1. Bandsaw the laminated leg. Cut about 1⁄16-in. away from the line, then sand or scrape the leg to the finished curve.
2. Glue the legs to the side panel. One long tongue and groove joint lines up everything. Before the glue dries, turn over the assembly and lay a straightedge across the legs and panel. Adjust the clamps if a leg is twisted.
3. Cut mortises and dadoes into the side with a plunge router. There’s no chance of getting a wobbly cut with this simple jig.
4. Shape the curved lower rail by hand. First draw the curve on both ends. Then extend lines that define the curve’s width and depth down the length of the board. Plane to the lines and sand.
5. Glue up the case. Join the side assemblies with the front rails and the bottom. Once the glue has dried, slip in the side rails and back rail from the rear of the case.
6. Rout stopped grooves for the drawer joints. Use an edge guide with your plunge router. This one is shop-made.
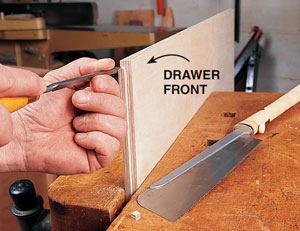
7. Round over the tongue to fit the top of the groove. Cut the small shoulder with a handsaw, then pare a round shape with a sharp chisel.
8. Drill indexed pairs of holes for the divider’s wire supports. This shop-made jig is clear plastic so you can line up a scribe mark on its arm with the centerline of the holes. Two 1⁄8-in. holes in the arm guide the drill bit.
9. Glue up the drawer box in a fixture to keep it square. After the glue has set, remove the box from the fixture and spread glue in the grooves that hold the bottom. Then slide in the bottom from the back and secure it to the back side with screws.
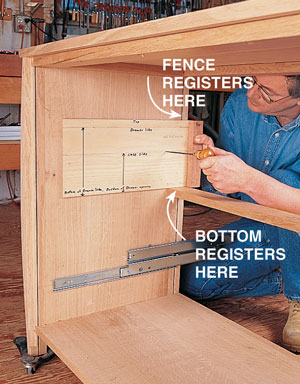
10. Mark screw holes for the slides with a homemade reversible jig. Use the same jig to lay out the holes in the drawer sides.
11. Use double-faced tape to position each drawer front. Shims provide the proper spacing.
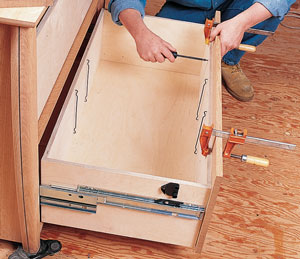
12. Screw the front on to the drawer box. Clamp it in place first so it can’t shift. Remove the clamps and check the overall fit again. Fig. A: File Cabinet Assembly
Fig. B: Side Assembly
Fig. C: File Divider Spacing
|


Here are some supplies and tools we find essential in our everyday work around the shop. We may receive a commission from sales referred by our links; however, we have carefully selected these products for their usefulness and quality.


