Hidden within a few trees in every forest lies a mysteriously
distorted wood that has always fascinated
woodworkers.You can’t spot curly wood from the outside, but inside
the tree a peculiar switch has been flipped, turning straight
tree cells into wavy cells. Cut the tree open, plane the
wood and you get spectacular, three-dimensional rippling
wood grain.
But beauty comes at a price.You can tear your hair out
trying to tame this unruly wood.Here are some practical
tips on how to buy,machine and finish curly wood.
What Is Curly Wood?
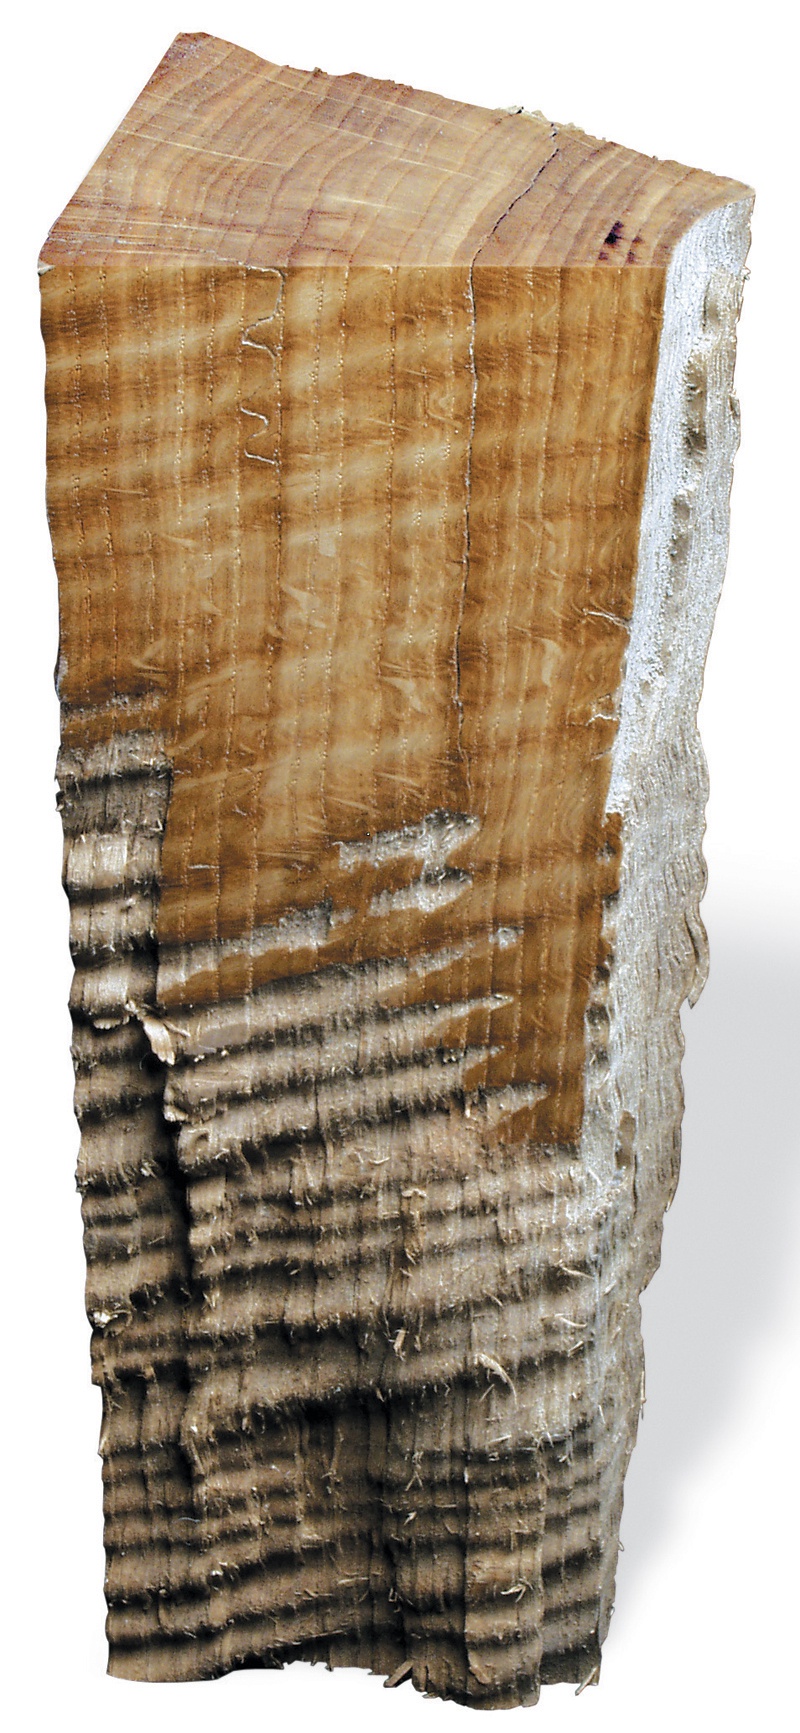
The stripes you see in a finished board of curly wood
come from the play of light on grain that waves from side
to side (Photo 1). The troughs and crests of the waves
reflect light in different directions. As you turn a curly
board around in your hands, its surface actually shimmers.
Light areas turn dark and dark areas turn light.
The biology of curly wood is as mysterious as its appearance.
No one really understands why some trees have
this wavy grain. It’s not genetic.You can take seeds from a
curly tree,plant them near their parent and get nothing but
straight-grained timber. The best guess is that stressful
growing conditions, such as cold and drought, turn on the
curly switch in a few trees,but no one has figured out how
to duplicate these conditions in order to grow curly trees.
Curly grain can appear and disappear within a single
tree. One side of a tree can be curly, and the other side
straight. Young outer layers may be curly, but not older
inner layers. It’s totally baffling!
Buying Curly Wood
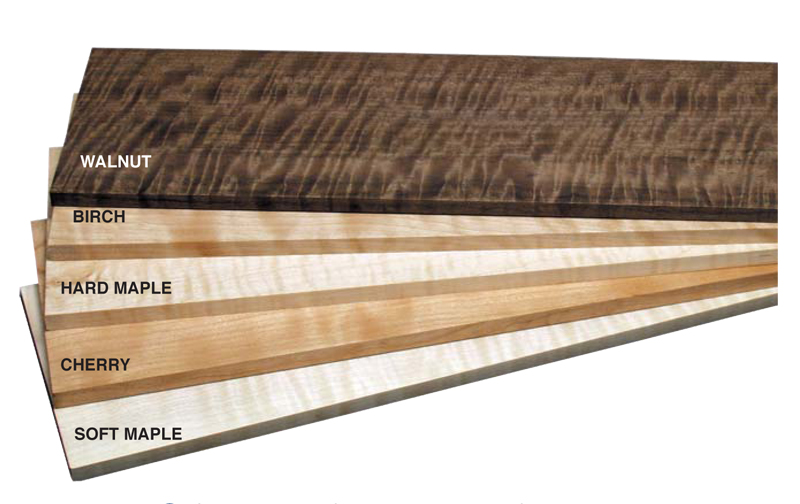
Any kind of tree can become curly,but
some species that grow in tough northern
climates produce a greater percentage
of curly wood than others
(Photo 2). Flame birch and tiger maple
are well-known examples, but you can
uncover curly walnut, curly cherry and
curly oak, just to name a few.
If you’re lucky, you can find curly
wood in any pile of lumber for the same
price as a straight-grained board.Many
lumber mills process logs so fast they
don’t stop and cull the unusual curly
ones. If you search for curly boards in
the rough, look for a striped barberpole
surface or alternating areas of
smooth and fuzzy grain.
A few folks in the lumber trade make
it their business to find curly logs.Wood
prospectors mine for curly gold in the
hundreds of average trees felled by a
lumber mill.The prospectors peel back
the bark of some logs before they’re
sawn.If they hit pay dirt,they’ll purchase
the log and gamble that most of it is
truly curly.No one will really know how
spectacular or faint the curl is until it’s
sawn.
Each dealer has their own system of
grading curly wood, based both on
general figure and the number of curls
per inch.They’ll be the first to tell you
that curly wood is so unusual that it
defies classification. Your best bet for
consistency is to stick with a dealer
who has a large stockpile and familiarity
with this enigmatic wood.
The Benefits of Wide Boards
Many dealers in curly wood hoard
wide stock.Their logs are custom sawn
to maximize the width of each board.
Why go to so much trouble? Imagine
a drawer front made of three curly
boards glued together. Individually,
each board looks fantastic, but they
don’t work together (Photo 3). One
wide board for the drawer front would
look much better. Experienced builders
of reproduction furniture look high
and low for wide boards.
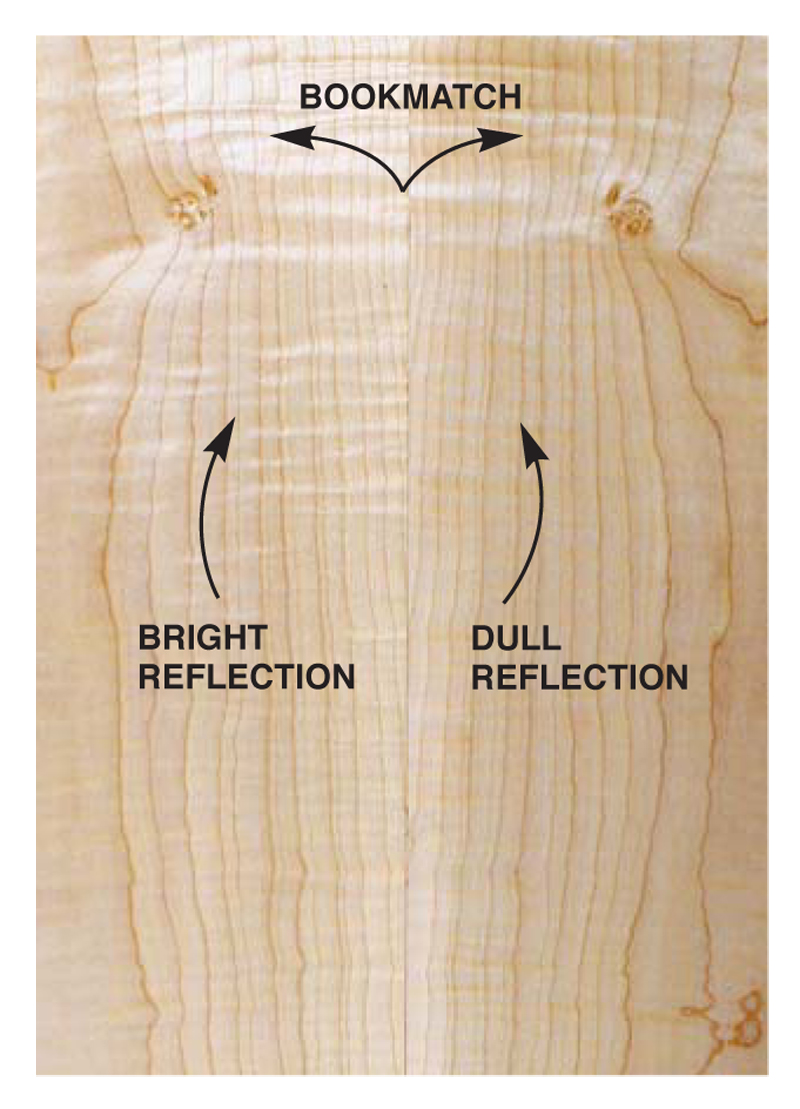
Bookmatching
If you resaw and bookmatch curly
wood, light can play tricks on you
(Photo 4). Sure, you’ve made a wide
board with mirror-image grain (the
physical structure of the cells),but look
what happens to the figure (the surface
appearance of the cells).The grain runs
uphill on one side of the board and
downhill on the other.
What does that do to the figure?
One side of the board can be light, the
other side dark. Shift your viewpoint
and the brightness shifts the other way.
Again, a wide board may be a better
choice. Musical instrument makers
routinely bookmatch the curly wood
they call fiddleback maple, but they’re
awfully picky about selecting just the
right boards.
Reducing Tear-Out
Curly boards are notoriously difficult to joint and plane,but
armed with some woodworking savvy you can usually produce
a blemish-free surface.The problem is the grain,which
changes direction with every ripple (Photo 5). It runs downhill
on one side of a wave and uphill on the other side. So no
matter which way you feed a board, whole hunks of wood
can be yanked off the surface by a machine’s knives, leaving
an ugly pit behind. If you’ve just spent a pile of money on
some special wood, this can be heartbreaking.Here’s how to
minimize tear-out:
– Change your knives. Dull knives on a jointer or planer
pull on wood grain; sharp knives cut it cleanly.
– Take a light cut. Set your machine to remove 1/64 to 1/32
in. at a time. Sure, you’ll take many more passes, but you’ll
minimize the depth of any tear-out.
– Wet the wood. Green wood is easier to cut than dried
wood, because wet cells are easier to separate and less likely
to pry out their neighbors.You can temporarily achieve the
same effect on kiln-dried wood by lightly sponging the surface
of a board before you joint or plane (Photo 6).Give your
jointer bed a good waxing and the board won’t drag. Rest assured, you won’t rust your cutter heads as long as you
clean and dry them right away.
– Feed slowly. Go slow on the jointer, about half the
speed you normally use.
– Scrape, don’t plane. If you’re working with hand tools,
use a No. 80 scraper plane (#03.12.05; $33 from Highland
Hardware, 800-241-6748). Its steep cutting angle allows
you to quickly remove milling marks without any fear of
tear-out. A card scraper is the perfect tool for smoothing
small areas of shallow tear-out.
Despite your best efforts, a little tear-out when working
curly wood is inevitable. Don’t get too discouraged. Some
curly boards are so wild that even the finest woodworkers
turn to two more tools: drum sanders and putty. A drum
sander is a surefire (and expensive) way to surface curly
wood perfectly smooth. It’s slower than a jointer or planer,
but you’re guaranteed a clean shave. For tiny pits of tear-out
that run pretty deep,use putty. If you scrape or sand down
to the bottom of the tear-out you might end up creating a
whole new problem: a shallow, dished out divot.You may
not see it right away, but it’ll show up under a finish.
Finishing Tips
The amount of color in a finish can make a big difference in
bringing out the curl. The explanation lies in looking once
more at curly wood’s grain structure.Remember how the surface
of a flat board cuts right through the rising and falling
grain? When the grain rises up to the surface it exposes the
ends of many cells. These end-grain cells are thirsty to
absorb a finish, just like the end grain of any board. But the
side-grain cells on the crests and troughs of each wave don’t
absorb as much finish. The result is that some areas of a
board soak up more finish (and color) than others.
Finishes such as shellac, oil and varnish are slightly colored.
The thirsty parts of a board soak up an extra amount
of this color. This extra color really makes the curl pop.
Orange or amber shellac has more color than blond shellac,
making the effect particularly striking (Photo 7).
Other finishes such as lacquer and waterborne
polyurethane don’t have much color in them.You can still see
the curl under them,but it’s not as dramatic. However, if you
apply these finishes over a coat of dewaxed shellac you can
have the best of both worlds.
Dyeing Curly Figure
Here’s a neat trick using dyes instead of stains to emphasize the dark
figure of curls. This is a shop-tested recipe to simulate the look of
antique curly maple furniture:
1. Sand your maple to 220 grit and apply one coat of Dark Mission
Brown water-soluble dye,mixed 1/8 tsp.powder to 1 cup water. Let dry.
2. Re-sand with 220 grit paper. Sand until the wood surrounding
the dark-colored curls is light.
3. Apply Early American water-soluble dye mixed 1/2 tsp. powder
to 1 cup water. Let dry.
4. Apply a liberal amount of boiled linseed oil.Wipe off the excess
after 30 minutes. Let dry at least three days.
5. To further warm the color of the wood and give it an aged look,
apply a burnt umber glaze.Visit the Web site listed below for more on
using glazes.
6. Apply your favorite topcoat. If you’re using a waterborne finish,
apply dewaxed shellac first.
Sources
(Note: Source information may have changed since the original publication date.)
Homestead Finishing Company, homesteadfinishing.com, 216-631-5309, Water-soluble dyes:
Dark Mission Brown, #3274, and
Early American Maple, #3273, $7.25 for
1 oz.;
Japan color:
Burnt Umber, #7002, $6.25 for 8 oz.
This story originally appeared in American Woodworker February 2002, issue #92. |
|
Click on any image to view a larger version.
1. Split open a curly log and you’ll find grain that
bends back and forth like a wave. Planing the wood
cuts through the waves, producing a shimmering effect
like light bouncing off the ripples on a pond.This chunk
of white oak is spectacular-looking wood!
2. Curly wood is found in every kind of tree under the sun.
Environmental factors probably turn normal trees into curly
ones, but nobody knows for sure how it happens. Soft maple and
birch are the most common domestic curly woods.
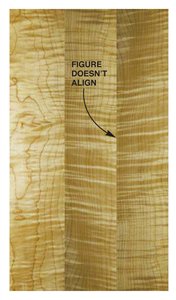
3. Glued-up curly boards may not
go well together. Curly figure is
unusual because it runs at right angles
to the edge of a board. It’s difficult to
align figure like this in a group of narrow
boards. Instead, look for wide boards.
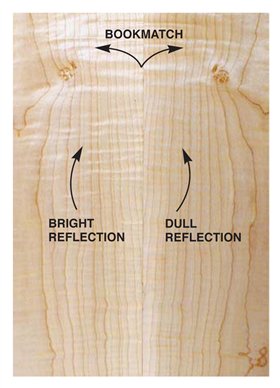
4. Resawing a curly board into two
bookmatched pieces makes a wide
panel, but you may not like what you see.
Although the grain structure is the same
in both boards, the figure doesn’t look
the same. Bright areas on one side may
look like dull areas on the other side.
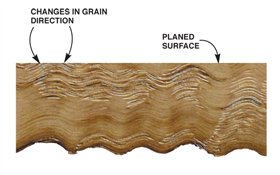
5. The planed surface of a curly board slices right
through the waves of grain. Making a curly surface
smooth and free of tear-out is pretty tricky, because the
grain constantly changes direction. Half the time you’re
actually cutting against the grain!
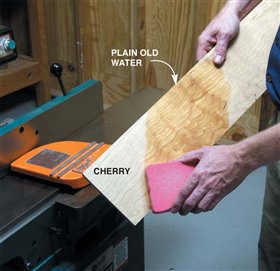
6. Wetting the surface of curly wood before jointing or
planing virtually eliminates tear-out.This may be hard to
believe, but temporarily softening the fibers really works!
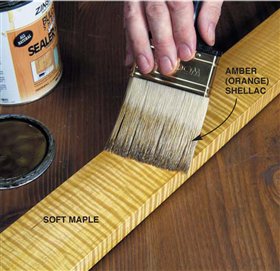
7. Finishes that are slightly colored emphasize the curls
more than perfectly clear finishes.Amber shellac has an
extra amount of color, enhancing the effect.
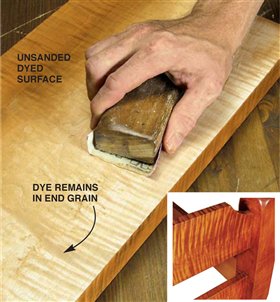
8. Dye penetrates deeply into the thirsty end-grain
areas of the curls. It makes them stand out from
the surrounding wood. For even more contrast, sand
the board.The curls remain dark while the surrounding
wood stays light.Then, apply a second coat of dye.
|