Cathedral raised-panel doors are beautiful, but they can be
intimidating to make. After many years of teaching students how to make
these doors, I’ve got a trick or two up my sleeve to simplify the
process and remove some of the fear factor. Here’s a tried-and-true
recipe to help you safely and successfully make beautiful doors.
There are a few specialized tools you must have to make cathedral
doors. Start with a suitable router table. It should be equipped with a
2-hp or higher variable-speed router that accepts 1/2-in.-shank router
bits. You’ll also need a bandsaw or jigsaw for cutting the curves and a
set of door-making router bits. The bits and a template set will set
you back nearly $400, but they are a big part of what makes this
technique airtight. The good news is the router bits are not specific
to cathedral-top doors; they can be used to make any frame-and-panel
door.
You’ll need a two-piece matched rail-and-stile set (about $135) to make
the frame. It’s easier to get good results with a two-piece set than
with a one-piece reversible bit. With a two-piece set, you feed all the
pieces face down. Reversible bits use one arbor with removable cutters.
Some parts are machined face up, others face down. This often results
in poor alignment between rails and stiles. Plus, it’s a hassle to have
to change cutters on the arbor. Bits with a 1/2-in. shank will produce
less chatter and a smoother cut than those with 1/4-in. shank.
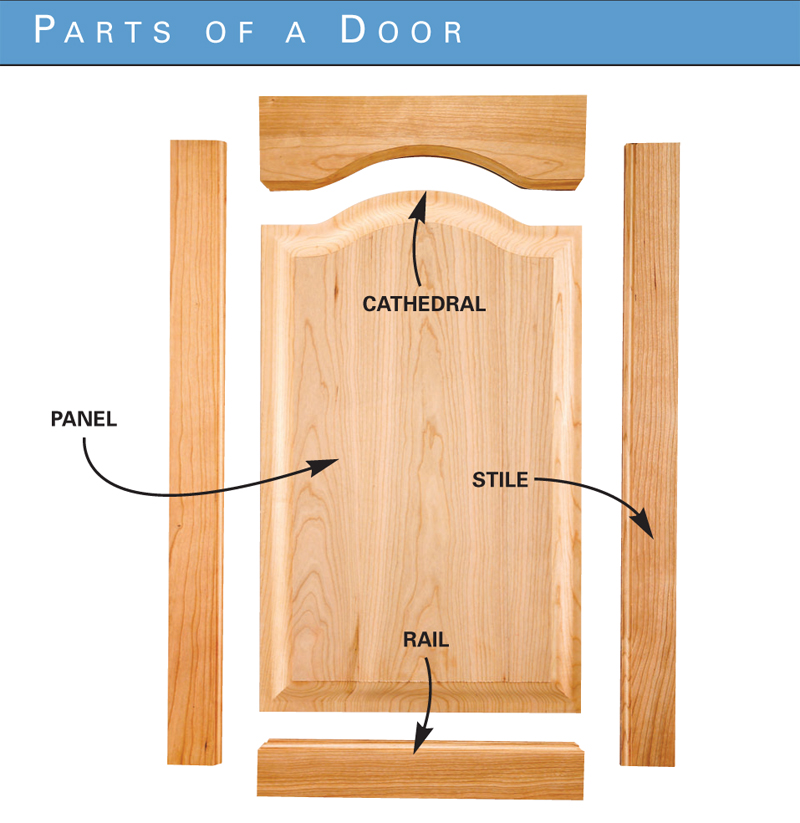
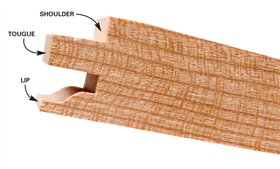
Parts of a Door

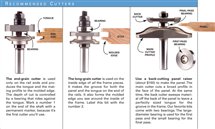
Recommended Cutters
Make the Frame: Photos 1-14
First, cut all the frame pieces (see “Sizing a Door,” below). For a good-looking, stable door, make the
frame from straight-grained wood.
Next, on your router table, set up the end-grain cutter
for machining the rail ends. Cutting end grain before
long grain helps prevent blow-out on the rails. Here’s a
memory device for you: Machine the Rails before the
Stiles, because R comes before S in the alphabet.
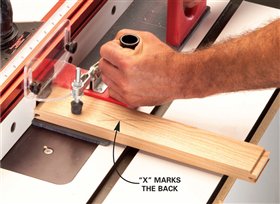
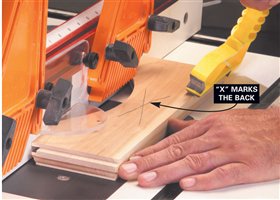
Mark the back of all the frame pieces. They get
machined with their good faces down, so you should be
looking at the mark on the back for all the cuts.
Note: Run the end-grain and long-grain cutters at full
speed on your router.
Recommended Tool: Coping Sled
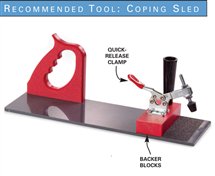
Get a coping
sled ($40) for making the
end-grain cuts on the rails. The sled uses
a quick-release clamp to hold the rails
with a firm grip. A replaceable backer
block keeps the rail square to the fence
and backs up the edge of the rail to prevent
blow-out.
Recommended Tool: Template Set
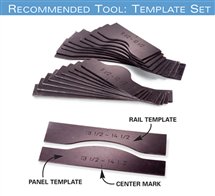
A cathedral template set ($70) is a
matched set of rail-and-panel templates.
A template can be fastened
directly to the material to act as a
guide for the flush-trim bit. A set
typically covers a range of panel
widths, generally from 9-1/2 in.
to 22 in. Each pattern has a centering
hash mark for locating the pattern on
the wood. Sure, with careful layout,
bandsaw and drum-sander work
you can make your own patterns,
but it’s hard to beat the simplicity
of commercially made patterns
(see Sources, below).
Oops!
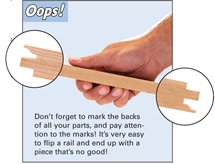
Don’t forget to mark the backs
of all your parts, and pay attention
to the marks! It’s very easy
to flip a rail and end up with a
piece that’s no good!
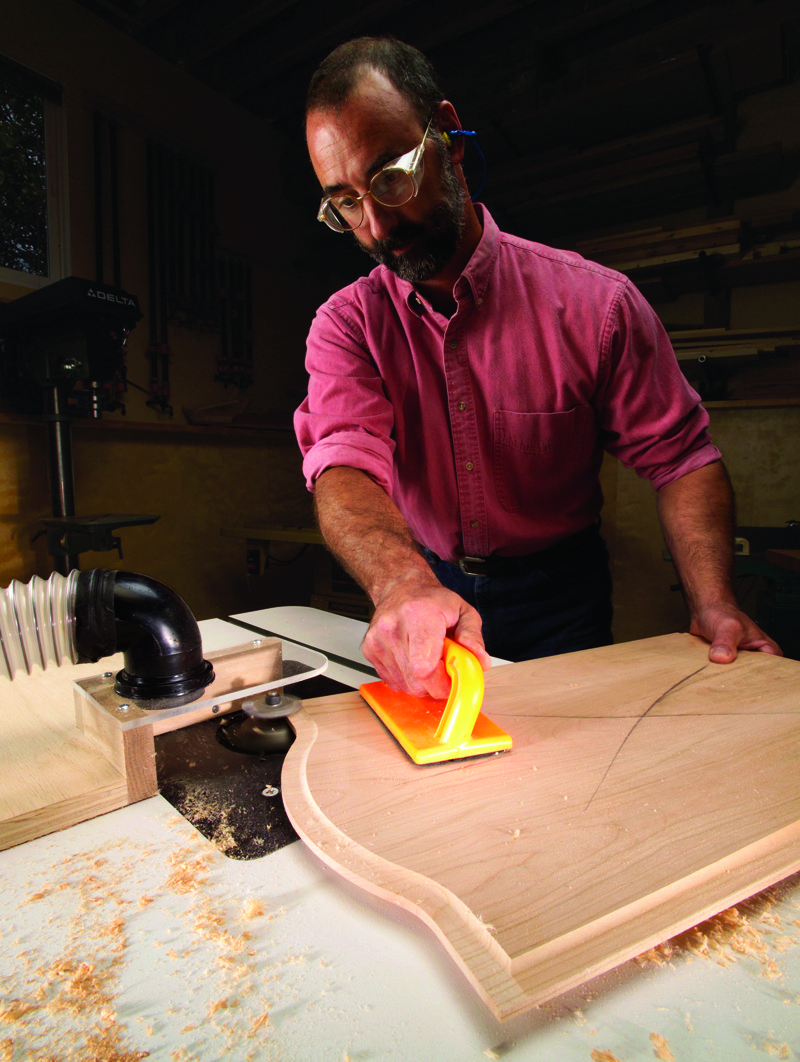
Make the Panel: Photos 15-22
Gluing up narrow pieces of wood is the best way to
make wide panels. You’re more likely to get a
panel that won’t warp, and it’s your chance to
exercise some creativity. Look for interesting grain patterns
or cool-looking pieces of wood with lots of character.
Rip the panel to width (see “Determining Panel Size,” below),
but don’t cut it to length until after you’ve flush-trimmed
the arch on top, just in case you have a problem with the
flush-trimming step. Mark the back of the panel to
remind you to keep it face down on the router table.
Large-diameter panel-raising bits must be run slowly,
at no more than 12,000 rpm. Routers with 3-hp motors
can easily raise the panel in two passes using the fence
to limit the depth of cut. A router whose motor has less
than 3 hp may struggle a bit. Use push pads to grip the
panel and guide it past the bit.
Determining Panel Size
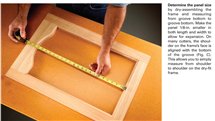
Determine the panel size
by dry-assembling the
frame and measuring
from groove bottom to
groove bottom. Make the
panel 1/8-in. smaller in
both length and width to
allow for expansion. On
many cutters, the shoulder
on the frame’s face is
aligned with the bottom
of the groove (Fig. C).
This allows you to simply
measure from shoulder
to shoulder on the dry-fit
frame.
Tips and Reminders
– If you’re making a door with rails and stiles less than 2 in.
wide, it’s easier and safer to work with pieces wide
enough to make two back-to-back pieces. After all the
machining is done, rip the stock down the middle to create
a pair of stiles or rails.
– Practice making a door with an easy-to-machine material,
such as poplar or pine. Keep a successfully made
door, dry-assembled only, so you can use the parts for
future setups.
– Make extra pieces, just in case. Rails are especially easy
to goof up. You’ll appreciate having a spare ready to go if
you need it.
– Use straight-grained material for the frame and more
open-grained pieces for the panel.
– Prefinish the panel before you assemble the door.
Recommended Gear: Bit Cover
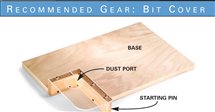
A shop-made bit cover with a starter pin is essential,
because the arched shapes can’t be cut with a fence. The
starter pin acts as a fulcrum for easing the arched rail and
panel into the router bit. The cover protects
your hands and provides dust collection.
The large plywood
base allows you to clamp the
cover to
y o u r
router
table
(see Fig. D).
Assemble the Door: Photos 23-25
With the router table work done, you’re almost
home free. Still, there are some tricks for
making assembly easier.
Sand all the pieces before putting the door together.
Be careful when sanding the long-grain profile on the
stiles. If you sand too much, the stiles won’t mate with
the rails the way they should.
Prefinish the panel to guarantee the entire panel is
coated with finish. That way you won’t have unfinished
edges peeking out of the frame when the panel shrinks
in winter. Prefinishing also prevents glue squeeze-out
from gluing the panel to the frame, which would prevent
the panel from floating in the frame. A glued-in,
solid-wood panel is bound to crack as it tries to expand
and contract with seasonal changes.
Have everything you need ready before applying the
first drop of glue. Glue dries fast, and you don’t want
the glue to start setting up while you’re running around
the shop looking for a clamp.
Speaking of clamps, use good ones. Sure, you can make
almost any clamp work, but parallel jaw clamps are the
best by far. They stay dead flat, even under clamp pressure.
If you only spring for one pair—and glue a kitchen full of
doors one door at a time—you won’t regret it.
Tip: Anti-Rattle Snakes
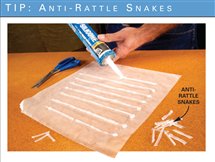
Solid-wood panels expand and contract seasonally. When
they’re at their smallest, they can rattle within the frame.
You can take the rattle out with these silicone strips. Make
them by squeezing 1/8-in.-dia. beads of silicone caulk onto
a piece of wax paper. After the caulk dries, peel off the
strips and cut them into 1-in. lengths. Set these into the
grooves before you assemble the door. They’ll provide a
cushion that allows the panel to expand but not rattle.
Sizing a Door
Before you can calculate
the lengths of the rails
and stiles, you have to
know how the door will fit
over or into the cabinet
opening. If the door will lay
over the opening, it’s called
an overlay door. You must
know the amount of overlay
to make your rail and
stile calculations. The size
of the overlay —how much
bigger the door is than the
opening—can be affected
by the hardware you use.
So, get the hardware
before you build your door.
If the door will be set inside
the opening, it’s called an
inset door. To calculate your
stile and rail size on an inset
door, you need to know the
gap size between the door
and the cabinet (usually
about 1/32 in.). Many cabinetmakers
cut the parts to
fit the opening exactly and
then trim the assembled
door to create the gap.
Fig. A: Sizing Stiles and Rails
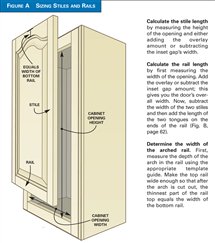
Calculate the stile length
by measuring the height
of the opening and either
adding the overlay
amount or subtracting
the inset gap’s width.
Calculate the rail length
by first measuring the
width of the opening. Add
the overlay or subtract the
inset gap amount; this
gives you the door’s overall
width. Now, subtract
the width of the two stiles
and then add the length of
the two tongues on the
ends of the rail (Fig. B).
Determine the width of
the arched rail. First,
measure the depth of the
arch in the rail using the
appropriate template
guide. Make the top rail
wide enough so that after
the arch is cut out, the
thinnest part of the rail
top equals the width of
the bottom rail.
Fig. B: Rail End
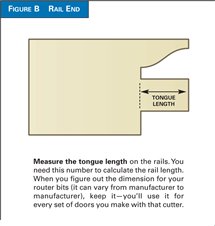
Measure the tongue length on the rails. You
need this number to calculate the rail length.
When you figure out the dimension for your
router bits (it can vary from manufacturer to
manufacturer), keep it—you’ll use it for
every set of doors you make with that cutter.
Fig. C: Stile Cross Section
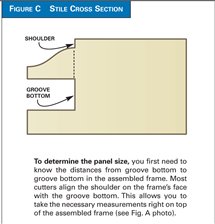
To determine the panel size, you first need to
know the distances from groove bottom to
groove bottom in the assembled frame. Most
cutters align the shoulder on the frame’s face
with the groove bottom. This allows you to
take the necessary measurements right on top
of the assembled frame (see Fig. A).
Fig. D: Bit Cover and Starting Pin
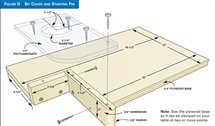
Note: Size the plywood base
so it can be clamped on your
table at two or more points.
Sources
(Note: Source information may have changed since the original publication date.)
Infinity tools, infinitytools.com, 877-872-2487, Classic door templates, PDT-100, $70.
MLCS, mlcswoodworking.com, 800-533-9298, Rounded curve template, 9378, $70.
Sommerfeld Tools, sommerfeldtools.com, 888-228-9268, Cathedral door templates, TMP-003, $80.
Woodhaven, woodhaven.com, 800-344-6657, Cathedral door template set, 5455, $95.
Eagle America, eagle-america.com, 800-872-2511, Coping sled, #400-1235, $40.
Woodworker’s Supply, woodworker.com, 800-645-9292, Double-faced tape, #127-877, $11.
This story originally appeared in American Woodworker November 2004, issue #111

Purchase this back issue. |
|
Click on any image to view a larger version.
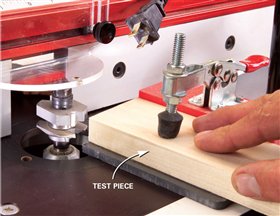
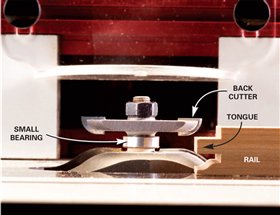
1. Set the height of the end-grain cutter against a test piece
in the coping sled. The cut should leave a shoulder on top
of the piece that’s twice as thick as the lip on the bottom (see
Photo 4). You can tweak the height after a test cut.
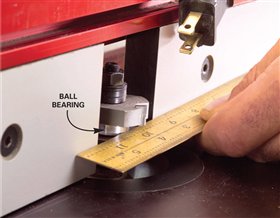
2. Set the fence even with the face of the ball bearing.
A straightedge makes quick work of this job.
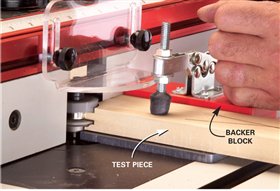
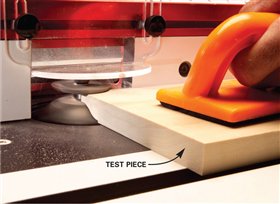
3. Make a test cut, but don’t cut all the way through the test
piece. You don’t want to cut into the backer block until the
bit height is perfect. That way, the block can be used to quickly
set the bit height the next time you make doors.
4. Check
the cut. The height of
the router bit controls the depth of the
shoulder and the thickness of the lip. The tongue
size is fixed. The shoulder should be about twice as
thick as the lip. In 3/4-in.-thick stock, this works out
to a shoulder depth of approximately 3/16 in. Raise
or lower the bit as needed and make test cuts until
it’s right.
5. Rout the rail ends. Remember, the back of the board is
face up for all cuts. To ensure a uniform cut, keep consistent
downward pressure on the sled at all times.
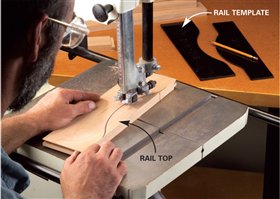
6. Rough-cut the arch in the top rail. Center the rail template
on the top rail with the bottom of the pattern even with the
rail’s bottom edge. Use a template that is the same length or
slightly longer than the rail. Trace the template and use a
bandsaw or jigsaw to cut the curve. Stay at least 1/16 in. but
no more than 1/8 in. outside the line.
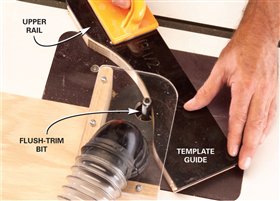
7. Flush-trim the rail with a template guide and a flush-trim
bit. Use double-faced tape to adhere the pattern to the rail.
The fence is replaced with a bit cover and starter pin assembly
(see Recommended Gear).
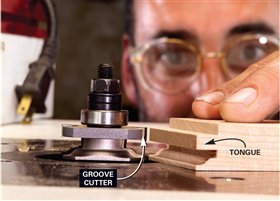
8. Set the height of the long-grain cutter by aligning the
groove cutter with the tongue on the end of a machined
rail. The top of the cutter should be even with the top of the
tongue.
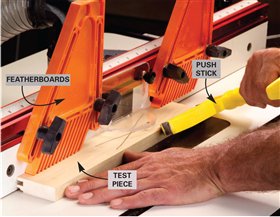
9. Make a long-grain test cut in a scrap piece. Use featherboards
to hold the rail down onto the table and a push
stick to drive the piece past the cutter.
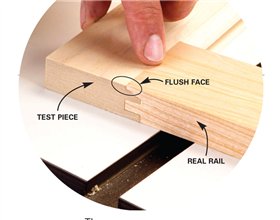
10. Check your
work by fitting a
rail into the test piece. The
faces of both parts should be flush. If they’re off by just a little
—the thickness of this page, for instance—you’re probably
OK. A tiny discrepancy like that will easily sand out after
assembly. If they’re off more than that, raise or lower the bit
to correct it. Make test cuts until you’ve got a good match.
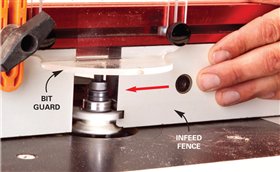
11. Make a zero-clearance fence by slowly sliding the infeed
half of the fence into the spinning bit. This eliminates most
of the chipping that can happen on these cuts. You only need the
zero-clearance fence on the infeed side. Caution: Make sure
your bit guard is in place and the mounting bolts on the fence
are just loose enough to let the fence slide easily.
12. Machine the long-grain edges of every frame piece,
including the straight portions of the arched rail. Make
sure the piece is face down. You should be able to see the
mark on the back of the piece when you’re machining it.
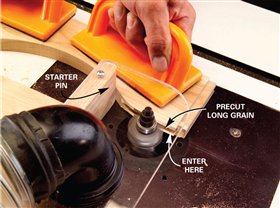
13. Begin the arched cut at the precut section of the top rail.
First position the rail against the starter pin without contacting
the bit. Then pivot the rail into the bit so the bit enters
the previous long-grain cut. Caution: Do not allow the bit to
contact the end grain, as this typically causes it to grab the
rail and ruin the piece.
14. Complete the long-grain cut by pivoting off the starter
pin and riding the router-bit bearing through the entire
length of the arched rail. Use push blocks to keep consistent
downward pressure on the rail throughout the cut.
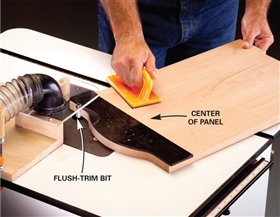
15. Form the arch on the panel the same way you did the
rail, but using the matching panel template. Use a
square to make sure the pattern is set square on the panel.
Center and trace the pattern, cut outside the line, tape the pattern
to the panel and flush-trim the shape.
16. Set the panel-raising bit’s height by aligning it with a
rail’s tongue. “Eyeball” the bit height so the bottom of
the back cutter is even with the top of the tongue. Use the bit’s
small bearing and set the fence 1/4-in. in front of the ball bearing.
At this stage, the fence is back in place of the bit cover.
17. Make a test cut on the long-grain edge of a piece of
scrap. It’s easier to cut long grain than end grain, so
make your test cuts on a long-grain edge. Make the first pass
with the fence about 1/4 in. ahead of the bearing. Set the
fence even with the bearing for the second pass.
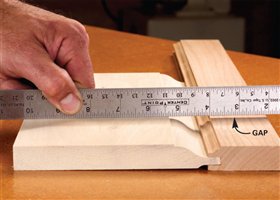
18. Check your work by slipping the test piece into the
groove and laying a straightedge across the face. The
panel and the frame face should be flush. In this case, the gap
means the bit is set too high. Adjust and test the bit height
until it’s right. When the correct bit height is established,
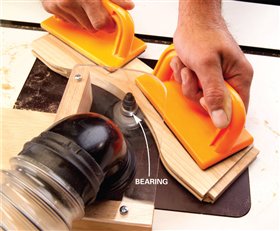
replace the small bearing with the large one.
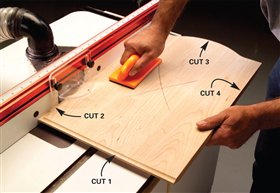
19. Make the first pass on the panel with the face of the fence
set even with the large bearing. The first cut is made on the
panel’s bottom edge. Rotate the panel counterclockwise and
make the second cut on the long-grain edge. Keep the panel
moving in one continuous motion to prevent burning. Cuts 3 and
4 will require different setups.
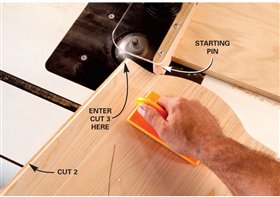
20. Set up to cut the panel arch (Cut 3) by removing the fence
and clamping the bit cover and starting pin in place. Turn
on the router and position the arch against the starting pin without
contacting the bit.
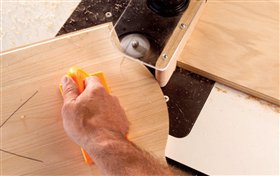
21. Start the cut by easing the panel into the bit so the bit
enters at the previously cut corner. At this point, the arch
is in contact with both the starting pin and the bearing on the
router bit.
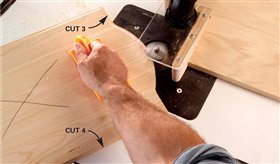
22. Rout the arch by pivoting off the starting pin so the panel
is only contacting the router-bit bearing. Finish the arch,
reposition the fence so it’s even with the bearing and make Cut
4 on the remaining long-grain edge. Replace the large bearing
with the small one and repeat the process (Photos 19 through
22) for the final pass.
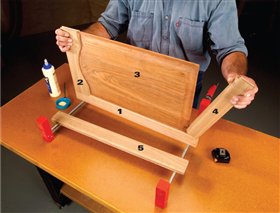
23. Glue in sequence from 1 to 5. Start with a stile and the
top rail. Add the panel, then the bottom rail, and capture
it all with the last stile. Keep the edge of the rail dead
even with the end of the stile.
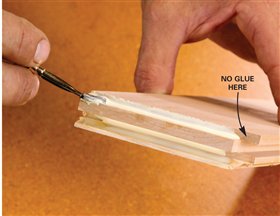
24. When you apply glue to the rail ends, make sure the
entire profile is covered except for the areas just
above and below the groove. This helps prevent getting glue
on the panel.
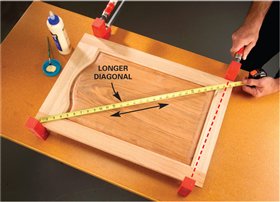
25. Clamp the door gently. It doesn’t take much pressure
to pull the rails and stiles together. Excessive clamping
can bow the door. Measure the diagonals to make sure the
door is square. If it’s not, loosen the clamps and rack them in
the same direction as the longer of the two diagonals. Tighten
the clamps, and recheck the diagonal. |