We may receive a commission when you use our affiliate links. However, this does not impact our recommendations.
Tenoning Jigs
By Tom Caspar
Tenoning jigs make the complicated world of mortise-and-tenon joinery a lot simpler. I’ve used a homemade wooden jig for years. I stand a rail upright on the tablesaw and clamp it to a tall box that slides on my fence. Most shop-made jigs have two drawbacks, though. First, they must be modified for different types of joints. Second, your fist is the only way to make a fine adjustment to the tablesaw fence. I kept telling myself to look into something better, but the only commercially made jig available a few years ago, the venerable Delta 34-172, didn’t tilt and was hard to adjust.
A new generation of redesigned jigs has changed everything (see Chart, right). They are fully adjustable and are extremely accurate. They fit both left- and right tilt saws. After trying seven different models, I’m ready to honorably retire my beat up wooden jig and move on.
Most Tenoning Jigs Are Alike
All seven tenoning jigs I tried are surprisingly similar. Remove the handles, paint all the jigs the same color and you would have a hard time telling them apart. Taking a closer look, though, I did find some subtle but important differences. Let’s examine their common features first.
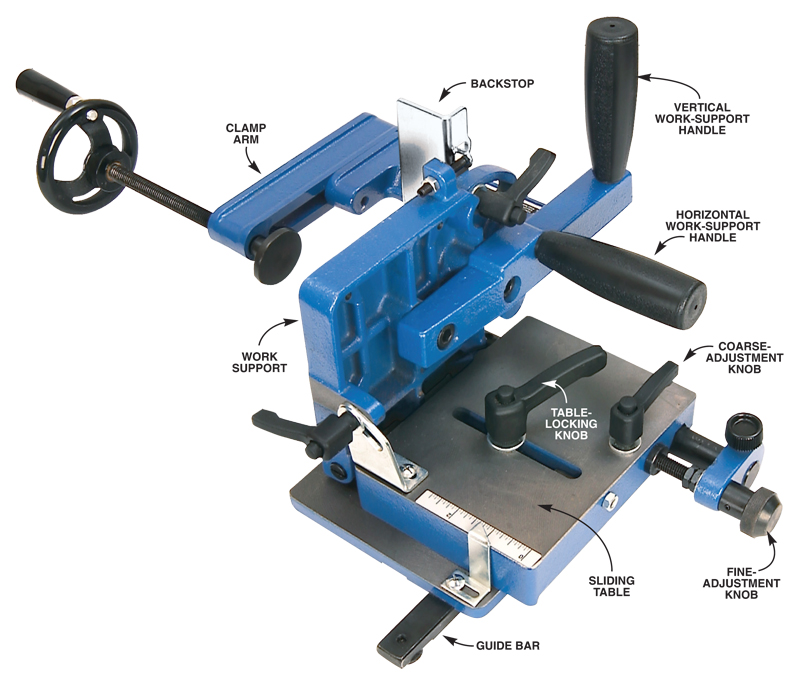
■ Work support. This 5-in.-wide by 6-in.-tall cast-iron plate holds the workpiece. It tilts from 0 to 17 degrees (see photo, page 86, left). You can cut steeper angles by tilting the saw blade. On a left-tilt saw, I turn the jig around and run it in the right-hand miter slot when I tilt the blade for steeper angles. This may not work on all saws, however.
■ Clamp arm. This adjusts forward or backward a total of 2 in. to center the clamp on the workpiece.
■ Backstop. The backstop tilts backward from 0 to 45 degrees (see photo right).
■ Sliding table. The table moves 2-3/8 in. to adjust the distance between the blade and work support.
■ Coarse adjustment. Loosening a knob allows you to slide the table. Many times, though, you must strike the table with your hand to get it going. That gets old real fast. Lubrication doesn’t help much.
■ Fine adjustment. Turning a knob allows you to fine-tune the sliding table’s position. One rotation of the knob moves the table a bit less than 1/16 in. The fine adjustment works so well that I usually skip using the coarse adjustment.
4 User-Friendly Features
Some jigs have additional features that make them easier to set up, adjust and use (see Chart, right).
■ Adjustable guide bar. Some guide bars can be adjusted to fit tightly in your saw’s miter slot. This must-have feature increases accuracy by preventing the jig from wiggling as you cut a tenon. The adjustment consists of a pair of set screws in the guide bar, similar to those on premium miter gauges.
■ Above-jig guide-bar alignment. You must align a new jig so that it’s parallel to the saw blade by shifting the guide bar’s position. This is a lot easier on jigs whose adjustment screws are accessible from above. On other jigs, the screws are below the sliding table, so you must remove the jig from the saw each time you shift the guide bar. That’s very awkward.
■ Rear handle on table. For the most accurate cuts, I prefer jigs that have at least one handle mounted on the sliding table (see photo, right). On other jigs, both handles are located on the work support. As you’re cutting a tenon, I find that you can inadvertently twist the work support by pushing too hard on one or both of these handles. That can ruin a cut.
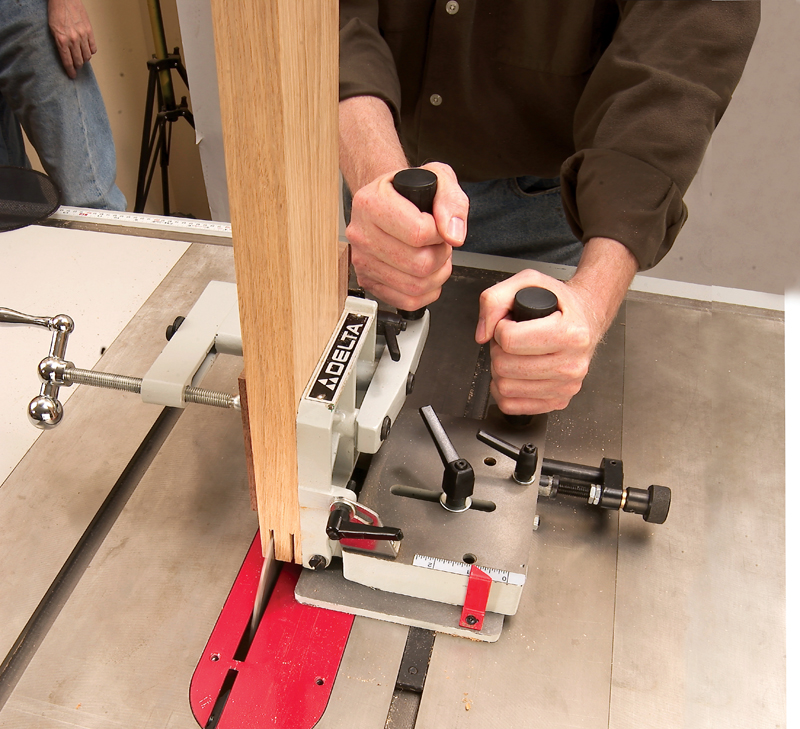
■ Front-mounted handle. Only one jig, the Delta 34-184, has a handle in front (see photo, above right). I think it’s a great idea.
Recommendations
The seven tenoning jigs I tested are very similar to one another, even though their prices vary quite a lot (see Chart, below). They all work very well. Some jigs have a few important improvements for easier setup and more accuracy. The least expensive jig, the Grizzly H7583, has most of these good features, as do the Woodcraft 144755 and the Delta 34-183. For the best value in a tenoning jig, get the Grizzly.
The most expensive jig, the Delta 34-184, has two features that make it the most convenient model to use right out of the box. First, it’s the only jig with two handles on the sliding table. Other jigs have one or two handles on the work support. Pushing on these handles can cause the support to wiggle during a cut. For most cuts, the wiggle is so small that it’s not a big deal, but for cuts that must be very precise, it’s a concern. Using both handles on the sliding table, I made more accurate cuts with the Delta 34-184 than using other jigs. The second feature is a fine-adjustment mechanism that’s graduated for fine-tuning a setting. Each line on the fine-adjustment knob indicates that you’ve shifted the work support by about .004 in.
6 Joints You Can Make with a Tenoning Jig
Tenoning jigs do much more than simply make straight tenons. You can create other joints by tilting the jig, leaning the workpiece backward or using a dado set. Here are a few examples:
■ Angled tenon. This complicated joint is often used on chairs when the seat is wider in front than in back. Angled tenons and shoulders go on the rails connecting the front and back legs. Before getting a tenoning jig, I couldn’t figure out how to quickly machine all those angles, so I slowly cut these joints on the bandsaw and by hand. Using a dado set and a tenoning jig, however, I can cut both the tenon and its shoulders with a single setup.
■ Open mortise and tenon. This joint is best cut with a dado set, too, to form the mortise’s bottom with one pass. The tenon’s length is limited by the maximum height you can raise your dado set above the saw’s table—about 2-1/4 in. for an 8-in. set, 1-1/4 in. for a 6-in. set.
■ Mitered end lap. This elegant door joint is mitered above and half-lapped below, for additional glue surface. Use a general-purpose or combination blade for all the cuts. Run a groove inside both pieces to receive a panel.
■ Splined miter. Use a dado set to cut these grooves. They can be wider and deeper than grooves made using a slot cutter on a router table.
■ Scarf joint, low-angled miter or long bevel. You can’t cut steep angles like these with a board lying flat on the tablesaw or a miter saw, but they’re no problem when the piece is held upright in a tenoning jig. A scarf joint is used to make one long piece from two shorter ones. A low-angled miter, less than 45 degrees, is used on triangular boxes. A long bevel is a design detail, rather than a joint. You’d use it to taper the end of a cleat under a tabletop or the foot of a trestle base. The bevel’s length is limited by the maximum height a 10-in. blade can be raised, which is about 3-1/4 in.
This story originally appeared in American Woodworker September 2006, issue #123.Click any image to view a larger version.
All tenoning jigs are remarkably similar, with comparable features and adjustments. Even the least expensive model will give you excellent results.

Every tenoning jig has a tilting work support for cutting angled tenons, scarf joints, low-angled miters or bevels. Caution: The blade guard must be removed when using a tenoning jig. Use both handles.

The backstop on every tenoning jig tilts for cutting grooves or tenons on mitered pieces. This jig, the Delta 34-184, is the only one with a front-mounted handle. This handle makes it much easier to push the jig without wiggling the work support.
7 Tenoning Jig Recommendations

6 Joints You Can Make with a Tenoning Jig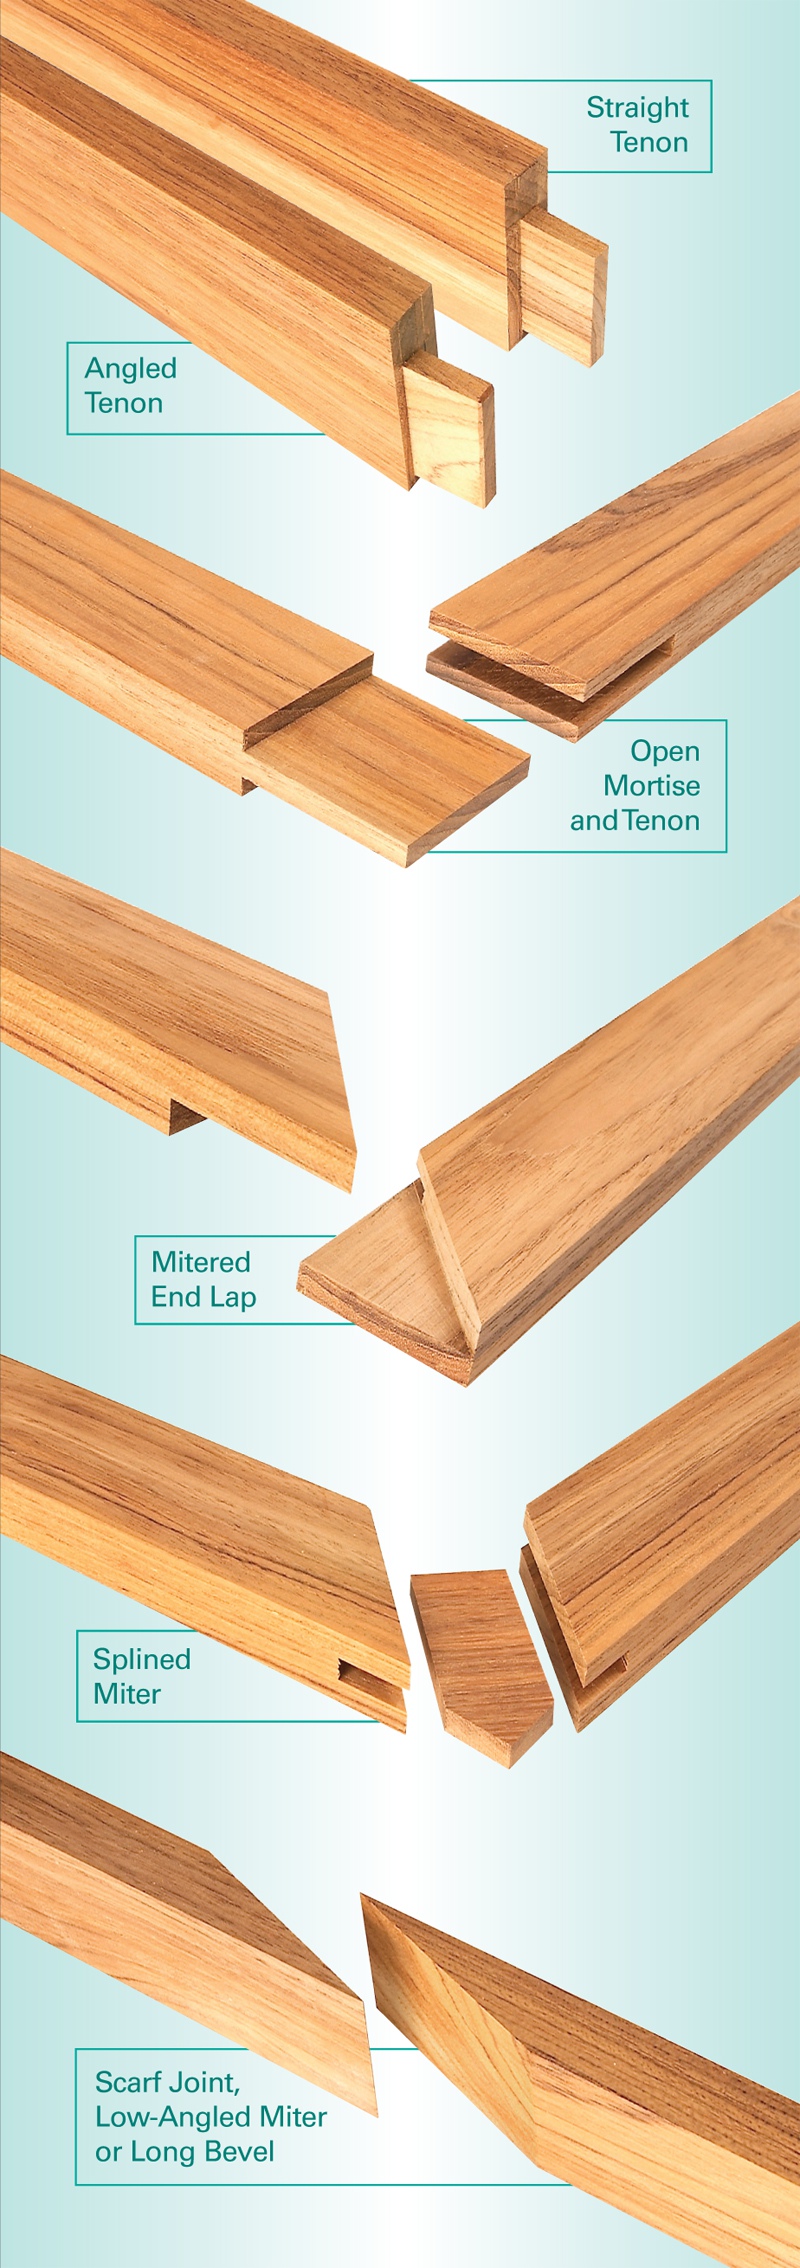

This remarkable jig cuts all these tenons with exquisite precision.
Here are some supplies and tools we find essential in our everyday work around the shop. We may receive a commission from sales referred by our links; however, we have carefully selected these products for their usefulness and quality.