|
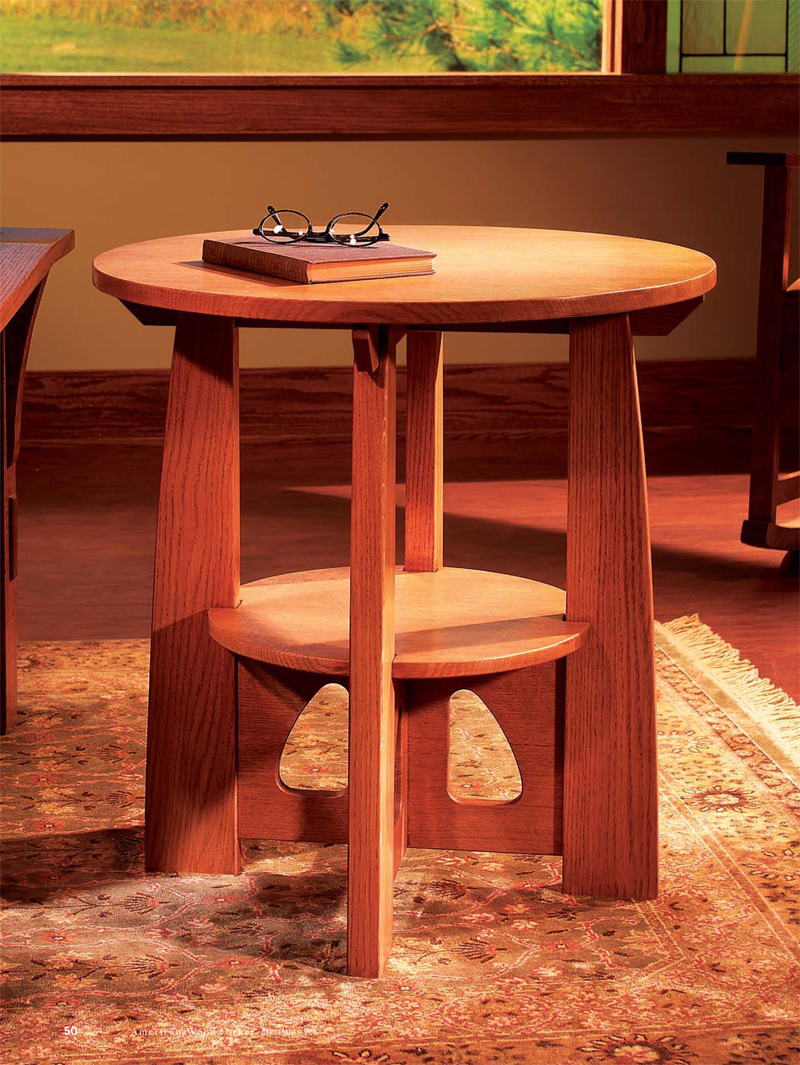
Bold design, strong joints and graceful cutouts.These
are hallmarks of the Arts and Crafts furniture made by
the Charles P. Limbert Company of Holland, Michigan.
In 1910, Limbert designed a large oval library table
that’s become an icon of American design.
Here’s a smaller round version that’s more practical for
today’s homes. All the parts fit together with four
different kinds of half-lap joints made on a bandsaw.
Follow along with us as we turn the bandsaw into a
precision joint-making machine by adding one simple
shop-made jig.
Tools and materials
You’ll need a jointer, planer,
bandsaw, router, router table
and jigsaw to build the table.
We recommend using a 1/2-
in. 4-tpi blade in your
bandsaw. You’ll use two
special router bits; a 1/2-in.
bottom-bearing flush-trim bit ($18) and a 1/8-in.
roundover ($23).You’ll also
need 1-in. and 1-1/4-in.
Forstner or spade bits and a
5/8-in. brad-point bit. (See
Sources, below, for
bandsaw blade and router
bit suppliers.)
The table requires
approximately 15 bd. ft. of
4/4 and 8 bd. ft. of 6/4
lumber. Our lumber cost
about $100. In keeping with
traditional Arts and Crafts
style, we used quartersawn
white oak for the top, rails
and shelf. It’s hard to find
quartersawn lumber thicker
than 4/4, so we used carefully
selected plainsawn white oak
for the legs (see Choosing
Wood for the Legs).
You’ll also need some figureeight
style desktop fasteners
($5). (See Sources, below,
for quartersawn oak and the
fasteners.)
Make the lower rails
Select wood for the lower
rails (E). It’s better to glue
up the rails from two or
three narrow boards rather
than use one wide board.A
wide board might not stay
flat while you build the table,
particularly if you use
plainsawn lumber, and that
would spell trouble in
making the rails’ half-lap
joints.You’ll also need a test
piece (F) for making the
half-lap joints. It must be the
same thickness and type of
wood as the rails. Cut both
rails and the test piece from
one long glued-up blank.
The rails will then match in
color and figure.
1. Joint the faces of the
boards, and plane them 7/8-
in. thick. Then joint both
edges.
2.Glue the boards together,
and scrape off any dried
glue.
3. Run the blank through
the planer, alternating sides,
until it’s 3/4-in. thick. Plane
another piece of wood
(spacer G) to exactly the
same thickness.
4. Rip the blank to final
width, and cut the two rails
to length.
Rout openings
in the rails
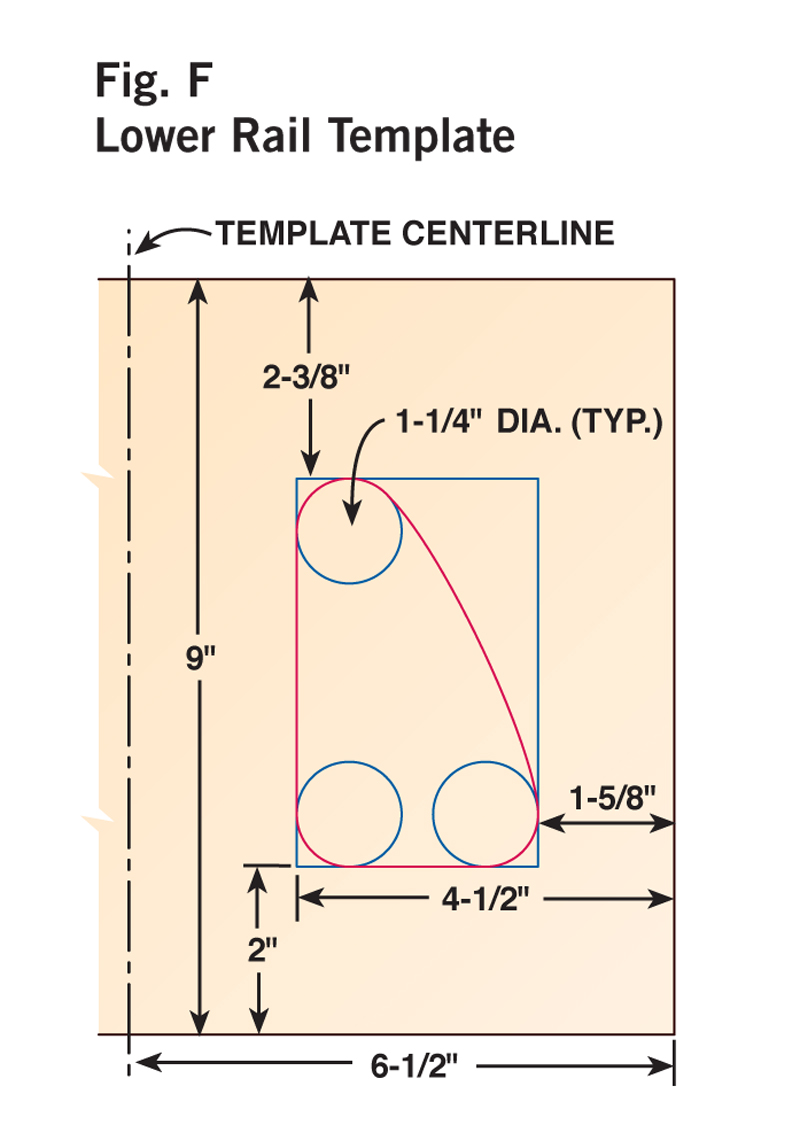
1. Make a router template
from 1/4-in. hardboard or
melamine (Fig. F, page 61).
Cut it exactly the same size
as both rails. Drill the three
holes in the template with a
1-1/4-in.bit.Cut the opening
with a jigsaw, staying 1/16-
in. away from the layout
lines. Clean up these rough
cuts with a drum sander in a
drill press or use a file and
sandpaper.
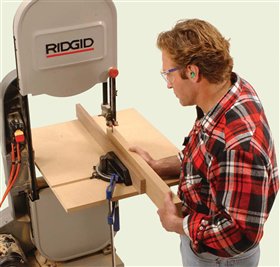
2.Trace the template openings
on the left and right sides of
each rail.Drill 1-in.-dia.holes
in the corners of the cutouts.
Rough cut the openings with
a jigsaw (Photo 1). Avoid
cutting right on the line, but
cut as close as you can,
leaving no more than 1/16-
in.waste.
3. Rout the openings with a
1/2-in.-dia. flush-trim bit
(Photo 2).
4. Flip over the template and
tape it to the other half of
the rail. Rout the opposite
opening. Sand the cutouts,
both faces of the rails, test
piece F and spacer G.
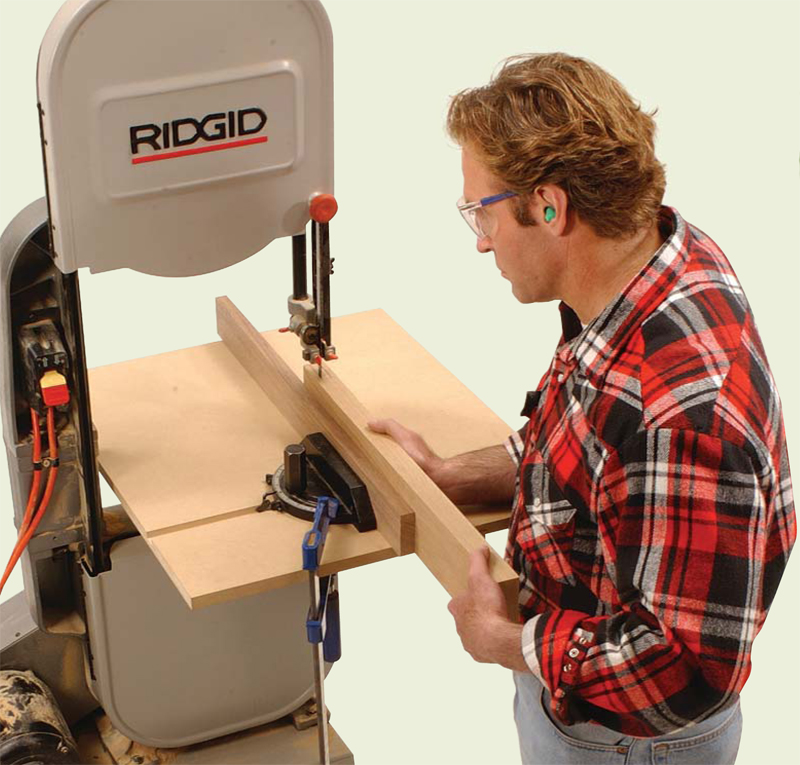
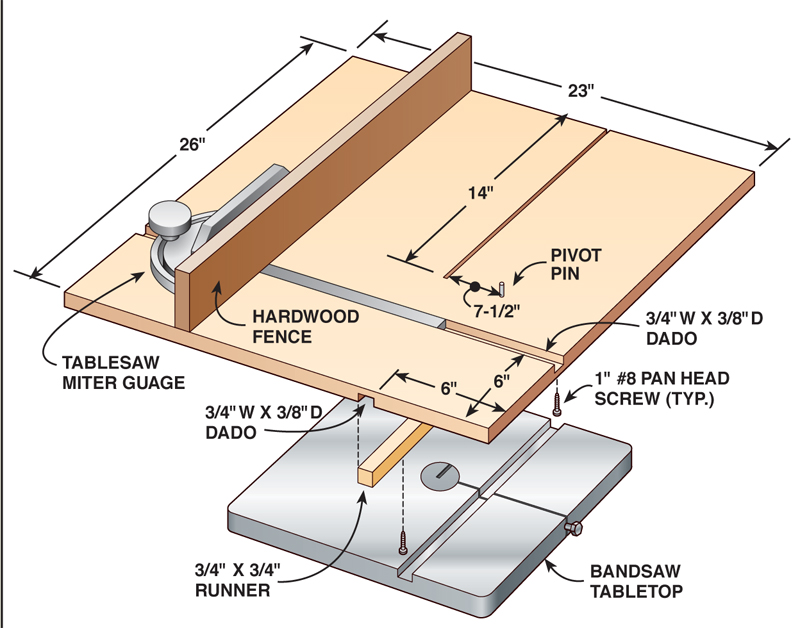
Build an auxiliary bandsaw table
The extra-large half-lap
joints and bridle joints in
this table are safe and easy to
cut on a bandsaw.You’ll need
a fence on your bandsaw,
however. If you don’t have a
fence,we’ve devised a simple
way to turn your tablesaw
miter gauge into a fence by
building a no-fuss auxiliary
table for your bandsaw. It’s generously sized to support
the large pieces of this
project (see Versatile
Bandsaw Table, below).
Perfect half-lap joints
Making perfect-fitting halflap
joints often requires a lot
of trial-and-error cutting,
but we’ve devised a simple
method to eliminate that
extra work. Set the fence for
drift with a 3/4-in.oak board
(see Adjust the Fence,
opposite page).
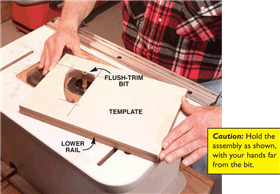
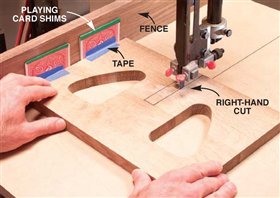
1.Make two shims equal to
the width of your bandsaw
blade’s kerf (Photo 3). Tape
the shims together in a
package.
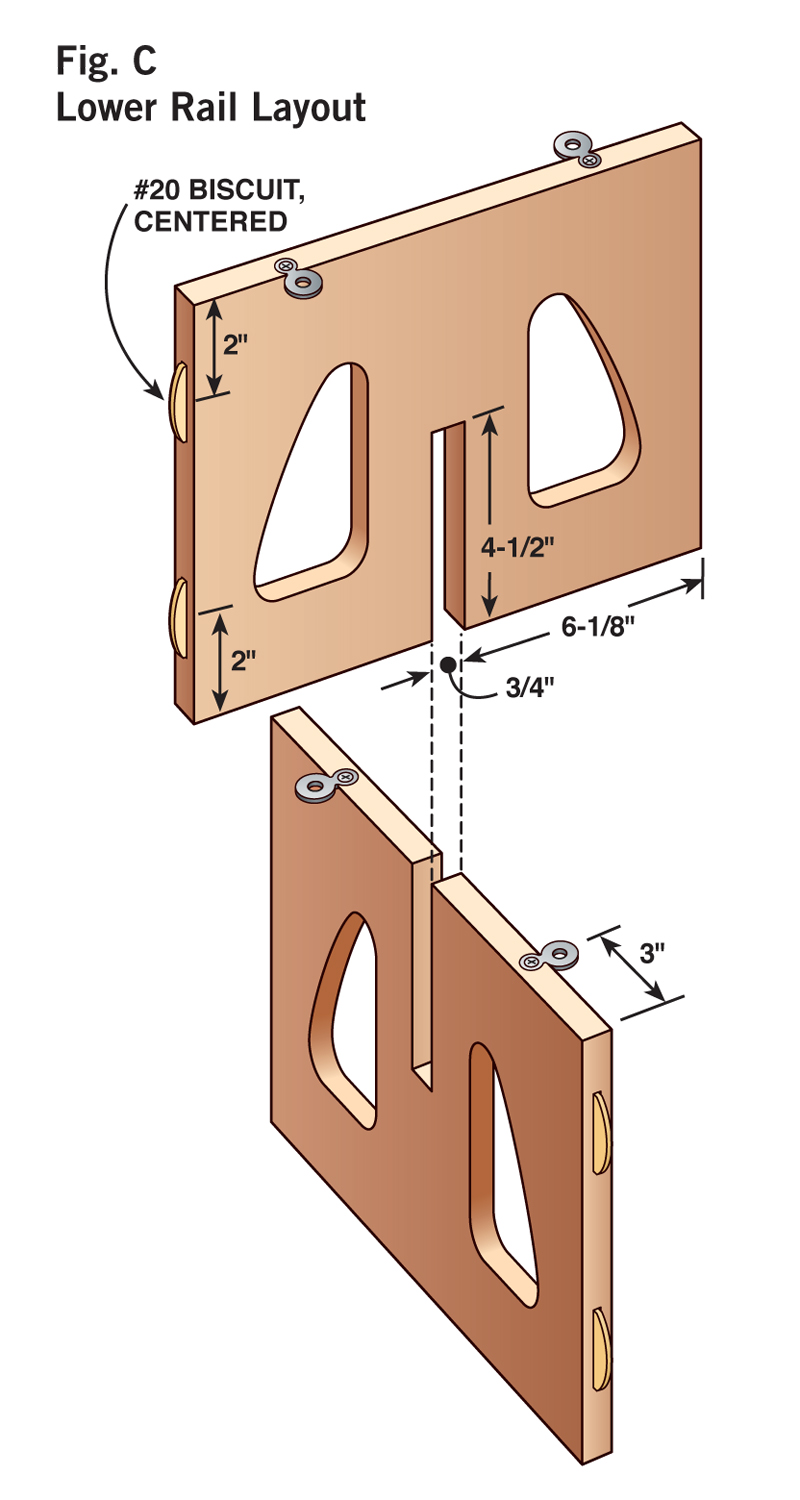
2. Lay out the half-lap joints
on both rails (Fig.C,page 61).
3.Mark one notch anywhere
on test piece F.Cut the notch
as described in Steps 4
through 7 and test the fit
with an uncut rail.
4.Tape the shims to the end
of the rail so they slide along
with it.Be sure the shims are
snugged up against the
fence. Make the right-hand
cut all the way to the bottom
of the notch (Photo 4).
Remove the shims and insert
spacer G.
5. Make the left-hand cut
(Photo 5).When cutting the
actual pieces, repeat steps 4
and 5 with the second rail.
6.Move the fence away from
the blade and clean out the
waste between the saw cuts
(Photo 6).
7.Test fit the notch on piece
F. If the joint is too loose,
add another paper shim. If
the joint is too tight, reduce
the thickness of both shims.
When satisfied, cut the real
joints.
8. Cut the bottom of the
notch by nibbling away at it
with your saw blade (Photo
7). Reset the angle on the
fence so it is parallel to the
blade, but don’t clamp the
fence in place.With the saw
turned off, advance the rail
into the saw blade so the
blade comes right to the
bottom of the notch.Clamp
a stop block to the fence
against the top of the rail.
Now, back the rail out a bit,
turn on the saw, and nibble
off the bottom of the notch
by moving the fence from
right to left. Make very
shallow cuts. After a few
passes, you’ll have a perfectly
square bottom. You could
finish off the notch with a
chisel or file, but nibbling
with a bandsaw goes much
faster.
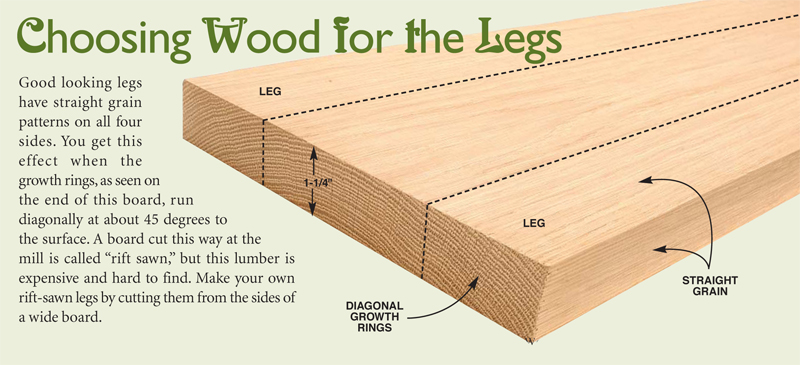
Make the legs
Select the wood for the legs
(see Choosing Wood for the
Legs).
1. Plane the legs (B) to
thickness, saw to full width
and crosscut to length.
Attach a taller fence board
to the miter gauge. Set the
bandsaw for drift with a
scrap piece that’s the same
width as the legs.
2. Draw the bridle joint
notches (Fig. B).
Each notch must be dead
center, but its precise width
isn’t critical.The surefire way
to center the cut is to saw the
notch from both sides of the
legs, without moving the
fence (Photo 8). Clamp a
stop block to the fence so
the cut stops at the bottom of
the notch. Saw the outside
cuts, then remove most of
the waste, as you did with
the rails above.
3.Take the drift angle out of the fence. Unclamp the fence
and square the bottom of the
notches by sliding the fence
right to left.
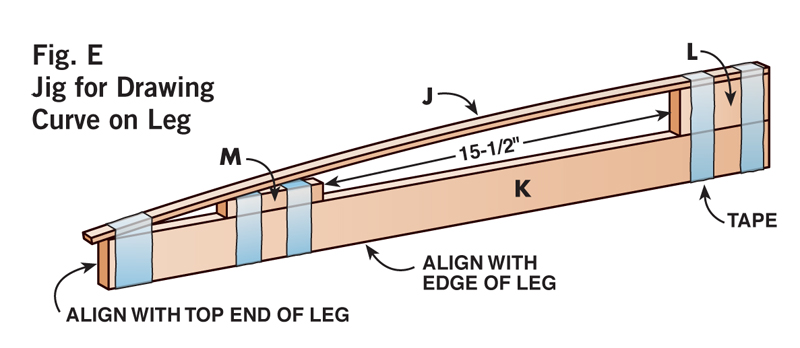
4. Trace a curve on the legs
with a jig (Photo 9 and Fig.
E). Align the
straight side of the jig with
the edge of the leg. Saw the
legs on the bandsaw and
smooth the curve with a
sander, rasp or hand plane.
Fit the upper rails
1. Plane the upper rails (C)
to fit the leg notches (Photo
10).Cut spacer H from a 12-
in.-long board planed to the
same thickness as the rails.
2. Layout notches on both
rails (Fig. D). Cut
the notches by a similar
spacing system as above.
This time you don’t need the
auxiliary table, however.
First, tape a shim to the right
end of the rail and line up
the blade with the left
marking line. Clamp a stop
block against the shim and
make the cut. Stop at the
bottom of the cut and clamp
a second stop block to the
table. Remove the shim,
insert spacer H and make the right-hand cut (Photo
11). Remove the waste and
clean out the bottom by
sliding the rail right to left
along the fence.
3.Angle the ends of each rail
(Fig.D).
4. Drill shallow holes in the
upper and lower rails (Figs.C
and D) for figureeight
desktop fasteners (see
Sources). Install all
the fasteners.
Construct the shelf and top
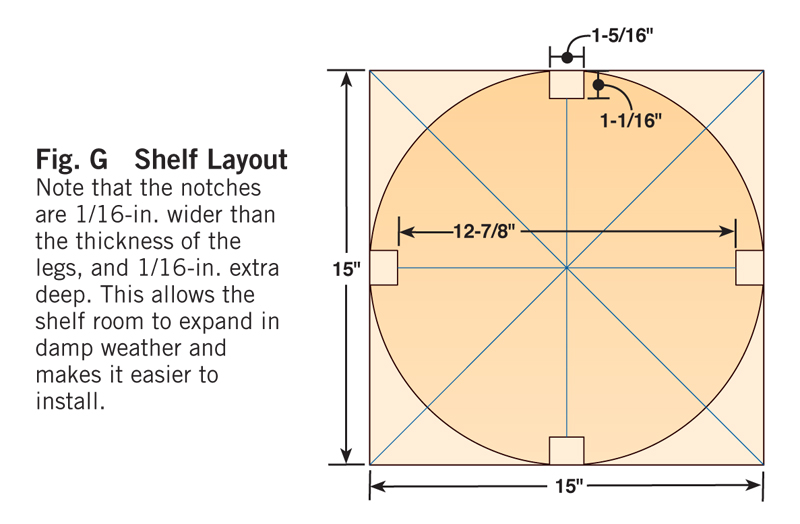
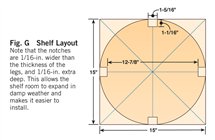
1.Glue up the shelf blank (D).
Lay out the notches and
circular edge (Fig.G,page 61).
2. Cut the notches on the
bandsaw (Photo 12).You can
simply reset the fence to cut
both sides of each notch,
rather than use shims and
spacers, because the exact fit
isn’t critical.
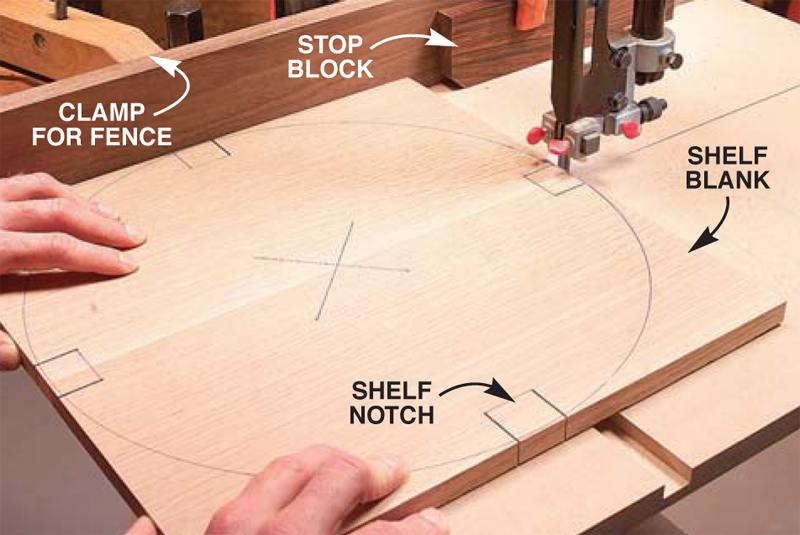
3.Cut the shelf’s circular edge
using a brad as a pivot pin.
Set the brad 7-1/2 in.
perpendicular from the front
of the bandsaw blade and
snip off the head (see
Versatile Bandsaw Table).Mark dead center on the
underside of the shelf and
drill a 1/16-in. hole for the
pivot pin. Set the shelf on top
of the pin, placing the blade
within one of the notches
(Photo 13). Rotate the shelf
on the pin, and you’ll cut a
perfect circle (Photo 14).
4. Glue up the top (A).
Bandsaw its circular edge
freehand.
5. Round over the edges of
all the pieces except the upper
rails. Use a 1/8-in. radius bit
in a hand-held router or a
router table. Round over the
inside corners of the shelf ’s
notches with a chisel or file.
Sand all the parts to 220 grit.
Join the legs
and lower rails
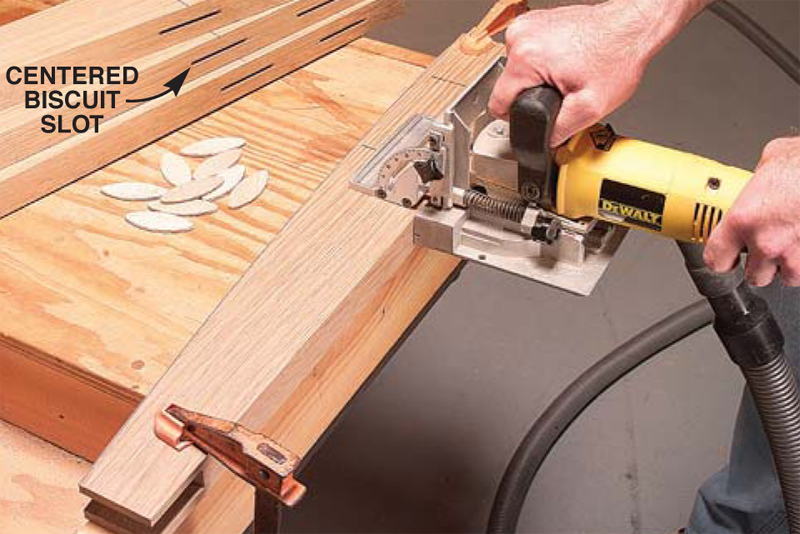
1. Cut biscuit slots for the
lower rails and legs (Photo
15). Be sure the slots are
exactly centered.
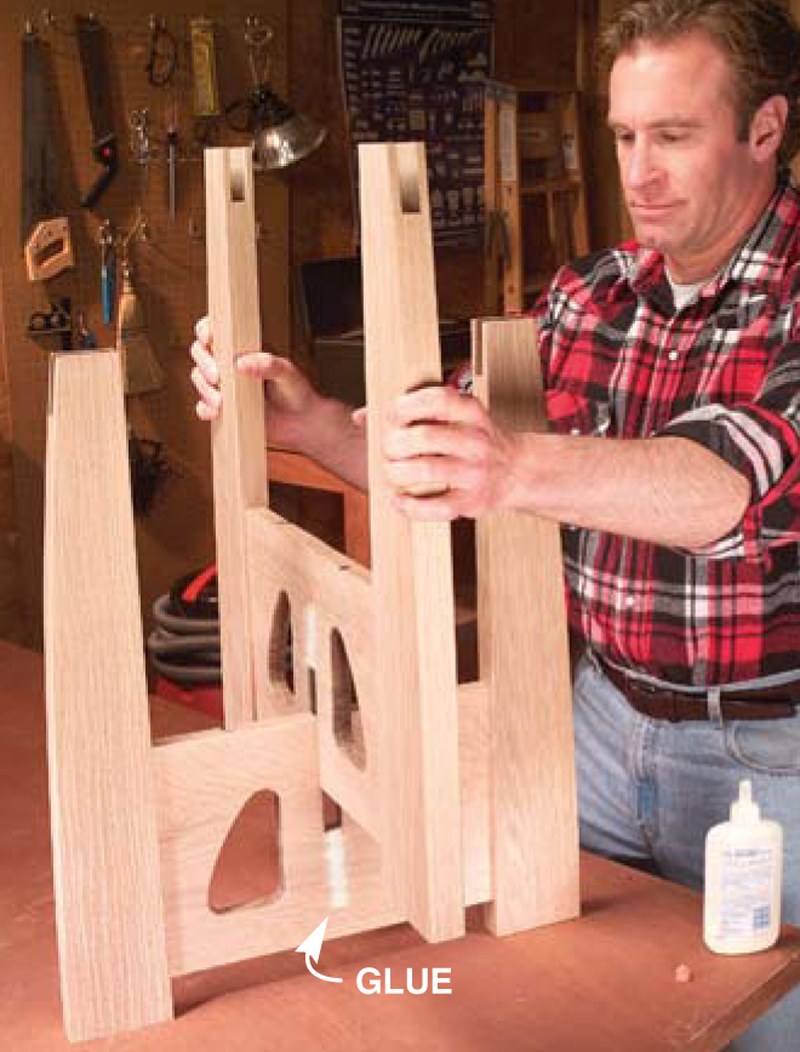
2. Glue two legs to a lower
rail (Photo 16). Make sure
the ends of the legs, a spacer
and the rail all fit tight
against a straight board
clamped to your bench.Glue
the other rail and the second
set of legs, too.
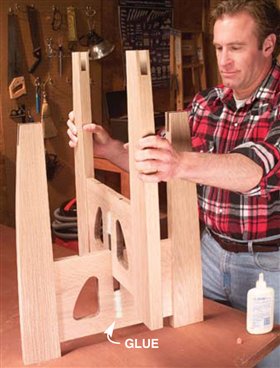
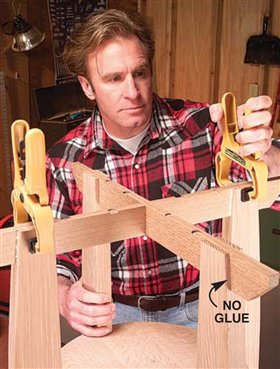
Assemble the table
1. Glue together the lower
rail and leg assemblies on a
flat surface (Photo 17).
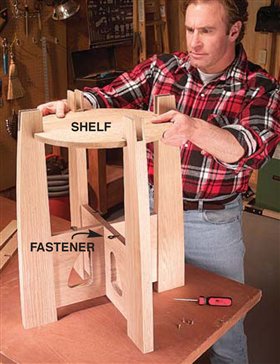
2. Slide the shelf down on
top of the rails (Photo 18). If the shelf is too
tight, trim the notches with a
chisel or on the bandsaw.
Screw the shelf to the
fasteners.
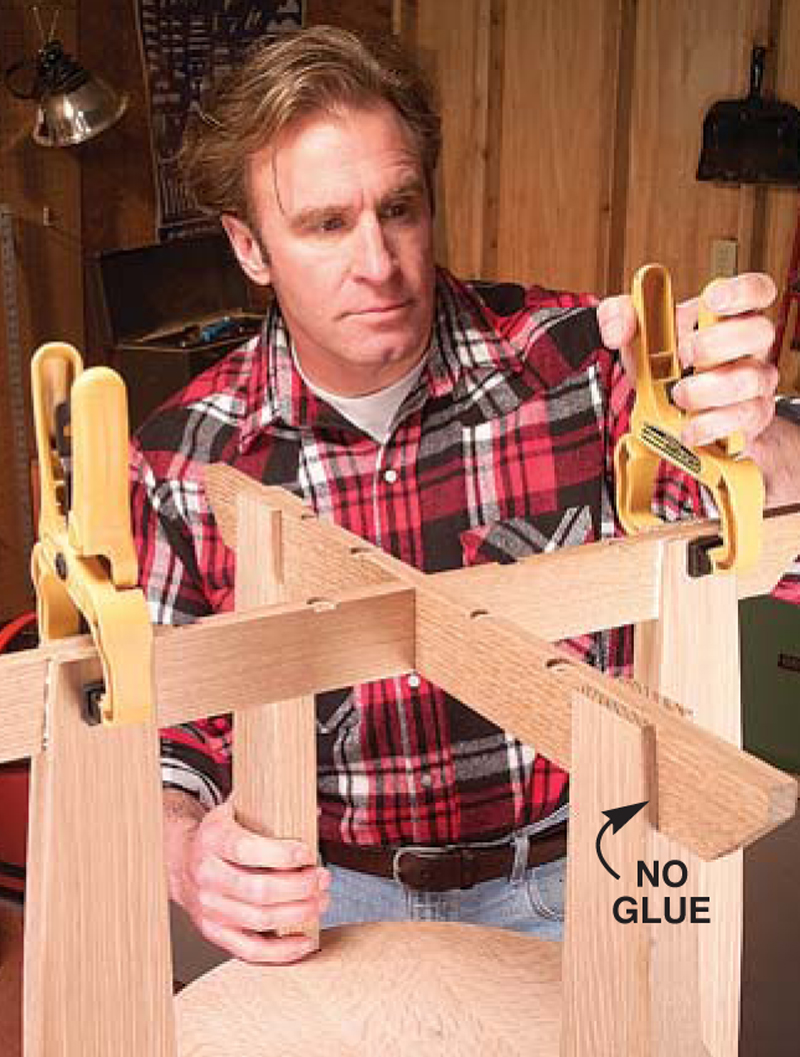
3. Test the fit of both upper
rails without glue. Glue the
rail that has the notch facing
up first (Photo 19).
Once it’s positioned,glue the
other rail. Sand the bottom
edges of both rails.
4.Center the top and attach
it to the fasteners.
Finish
Many commercial stains
look good on oak, but we
went a step further. We
colored the raw wood with
golden oak dye, sealed it
with shellac and applied a
glaze made of equal parts of
raw sienna and raw umber
pigments.
Finally, we brushed on
two coats of varnish.
Sources
(Note: Product availability and costs are subject to change since original publication date.)
Woodcraft Supply, woodcraft.com, 800-225-1153,
1/2" 4 tpi bandsaw blades, various
lengths;
1" Forstner bit, #125935;
1-1/4" Forstner bit, #125937.
West Penn Hardwoods, westpennhardwoods.com, 888-636-9663, Quartersawn White Oak, 4/4.
Woodworker’s Hardware, wwhardware.com, 800-383-0130, Desktop fasteners and screws
KV1547.
*** Blick Art Materials, dickblick.com, 800-828-4548, Raw Sienna artist’s oil,
#00461-8063; Raw Umber artist’s oil,
#00461-8073; Liquin glazing medium
#00445-1004.
Woodworker’s Supply, woodworker.com, 800-645-9292,
W1100 Light golden oak dye.
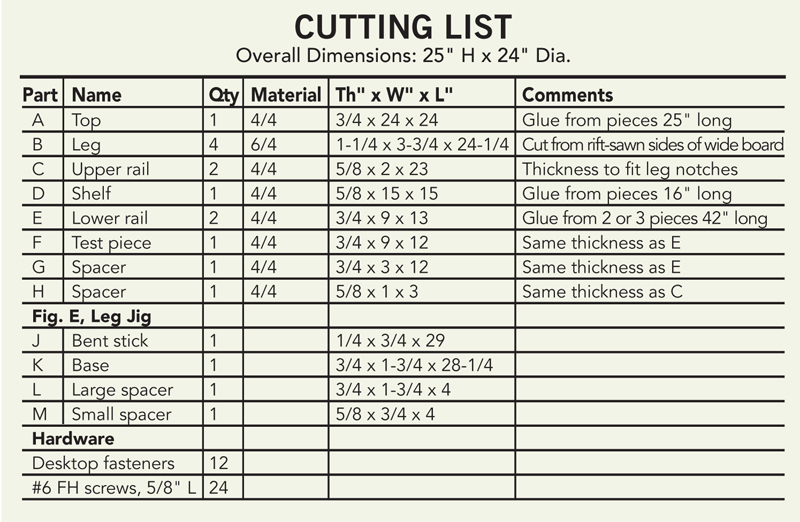
Cutting List
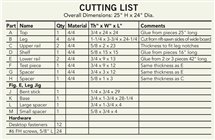
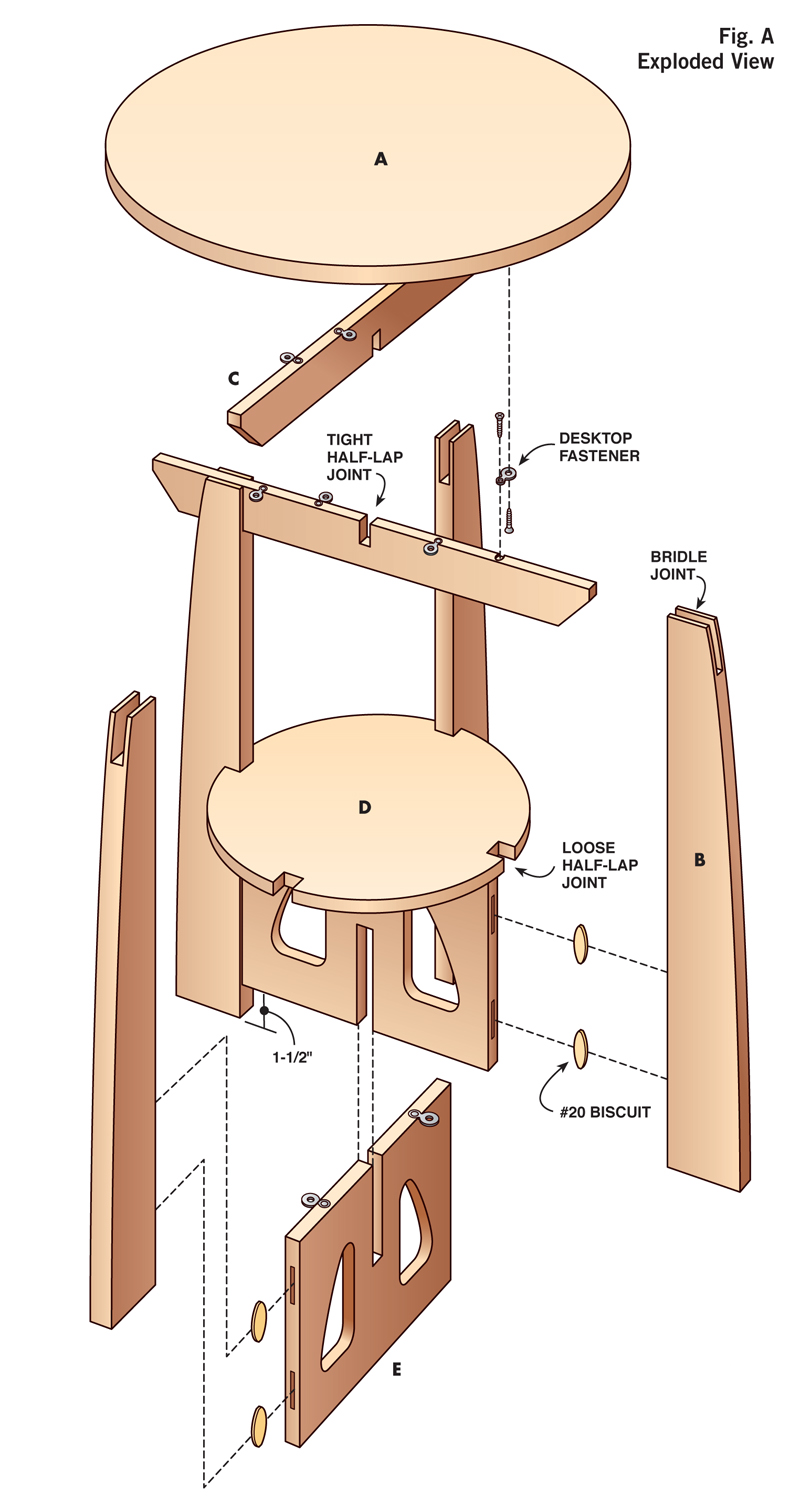
Fig. A: Exploded View
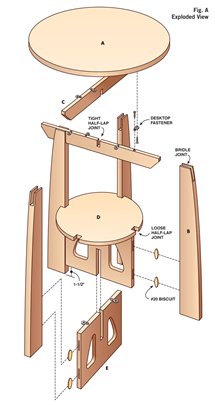
Fig. B: Leg Layout

Fig. C: Lower Rail Layout

Fig. D: Upper Rails
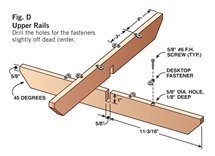
Fig. E: Jig for Drawing Curve on Leg
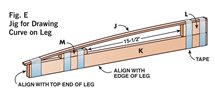
Fig. F: Lower Rail Template
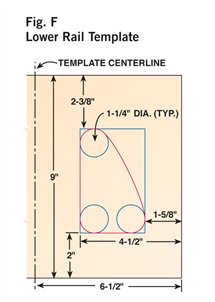
Fig. G: Shelf Layout
This story originally appeared in American Woodworker September 2003, issue #102.
September 2003, issue #102
Purchase this back issue.
|
|
Click any image to view a larger version.
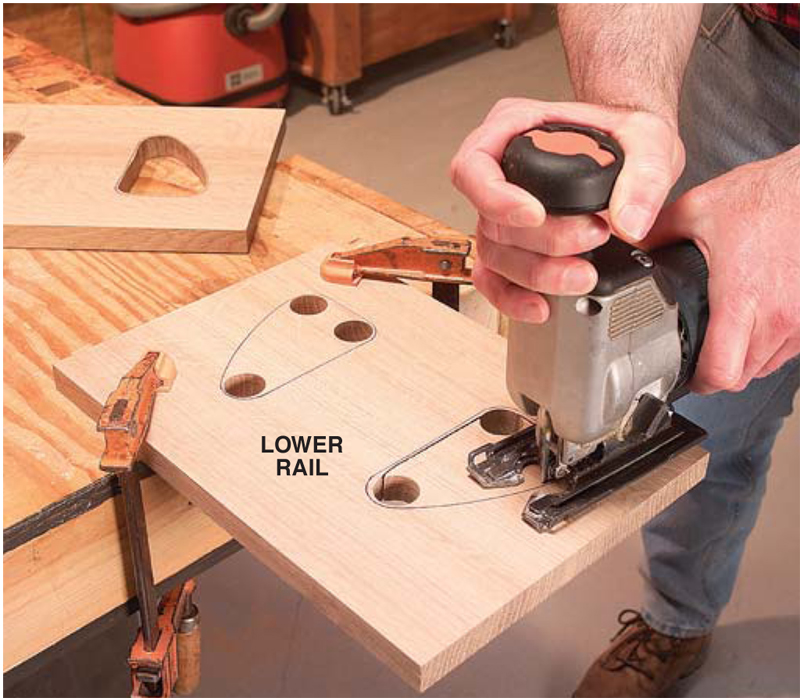
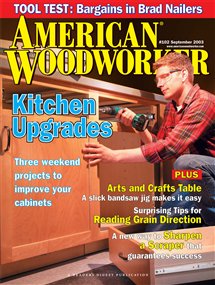
1. Rough cut
the openings in
the lower rails. Drill
large holes in the
corners, then
connect the holes.
Stay 1/16-in. off
the line.
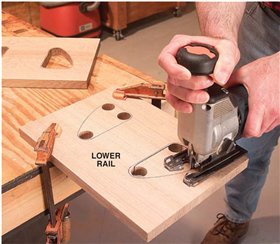
2. Cut the rail’s
final shape with
a template and
router table. Fasten
the template to the
rail with doublefaced
tape.Move
the rail and template
counterclockwise
around the
router bit.
3. To prepare for
cutting the half-lap
joints, make shims that
fit exactly into the kerf of
your bandsaw blade.The
width of a kerf varies from
blade to blade.This one equals
three playing cards and one sheet
of paper.
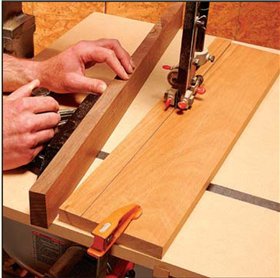
4. Saw the right side of
the half-lap joint using
the bandsaw table. Tape the
playing-card shims to the
end of the rail. Position and
clamp the fence so the
blade lines up with the
right-hand marking line.
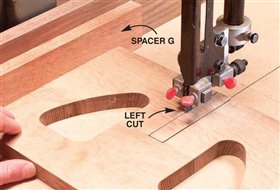
5. Saw the left side.
Replace the shims with
a spacer that’s the same
thickness as the rail you’re
sawing.Without moving the
fence, you’ve made a
perfectly fitting half-lap
notch.The space between
the cuts is exactly the
thickness of the rail.
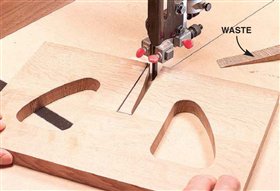
6. Remove the waste
with several diagonal
cuts. Unclamp and slide the
fence out of the way. Keep
cutting until all that’s left is
1/16 in. of wood above the
bottom of the notch.
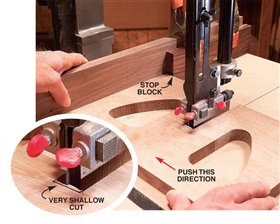
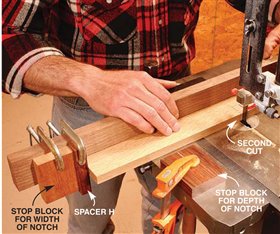
7. Trim the
bottom of the
notch by cutting
sideways. Remove the
clamp from the fence.
The miter-gauge can
now slide in its slot, so
you can move the
fence and rail as a unit.
Nibble off about 1/64-
in. per pass (see inset).
The result is a
perfectly straight and
square bottom.
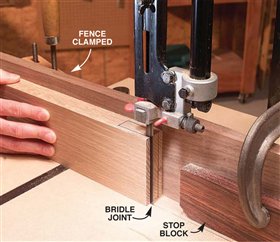
8. Saw bridle joints
in the top of the
legs with the bandsaw
table and fence.To
center the notch, saw
one side first, then flip
over the leg and saw
the other side. Clean
out the waste and trim
the bottom the same
way you did for the
rails above.
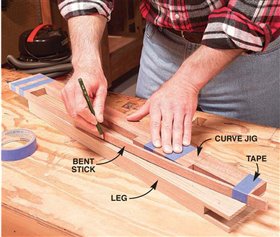
9. Draw the
curve on each
leg with a bent-stick
jig.Tape holds the
bent stick to the jig,
freeing your hands to
draw a smooth curve
(Fig. E).

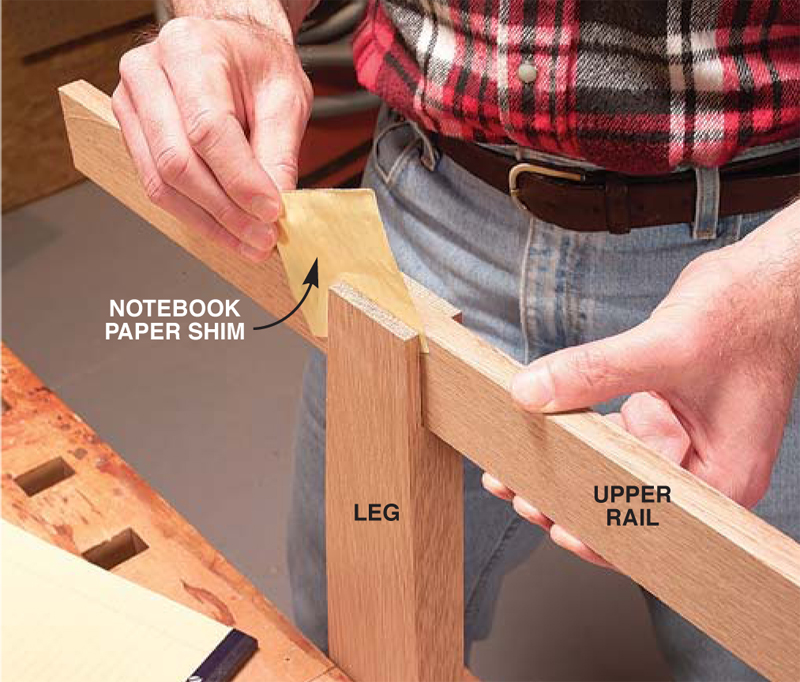
10. Test fit the
upper rails to
the legs. Plane each rail
until it’s one sheet of
paper thinner than the
notch in the leg. If the
fit is too tight, you’ll
have a hard time
pushing the rail down
into the notch at glueup
time.
11. Cut notches in
the upper rails.
The cutting process is
identical to making the
joints on the lower
rails, using the same
shims but a new
spacer.This time you
use the miter gauge in
the standard slot on
the bandsaw table.
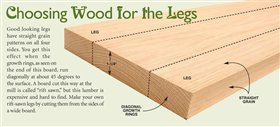
Choosing Wood for the Legs

12. Saw the shelf
notches while the
shelf blank is still square.
Back on the bandsaw
table, cut all the right
sides with one fence
setting.Then move the
fence and cut all the left
sides. Nibble the bottoms
square.
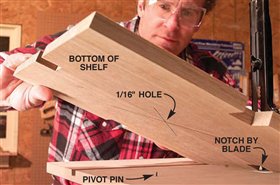
13. Position the
shelf on a pivot
pin. It’s just a brad driven
into the bandsaw table.
Snip off the head of the
brad and align it with a
small hole drilled in the
center of the shelf.
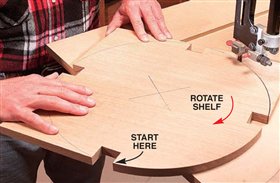
14. Rotate the
shelf on the
pivot pin to cut an
exact circle. Start the
cut inside one of the
notches.

15. Cut biscuit slots
in the legs. If you
don’t have a plate joiner,
you could use 3/8-in.
dowels or make 1/4-in.-
thick loose mortise-andtenon
joints.

16. Glue together the lower rail and legs. Clamp a 1-1/2-in.-wide spacer between the rail
and a long, straight board to align the joints. Check for flatness to ensure that the
upper rails will fit across both notches.
Oops!
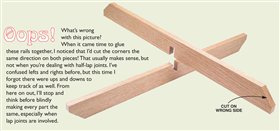
17. Slide one half of the table down
over the other to glue them
together. Clamping is not necessary.
18. Drop the shelf down onto the rails.
The notches are slightly oversize to
make this easier. Screw the shelf to the rails
with desktop fasteners to stiffen the whole
assembly.
19. Glue one rail at a time.Apply glue
to the rail that has the notch facing
up and set it in the legs. Before clamping,
insert the other rail without glue.This
ensures the first rail is properly aligned.
Versatile Bandsaw Table
In less than an hour,
you can upgrade your
bandsaw with a larger
work surface, a rip
fence and a circlecutting
jig.All it takes
is three pieces of
wood.
Make the Table
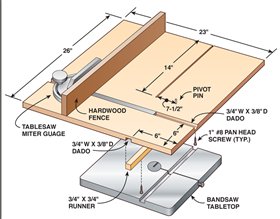
This is really easy. Cut a piece of MDF or plywood to size. Use a router or
tablesaw to dado one groove on the top and one on the bottom. Glue a
runner into the bottom groove (you can use an offcut from the top).Turn
on your bandsaw and slide the table into the blade, stopping about in the
center. Install two screws under the runner to act as stops, keeping the
table from moving.To remove the table, tilt up the far end and pull back.
Adjust the Fence
Attach any straight board to the face of your
miter gauge, and you’re set to go.The fence has to
be angled a little bit to compensate for the “drift”
of the blade, and that angle varies with each blade
and thickness of wood you’re cutting.
To adjust the miter gauge fence for drift, draw a
straight line on a board parallel to one edge. Saw
freehand, angling the board to stay on the line.
Stop halfway, turn off the saw and clamp the
board. Loosen the miter gauge and push the fence
up against the board.Tighten the miter gauge,
remove the board and you’re ready to saw.
|