We may receive a commission when you use our affiliate links. However, this does not impact our recommendations.

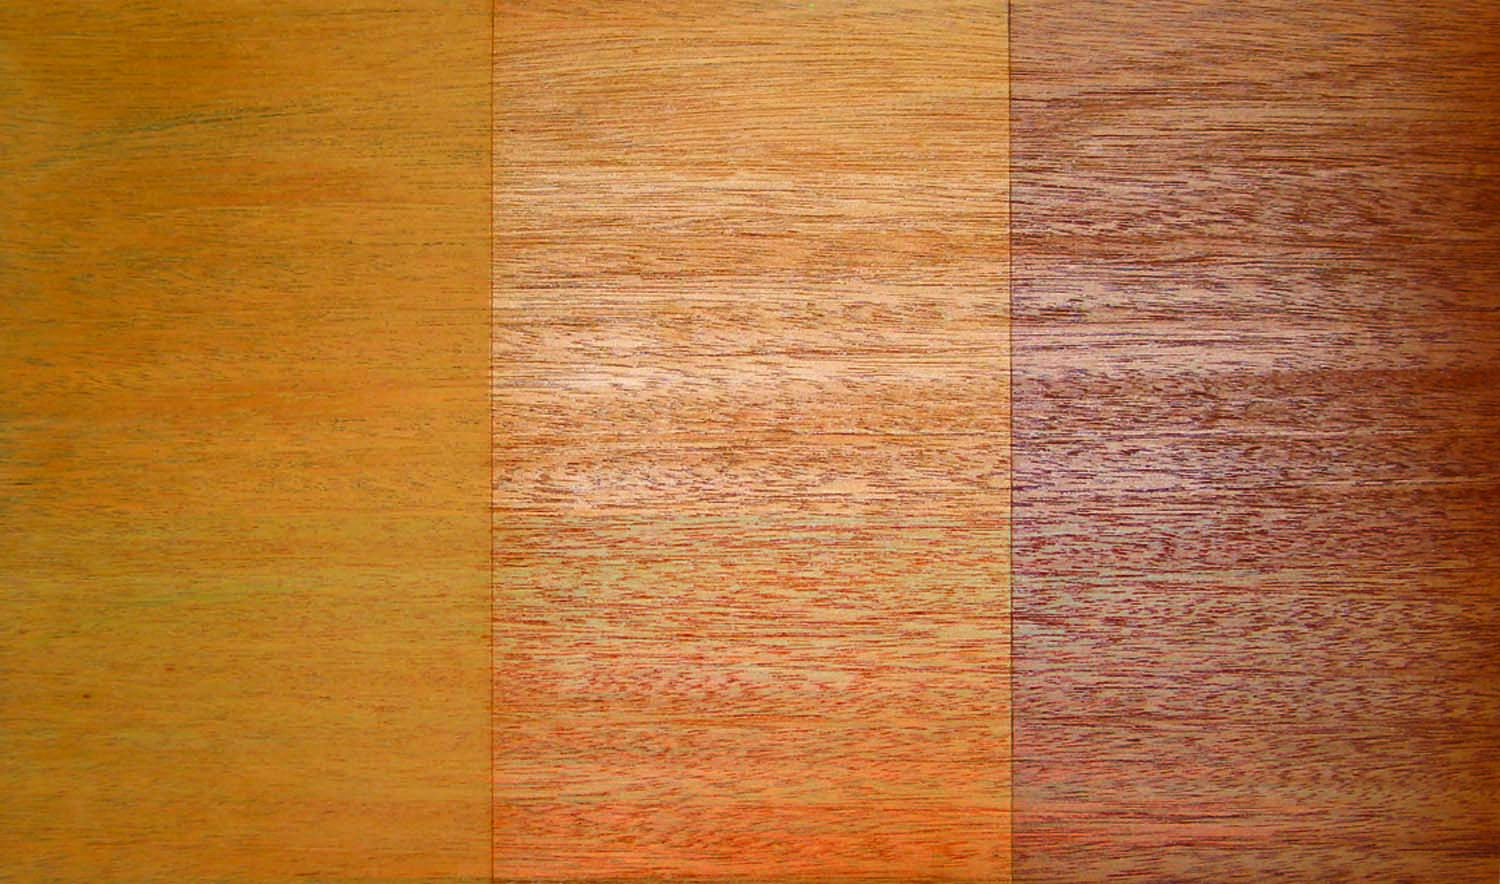
Unfilled vs. filled. The difference on a wood such as this unfilled mahogany surface (left side) and a filled mahogany surface (right side) is striking. The pores on the unfilled side break up the light creating a raw look. The filled side looks richer, deeper and more elegant.
Very few woodworkers or refinishers fill the pores of wood anymore. The process is not well understood and it’s perceived to be difficult. So if the wood has large open pores, the pitting is usually allowed to show.
This open pored, “natural wood” look has even become quite popular and is often promoted in the woodworking literature.
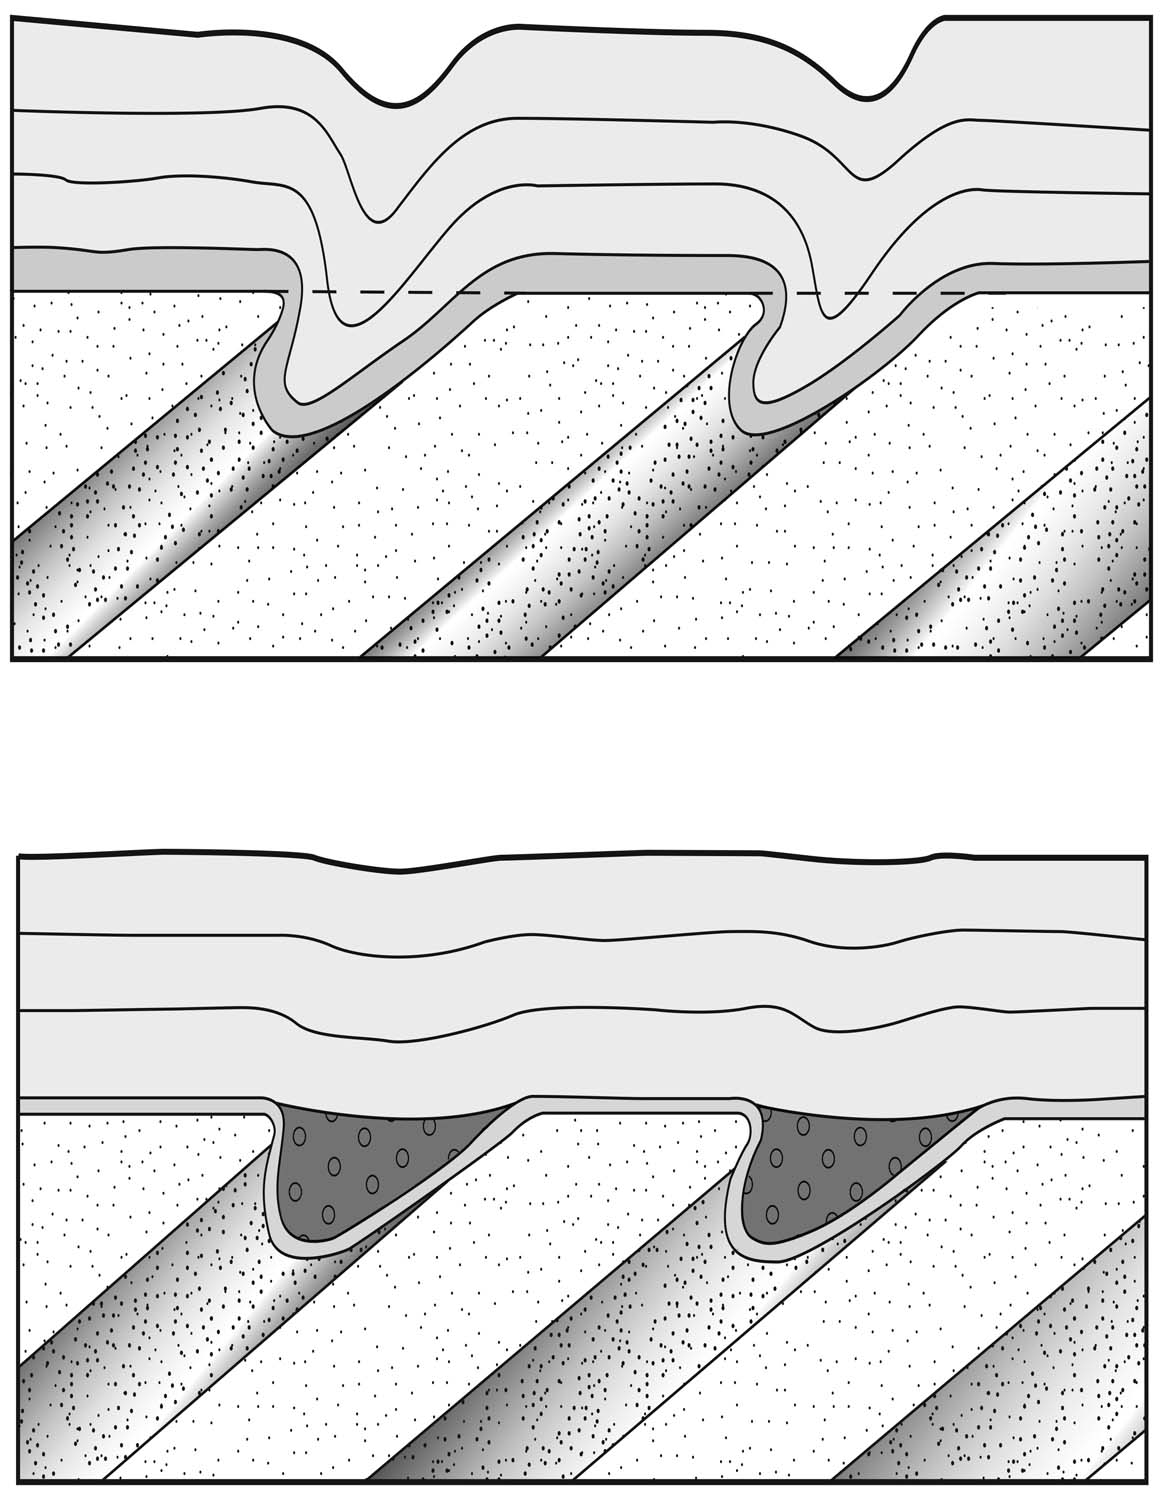
Unfilled pores (top). Topcoats follow the contours of this unfilled wood surface. Filled pores (bottom). You can use grain filler to fill pores almost level. But to get the surface perfectly mirror-flat, you still have to sand a little.
But for some, the natural-wood look creates a less-than-elegant appearance. This is surely the view of companies that mass-produce high-end furniture and most people who buy this furniture. For the last 150 years, in fact, most better-quality, factory-produced furniture has had its pores filled to create a “mirror-flat” appearance.
Better-quality furniture in the past was made largely from mahogany, walnut or quarter- or rift-sawn oak. It’s these and other woods with similar pore structures that look better with their pores filled (in contrast to plain-sawn oak, for example, which is difficult to get flat because of the wide segments of deep grain).
If you use these woods to make furniture or you restore old furniture and you want the wood to look its most elegant, you need to know how to fill pores.
Two Methods

With filler. A walnut-colored grain filler stains and fills the unsealed wood at left but fills and colors only the pores of the washcoated wood in the middle, and the stained and washcoated wood at right.
Before filler. The three situations for applying grain filler are (from left) over unstained and unsealed wood, over unstained and washcoated wood and over stained and washcoated wood.
There are two ways to fill pores in wood to produce a mirror-flat finish. One is to apply many coats of a film-building finish such as lacquer, shellac, varnish or water-based finish then sand them back (a little after each coat, or a lot after all the coats) until the pitting caused by the pores comes level. The other is to fill the pores almost level with grain filler (also called “paste wood filler” or “pore filler”) then complete the filling by sanding the finish level.
The first method is fairly effective with alkyd and polyurethane varnish, and with water-based finish, because these finishes build rapidly. It’s often less work to leave out the filling step with these finishes.
But with lacquer and shellac, it’s definitely more work using only the finish to fill the pores. It is also wasteful of finish material and sandpaper, and the finish shrinks back into the pores more over time than if grain filler is used.
Keep in mind that until recently, with the introduction of water-based and high-performance two-part finishes, the furniture industry and most shops have always used either shellac (until the 1920s) or lacquer (since). So most discussion of filling pores has always been connected with these finishes.
If you use shellac or lacquer on a wood with a pore structure resembling mahogany, you should consider using grain filler. If you use varnish or water-based finish, you could experiment with both methods to see which you like best – or simply not mess with grain filler at all.
Filling With Finish
Finish as filler. To fill the pores of wood and keep it looking as natural as possible, without any color in the grain, use just the finish and sand it level after many coats. To speed the sanding of alkyd varnish and lacquer, apply a coat of the finish, then several coats of varnish or lacquer sanding sealer. Then sand off the sanding sealer, as I’m doing here, until you reach the resistance of the varnish or lacquer. You are filling the pores with the sanding sealer.
There’s nothing complicated about filling pores with just the finish. It’s simply a matter of applying enough coats so you don’t sand through when sanding them level. You won’t know how many coats is enough without trying first on scrap because woods vary and people vary in how thickly they apply each coat. Four to six coats of varnish or water-based finish should be enough, but more will be necessary with shellac and lacquer.
For instructions on sanding and rubbing a finish to the sheen you want, please refer to “Rub to Create a Great Finish” in the August 2006 issue (#56) or online at popularwoodworking.com/finishing.
With both alkyd varnish and lacquer, dedicated sanding sealers are available that are much easier to sand than the finish itself. Sanding sealers contain a soap-like lubricant that causes the finish to powder rather than clog sandpaper, so it’s easier to bring the pore pitting level with sanding sealer than with varnish or lacquer.
But sanding sealer causes bonding problems if applied thick, so you shouldn’t apply more than one or two coats. A trick, if you decide you want to fill the pores with sanding sealer, is to apply a full coat of the varnish or lacquer first, then apply several coats of sanding sealer on top.
Sand the sealer using non-stearated sandpaper until you reach a little resistance, which tells you that you have reached the varnish or lacquer. Then stop sanding so you don’t sand through. This technique will eliminate the build of sanding sealer that could cause problems.
Water-based finish and polyurethane varnish sand fairly easily, so no sanding sealer is necessary – or even available.
Grain Filler
I’ve heard of people using all sorts of products to fill grain, including wood putty, plaster-of-paris and joint compound. I can understand how these could be made to work, but they provide very little working time, especially in warm or hot temperatures. At least with shellac, lacquer and varnish, oil-based grain fillers are a lot easier to use.
These fillers are made thick with a high percentage of solid material (usually silica) added to some oil (which acts as the binder) and a little thinner.
A few brands offer grain filler in colors, but most fillers are available only in “natural” to which you have to add a colorant. Adding color is critical with oil-based fillers because they don’t “take” stain well after they have dried.
You can add any colorant to oil-based grain fillers, including Japan, oil and universal colorants. Use universal colorants with water-based fillers. These are the same colorants paint stores use to tint latex paint. Don’t use a dye colorant because it could fade and leave the filled pores lighter than the surrounding wood.
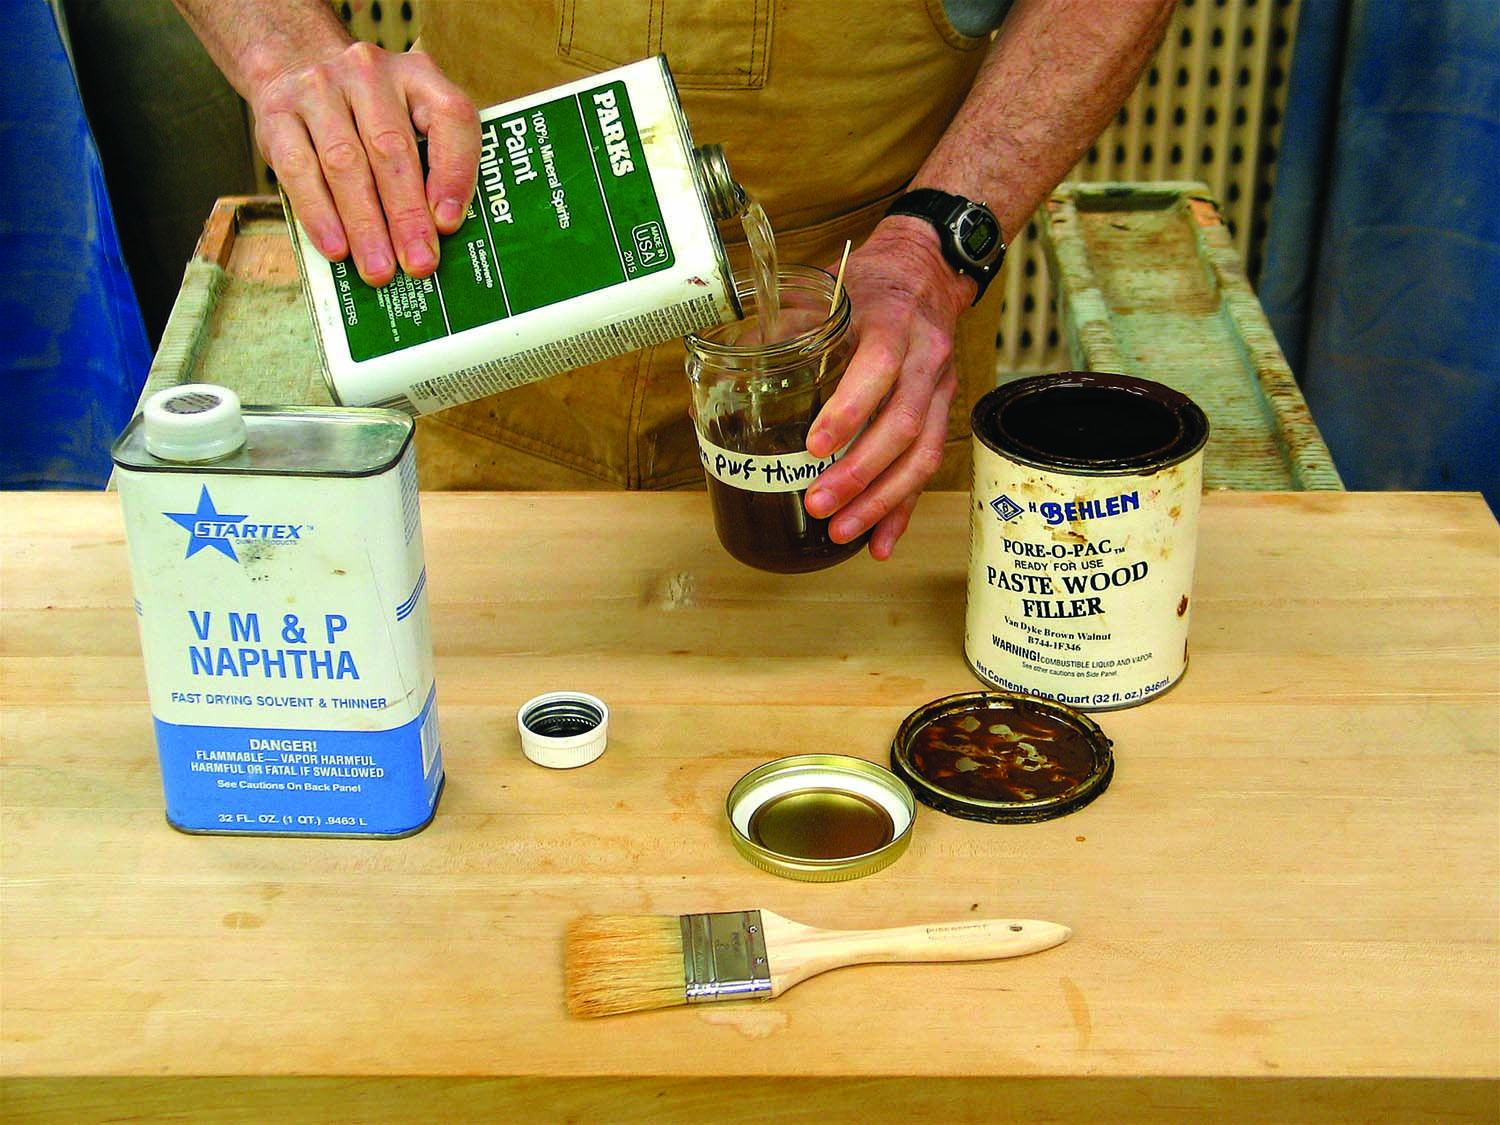
Thinning filler. To thin oil-based grain filler to make it easy to brush or spray, use mineral spirits to add more time for large surfaces or naphtha to speed up the drying on small surfaces. You can also mix the two thinners to get something in between. Thin to a brushable consistency.
You can also add stain to the filler to get the color you want, but this is not usually the best practice because it locks you into the evaporation rate of the thinners in the stain, which may not be what you want. Also, the stain may contain dye, which could fade.
Usually, a walnut color is best, but there are situations where you might want another color, such as white for a pickled effect.
In most cases it’s best to thin the grain filler to make it easier to spread or spray. Use mineral spirits or naphtha (for faster evaporation) with oil-based fillers and water with water-based fillers. You can apply grain filler successfully at any consistency. I like to thin it about half to an easily brushable consistency.
All commercial brands of grain filler I’ve tried, which is most, work well; the critical difference is drying time. It’s best to adjust your work rhythm to the drying time of the product you’re using, but you can also add a little boiled linseed oil (to slow the drying) or some Japan drier (to speed the drying).
It’s not easy to change the rapid drying of water-based fillers. Temperature and humidity will be critical.
Sealing First
Instructions have created confusion about whether or not to seal the wood before applying the grain filler. Unquestionably, the best practice is to seal first. But before discussing why, I want to discuss “seal.”
A sealer coat is a first coat of finish. It can be any finish, but it’s usually the same as you’re using for the topcoats.
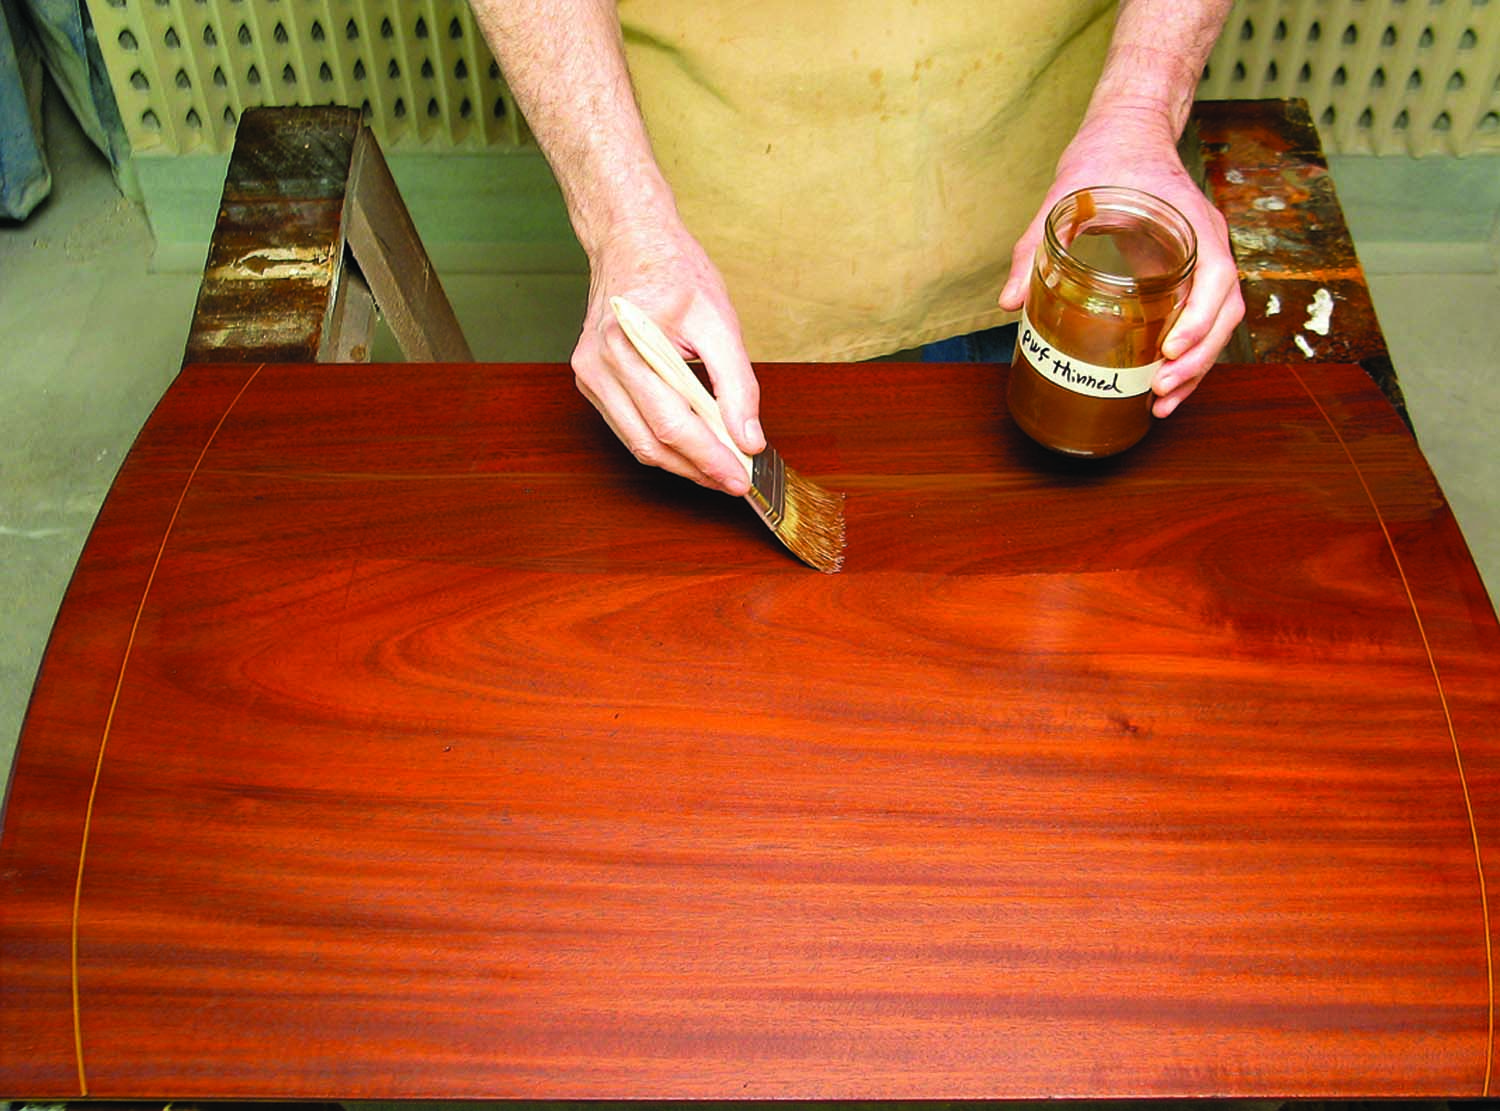
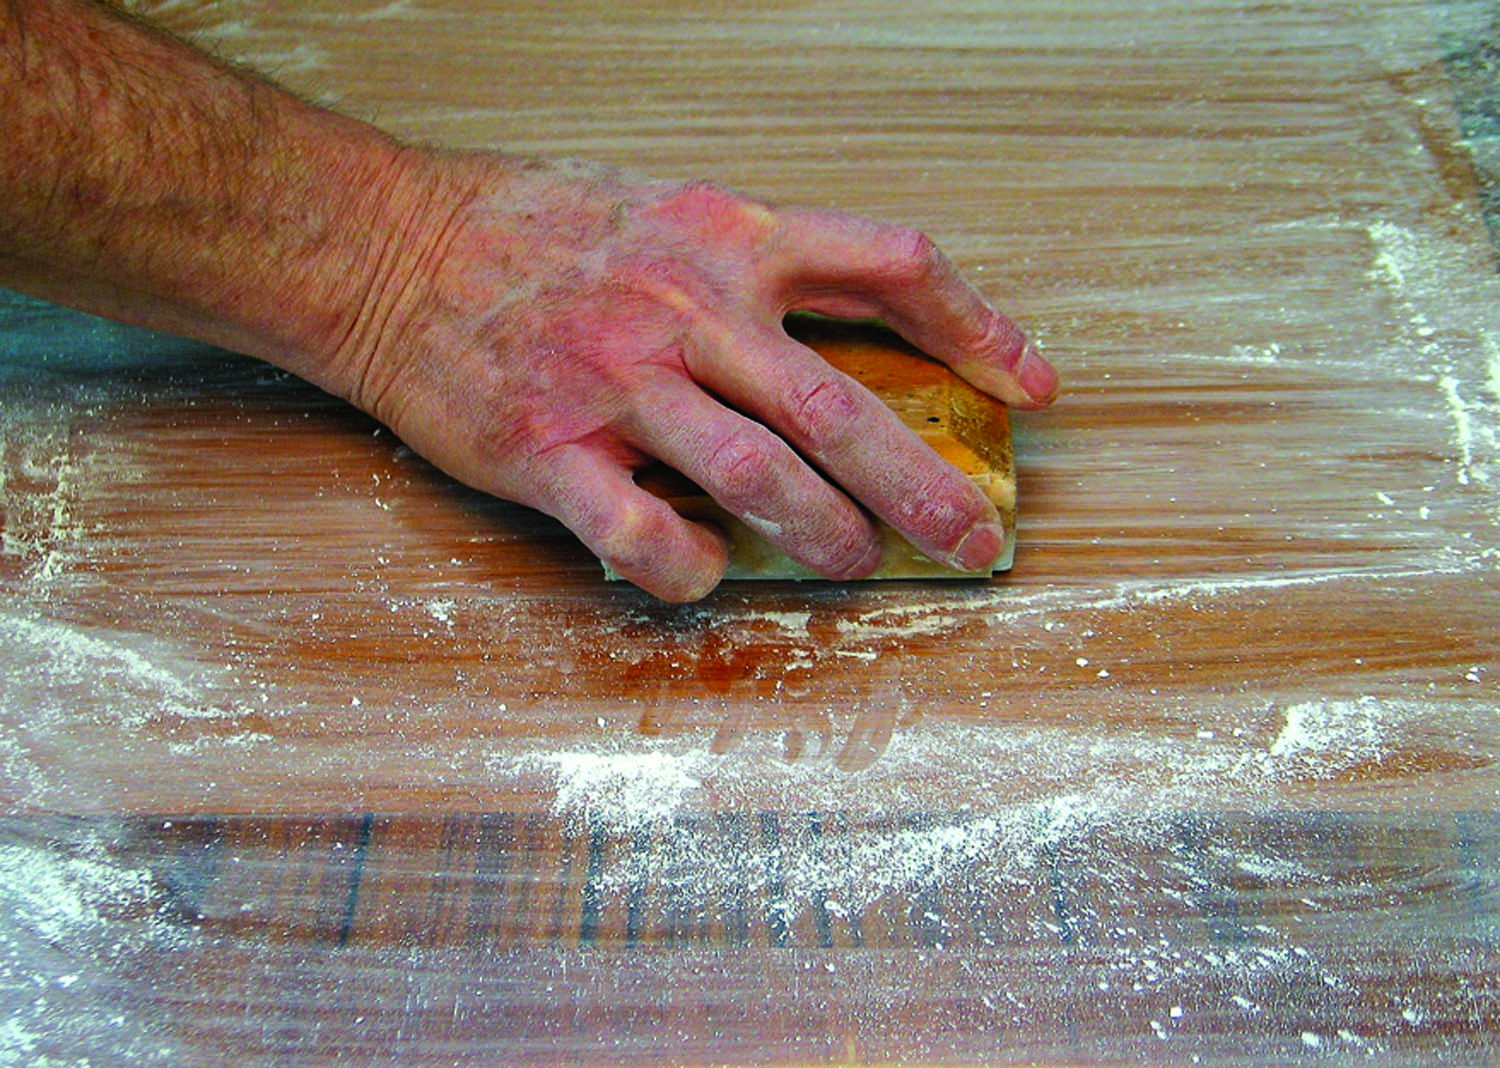
Brushing. The most efficient method of applying grain filler is to brush or spray it to get an even thickness that hazes uniformly over the surface as the thinner evaporates. A thinned grain filler soaks into the pores on its own. If you apply the filler thick with a cloth, you should press it into the pores as you wipe.
If this sealer coat is applied heavy, it will round over the pores and more of the filler will be pulled out when you wipe off the excess. So it’s best to thin this first coat to create what is called a “washcoat.” A washcoat is about 10 percent solids content, which translates to varnish thinned with about two parts mineral spirits (the same as “wood conditioner”), lacquer thinned with about 11⁄2 parts lacquer thinner and shellac thinned to about a 3⁄4-pound cut.

Hazing. When the grain filler hazes, it’s ready to be removed. Removing the filler before it hazes will result in more shrinkage in the pores as the remaining thinner evaporates.
Water-based finishes don’t work well when thinned with a lot of water, so use a commercial water-based washcoat or wood conditioner instead of doing the thinning yourself. Or apply the water-based grain filler directly to the wood as I describe below.

Rag wiping. One method of removing the excess grain filler is to wipe with a cotton cloth across the grain so you pull less filler out of the pores. If you time it just right, the filler will still be soft and moist enough to remove easily with the cloth. Finish by wiping lightly with the grain to remove streaks.
A washcoat will leave enough film build to block the color in the filler from getting through to the wood while leaving the top edges of the pores sharp enough so more of the filler will remain in the pores. It’s not necessary to sand this washcoat, and in fact you shouldn’t because you might sand through.
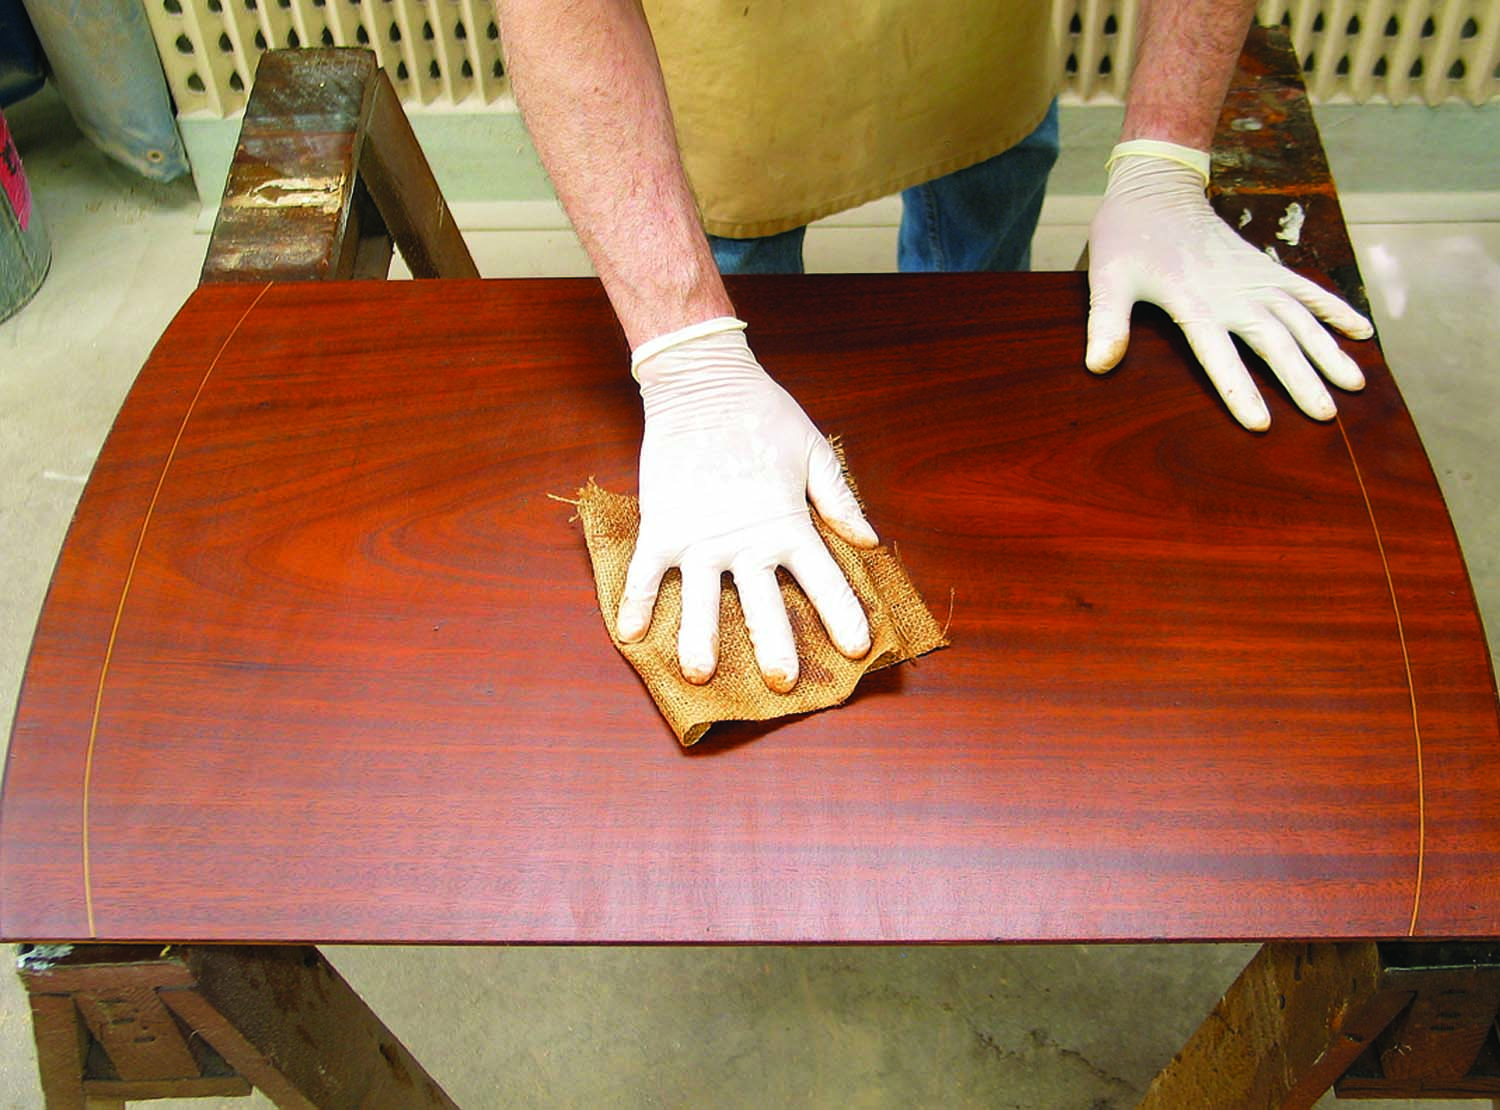
Burlap wiping. If the grain filler has hardened too much to be removed easily with a cotton cloth, use burlap instead. Burlap is coarser but not so coarse that it scratches the wood. On turnings, carvings and inside corners, use a stiff brush or sharpened dowel to remove the excess filler.
The best practice, therefore, especially with oil-based grain filler, is to stain the wood, apply a washcoat, then apply the grain filler. Here are the reasons:
■ You’ll get better contrast between the pores and the wood, which will create more depth.
■ The surface will be slicker so it will be easier to wipe off the excess filler.
■ The washcoat will create a cushion so you’re less likely to sand through stain if you have to sand off some streaks of filler later.
■ A washcoat makes it possible to apply filler to small areas at a time without getting lap marks, which are darker-colored streaks caused by overlapping.
■ If you don’t get all the filler removed before it begins to harden, you can remove it with solvent (mineral spirits or naphtha for oil-based and water for water-based) without also removing some of the stain.
On the other hand, you can skip the stain and washcoat and use a colored grain filler to stain the wood and fill the grain in one step. There is nothing wrong with doing this.
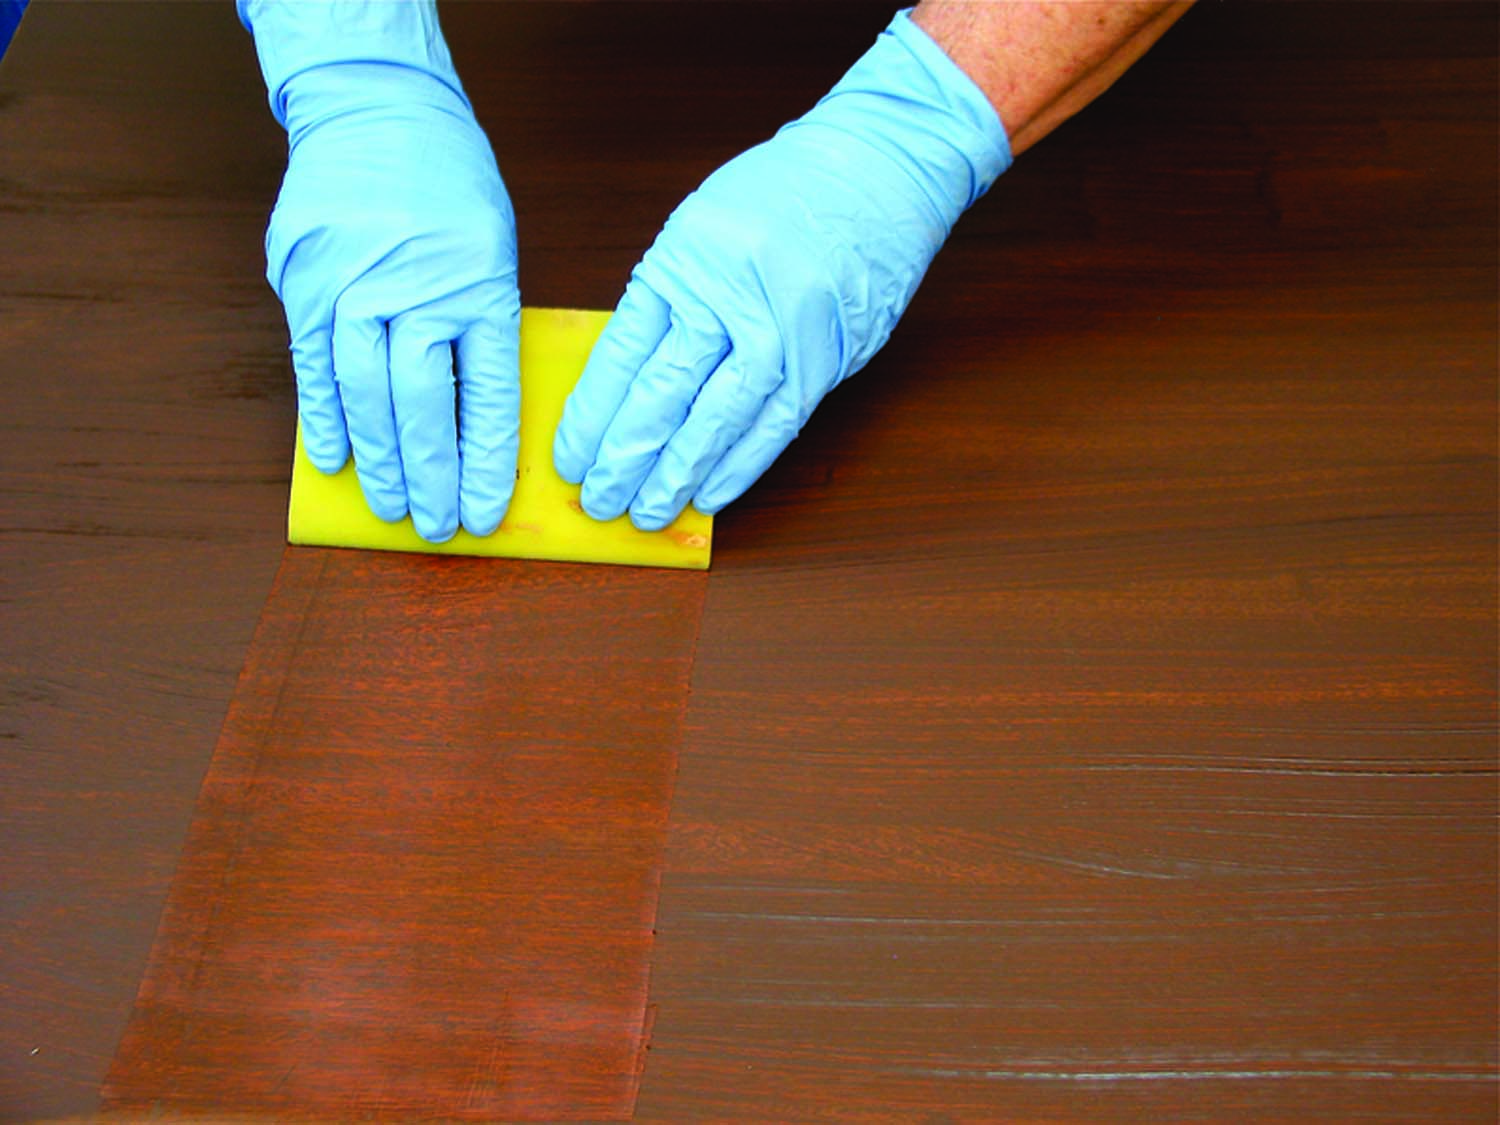
Scrape off. An efficient method of removing the excess grain filler is to scrape it off with a plastic spreader. Then follow with a cotton cloth or burlap. Whichever method you use, finish by wiping lightly with the grain to remove streaks.
With water-based grain filler a case can be made for applying the filler directly to unstained wood. Then scrape or wipe off as much of the excess as you can and sand off any remaining after it dries. Use colored grain filler as a combination stain and filler. Or use natural grain filler, then apply a stain after you have wiped and sanded off all the excess. Most brands of water-based grain filler take stain fairly well.
I’ve applied water-based grain filler both ways – over a washcoated surface and directly to the wood. I like the first method best, but I sometimes use the second with colored filler. The second doesn’t produce the depth the first does, and neither method using water-based grain filler produces the depth the oil-based system does.
Other Considerations
Because you can’t wait until all the thinner has evaporated from an oil-based grain filler (or it will be too hard to remove), there will always be some shrinkage. So you will always get a more level filling with two applications – the second after the first has dried overnight.
If you are spraying lacquer over an oil-based grain filler, spray the first coat or two very light, even to the point of just “dusting” the finish by holding the gun farther from the surface and moving it faster. Try to avoid wetting the surface excessively. A wet coat will cause the filler to swell and push up out of the pores. Sanding to level the surface then removes some of the filler and leaves the pores partially open.
Sand off. It’s nearly impossible to get all water-based grain filler wiped off of wood (such as this crotch mahogany) when no washcoat is applied. You’ll have to sand it off, trying to avoid sanding so deep you open up some of the pores.
You could also apply a coat of shellac between the filler and lacquer coats. The alcohol in the shellac won’t cause swelling and the shellac will slow the penetration of the lacquer thinner that is causing the problem. Unlike the other finishes, the thinner in each fresh coat of lacquer opens up the pores a little even if you’ve sanded the surface perfectly level. If you want a perfectly mirror-flat surface, you’ll have to sand the last coat level and rub it to the sheen you want. Very little sanding will be necessary if you’ve done a good job of filling.
The biggest fear is usually that the filler will set up hard before you get it all wiped off. You need to get used to the drying rate of the product you’re using, of course, and you can washcoat the wood first, then fill smaller areas at a time. But if the grain filler still gets too hard to wipe off even with burlap, remove all or most of the excess quickly by wiping with mineral spirits or naphtha for oil-based filler or water for water-based filler, then fill again – working faster or in smaller areas at a time.
Bob’s new book, “Flexner on Finishing” (Woodworking Magazine Books), will be available in mid-August.
Here are some supplies and tools we find essential in our everyday work around the shop. We may receive a commission from sales referred by our links; however, we have carefully selected these products for their usefulness and quality.