We may receive a commission when you use our affiliate links. However, this does not impact our recommendations.

A client recently commissioned me to build a 5-foot-square dining table. He’d seen the basic design online, but it wasn’t available in the size he wanted. Having built the table for him, I’m pretty sure I can now explain why.
I’ve built plenty of large pieces, but 5-foot square is an exceptionally unwieldy proposition; most arm spans will barely accommodate that width. Even a 4-foot by 8-foot table, at 32 square feet, is easier to carry than a mere 25 square feet of these proportions.
1. Before you start building, make sure it will fit
I know, it should be a no-brainer, but things don’t always work out that way. Before you decide to build something large, make sure you will be able to get it out of your shop (not everyone has an overhead door) and into its new home.
I’ve learned this lesson the hard way. There’s nothing like having to cut an armoire in half at your client’s house after you realize that you didn’t allow for that right-angle turn at the end of the hallway.
Most houses have interior doors at least 30″ wide, so a table or desk no wider than this should be fine, provided you can carry it on its side. Popping the door of a room off its hinges can buy you an additional inch-plus, and in extreme cases you can (in principle) pull off the door stop, too, to gain an extra 1/2″. Just remember you’re going to have to replace any trim you remove, which may take a couple of trips for paint touch-up.
2. Glue up big widths in sections
Don’t try to glue several wide boards together in one fell swoop. Not only is that a recipe for panic-stricken nightmare; it may also result in less than perfect joints. It’s hard to get the necessary pressure across multiple glue joints in a 5-foot-wide glue up comprising 8 boards. Instead, glue the system in sections, two or three boards at a time. Run each section through a thickness planer or drum sander, straighten the edges you’ll be joining, cut spline joints if you’re going to use them, and then glue the sections together.

A recent dining table commission called for a 1-3/4″ thick top made of eight boards. I added Dominos for reinforcement and began by gluing the boards up in pairs.
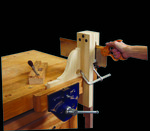
3. Capacious clamps
The most affordable way I know of clamping large pieces is with pipe clamps. A plumbing supply shop will usually have 8-foot and better black pipe on hand. Add a pair of Pony clamp ends and you’re set. Bonus: You can remove the clamp ends for use on pipes of other lengths.

In addition to pipe clamps, I have four sash clamps with extensions that I received as a gift for my 21st birthday. My husband, Mark, helped with this glue-up at the end of a long, hot workday. (Note: The biscuit slots visible on the outside edge were rejects. The top was still oversize.)
4. Trimming to size
Even if I could handle a top this large and heavy by myself without damaging it (I can’t), my table saw fence lacks the capacity to rip a piece that’s 60″ wide. I cut the top slightly oversize using a circular saw, then trimmed the edges using a router with a 2″-long pattern cutting bit.

To get clean, straight edges on large table tops, I clamp a straight-edged piece of plywood (in this case, 1/4″ thick) to the work piece to guide a pattern cutting bit in the router.
5. Finishing
The finish for this commission started with a water-based dye, followed by an oil-based stain. On applying the dye to the underside of the table top with a 3-inch foam brush, I found it impossible to maintain a wet edge, which can translate to lap marks. While this is not necessarily a disaster on the underside of a table top, it would be on the face.
If you’re applying a fast-drying finish such as water-based dye or anything with an alcohol base, consider applying by spray or roller. Even an absurdly low-tech solution like the paint roller I used (see illustration) will work like a charm compared to a 2″ or 3″ foam brush. The only caveat, if you’re using a paint roller, is that the cover will soak up the water- or alcohol-based dye, then gush it out on your workpiece. It’s a good idea to experiment on scrap before you tackle the finished piece, to get a feel for how best to handle the roller.

I used a roller to apply water-based dye quickly.


A quick double-check to make sure the top fits the base, still clearly in need of cleaning up
6. Spraying
Although I used to spray finishes, I no longer do. When a job calls for sprayed lacquer or conversion varnish, I sub it out. In view of the table’s minimal structure, the drawbacks of which I pointed out to my client before starting to build (he assured me that he wanted this design — no stretchers, and no overhang to speak of), I decided to postpone attaching the heavy top to the lightweight base until the table was in my client’s home. My finisher, David Willibey, sprayed the underside of the top on one day, then I returned to help him flip it over the next day.
With a top this heavy and unwieldy — and one that would show every flaw, thanks to the close-grained walnut, the semi-opaque dye and stain, and the barely eased edges — two people are essential. You have to be extremely careful not to lay the edge on anything that might mar it, as well. A clean moving pad does the trick.

In David’s spray shop we set the tabletop on a mobile base, protecting the surface that was face-down with a couple of clean towels.
7. Delivery
My full-size truck has a bed that will carry 4 x 8 sheets of plywood between the wheel wells, but it’s still too small for a 5-foot-square table like this one, made with legs that come within a gnat’s hair of the table top edges. After momentarily considering laying the table on one side (which would have been a recipe for disaster, given the completely open base without stretchers), I realized I had two options: hire a moving company (always risky; no mover I know is as careful as I am with finished pieces) or take my husband up on his offer of using the trailer he uses for his tractor.
– Nancy Hiller
 English Arts & Crafts Furniture explores the Arts & Crafts movement with a unique focus on English designers. Through examination of details, techniques, and historical context, as well as projects, you’ll discover what sets these designers and their work apart from those that came before and after, as well as gain a deeper understanding of the Arts & Crafts movement and its influence.
Three complete furniture builds provide a glimpse into the breadth of ideals encompassed by Arts & Crafts:
- Voysey’s two heart chair, with its woven seat and sharp finials, combines simplicity of form with an elegant uprightness
- A striking sideboard design from Harris Lebus, one of England’s largest furniture manufacturers at the turn of the century, was not just imposing, but affordable for a middle-class market
- Gimson’s hayrake table marries rural allusions, challenging joinery, and exuberant hand-carving in a project that is a joy to build
Pick up a copy today!
Here are some supplies and tools we find essential in our everyday work around the shop. We may receive a commission from sales referred by our links; however, we have carefully selected these products for their usefulness and quality.