


We may receive a commission when you use our affiliate links. However, this does not impact our recommendations.
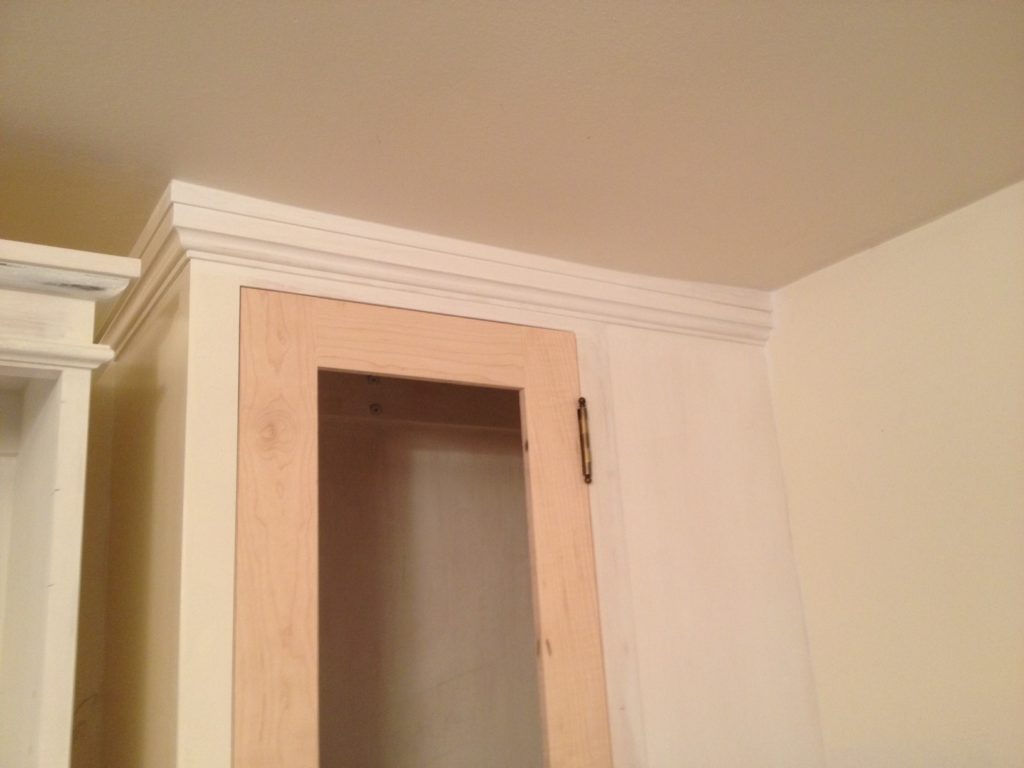
A shopmade crown moulding scribed to the ceiling in an extreme case of “not-flat” ceiling
Rooms are virtually never square, level, or plumb. Ceilings tend to sag toward the middle of their rooms; floors usually do the same. Plaster walls are rarely flat; drywall builds up at interior and exterior corners. You get the picture.
Designing built-ins is an art that takes contextual imperfections into account and makes dealing with them as easy as possible. A common way of handling these points of intersection between a cabinet and its surroundings is to cover them up with trim: Think cove moulding, quarter-round, shoe moulding, crown. Applied kicks are another example. But some historical styles call for minimal applied trim. In these cases, it’s customary to handle the gaps between built-ins and their settings by scribing, a method of marking a built-in precisely so that it can be trimmed to conform to its context.
In a previous post I described a method for scribing applied drawer faces to fit their face frames. Here I’ll outline a method for scribing a base cabinet to an adjacent wall and the floor.
Note: In most real-life scenarios, we’re not just installing a single cabinet, as we did in the kitchen example I used for this post, but a bank of cabinets that are fastened together. The same basic principles apply in such cases, but there are a few additional points to bear in mind. I’ll deal with those in future posts.
Step 1: Assess your surroundings
In an ideal world, we would start with an empty room. No carpet, no furniture, no existing built-ins: a clean space to check for plumb, level, and square. Before heading to the drawing board, we would note the conditions outlined in the following paragraphs; this would guide us in planning the width of face frame members that might need to be scribed.
Few jobs offer such ideal conditions. We often have to assess a room’s conditions while our customers (or family members) are still living in the space. That was the case with the kitchen in this example.
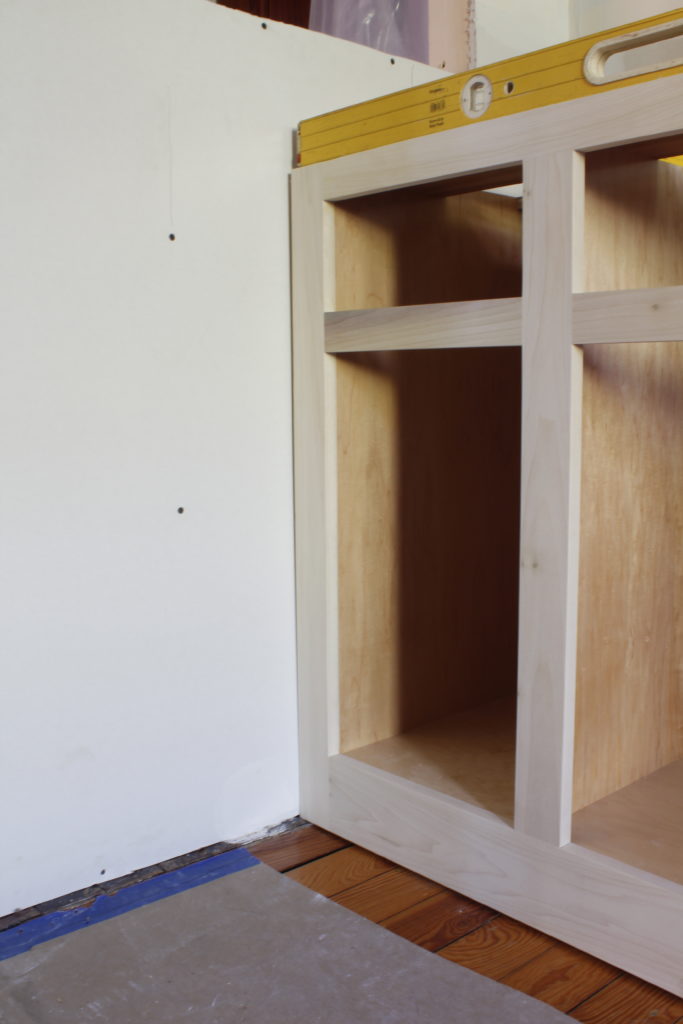
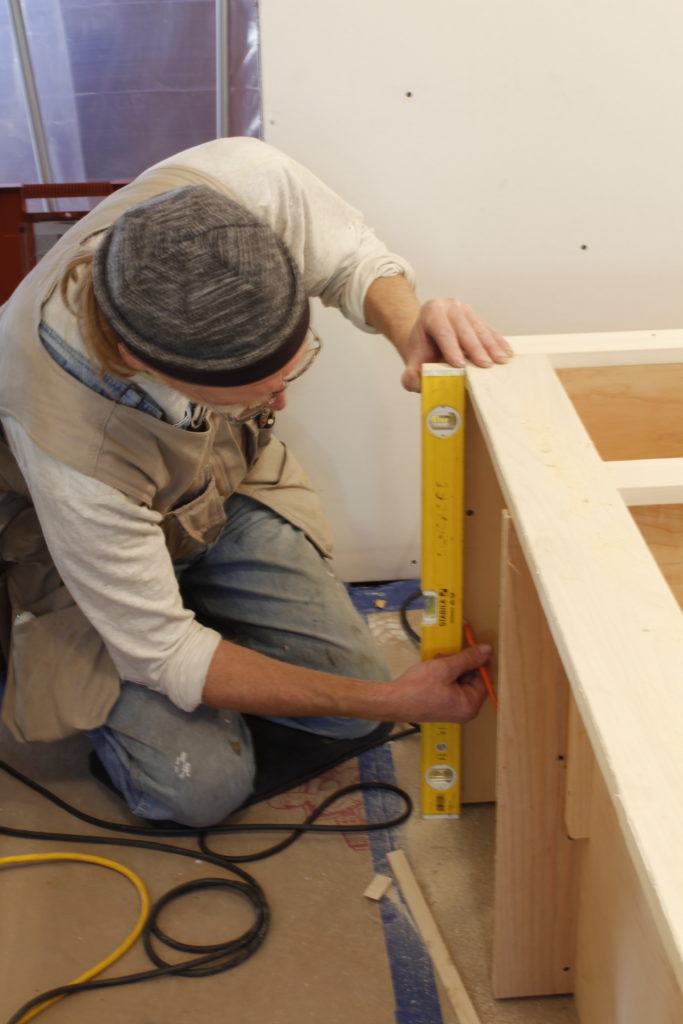
When you’ve finally been able to clear the room and are ready to install your built-ins, use a level to check the status of the floor and walls. You’re not just assessing whether the floor is level (it’s probably not; few are), but also appraising the contour of the floor.
Is the floor flat? Don’t assume that it is. It may dip toward the center of the room or have high spots — for example, over a beam. Is it level? Probably not; few are. Note the direction of slope and amount of fall.
Check the floor at the back wall and at the point where the front of the cabinet will be. Cabinets, unlike drawings, exist in three dimensions; we need to take depth into account as well as width and height.
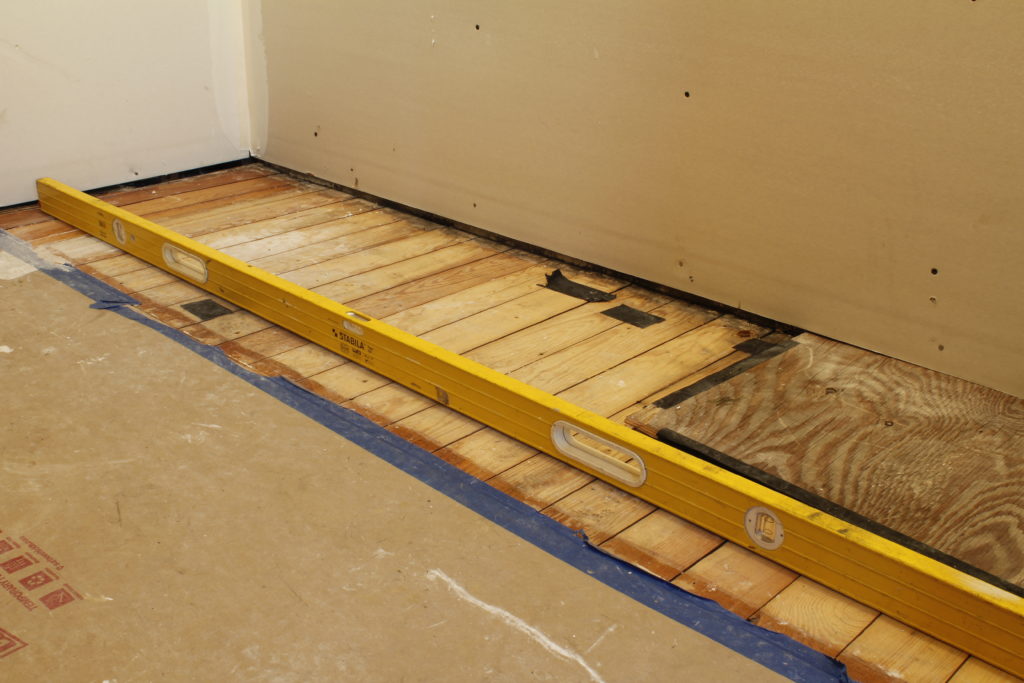
For this sink base, we used an 8′ level to gauge the flatness and slope of the floor at the back wall and also at the point where the front of the cabinet would land.
Do the same in the other direction, i.e. from the back wall to the front of the cabinet, assessing the floor at several spots along the width of the wall where the cabinet will go.
To gauge the slope of the floor from the cabinet’s front to back, we used a 2′ level. Note that we pulled up the floor protection, which would have given an inaccurate reading.
Now repeat the process with the walls at the back and side(s) of where your cabinet will go, holding a long level against the wall to see how plumb and flat it is.
Step 2: Shim the cabinet level and plumb in the spot where it will be installed
Use carpenter’s shims to get the cabinet sitting level and plumb. You may need to move shims around, adding more than one and wiggling them back and forth until the cabinet is sitting level across its width and depth and plumb at its face.
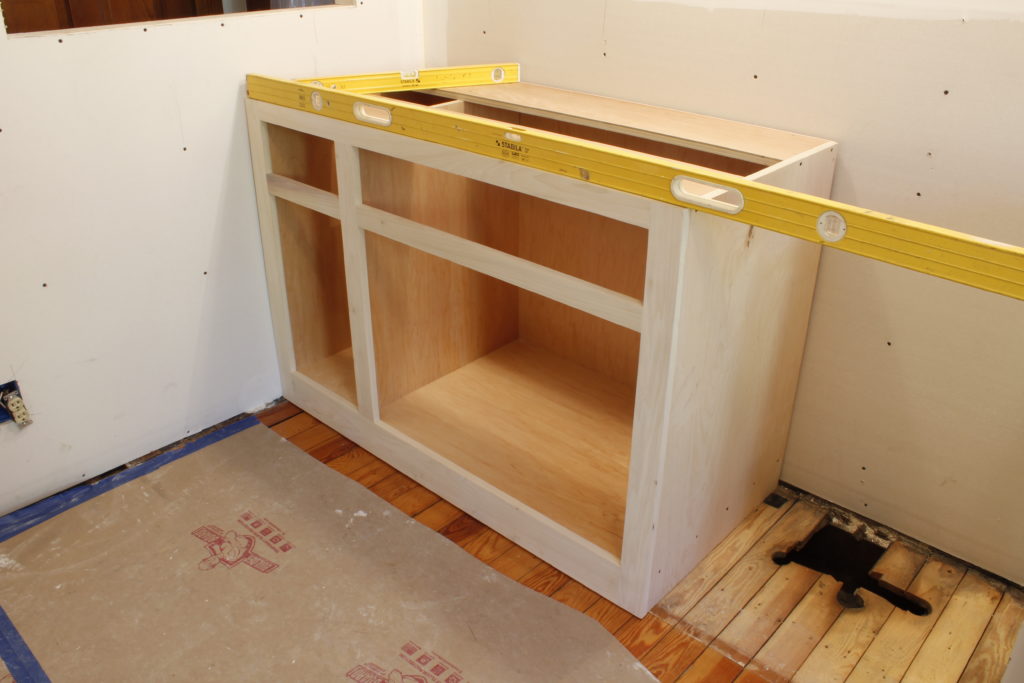
Multiple levels come in handy for cabinet installation. Here we used an 8′ level across the cabinet’s width and a 2′ level across its depth at the same time.
Step 3: Assess the gaps
So…how’s it looking? Odds are, you now have a gap between the cabinet at the wall and another at the floor. The object of scribing is to remove the material that’s causing those gaps. Although you’re dealing with wood, not fabric, it’s a process not entirely dissimilar to that of fitting a piece of clothing to a model.
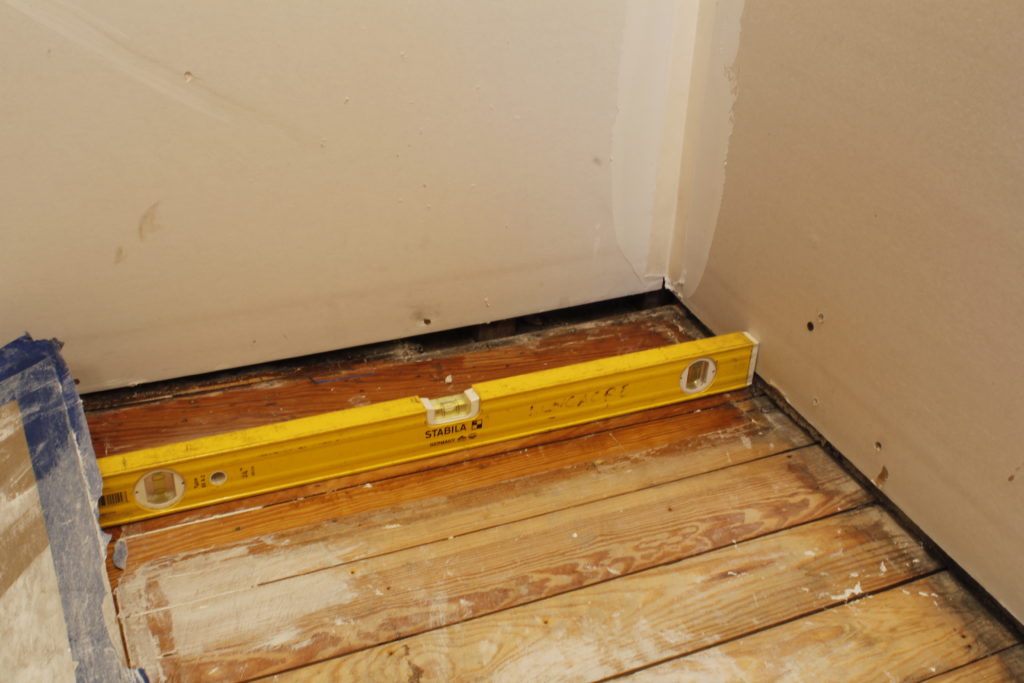
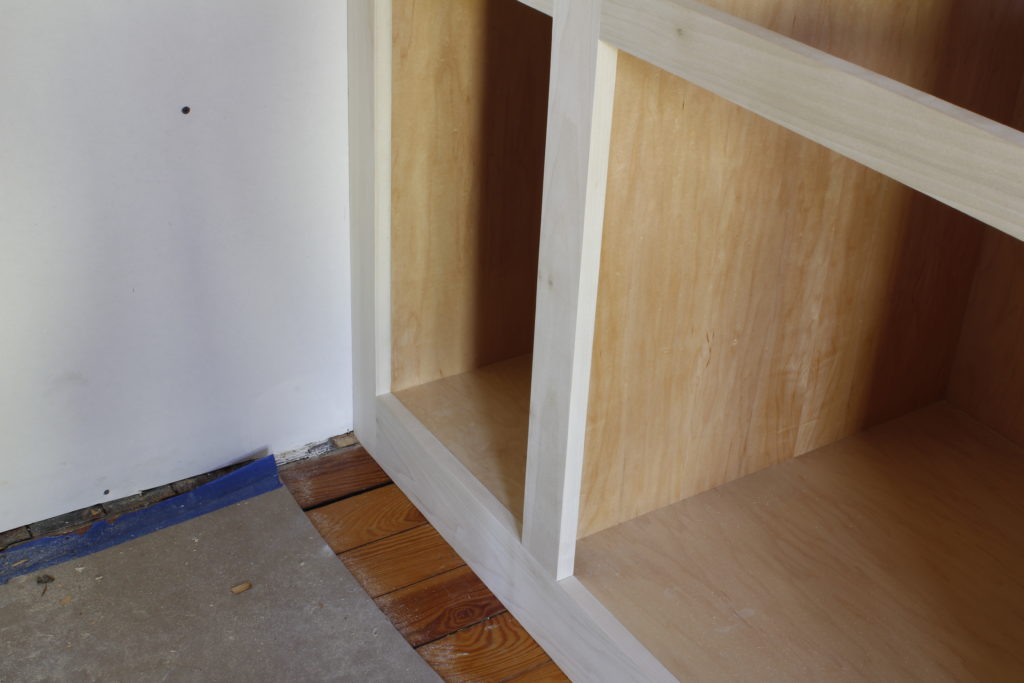
Once we had the cabinet sitting level and plumb, there was a gap at the wall (see the shadow line at the upper part of the left face frame stile) and a good gap at the floor created by a little ledge of wood at the wall left when the floor was sanded many years ago.
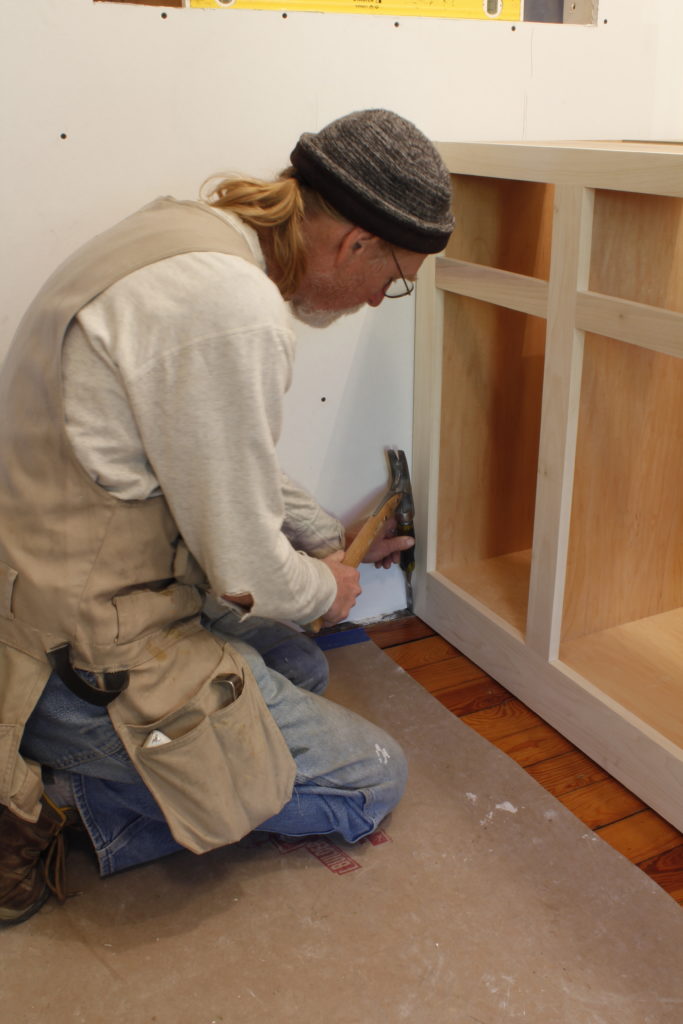
When a simple solution is obvious, go for it. Here Mark used a job site chisel and hammer to chop out the little bit of floor that was sticking up above the level of the rest; this little ledge had previously been in the doorway to the adjacent hall. But after removing this obstruction, we found we’d have to remove a good bit of material from that end of the face frame’s lower rail.
Step 4: Make a guide
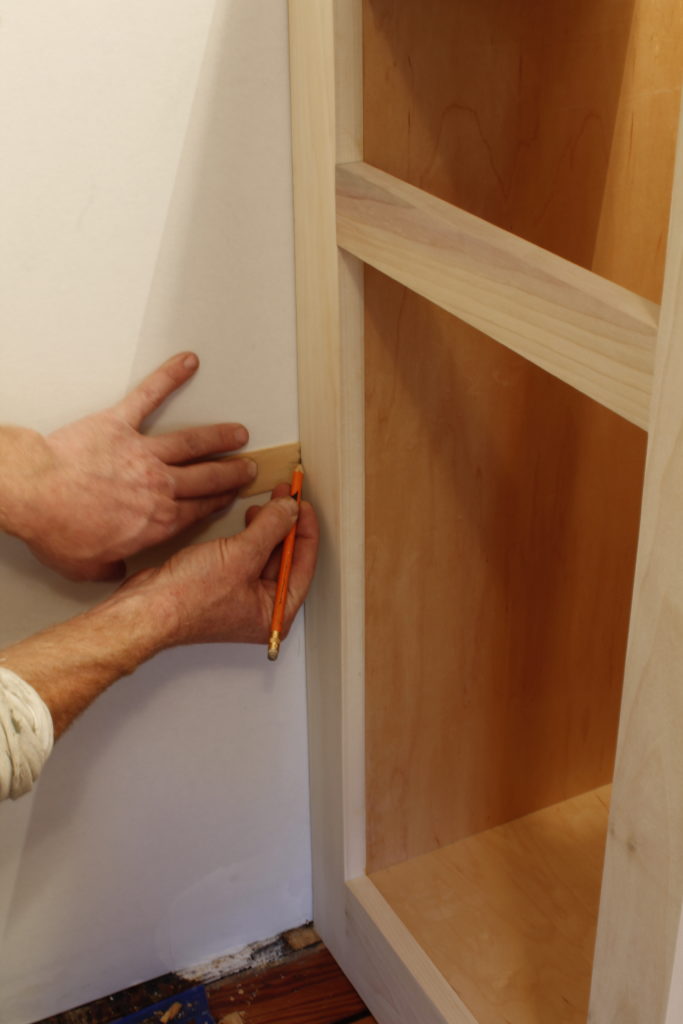
With the cabinet shimmed level and plumb, make a scribing guide. As I mentioned in a previous post, you can use dividers or a special log scribe, but most of the time I find it perfectly reasonable to make my own guide from a carpenter’s shim. Find the widest part of the gap between the cabinet and the wall (or floor). Insert the thin end of a shim into the gap at this point, until it fills the space — don’t push it in tight, or you’ll move the cabinet and end up with a scribing guide that’s too thick. Mark this point on the shim with a pencil, then pull the shim back out and cut along the line with a utility knife.
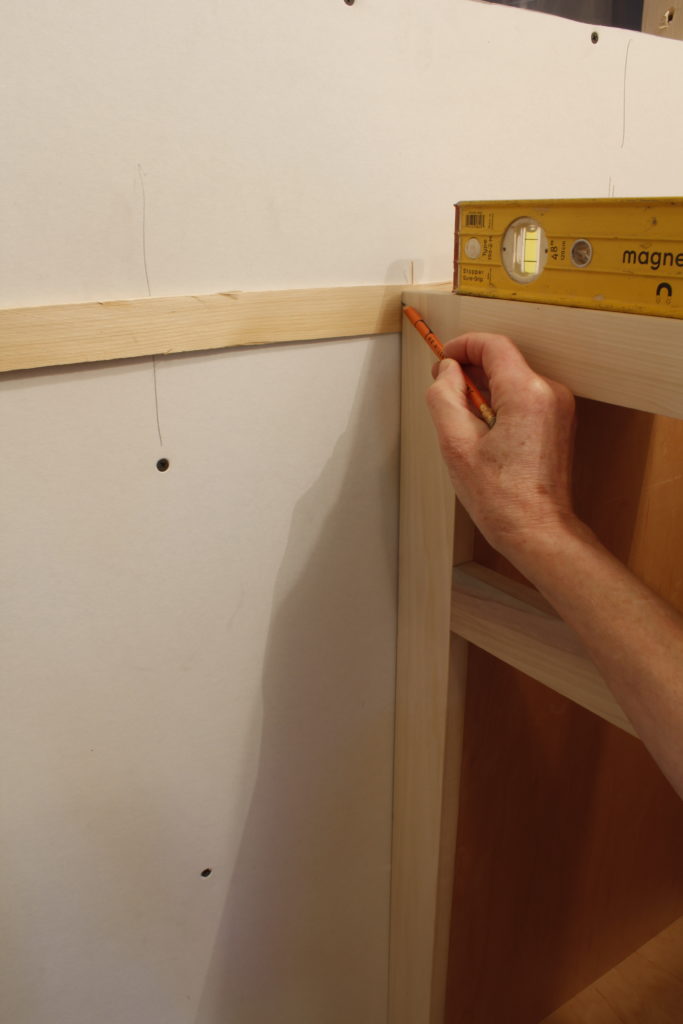
I insert the thin end of a shim into the widest part of the gap between the cabinet side and the wall until the shim takes up the full width of the gap. Then I mark that point across the width of the shim with a pencil.
The cut end of the shim will be your guide.
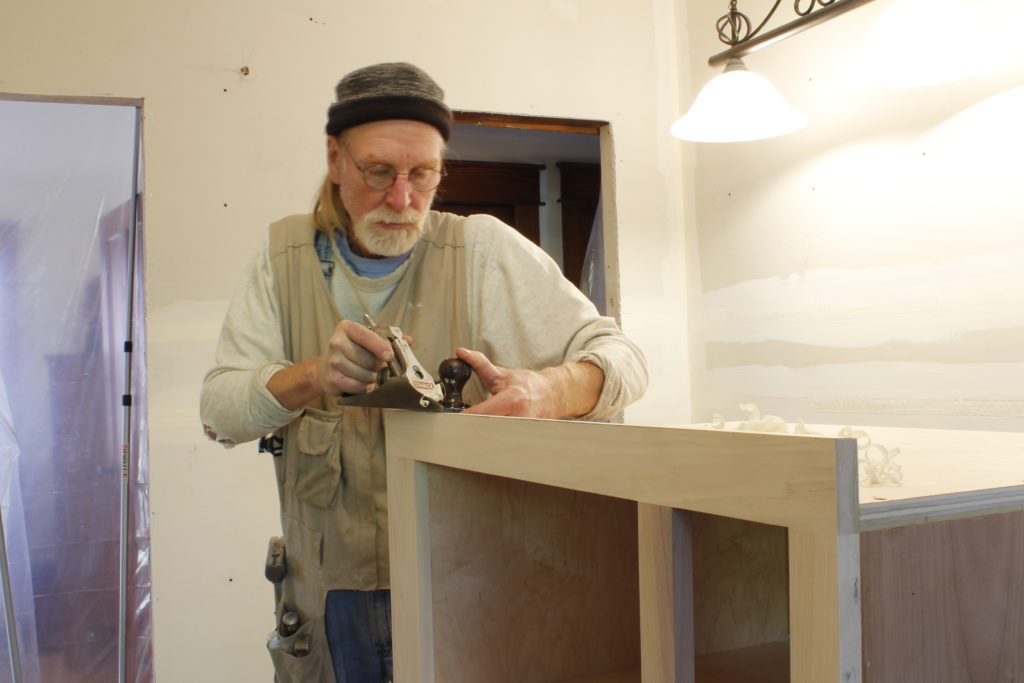
Step 5: Scribe
Now hold the cut end of the shim in place against the cabinet with one hand (the left hand, below), hold a pencil against it with the other hand, and in a smooth motion, trace the width of the gap from the floor to the top of the face frame stile. When you reach the widest point of the gap — the point you used to make your guide – your line will die out to nothing.
Step 6: Cut to fit
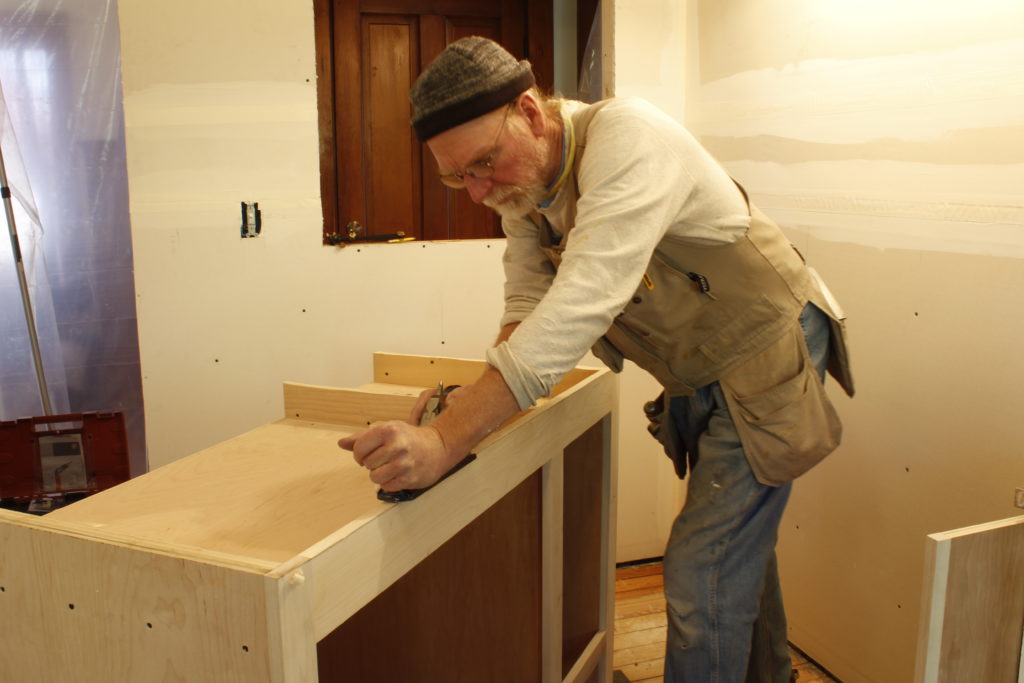
Turn the cabinet on its side and plane down to your line. It’s helpful to angle the cut toward the back of the cabinet, where the fit need not be as snug, to create a nice sharp edge at the front where the face frame meets the wall.
Plane the cabinet face frame to fit. If you have a lot of material to remove, you can start by sawing close to your line with a jigsaw, then finish up with a handplane.
Step 7: On to the next plane (this time, horizontal)
Push the cabinet tight against the wall and check the fit. Remove more material if necessary. When you have it fitting well, move on to the next step: the floor.
With the cabinet against the wall but still shimmed level and plumb, repeat the same basic process you used to scribe the face frame stile to the wall. You can use a shim, as we did in the example above, or a log scribe, as Mark did here. You can even use a pair of dividers. The basic principle is the same: You are extending a mark equal to the widest part of the gap all the way across the bottom of the face frame.
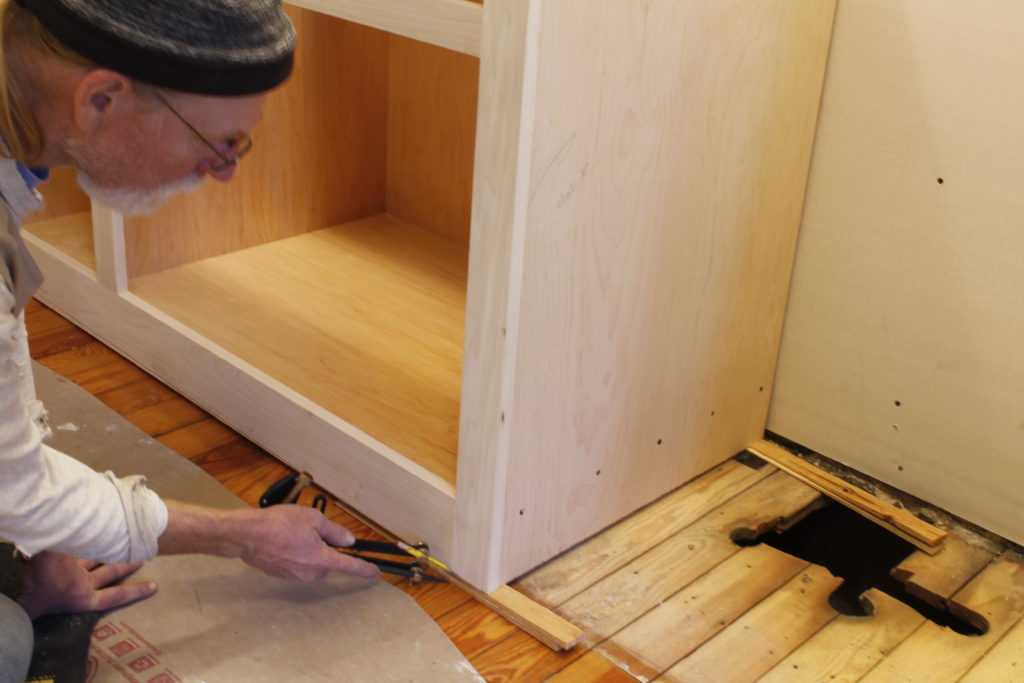
Here Mark is using a Lee Valley log scribe. The log scribe is set at the widest point of the gap between the bottom of the cabinet kick (in this case, the lower edge of the face frame’s bottom rail) and the floor.
To fit the kick to the floor, we turned the cabinet on its back. You can see the line at the top of the image; it fades to nothing at the cabinet’s right side (i.e. at the bottom of the image).
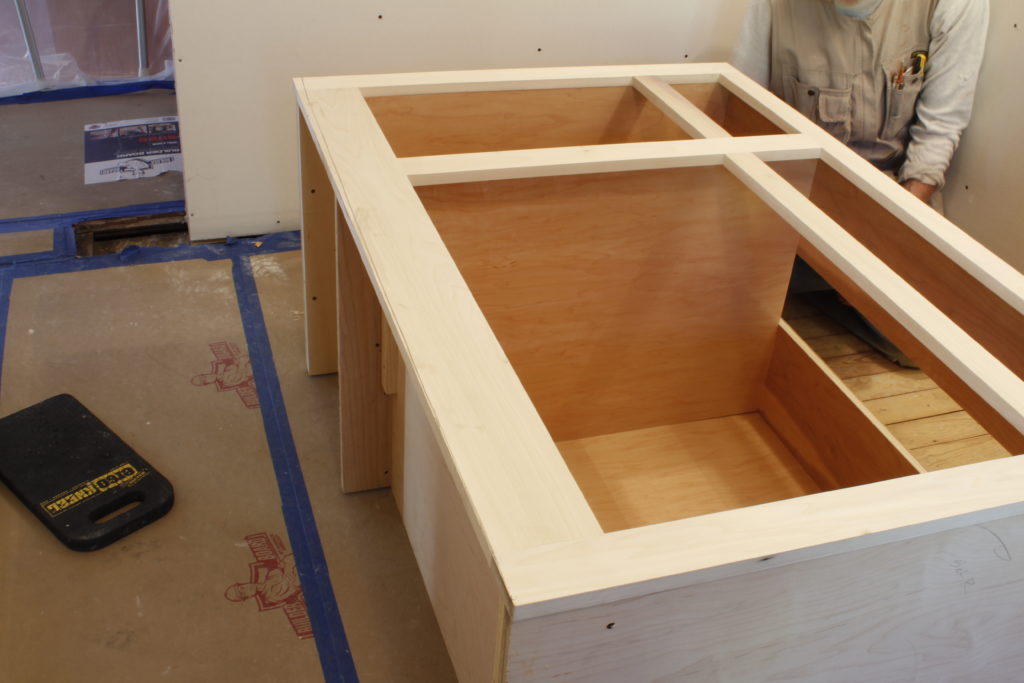
When it comes to how a base cabinet meets the floor, there are two parts to the process: First, the sides of the cabinet must be trimmed to conform to the floor across the cabinet’s depth. We do this with a jigsaw or Fein tool. Then comes the front of the cabinet, which in this case has a flush kick (i.e., the bottom rail of the face frame comes down to the floor without any recess — a detail typical of many early 2oth-century built-ins).
The cabinet sides will not show once the piece is installed, so there’s no need for special finesse with those; you really just need to remove material. Nor do the sides need to sit firmly on the floor all the way from front to back; it’s fine to have just a couple of sturdy sections (each at least an inch or so wide), one toward the front and one toward the back, making contact with the floor. That’s plenty of support for most cabinets.
Step 8: Cut again
Repeat the process of removing material as necessary.
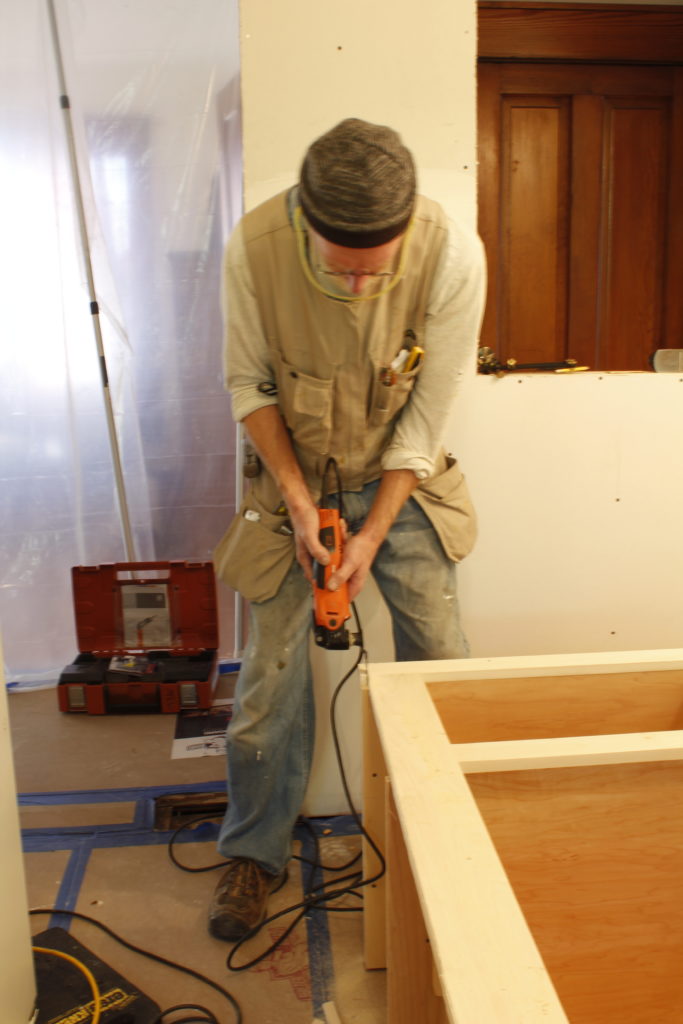
Mark used a Fein tool fitted with a coarse saw blade to trim part of the cabinet side.
We had determined at the start of the process that the same amount of material needed to be removed at the back of the left side as at the front, so Mark used a straightedge (in this case, a level) to transfer the mark from the front to the back of the left side, then removed the material with a jigsaw.
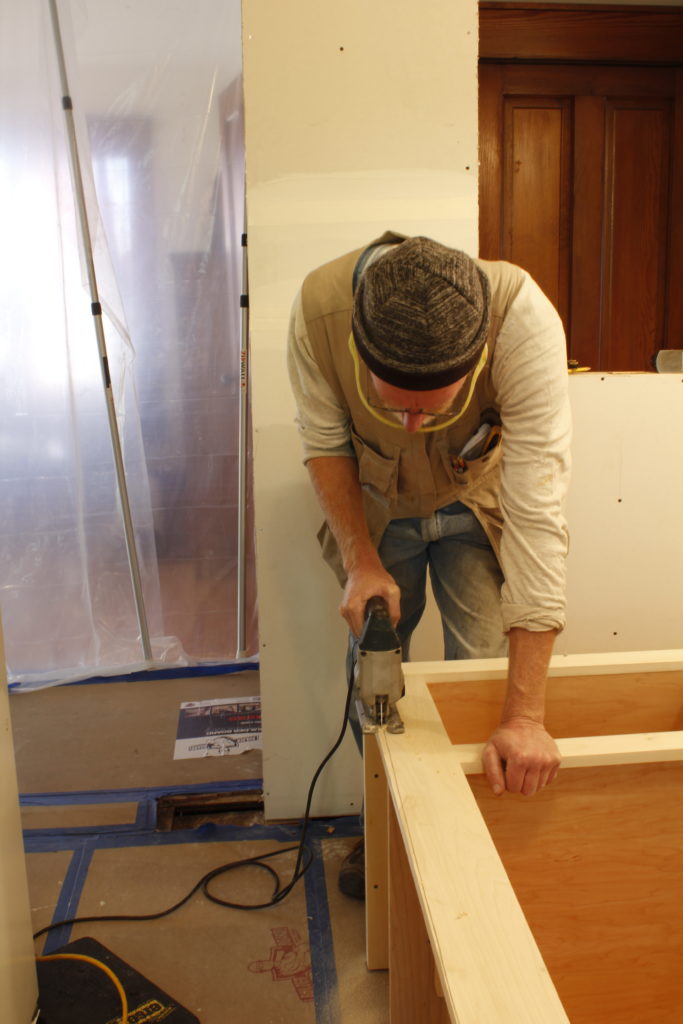
A jigsaw removes the bulk of material. Be sure to stay a little bit away from your mark.
Finish up by hand with a plane.
Step 9: Test the fit
Replace the cabinet and check the fit. Make sure that it is level and plumb. You may need a few more strokes of the plane to adjust the fit.
Tight
– Nancy Hiller
 Available from ShopWoodworking.com
Making Things Work:
Tales From a Cabinetmaker’s Life
By Nancy R. Hiller
Honest, earthy, and wryly humorous, this collection of tales drawn from more than 30 years of experience at shops in England and the United States is thought-provoking as well as entertaining. We follow Hiller as she stumbles into furniture making after dropping out of Cambridge University, finds employment in one, then another, English workshop, grapples with monotony, sexism, and self-doubt, attempts escape, and eventually makes peace with her vocation.
Purchase your copy!
Here are some supplies and tools we find essential in our everyday work around the shop. We may receive a commission from sales referred by our links; however, we have carefully selected these products for their usefulness and quality.


