We may receive a commission when you use our affiliate links. However, this does not impact our recommendations.

One of my favorite Popular Woodworking Magazine cover lines – of the
ones that actually make the printed issue as opposed to the lines we
create, laugh about but then erase – is on our December 2010 issue.
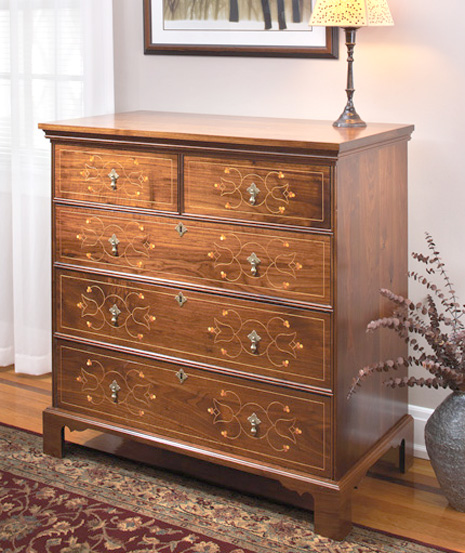
It deals with the string inlay on the Line & Berry chest and reads,
“Stop Scratching It!”
This refers to the fanciful stringing found on our
cover project and on many period pieces from the Chester County area
near Philadelphia, and how that stringing was inlaid on the original
pieces; a groove was scratched into the surface then a piece of string
fits to the groove. Of course, back during those times the best mode of
transportation was a horse and buggy. Today, we have automobiles that
travel more than 100 miles per hour. With all the changes throughout
time, why should we continue to scratch these designs with hand tools
and resist reproducing these patterns (or any inlay patterns) using
power tools?
In the article, I use patterns developed for this
particular chest and inlay design (patterns that are included in the
article), then use a router with a guide bushing to cut the lines before
installing the string. Due to space limitations – the article is 10
pages as it is – and due to the fact that not many woodworkers would want to
read an entire issue devoted to a single project, we decided to film “Line & Berry String Inlay by Router,”
a DVD that shows the procedures used to create the inlay work. Please
don’t think of this DVD as an companion to the article in the magazine.
Yes, the two do go hand in hand, but the DVD is so much more.
Even
if this style of furniture is not your favorite, the techniques learned
from the video help you with many types of inlay – regardless of the
period or design. In the video, you’ll see how to develop patterns from
photographs, learn about period stringing details and see different
router bit setups used during the process. You’ll learn how easy it is
to bend thin pieces of wood with a torch and a few short lengths of
plumbing pipe, and you may even discover that you have a thickness sander in
your shop but don’t know it. Each step from start to finish is shown as
the project moves from concept to completed design.
In the DVD,
the end result is a drawer front, but if you look at the design through
different glasses you might see the stringing work for a spice box door
or the decoration on a candle box or tabletop. The ideas are endless as
long as you know the process. Click here to pre-order a copy of “Line & Berry String Inlay by Router.”
• Want a quick video tour of the chest? Click here.
• If
you cannot operate with tailed tools and need to stay “old-school” with
your string inlay, you can’t go wrong with Steve Latta’s DVDs:
Fundamentals of Inlay: Stringing, Line and Berry DVD
Fundamentals of Inlay: Federal Table Leg DVD
• For
another perspective of how to create and inlay stringing, see Rob
Millard’s article “Federal-style Inlay” from our August 2009 issue. Purchase the magazine here.
Here are some supplies and tools we find essential in our everyday work around the shop. We may receive a commission from sales referred by our links; however, we have carefully selected these products for their usefulness and quality.


