


We may receive a commission when you use our affiliate links. However, this does not impact our recommendations.
 I use a lot of arched shapes in my work. They are a pleasing geometrical construction that can be used in doors, on the ends of bookshelves or on the bases of chests (I particularly like them on the ends of a six-board chest).
For the most part, I use three types of arches. And to be honest, that was because I didn’t know the geometry for other forms.
Recently I was browsing through Charles H. Hayward’s “Woodworker’s Pocket Book” (Evans Brothers) and found a brilliant page of information that explained how to construct eight different arches. It is pure gold.
And so I am sharing that information here.
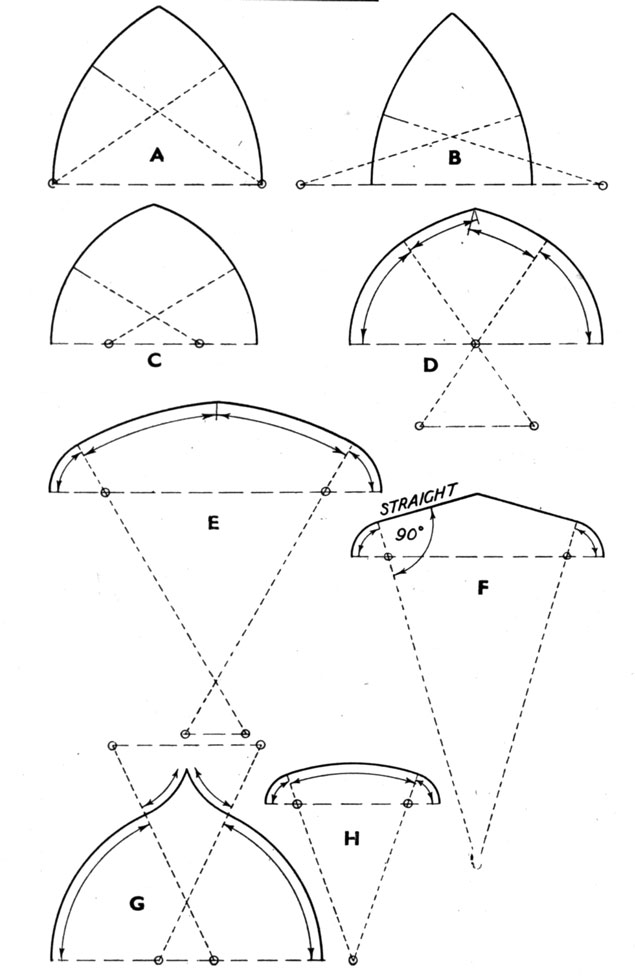
- EQUILATERAL. The centers of the arcs are at the spring (also called the base) of the arch.
- LANCET. This gives a sharply pointed arch. The centers of the arcs are outside the arch.
- DROP. This makes for a flat arch. The centers of the arcs are inside the arch.
- THREE CENTERED. This is an arch with a compound shape. The dotted lines along which both centers are placed show where the two curves meet. They can be at any angle, and the centers of the top curve can be in any position along the straight lines below that of the common or lower curve.
- FOUR CENTERED. This forms a depressed arch. The proportions of the curves can be varied to create alternative shapes. The angle of the dotted lines on which the centers are placed can be varied, as can the position of the centers, providing that are on the dotted lines.
- STRAIGHT TOP. This is similar to E, but the top part is straight. The dotted lines that pass through the centers can be at any angle, but the straight part of the arch must be at right angles to the dotted lines.
- OGEE. The lower centers can be in any position along the horizontal line, and the dotted lines on which both centers are placed can slope at any angle. The top centers can be in any position outside the arch, which will give a point to the arch.
- DEPRESSED. The side centers are always at the intersection of the dotted sloping lines with the horizontal line at the spring of the arch. The dotted lines can be at any angle, but are generally arranged so that the center curve is struck from a considerably greater radius than those at the sides.
Grab your compass and a straightedge. It’s time to play with arches.
— Christopher Schwarz
Here are some supplies and tools we find essential in our everyday work around the shop. We may receive a commission from sales referred by our links; however, we have carefully selected these products for their usefulness and quality.


I just made a convex strop with a cross section properly described by H/8; this would have been a great guide for laying it out more neatly. Certainly this will be a great guide for future work.
Thank you Messrs. Hayward & Schwarz!
I learnt a lot from a book called The Geometry of Sheet Metal Work by A. Dickason. It can be expensive to find new but it’s packed with layout tricks.
Great timing. Spent part of the morning drawing a copy of fretwork gallery on a side table from a LAP post about the Aesthetic Movement (Oct 2016), Lancet arch is just what I need.
Very nice, some obvious additions to your arch quiver are the long and short half elypses with two points and
A string, and an easy parabola wth this method https://mysite.du.edu/~jcalvert/math/parabola.htm ( first example)
Smooth the arcs with some nice French curves, if you know where to get any ( ahem)
Pure gold indeed! This is great stuff.