


We may receive a commission when you use our affiliate links. However, this does not impact our recommendations.
Woodworkers ask me a lot of questions on routing wood, and many of the questions are similar, so here’s a short list of FAQs and answers to help you.

Routing wood? The process and results will depend on bit and collet sizes. Bits and collets come in 1/4″ and 1/2″ standards.
Question #1 – I just purchased/inherited a router that only takes 1/4″ bits. Can I put 1/2″ bits in this router?
Answer – If the router does not come with a 1/2″ collet, probably not. The best way to know if your router is powerful enough to use 1/2″ bits is by looking at the horsepower rating. If the router has a horsepower rating of 2HP or 13 amps, it is should be powerful enough to drive 1/2″ bits, assuming they are available from the manufacturer.
More – The industry standard is 1/4” and 1/2” plunge and fixed-base routers. One of the reasons these standards are so popular is bit selection. There is such an enormous selection of bits – and many come in both 1/4” and 1/2”. The exception is the larger, heavier bits, which only come in 1/2″ shank size. These larger bits require more router horsepower to not only spin the bits but also cut wood. Smaller router motors trying to spin larger bits would simply burn out while routing wood.
Question #2 – I make small ornamental jewelry and display boxes. Where can I find small bits for routing wood on these projects?
Answer – In recent years, a whole new variety of routers has been introduced that may be more suitable for what you are doing. These routers are based on the Dremel-size motors, and the bits are perfect for small, intricate work such as box- and instrument-making.
Question #3 – There is a huge number of brands of bits available. How do I know what to purchase?
Answer – There are good router bits and not-so-good router bits available, and you cannot always tell by the price. Sometimes, poor-quality bits are sold at high prices to make them seem high-quality. The best answer is: Purchase brand-name bits from established suppliers. This is especially true for the biggest matching bits, like door sets. I also recommend purchasing the best-quality bits you can afford – especially for the work you do most often. My most-used bits are roundover bits, trim bits and pattern bits.
Question #4 – Can I use a trim bit instead of a pattern bit, or do I need to purchase both?
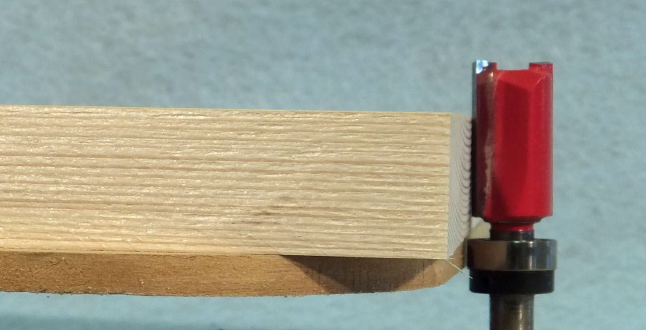
Routing wood with a pattern bit looks like this mock-up. The bearing follows the pattern, just below the workpiece.
Answer – Yes, you can use a trim bit for making patterns. The only difference between pattern bits and trim bits is the location of the bearing. In a trim bit the bearing is at the end of the bit; in a pattern bit the bearing is between the cutters and the shank. If you cut a lot of patterns, however, you will find the pattern bit more convenient.
Question #5 – How do I know what direction my router bit is spinning? When routing wood, what side of the wood should I be on?
Answer – When you are holding the router and looking down at the top, the bit will be spinning clockwise. If it does not already exist, draw a black arrow on the base of your router in the direction the router bit spins.
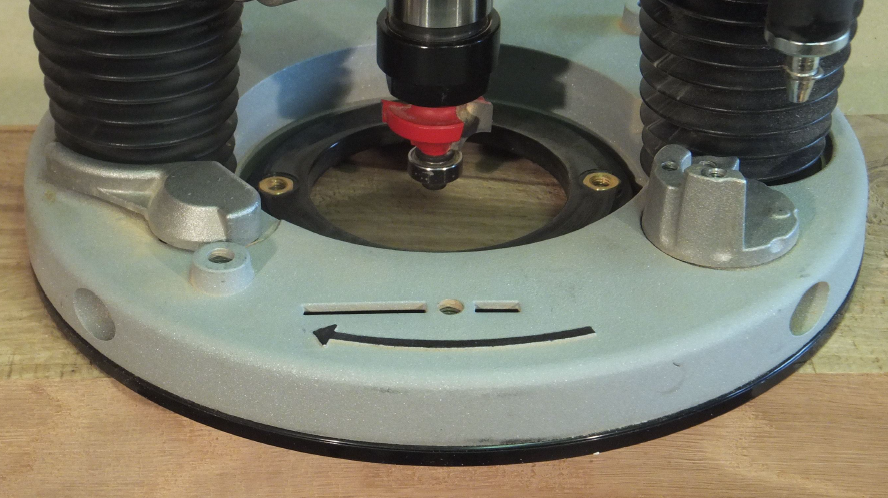
Now imagine the bit is a small wood cutting blade – like a miniature table saw blade. Blades (and bits) always want to cut into the wood. So if you are hand routing wood, and the router is on the near side of your workpiece, you will want to travel from left to right. The blade will be cutting into fresh wood as it moves along, just the same way your table saw works.
More – On rare occasions, you may need to make small cuts in the opposite direction, sometimes called “climb cutting.” But these should be rare and infrequent exceptions. The cuts made when doing this are often inferior, because the bits are designed to cut into the flow of the wood. Just as you would not stand at the back of your table saw and feed wood into the blade from the back, you should not make a habit of routing wood in reverse.
Buy yourself a copy of my 1-hour presentation on this topic in ShopWoodworking.com. If you have more questions on routing wood, I am happy to answer them in the comments section below.
–Colin Knecht
Here are some supplies and tools we find essential in our everyday work around the shop. We may receive a commission from sales referred by our links; however, we have carefully selected these products for their usefulness and quality.


Regarding climbing the grain: On CNC routing machines, the direction of the path is usually a climbing cut, and the reason is that there will be little or not tearout, which is a constant problem when routing corners and edges in particular. My opinion is that this rule of thumb about not climbing the grain is grossly oversold by experts, probably because of the danger of losing control of the router. But with smaller bits, and with graduated cuts there is little of this problem, as long as you are aware or and prepared for the “running away: tendency of the router. I’m a professional woodworker, and my default direction when hand holding the router is a climbing cut. I cut most , not all, of the material on the first or second pass, then a conventional direction final pass, which solves the problem of a poor cut.