We may receive a commission when you use our affiliate links. However, this does not impact our recommendations.
 How productive would you be in the shop if you tried to build furniture from blocks of Silly Putty coated with Crazy Glue? Imagine the mess if one board stuck to another automatically and both parts stretched and distorted if you tried to move one. This is exactly what happens if you try to make a SketchUp model, and don’t combine parts into components. That’s the nature of things in SketchUp when you first create them, everything sticks to everything else, and edges and faces that touch each other stretch. But if you can avoid thinking that you’re drawing and pretend you’re out in the shop, you can avoid all of that. Here’s my rule; as soon as something looks like a hunk of wood, make it a component.
 When objects are made into components, they are still sticky and stretchy within the component, but the component itself is considered one object, and that won’t stick to other stuff in the model. It’s like creating a wrapper, or putting a peanut butter and jelly sandwich in a zip-lock bag. The wrapper keeps other geometry from messing with the component, and it also keeps the geometry of the component from messing with other things in the model. If you want to change something about the component, you can but you first have to open the wrapper, or in SketchUp terms open the component for editing.
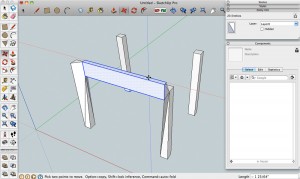
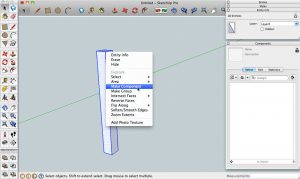
 The first step is to select all of the lines and faces that you want to combine. You can do this by drawing a box with the selection arrow, moving from left to right to include everything inside the selection box. Or you can click the left mouse button three times on any part. When all the parts are highlighted as seen in these images, right-click with the cursor over the selected objects. Select “Make Component” from the menu, and when the box appears give it a name and click the button that says “Create”.
Now you’re in control of the parts of your model and you can increase the speed at which you model as well as make life easier for your computer’s processor and video memory. Instead of having to keep track of six faces and a dozen lines that make up a hunk of wood, you and your machine only need to keep your eye on one. One click with the selection arrow grabs the entire component if you want to move it or copy it, and an unlimited amount of copies are in the Components window where you can drag them into your current model, or save them to use in a different model.
 Treating a bunch of lines and edges as a single object moves modeling closer to reality, but there is a feature to components that is better than reality. Components are essentially clones of each other as long as they share the same name. If you change one of them, they all change. In the shop you’d have to make eight cuts on the band saw and eight passes over the joiner to taper four legs of a table the same way. To put mortises in those legs, you’d need to make eight cuts at the hollow-chisel mortiser, eight passes with the plunge router, or chop by hand until your arm feels like it’s about to fall off. In SketchUp, make those changes to one leg, and if it’s a component all the other instances of that component will change along with it.
Opening a component is easy, right-click with the cursor above the component and select “Edit Component” from the menu, or double-click on the component. Everything else in your model will dim, and the component will be surrounded by a box of dashed lines. When a component is open, it is the only thing in your model that can be changed so you don’t have to worry about breaking something else. When you’re done editing, click the selection arrow out in empty space to close.
Four resources for learning SketchUp:
Learning SketchUp Posts on the Popular Woodworking Editor’s Blog
SketchUp Videos in our store
Bob Lang’s digital book with embedded video, “Woodworker’s Guide to SketchUp”
Bob Lang will be teaching a SketchUp class in August 2012 at Marc Adams School of Woodworking
Here are some supplies and tools we find essential in our everyday work around the shop. We may receive a commission from sales referred by our links; however, we have carefully selected these products for their usefulness and quality.


Hi Bob,
Great explaination of a complex subject. Your sandwich-in-a-bag analogy was spot on. I’ve seen a few complaints, in some of your related SketchUp posts, that the Pro version is pricey at $500. Compared to what? I can do exactly what you’ve described above in AutoCAD, with editable blocks, but the cost of the software was almost double that amount. I think that SketchUp continues to be an amazing value, even at the Pro level. Besides that, SketchUp has a great “look” that no one else can match.
John