


We may receive a commission when you use our affiliate links. However, this does not impact our recommendations.
Even though I build a lot of straight line Arts & Crafts style furniture, one of my favorite tasks in woodworking is shaping an irregularly curved surface. It adds life and interest and I find it entertaining to find a gentle curve that works with the grain for looks and the hand for feel.
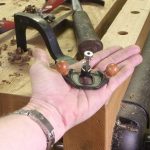
There are a bunch of ways to do it, and for the project I’m working on now I started with a roundover bit at the router table to quickly get most of the waste out of my way. Then I take a spokeshave and knife to alter the curves. Some areas want to be thinner and some rounder, and at this point I’m taking thick rough cuts. The trend in modern spokeshaves is to imitate a smooth plane, taking the thinnest of shavings and leaving a highly refined surface. That may suit some, but I’m no longer young, so I set the blade on the spokeshave to take a rank cut and get the basic shape as fast as I can. To refine the cuts, I’ve found rasps, followed by a scraper, to be a great combination to get a nice surface in short order.

Click on the image for a larger version; you'll see the marks left by the rasp
There are all kinds of power-tool alternatives for this task, and most of them claim to make this work quick and easy. The trouble is they also make it quick and easy to go too far, or to lose control of the tool. And they tend to make a lot of noise, raise a cloud of dust and vibrate one’s hands into a state of numbness. Shaping wood with power takes more hand/eye coordination and control than doing it by hand. Hand-cut rasps remove wood faster than you might think, with some distinct advantages over powered methods. The flat surface of the tool takes down the high spots as it glides along, and it won’t grab and take off if you start to daydream. But wait a minute–the surface, as you can see, is raggedy and kind of ugly. Is it getting closer to being a nice smooth surface, or is it getting rougher?

The next round of rasping still leaves a rough surface. Don't panic.
This can be disturbing. You read somewhere how great rasps are so you get one, only to scratch the daylights out of a nice piece of walnut. Calm down– you have to break some eggs if you want to make an omelet. There are two distinct steps to the process: defining the shape and refining the surface. When the shape is right, the next step is to make those deep ugly scratches into smaller ones. Those sharp teeth remove a lot of wood, but in a controlled and defined way. With a hand-cut rasp the teeth are randomly arranged, but they do leave marks. The good news is that they aren’t as deep as they appear, and a rasp with finer teeth will remove them quickly. The surface is getting better, but you can still see (and feel) the marks.

This is better, but not quite there.
An even finer rasp reduces the marks, and you can start to see a visible improvement on the surface. I know I’m getting close when the surface begins to reflect some light. None of these rasping steps takes long. The coarsest rasp usually takes the most time, because the shape is being defined. The following steps are “once over lightly.” With some experience you recognize how smooth a surface each tool will leave, and when you get there it’s time to stop and pick up the next one. So now what – are we going to keep switching to finer and finer rasps until we run completely out of patience and money?

The scraper easily slices of the hills, leaving a nice surface behind.
Nope. When you think you’re close switch to a scraper. This was explained to me a couple of years ago by rasp maker extraordinaire Michel Auriou. The teeth on the rasp leave a series of hills and valleys. Because the teeth are sharp and pointy the bottoms of the valleys are nice and smooth. The upper surface doesn’t look so good because you’re seeing (and feeling) the tops of the hills. Push a scraper across the surface and it slices off the hills. Because of the valleys, there isn’t much material to remove which makes the scraper work much easier than it would be if you were trying to scrape the entire surface. By using a series of tools in steps you can get a nice curved surface in just a few minutes. I’ll finish up with a bit of sanding, but I’ll be able to start with a fine grit, and it won’t take long at all.
Here are some supplies and tools we find essential in our everyday work around the shop. We may receive a commission from sales referred by our links; however, we have carefully selected these products for their usefulness and quality.


When I was boy, I watched my dad do woodworking projects. On many of these projects he used wood rasps. He had a wooden box full of all shapes and sizes. After I started doing woodworking, he gave me a few of his prize rasps. After he pasted away, my mom gave me the wooden box full of the wonderful tools. I have used these rasp for many years and find new ways to use them every time I pick them up. When you use these rasps and follow up with a good scraper you will love the outcome. It takes a little while to get the hang on using a rasp, but don’t give up just keep useing them.
I made a scraper with variable curvature, out of a plain one. It works pretty well for wider curves, even after spokeshave.
Bob-
Greetings from Brooklyn!
Thanks for the timely article. I’ve been doing a lot of reading and window-shopping on rasps lately. Still have not made up my mind as to what I need. Any suggestions on two rasps to get me started? Before I head over to visit Joel I want to know exactly what I want. Otherwise, my eyes get too big and I might spend too much!!
Chris
I often use an expanding drum band sander for pieces like the one you pictured. It has a 3″ wide by 8″ diameter soft deformable surface and is stationary mounted on the bench. There is very little vibration in the piece and you have very good control because you are not fighting the motor and its centrifigal forces. This is a tool I have had for 20 years; originally purchased for jewelry finishing.
what grit rasps were used in this demonstration??
Thanks for the information Robert.