We may receive a commission when you use our affiliate links. However, this does not impact our recommendations.
 Sometimes I need to be reminded that not everyone who reads our blogs are at the same level of woodworking experience, and that I should give explanations as if my readers were beginners.
I learned that lesson when I was teaching my first continuing education class in woodworking. It quickly became apparent that I had some absolute beginners in the class. So I began the class discussing the properties of wood and how to read a ruler. While I may work with fractions every day, many of the students in my classes did not, and more often than not, fractions intimidated them. They wouldn’t know where to find a 1/8″ if their lives depended on it.
The same is true about wood. Many of the students had no idea about the different types of trees. Trees were something they learned about in grade school, and because trees no longer had any real relevance in their lives, the information was relegated to the dungeon of their memories.
So I discussed how some trees shed their leaves in the fall and how that affected how the wood on the inside of the tree was compacted, because it was trying to conserve water and so on and so forth. I tried not to use words such as “deciduous” or “conifers,” rather hardwoods and softwoods. I didn’t want anyone to shut down because he or she thought a science lesson was coming on.
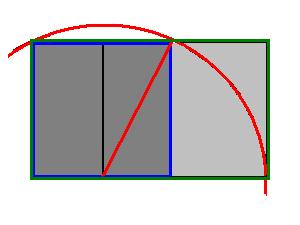
Which brings me to the point of this blog entry. The other day, I wrote about playing with the golden ratio in the design of my workbench. I quickly discussed how to figure out the ratio by using math. But if I were teaching one of my classes, I would have jumped up to the board and showed how to figure out the golden rectangle with only a ruler and a compass. The following are images that illustrate how to make a golden rectangle without math in only a few steps.
1. Begin by drawing a square (blue lines.)
2. Then draw a line that divides the square in half (forming two rectangles, a left and a right – the black line.) 3. Next, take the point of your compass, and place it in the bottom left corner of the right rectangle that you just made when you divided the square – bottom of straight red line)
4. Then, extend the pencil point of your compass to the opposite right top corner of the original square– top of straight red line.)
5. Rotate the pencil point of the compass downward, drawing an arc until it extends your square– red curved line or arc.)
6. Finish off the rectangle by extending the bottom line of your original square until it crosses the arc. Extend the original top line of the square to the right. Make a 90° line to connect the two long sides. This is the long side of your golden rectangle –green lines.)
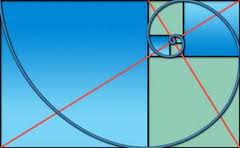
 As you can see in the above illustration, a distinctive feature of the golden rectangle is that when a square section is removed, the remainder is another golden rectangle; that is, with the same proportions as the first. Square removal can be repeated infinitely, in which case corresponding corners of the squares form an infinite sequence of points on the golden spiral.
Check out George Walker’s “Unlocking the Secrets of Traditional Design” DVD at shopwoodworking.com.
Here are some supplies and tools we find essential in our everyday work around the shop. We may receive a commission from sales referred by our links; however, we have carefully selected these products for their usefulness and quality.


This points to how difficult it is to teach a class.
This made me think of the PBS show on fractals.
I would suggest that:
If your woodworking is a science use the ratio or Steve’s suggestion.
If your woodworking is an art, use your eye.
In his presentations at Woodworking in America in the Spring of 2009, George Walker did not mention the Golden Ratio or the Golden Rectangle. Then Christopher Schwarz raised his hand…
Read the article on Walker’s blog, at http://georgewalkerdesign.wordpress.com/2010/01/29/golden-rectangle-a-different-viewpoint/
The key, in Walker’s opinion, is that using proportions (and dividers) is a much better approach. Fascinating stuff, especially since I was there in person!
Al
5/3.
George Walker talks about this extensively on his blog. 5/3 is nearly indistinguishable from the golden ratio, and is a lot easier to remember and plot out!
A few coments about the Golden Ratio:
1) In the other recent thread, one of the comments talked about how the Golden Ratio was “created.” The Golden Ratio exists for some very basic mathematical reasons, and is omnipresent in nature. So, it would be better to do as the mathematicians do and say that the Golden Ratio was discovered, rather than created. That said, however…
2) The Golden Ratio has been misapplied to manmade artifacts in countless situations. More often than not, something that has proportions that are sorta kinda near the Golden Ratio is crammed into it to make it fit. In cases where an artifact has proportions that equal the Golden Ratio to high precision, it’s invariably because the designer made a conscious effort to do so, not because they tried to make something look good and just happened upon the Golden Ratio.
3) While the Golden Ratio looks good to most people as far as height/width and related proportions go, recent cognitive research suggests that a different ratio, somewhere in the vicinity of 2.5-3.0, governs what looks good in the context of detail/whole. That is, something looks good if its largest details are around 35% as large as the whole, its next-largest details are around 35% as large as the largest details, and so on. If it pans out, this finding is probably of greater significance to woodworkers than the Golden Ratio is.
-Steve