


We may receive a commission when you use our affiliate links. However, this does not impact our recommendations.

The basic principle of woodworking is painfully easy: Mark your project carefully, then remove the wood that isn’t part of your project. Over Christmas break, I built my wife a coffee table. Here it is:

The table has “clamped” or breadboard ends. Three tenons, integral with the top, fit into attending mortises cut into the breadboard end. Oh, and the couch in the picture is massive. The table is 31″ wide, and 6′ long… more the size of a dining table than a conventional coffee table, so there was a ton of end grain wood to remove and no good way to saw any of it. No big deal, you just mark it out and cut away material with a chisel until you get what you want, right?
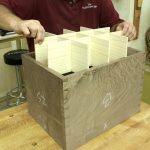
So back to the beginning of this blog post. In the top picture, I’m excavating material to inlay a brass pull into the tool box I’m making. You know the drill: You lay the hardware on the work, mark around it, then cut to the line, right? I had to stop myself and take this picture because I think I never cut to the line – I almost always end up leaving the line. And even when I have to remove the line, I tend to sneak up on it. When I cut dovetails, I cut tails first, then mark the pins from the tails. I tend to darken that scratched line with pencil and I think I always leave that line. For some joints, a line-to-line fit will result in a gappy joint. Why? Because wood compresses. For other operations, the action of the chisel alone compresses wood. Try it. If you knife a line cross grain, then lay your chisel on the line and chop, inevitably the chisel back compresses material and basically undercuts your line.
The basic principles of woodworking are simple. But the reality of woodworking often isn’t.
– Adam Cherubini
Here are some supplies and tools we find essential in our everyday work around the shop. We may receive a commission from sales referred by our links; however, we have carefully selected these products for their usefulness and quality.


Great Article. The art and mysteries of woodworking are as deep as those of life. It’s great to find this blog.
I believe the “chopping” aspect is complete when the majority of the waste is removed. I’m thinking dovetails or mortices here. Inlay for hinges doesn’t really require chopping, but light tapping. After that, pairing to the line begins. Whole new chisel, no mallet (chopping) and muscle the chisel edge down into the work. Even a slight blow with a mallet can sway the chisel back, compressing the line: resulting in a poor joint. A very sharp pairing chisel is much safer and more accurate for the finer details.
I’ve been cutting dovetails for only a few months and have begun to notice the need to “leave the line” when chopping out the waste. I’m getting better, but have been using liquid hide glue [successfully] to avoid the swelling associated with the “yellow” glues, although I will use them on other parts of the project. That way a tight fit won’t get too tight.
Hi Zach,
I guess my fascination (not entirey clear in the post) is that someone asked me how I made the bread board end and I responded: “I just marked what I wanted and cut everything else away.” But that isn’t exactly the truth is it. In actuality, learning to perform the simplest task, cutting to a line, is deceptively complicated. It requires skill and judgement and the experience to know what risks are involved with each chisel placement.
I’m with you on this one Adam. Working to a line, even a knife line, can give you sloppy, gap-filled work. Leaving the scribed-line is the way to go, and you can always pare back if necessary. It’s a bit more difficult to put the wood back on.
I think the situation of removing material to inlay a pull or a hinge is quite different from cutting dovetails. For inlays, the sideways fit is mostly for appearances sake, and the hinge or pull is held by screws. So no matter how hard your wood is, you alwys have to remove some waste on the bevel side of the chisel before putting it in the knife line and giving it that first light tap. For dovetails, on the other hand, I think you have to take into consideration how hard the wood is – If you rely on compression with a really hard wood, you’re gonna have a bad time fitting the two pieces together. With soft(er) wood, however, I would think that (for a functional joint) you’d have to make it a very tight fit, because otherwise it might compress over time and become loose – mind you that’s just an assumption on my part, I’ve never really tested that…