We may receive a commission when you use our affiliate links. However, this does not impact our recommendations.

This carving took about two hours on Randy Winn’s homemade CNC router.
I use my CNC router mostly to make small parts out of solid wood, MDF and plastic. Until recently, I had never done any 3D work with it. Then I saw a photo from one of the students in Build a CNC Router, and I was inspired to try something new.
Randy Winn posted a couple of photos on Google+ of some carvings he did with his CNC router. He carved two scenes into some walnut frame-and-panel doors.

Randy Winn carved this scene into walnut with his CNC router.
Here’s how Randy did it. First, he purchased some 3D artwork from a company online that specializes in downloadable files that can be used for CNC work. Next, he imported the file into some special software that generates code from the shape. He had to do a little work in the software; it doesn’t create the code automatically.
Randy exported two separate files for each carving: one for a roughing pass with a ¼” spiral end-mill and another for a finishing pass with a 1/16” tapered ball-nose bit. He says the carving was surprisingly smooth when it came off of the router and didn’t need much sanding. Each carving took about two hours of machining time. Imagine trying to do that by hand in two hours.
After I saw Randy’s photos, I immediately bought a tapered ball-nose bit online and started trying to come up with some ideas for 3D projects I could do with my CNC router. Here’s the funny thing: it’s not easy to decide on a project when you have so many options.

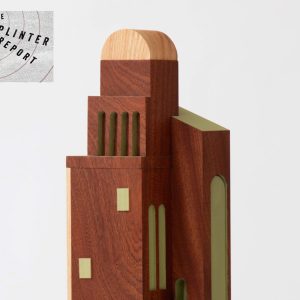
I made this 3D shape with Fusion 360 software and my CNC router.
I started playing around with Fusion 360, the software I use to design most of my work. I tried to come up with something useful, but eventually gave up on that idea and created an interesting shape that would allow me to experiment with 3D routing. You can see it on the left.
This part required three different tool paths: a roughing operation that cleared away most of the waste material, a finishing pass with the tapered bit to do the shaping and a simple 2D contour cut around the perimeter of the part to free it from the stock. With Fusion 360’s built-in CAM, I didn’t have to do any programming. The software did it all with just a few mouse-clicks.
Now that I have the right bit, software and inspiration to do 3D work with my CNC router, the only thing standing in my way is the inability to decide what to do next. I could try some carvings, make some cool shapes out of wood or play around with other materials like aluminum.
Interested in CNC routers? Learn how to build your own in Build a CNC Router, an online course from Popular Woodworking University.
Here are some supplies and tools we find essential in our everyday work around the shop. We may receive a commission from sales referred by our links; however, we have carefully selected these products for their usefulness and quality.