We may receive a commission when you use our affiliate links. However, this does not impact our recommendations.
“(Chairs) are too hard. Chairmakers are doomed to poverty.”
— Gary Bennett (1934 – ) furniture maker and artist
If I were a full-time chairmaker, I don’t think I’d be doomed to poverty.
Instead, I’d be doomed to starvation – or taking a job as an assistant baby chicken sexer.
But I do like me the chairmaking. It’s so different than building other types of furniture. It is in some ways easier – the angles are pretty simple once someone explains it to you. But it is in a lot ways more difficult. You have got to understand your material in a way that is even more intimate than that of a typical hand-tool woodworker.
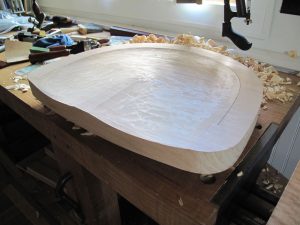
For example: saddling a seat, which is when you remove material to make the seat more comfortable for the human hinder. Even with mild, straight-grained wood, you are going to fight the grain with every cut. You have to plan every cut and get used to reading the grain of every single seat.
The seat I saddled this afternoon took me about 45 minutes. That’s way too long compared to what a real chairmaker does. But I always try to think that saddling a seat is always a refresher lesson in “Advanced Grain Direction.”
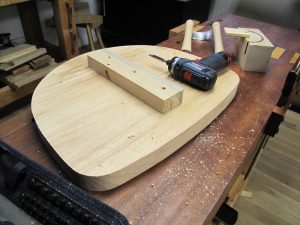
One of the things that always helps me when saddling a seat is to make it easy to attack the seat from almost any direction. So I screw a piece of 2×4 to the underside of the seat and clamp the block in a quick-release vise. No crazy dog array is necessary.
If I need to turn the seat around, it’s no problem. But once you get used to working this way, you’ll find yourself working with the seat in one position and simply moving your body around the seat.
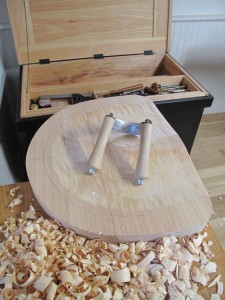
I’ve learned a lot of ways to saddle a seat, including using an adze. I don’t have an adze, so I start with a scorp, which looks like a drawknife that has been bent into a curve by He Man, Master of Universe.
I try to remove all the material that I can with this tool and finish up with light cuts. I end up working both across the grain and with the grain. There is a lot of skewing and scooping. But after the scorp, you should pretty much know how to deal with the seat with the next tool.
I’ve used a travisher for many years to finish up seats, but recently I realized that I really like my Veritas Pull Shave loads better. It’s easier to adjust (like a spokeshave) and handles more like an awesome floor scraper.
With this tool I can bring the seat to an almost-finished state.
One last tip: I don’t like seats that are deeply saddled. They feel good at first when you first sit in them, but they wear out my bottom and legs. A lightly saddled seat doesn’t treat your bum like a Jell-O mold. What’s lightly saddled? I like the deepest part of the seat to be about 5/8” deep. The area for your thighs is 3/8” deep.
But even with less material to remove, I’m still woefully slow. Oh well, I like me some ramen as much as I like chairmaking.
— Christopher Schwarz
Would you like to build a chair? Here are some great resources:
Mike Dunbar’s The Windsor Institute is a great place to learn. He has perfected both the art of chairmaking and the art of teaching chairmaking.
Peter Galbert’s blog on chairmaking is a must-read if you like chairs. Great stuff.
One of the best books on chairmaking is “The Chairmaker’s Workshop” by Drew Langsner. You can get it directly from Drew at Country Workshops.
And also check out Kerry Pierce’s “Chairmaking Simplified” a great book that I have in my personal library.
Here are some supplies and tools we find essential in our everyday work around the shop. We may receive a commission from sales referred by our links; however, we have carefully selected these products for their usefulness and quality.


I like that Veritas pull shave! But when you hit the “view” button on the product page on their website…it’s…it’s SMILING at me!
Beautiful Saddle, great attention to detail.
“He Man, Master of Universe”… Nice reference!
Jonathan
================================
That cherry Roubo top looks better every time you post. I hope your apprentice is enjoying it.
Oh, and that scorp keeper: how did you excavate that deep groove? For my keeper, I just had to cut out the traced inner curve and glue that block to a base. Pic is worth a thousand words:
http://www.flickr.com/photos/chevy_chase_hughtos/3897263254/sizes/l/in/set-72157607001006126/
Another option is to saddle the seat before sawing out the shape. This way, you are just dogging a square.
I have no affiliation, but am a very satisfied customer of Mr. Mursell’s: http://www.travisher.com
Best travisher I’ve used. He has a good youtube video showing it in action too.
Best,
Sean
Love the scorp holster in the first pic
Chris,
Good article as usual. I like me some chairmakng too. But so far it has only been the Moravian plank chair from King Roy’s book and several dozen stools which are just mortice and tenon held together with tusk wedges in a stretcher for reenactment friends. I m working up to either a J. Alexander rush seat or a Windsor. But first a breakdown work bench. I am about 60% through TATC nd am really enjoying it. Please keep them coming, I’ll keep reading.