


We may receive a commission when you use our affiliate links. However, this does not impact our recommendations.
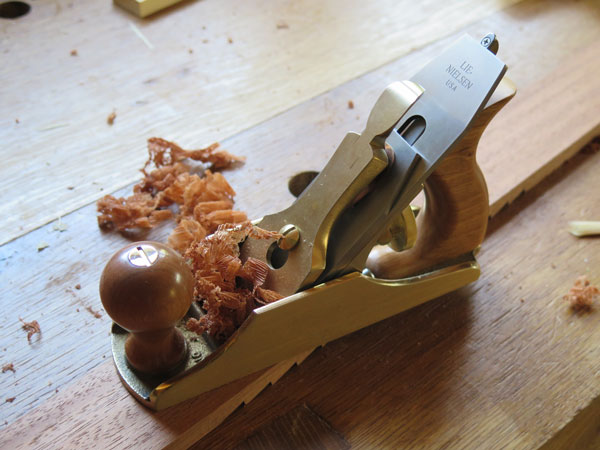
For me, the goal with my smoothing plane is to set it up so I can ignore the grain direction of a board or a glued-up panel.
There are many valid ways to do this. For most woodworkers I know, there are two ways to accomplish this goal that we all agree upon:
- Sharpen the iron. Sharp fixes almost everything.
- Take a finer cut. Thin shavings reduce tear-out.
After using those two strategies, woodworkers differ on what else we can do to reduce tearing. We fall into three camps:
- Use a high angle of attack. The higher the planing angle, the better – 62° or so being the maximum planing angle before you start delving into scraping.
- Reduce the mouth aperture. The finer the mouth, the less likely the cut will shift so it is occurring ahead of the iron’s cutting edge. Reduce the aperture to reduce tearing.
- Use a “back iron” or “chipbreaker” that is set about .004” to .008” back from the cutting edge.
I will swear on a stack of Joseph Moxons that all three strategies work. You simply need to pick one that suits you best. Using all three simultaneously, however, will cause your handplane to clog.
During the last few years I have used a back iron with great success after I figured out a few of the details that make it effective. The above video shows the steps I take with a new back iron to make it effective. Though I hate to repeat the points of the video, here are the important points:
- Sharpen the iron. Sharp. Sharp. Sharp.
- Sharpen the tip of your back iron so it has a 50° bevel at its tip. Some back irons have a small flat at the tip that will cause your plane to clog. Sharpening the tip of the back iron removes this small flat and helps eject shavings. You have to do this once every few years or so – not every time you sharpen.
- To prevent shavings from getting between the back iron and iron, turn a hook on the tip of the back iron – much like you would turn a hook on a scraper. This hook will eliminate most gaps between the back iron and iron, reducing clogging. It takes about 10 seconds to add the hook right before you screw the back iron to the iron.
- Set the cap iron about .004” to .008” from the cutting edge.
Woodworkers who dislike back irons will tell you that these strategies are difficult or time-consuming. Try them out before you agree or disagree.
Using a back iron can be an interesting experience. When set properly, the back iron will push the shavings out smoothly without making the plane difficult to push. But when set poorly or when the back iron has a flat on its tip, the plane can be quite difficult to push.
The tool will still reduce tearing in this configuration, but I have found that the surface quality will suffer a bit, though not any worse than with a card scraper.
I’ll be honest: I like all three strategies for reducing tear-out and have employed them all successfully during the last 19 years of working with handplanes. I encourage you to try them all, and refuse to let anyone tell you there is only one magic trick to eliminating tear-out.
— Christopher Schwarz
Here are some supplies and tools we find essential in our everyday work around the shop. We may receive a commission from sales referred by our links; however, we have carefully selected these products for their usefulness and quality.


Chris man, help! Feeling a bit like an idiot here. Don’t seem to be getting a higher angle than about 45deg out of my vintage Eclipse honing jig. Min protrusion the jig will allow is about 19mm. Nobody else seems to be experiencing this problem(?). Not enough meat either to grind the jig’s shoulder away.
Thanks Chris! I used this to set up my #4 this weekend and it is awesome.
I have always kept a nicely sharpened blade. So I tried sharpening and buffing out the cap iron as well as setting the cap iron with a 0.005 feeler gauge.
Well, I’ve never had shavinging shoot out of the plane before; but now they do!!! No clogging of the mouth!!
Thx.
One has to sharpen the cap iron every few years?? Are you talking from experience? I have used the double iron for over forty years and have never touched any of my five cap irons once they were in service.
Chris – I assume this is easier with the cap iron on a LN given it has a flat bevel like front similar to a blade. What about with a cap iron on an old Stanley? Would you change the way you sharpen that given the curved front edge?
Chris
Any advantage or disadvantage to using a tight 50 degree chip breaker with a high angle frog as long as the mouth is open?
Thanks
What is a good source for the thin feeler gauges you used in step 4? I am also looking to find one to use for plane sharpening, and I assume they would be similar “shims” but I could be wrong.
Have you seen this interesting research video which suggests a even steeper cap iron face is advisable/useful?
https://vimeo.com/41372857
Ohhh, the gossamer shavings! Stop it! Are you trying to make all of us fall back on our smoothing plane addiction?!?!
Hi Chris,
As a free hand sharpener for years the need to go back to the future is upon me. A simple honing guide is what I’m after. Similar to yours. If you have an idea or suggestion, please contact me off line as I’m having some issues here at the home front.
Thank you,
michael.rogen@gmail.com
The epiphany for me happened while planning some recalcitrant curly maple a few years back. That the mouth needed to open to accomplish the smoothing function went against previous experience/knowledge. Since then, I’ve done the same work on burl walnut and quilted maple with measured success [giving the devil his due here] with satisfactory to extraordinary results.
I dig the feeler gauge setup and turning a burr on the back iron, that is GENIUS. Thanks again.
Thank you Chris,
Once again, advice specifically when I needed it!
Q: “Why oh why when I do all the things I am supposed to do, does this stupid old plane clog?”
A: “It’s not the tool – stupid!” ha ha
it plays if I click through to the Vimeo page, just not the embedded version.
video won’t play for some reason.
Great idea I’ve never heard this one before. What is the make of the burnisher you used? I have never seen that before. You stuff is always amusing.