


We may receive a commission when you use our affiliate links. However, this does not impact our recommendations.
1. Your house will smell like Pier 1
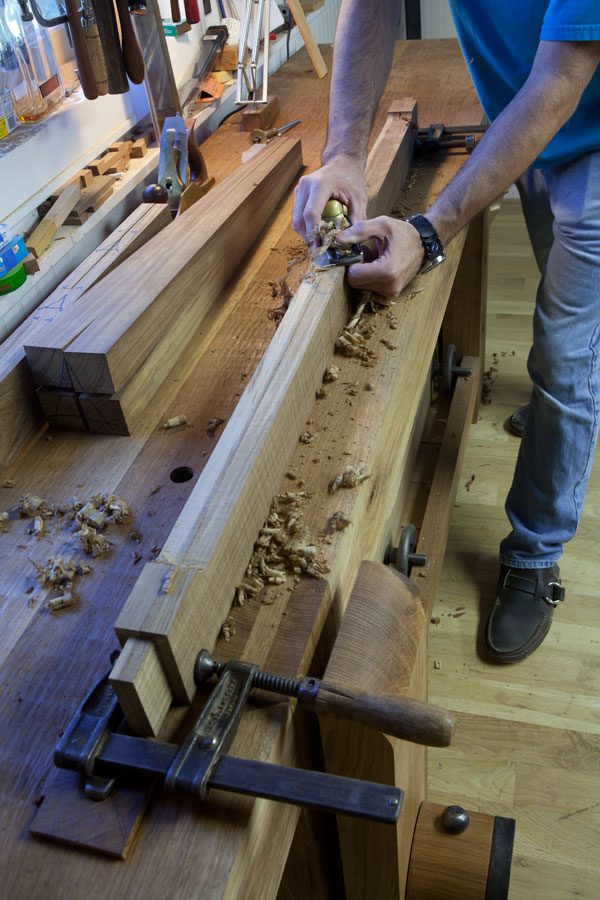
2. Because of teak’s waxiness, your machines will be able to take only about one-fourth of their usual cut. Teak bogs everything down.
3. When handplaning it, you cannot position your cap iron close to the iron’s edge. The waxy shavings gum up the works. Ditto on the mouth. Open it up.
4. Even though teak is waxy, you need to wax your plane soles about twice as much as usual. Use dry lube on the surfaces of your machinery.
5. Sometimes it smells like dung (see also, No. 1).
6. When you cut open thick pieces, the inside can be lightning-bug green. Don’t freak. It will turn brown.
7. It is an outstanding wood for dovetailing. Doesn’t crush. Pares beautifully. Tough as nails at assembly time.
8. Teak repels water. So water-based glues are tricky. If you use PVA or hide glue, wipe all surfaces with lacquer thinner before gluing. Hope for the best and peg your tenons.
9. Epoxy and polyurethane glue are fantastic choices for teak, but you have to use gloves etc. to protect your skin from the chemistry.
10. Teak used to be one of the least-expensive woods used for campaign furniture. Now it is just about the most expensive choice ($20/board foot is common). This stinks because it’s hard to throw away any scraps (need some wedge-shaped offcuts?).
11. Teak turns crisply with little tearing.
12. Teak can be so gorgeous I couldn’t imagine using any colorant on it. Shellac and maybe a little wax is all it needs.
— Christopher Schwarz
Here are some supplies and tools we find essential in our everyday work around the shop. We may receive a commission from sales referred by our links; however, we have carefully selected these products for their usefulness and quality.


Great Write up! Thanks for sharing.
I’ve grown to really enjoy working with teak. It does leave a lot of gum on the table saw blade, but blade gum remover works fine for clean up. Nice teak tips.
Hey Chris,Im Chris, I was talking to Chris the other day who had spoken with Chris about the New PMV-11 steel and curiousity was killing Chris So I bought me a couple of the New PMV-11 Chisels and did my own test. Now, to clarify my credentials and to set the Record straight, Im in no position and do not claim to be an authority on steel , woodworkingh or just about anything for that matter, So that being said I took four different makes of chisels and used them in the same manor While cutting out my joinery for my new Workbench that Im building.The Base is all Sapele 8,12, and 16/4 Rift sawn and Quatersawn. Dont ask me why Its just what I had thats all. It is turning out beautiful, and No the top is Hard Maple. Anyway after using the same size chisels after all the chopping, wood and fingers, paring, slicing, dropping, I have a 1″ rubber floor my whole shop I can drop all I want , No Problem” This is no lie Chris Im not favorable for anyone here concerning this infact I like all opf these companys and they Hate Me. But in the end Hands down not even a close call the LN A2 out preformed. It was If the didnt dull at all, I could only use the A2 to pare with. Now that was the last and only test I will ever have to do. Listen Chris I even used chisels that went all the way back dating 115 years ago up to 2013. Im glad that I was able to see this first hand. and I could care less what anybody says I know for fact. Thanks for the Blog Chris
I’m currently making a teak counter top for our guest bath. This will have a top mounted sink so there may be some stressing. I was concerned with gluing it up because I’m allergic to epoxies (yup, from working on wooden boats.)
I ended up testing three and settled on Gorilla Glue for Wood. This is not a paid or unpaid testimonial only telling what worked.
I tested with off cuts and found the following to produce nearly indestructible joints. Of course, your matching surfaces are assumed to be tight.
1. Soak a small rag with acetone and rub down the surfaces to be glued. If the rag shows an excess of “wax” you may want to do this a couple of times.
2. Spray the surfaces with a light mist of water. I used my sharpening stone spray bottle.
3. Run a bead of glue on each surface and spread with one of the little throw-away glue brushes.
4. Clamp tight and the more clamps the better but make sure not to “rack” the panel. I did mine in three sessions rather than all at the same time.
5. Leave them alone overnight and go have a beer or whatever.
those 3″ wetzlers make a mockery of any pony clamp. Any hope of a wetzler revival?
Chris,
May I impose and ask where did you get those buckel mocs/shoes? Real nice….Thanks.
13. Your edges will dull very quickly because of the silica in the timber.
14. Environmentalists will hate you.
15. Boatbuilders will hate you for stealing their wood for a poxy table.
16. You will always look at the finished item and think it would have looked a bit better in Mahagony. Or Ash, or anything. Teak’s expensive but it looks a bit dull. You pay for the rarity and rot resistance.
Aww…polyurethane glue wears off the skin….eventually.
Are the F-clamps just to keep the piece from rocking side to side, or are they holding on to something else?