


We may receive a commission when you use our affiliate links. However, this does not impact our recommendations.

I’m busy dovetailing the 13 tiny drawers for the tool chest I’m making. I’m using two marking gauges to mark out the drawer fronts, but I was having some problems with the precision of my marks. I first turned my attention to the pins. They get dull and need to be reshaped or just resharpened, but that wasn’t the problem. I was getting double lines (after two passes) or I’d mark a face then mark through the end grain and the marks wouldn’t line up. Hmmm.

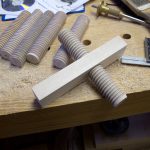
I traced the problem to a worn face of the gauge. Not sure if you can see it in the picture, but the sides are worn down and the face is a bit crowned. The wear was just enough to allow me to get the pin in the wrong spot. I think a worn face like this can even produce a mark that is not parallel with the reference face.
The solution was easy: Take the gauge part and plane the face down.
I like making my own tools. I really loved making these gauges. I have seen commercial gauges with bits of brass on their faces, presumably to reduce wear. I think this is the first time I’ve planed this gauge in eight years of near-daily use. And mahogany is not even a particularly hard wood.
– Adam Cherubini
Check out a CD collection of Adam’s magazine columns, “The Arts & Mysteries of Hand Tools,” at ShopWoodworking.com
Here are some supplies and tools we find essential in our everyday work around the shop. We may receive a commission from sales referred by our links; however, we have carefully selected these products for their usefulness and quality.


Hi Adam
Sometimes it is the pin/cutter in combination with the gauge face.
When using a cutting gauge made from a steel rod (I use 3/16″ HSS drill bits) it is important to ensure that the blade is perfectly aligned – parallel – with the face. If it is even slightly skew, the knife edge will drag and cause tear out.
To get it parallel, grind a slot at the upper end of the rod. Use a screwdriver to turn it until it is cutting as you wish.
http://www.inthewoodshop.com/ShopMadeTools/CuttingGauges.html
Regards from Perth
Derek
I, too, like to make my own gauges. At the rate I work, I may never have to plane down their faces, but your experience makes me more confident in my decision to use laminated fences on my gauges. The working faces are all a much harder hardwood than the rest of the fence is made from. Thus far, they show very little sign of wear.
How did I keep the face of the gauge square with the arm? I planed the entire face evenly with a smooth plane that had a straight iron. If I understand the question, I maintained the orientation between the arm and the face- but that isn’t super critical. Having the pin, which is a bit more like a tiny blade parallel to the face is a bit more important.
So how did you keep it square to the rail?