


We may receive a commission when you use our affiliate links. However, this does not impact our recommendations.
One of my favorite parts of our now-retired publication, Woodworking Magazine, was the back cover. Each issue featured a handy, illustrated guide to something every woodworker should know – and about which some woodworkers are too proud to ask. The following post on try squares is a perfect example.
We are releasing the new “Woodworking Magazine Compilation” – all 16 issues on a disc. Buy your copy now!
–Dan Farnbach
Handy Sizes of Try Squares You Should Own
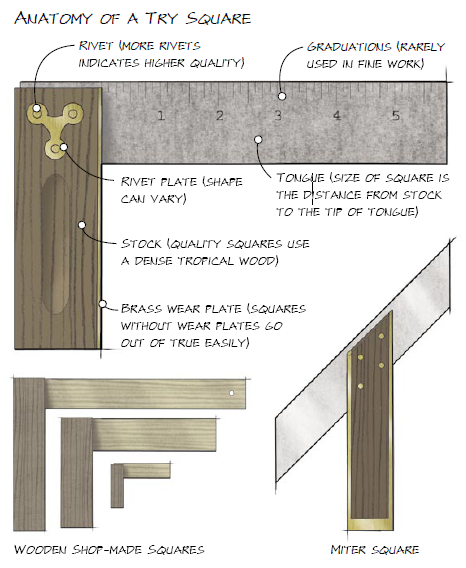
Click the image for a larger view.
3″ square. Useful for checking small joints and plane irons.
6″ or 8″ try square. The 6″ is ideal for smaller projects; the 8″ is nice for large cabinets. This square marks out joints and crosscuts and tests the results of your cuts.
24″ wooden square. A shop-made square in this size will handle almost all your large-scale cabinetry layout chores.
10″ miter square. Miter squares are sized by the overall length of the tongue. The 10″ size is typical; smaller ones are nice for building jewelry boxes.
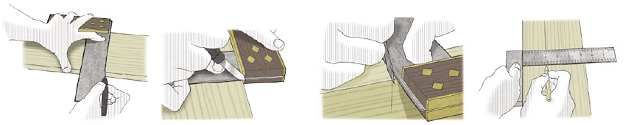
Test Your Try Square
1. Place stock firmly against a board with a reliable straight edge.
2. Carefully and slowly scribe a thin knife line along tongue of the try square.
3. Flip square over and compare the same edge of the tongue to the line. If they match up, your square is true.
4. If they don’t match up, scribe a second line that touches the first line at one point.
5. Set a T-bevel to one-half the angle of the intersecting lines. Scribe this angle on your tongue and remove the material with a file.
Use Try Squares Properly
Always hold the stock against the jointed edge of your work. Holding it on the far edge of your work reduces the tendency for the square to shift during marking.
When knifing a line, begin by nicking the corner of your work deeply and then draw the knife slowly and surely against the tongue. Several light passes are better than one heavy pass.
When marking around a corner, drop your knife into the nick you made on the corner, then slide the square up to the knife and make your mark.
If your square has graduations on its tongue, they are convenient for scribing a line parallel to an edge in coarse work.
–Popular Woodworking Editors; illustrations by Matt Bantly
Here are some supplies and tools we find essential in our everyday work around the shop. We may receive a commission from sales referred by our links; however, we have carefully selected these products for their usefulness and quality.


I worked for Bridge City Tools for many years and did most of the repairs while there. I re-squared a boatload of TS-2 Try Squares. I avoided filing the edges at all costs. It is a nightmare. Getting the edges to be parallel and straight again is nearly impossible.
Pop the pins out and reseat the blade to be square to the body. It is the most accurate way to make the square new and accurate again.