We may receive a commission when you use our affiliate links. However, this does not impact our recommendations.
 This seemingly simple tool has lots of details that vary by brand. We investigate.
By Glen D. Huey
From the Spring 2009 issue of Woodworking Magazine
When the idea to write about all-in-one countersinks was suggested, I was somewhat amused – as I’m sure you might be. What’s to learn? You drill a pilot hole, then drill a recess so the screw head sits flush to your surface (or you drill a little deeper – called a counterbore – so you can tap in a wood plug). Then you drive your screw and insert a plug to cover it. And most times you won’t even use a plug.
Well take a look at the next few pages. You might be surprised how many different tools are available – and we’re not even including traditional countersinks.
An all-in-one countersink has a pilot bit, a countersink/counterbore and a depth stop combined into one adjustable tool. Take a close look at different brands and you’ll find some countersinks have a single cutting edge while others have two or four cutting edges. Some setups use hex-shaped shanks for quick changes while others rely on the round shaft of the drill bit only. Some have a straight drill bit for the pilot hole and others have tapered bits. And do you even need a depth stop?
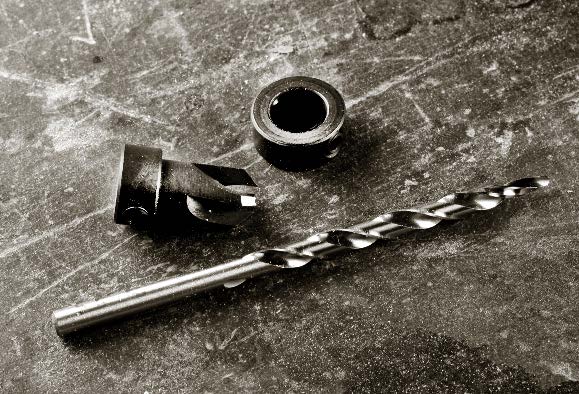
An all-in-one countersink consists of these three parts: a drill bit, countersink and stop.
How do these parts work in unison? How do you know you have the right tool for the task?
Countersink Basics
Screw installation begins with a pilot hole. The pilot hole has to be accurately sized based upon the screw’s gauge (#2 to #18) and length. The gauge part is simple. Match the pilot hole to the screw size. As for depth control, it’s critical when using a tapered bit, while a straight bit is more forgiving. Additionally, differing materials such as softwood, hardwood or man-made material have to be considered. A simple rule of thumb is to drop down one bit diameter (1⁄64″) when moving from hardwood to softwood.
To properly create a hole for a screw, you need a clearance hole, too. This hole extends from the hole’s countersink and through the upper piece of stock and is sized to allow the screw’s shank to pass without its threads engaging the wood. As a result, the head of the screw pulls the upper piece tight to the lower piece as the threaded portion of the screw grabs the pilot hole. In today’s hurry-up world, woodworkers seldom take the time to make a proper clearance hole.
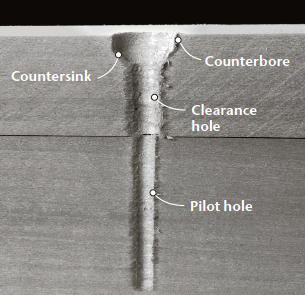
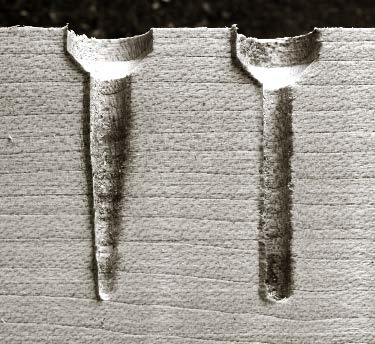
A properly drilled screw hole should have the recess at the top, followed by a clearance hole that extends through the upper stock and a pilot hole drilled into the lower stock.
Also keep in mind that some countersinks are designed for screws with different angles on their heads. The standard wood screw angle is 82º, but it’s always best to confirm you have a match.
After making the pilot, countersink/counterbore and clearance hole, you’re ready to drive your screws. It’s a good idea to add lubricant to the screws to aid as you drive. I use paste wax as a lubricant, but I must caution that if you smear the wax around the hole, some stain and finishes might not bond there.
There are some woodworkers who lubricate screws with bar soap or liquid soap.
However, there are also woodworkers who say the soap is caustic or attracts moisture that will corrode screws. We have yet to investigate this claim.
Even if you properly countersink your screws there’s a possibility that the top piece won’t draw tight to the second piece. Here’s a quick fix for that: After using a countersink on the show face of the top piece, flip the board and countersink the inside face slightly. Then, as the screw pushes through the stock, any potential blowout is reduced.
All-in-one countersinks have replaceable drill bits. If a bit breaks, simply replace it (as long as the countersink is in workable order). And you can swap different bits – tapered for straight and vice versa.
The difference between tapered and straight countersink drill bits is obvious in this photo. Both pilot bits work, but we think the tapered bits offer some advantages.
Drill Bits: Don’t Get the Shaft
Most drill bits used in countersinks are high-speed steel and most have two flutes. With a quick glance at the different countersink drill bits, it’s the shape of the drill bit that likely catches your attention. Some are straight and others are tapered. Is a tapered drill bit better than a straight bit? Why should you select one design over the other?
According to Leonard Lee, the founder of Lee Valley Tools, tapered countersink drill bits were designed for use with cut-thread brass screws. At one time, cut-thread brass screws were considered the best screw for quality furniture. Threads that are cut into brass screw blanks add strength to the screws. The result is a screw of a specific shape – cut-thread screws taper from shank to the tip.
Today, most screws have their threads rolled into the screw’s shank and the screw maintains a uniform diameter until the tip. There isn’t a continuous taper. (For additional information about screws see Issue 10.) When asked if he would use a straight drill bit if he were not using cut-thread brass screws, Lee’s answer was a resounding “yes.”
Manufacturers of tapered-bit countersinks disagree. They contend that a tapered pilot hole accomplishes two things. First, the design of the bit creates a true clearance hole at the top of the hole. (We have found that this depends on the relationship between the screw length and the bit length.) A straight bit pilot hole is engaged by the screw threads over the entire length.
And second, a tapered hole allows additional thread contact as the screw travels toward the bottom of the tapered pilot hole. As the hole narrows, the threads cut deeper into the wood.
A third advantage that the staff found in side-by-side testing that the tapered bits have deeper flutes and cut faster and with less effort.
We have found one disadvantage to using tapered drill bits. As you set the countersink for shorter screws, the opening of the countersink around the bit increases because of the taper. This allows additional waste to gather in the opening. As the material builds, it gains heat. Excessive heat leads to a build-up of residue on the bit and that increases friction.
Given our experience and testing, we recommend countersinks with tapered bits because they cut faster and result in stronger screw connections.
When a tapered-bit countersink is adjusted for shorter screws shows, a small gap around the drill bit opens. That opening collects debris.
The Countersink: The Real Cutter
The real workhorse of all-in-one countersinks is the countersink portion itself. This part of the tool cuts the opening for the screw head; and if you need a counterbore it does that as well.
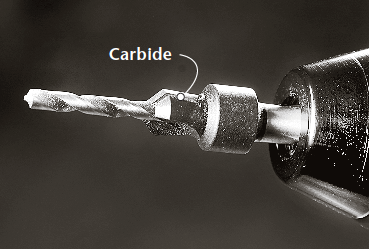
Countersinks are generally made of high-carbon steel, but due to the amount of work done by this part of the tool, you can find countersinks with carbide tips or high-speed steel, also. The high-speed steel and carbide countersinks hold an edge longer than high carbon and are often reserved for production work.
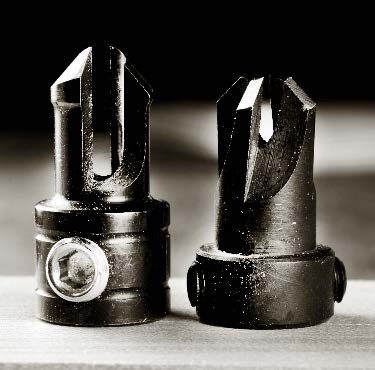
All-in-one countersinks with carbide wings are similar to the design of router bits. (See the photo at right.) Carbide-tipped countersinks are favored when working with melamine and/or particleboard. These countersinks are not inexpensive and could cost you more than twice the amount of a standard all-in-one countersink, but they will last several times longer.
Just as with the drill bits, there are many different designs in countersinks. One of the most important differences to me is that many of these countersinks sized for #8 screws (the screw size I find most used in my work) leave a counterbore that is smaller or larger than the standard 3⁄8″ for most plugs. This is also why many manufacturers have matching plug cutters available in sets.
The area between the cutters carries the waste from the countersink.
Another area that garners attention is the number of flutes on the countersink. Some setups have two flutes while others have three or four flutes. And while an increased number of flutes makes for better cuts – think three knives versus two knives in your jointer or planer – it’s not the deciding factor for us.
The cutting edge of a countersink flute is no different from the cutting edge of a chisel. Sharper is better. So the amount of actual cutting surface and its angle is important. Some countersinks scrape the wood to form a recess; others have a lower pitch that cuts a shaving.
After waste material is cut, it has to be carried away. The area between the cutters helps accomplish that chore. If the waste jams in the recesses, it clogs the cutter and inhibits a clean cut. That also builds up heat and increases friction. The trailing edge of the opening should be angled or sloped so the waste material is swept away from the cut. (See the photo at left.)
In our testing, we found that the two-flute cutters tended to cut faster and with less effort. They also had the largest areas for carrying away waste. However, the four-cutter designs will stay sharp longer because you are spreading the wear across four cutters instead of two. So it’s a trade-off.

Finer threads on setscrews grip better.
Another issue to watch is how the countersink affixes to the drill bit. Most countersinks are held with setscrews. One setscrew, as it’s tightened, causes the countersink to push against one side of the drill bit, forming a small offset opening. Or if the setscrew falls into the flute of the bit, it can move the countersink position when tightened. With two setscrews you can secure the bit in a more centered position. One setscrew works, but it’s better to have two per countersink.
Some bits used with countersinks have flattened areas on the shank where the setscrew locks. Generally, these use a single setscrew. If you need to adjust the setup for shorter screws, it’s possible to move beyond the flat areas onto the rounded shaft. This results in surely a weaker hold.
A Word About Setscrews
Each all-in-one countersink is adjustable to match various screw lengths. To make an adjustment, loosen any setscrews holding the drill bit, slide the bit to increase or decrease the length, then tighten the screws to hold everything in position.
As you might expect, there is great force on the countersink as it makes contact with the wood. If the setscrews don’t hold, the countersink spins on the bit shaft, which damages the bit. Also, the countersink can creep and change the depth of cut. Neither result is acceptable.
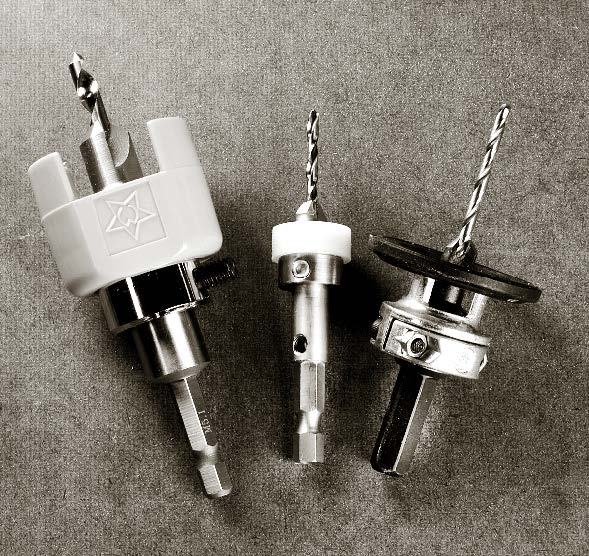
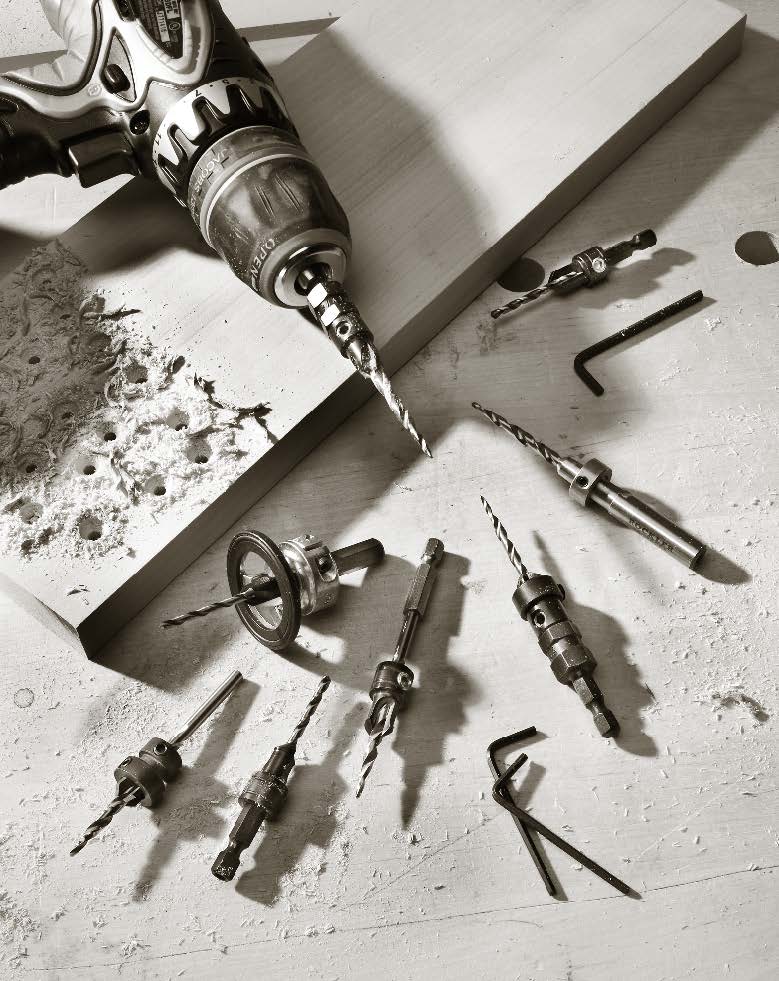
These contemporary countersink designs all focus on the stop portion of the tools. Spinning attachments stop as the surface is reached.
When it comes to setscrews, its size doesn’t matter. Large setscrews don’t equate to more holding power. To be securely tightened, setscrews need to have fine threads. Finer threads hold best when tightened. And don’t hesitate to crank the screws into the shaft.
Stops: Use Them if You Must
Several companies that market all-in-one countersinks include depth stops. Most of the time, stops are used in production work. If you have the need to drill hundreds of countersinks, set the stop to reduce any potential for mistakes.
Most woodworkers seldom set the stops for countersinks. But if you’re a stop setter, here are a few things to keep in mind.
Make sure the stop fits snugly to the countersink. If the fit is sloppy (as some are), chances are you’ll set the stop at an angle. When the stop contacts the surface, a burnished ring can appear.
Also, make sure the setscrews used to hold the stop have fine threads. Plus, you should watch the position of the setscrews as you tighten them. I found one setup where the setscrews wouldn’t grab if they were positioned on the area of the countersink that cleared the chips.
If you work in melamine or you’re simply searching for a long-lasting, stay-sharp edge on a countersink, a carbide-wing countersink is the answer.
New Designs in Countersinks
Some of the new countersink designs seem to follow the “build a better mousetrap” theory. And while the designs are highly engineered, each focuses on the little-used depth stop with the addition of a rotating element that stops as the depth is reached.
The countersink on the left in the photo above is engineered to the max. It’s a massive countersink with an engraved depth-adjustment scale on the countersink shaft, a single-flute bit drills the pilot hole efficiently and the areas between the flutes are shaped to dispel waste with ease. As the spinning orange plastic cone kisses the wood, the action stops to inform the user the specified depth is reached. On the downside, this bit produces a 1⁄2″ counterbore for a #8 screw.
The new design on the far right in the same photo reminds me of a satellite spinning in space. Again, the black circle rotates as the bit begins its descent. Once the depth is met, the spinning stops, but this tool still leaves a burnished circle on the wood surface.
Additionally, this countersink is designed for both #6 and #8 screws. Don’t try to use a 3⁄8″ plug with this setup.
The countersink in the center of the photo more closely mimics the traditional designs for all-in-one countersinks. It is assembled from three parts including a bit, countersink and stop. The stop is held tight with a single setscrew while two screws secure the bit in the hex shank.
This countersink works great. As the stop collar nuzzles the surface, the spinning action of the stop ceases without any marks left behind. The result is the same even if you’re using a hand-held drill and drilling at an angle.
Recommendations
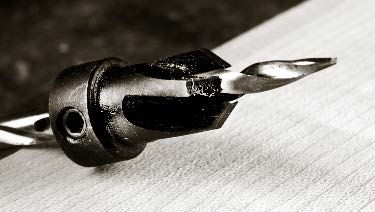
Most important: Don’t buy the inexpensive bits at the hardware stores that have the stepped solid collar for the clearance hole (see the photo above). These are prone to break and are very difficult to push into the work.
In the end, we recommend a countersink with a tapered pilot bit. The countersink can have two or four cutters – choose the one that matches your preference for long edge life (four cutters) or quick work (two cutters).
We’re not big fans of depth stops. We don’t use them because we don’t countersink screws for a living. Instead, our focus is on getting a strong joint without working too hard. We don’t worry about perfectly tidy holes because our countersinks are generally out of sight; and if they’re not, they are most likely plugged. WM
Here are some supplies and tools we find essential in our everyday work around the shop. We may receive a commission from sales referred by our links; however, we have carefully selected these products for their usefulness and quality.