We may receive a commission when you use our affiliate links. However, this does not impact our recommendations.
Heather Trosdahl’s article in the Dec. 2012 issue, “Parquetry Tabletop,” requires shop-sawn veneers for the best results. In case sawing one’s own veneer is a technique with which you’re unfamiliar, she’s shared her methods below:
• Install an appropriate blade for re-sawing. Fully tension the blade, using the 1/8″ rule. That is, the flesh under your fingernail turns white while applying the pressure needed to flex the blade 1/8″. Perform a drift test and set the fence accordingly (Ed note: for tips on setting up your band saw to avoid drift, see “Make Drift a Myth“). Set the fence to the desired veneer thickness and make sure the blade is parallel to the fence. Prepare a board for test cuts. For this project I have it set for 3/32”. The first test is to make sure the bandsaw is cutting properly. Make sure the cut is the same thickness, front, back, top, and bottom.
• Do a full practice run before cutting into your precious stock. Prepare a test piece to match the dimensions of your project board. You can practice your feeding technique and also make sure the thickness is set to get the most out of your board.
• Cut the boards to length, plane the surfaces and joint one edge square. Mark one edge of each board with three bold, diagonal lines to show the grain direction. Once you get the board sliced into thin veneers grain direction can be a lot harder to read, and we’ll need to know that when we plane the band-sawn side for the parquetry pieces.
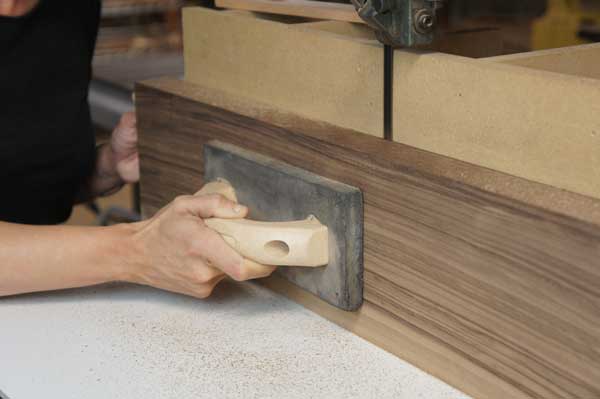
• I use a push block to maintain constant pressure, while keeping my hands away from the blade once the board gets thin. Keep a push stick nearby and slowly push the stock through at the end of the cut. It’s important to be patient while cutting veneers; if you keep a slow, constant pace and even pressure through out the cut, your veneers will come out smoother, leaving less clean up later. Again, make your test cuts not only to test your machine set up, but also to practice your movement. Set up your jointer to remove the band saw marks on the remaining board in one pass. You don’t want to be wasteful when it comes to your precious stock, and too many passes can lead to a tapered board by the end. Once you’ve removed the band saw marks take the test board back to the band saw and cut another veneer. Continue this until your results are consistent and you feel comfortable with the process.
Planing Your Veneers
• You can put shop-sawn veneers through a planer, but be careful! I recommend installing sharp blades and doing a test with a sacrificial piece of the same wood first. Some woods handle this just fine, but others can end up in little pieces. In that case, a scraper or handplane works best to take down any high spots left by the band saw. Sometimes a veneer will just chip out on the first inch or two but cut fine after that. Add a few extra inches when you cut your board to length to allow for this.
• Because planer tables often rise no closer to the cutterhead than 1/8″ , you’ll need a backer board to surface the veneers to a strong 1/16″. Find a flat board, larger than a single veneer. Place a strip of double-sided tape a couple inches in from the leading edge of the board. Place the edge of your test veneer over the tape (make sure to pay close attention to grain direction here) adjust the planer to take a light cut and feed the board through. If all goes smoothly send the other veneers through, one veneer at a time, possibly taking a couple of light passes until the band saw marks have been removed.
— Heather Trosdahl
Here are some supplies and tools we find essential in our everyday work around the shop. We may receive a commission from sales referred by our links; however, we have carefully selected these products for their usefulness and quality.


It is so funny that I always start a project – usually above my skill level – then read the technique in multiple articles a month later. I resawed a stunning piece of spalted cherry. The problem was to keep a uniform thickness.
I made the mistake not to use the “good” side of the board against the guide. That prevented me from moving the guide, but it increased the wagging exponentially.
I waxed the saw blade between every pass.
I tried to plane on my Delta 13″ with new blades and a backer board and a sled… the first veneer simply exploded, and I got scared.
I ended up sanding with a portable bandsander, then gluing on the substrate, then politely asking a kitchen cabinet manufacturer to drum sand the top.
The piece in made in New York and will travel to a way more humid area in Switzerland… We’ll see how the glue holds in the next 4 years:)
I am still proud of the effect. I’d like to post a pix of the final result.
Thank you Heather!
You need both, and lots of practice.
Two questions:
1) No bandsaw, how do I handsaw veneers?
2) How does one handplane such thin, 1/16″ pieces?
Cheers – Miles (who is really starting to wonder if he should have bought a bandsaw rather than a tablesaw)