


We may receive a commission when you use our affiliate links. However, this does not impact our recommendations.
 I’ve been working on a cherry and bird’s-eye maple entry table for the October 2012 issue of Popular Woodworking Magazine, and as I was installing the upper drawer stretcher I remembered how puzzled I was when faced with cutting my first one. It’s just a single dovetail cut on the end of the stretcher that fits into the top of the leg. I wasn’t sure how to pull that off, but to make matters worse, the stretcher generally wraps around the side of the leg as well. It looks daunting, but once you know a few quick tricks, it’s a simple and very forgiving joint to cut. It’s also a task you run into on almost any table with a drawer, whether it’s a simple Shaker end table, a one-drawer Arts & Crafts piece or any other style, ranging from period to modern.
Start by cutting the tails on the ends of the stretchers. Position the stretcher on top of the legs, then mark the underside of the stretchers so you can tell where it wraps around the leg. Flip the stretcher over and mark out the tail location.
 Use a handsaw to cut the lines of the dovetail, but don’t get too hung up on perfect angles – just try to keep the sides of the cuts square top to bottom. Then cut the square line where the stretcher wraps around the leg. You can chop out the waste with a chisel. Then either cut or chisel a 1/8″ rabbet on the underside of each tail, all the way to the base of the tail.
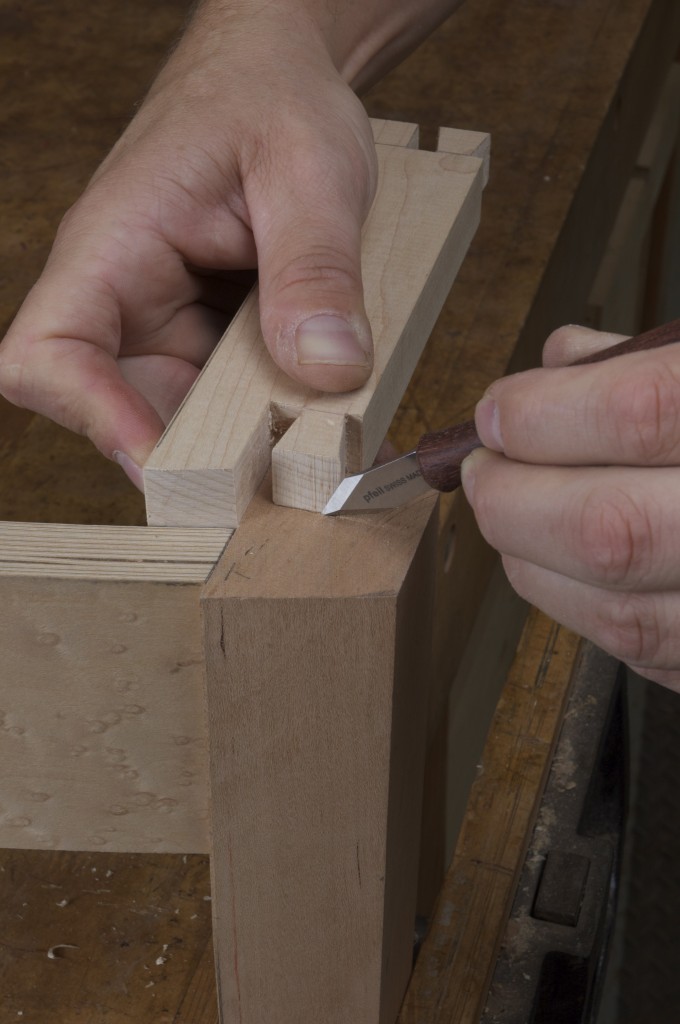
Set the stretcher back in position, resting the rabbet on the tops of the legs. Then knife the line on the legs directly from the tail. After removing the stretcher, I like to trace the knifed lines with a pencil so they are easier to see.
You can saw down the layout lines on the legs with a handsaw and then chisel out all the waste, but I find it easier to use a 1/8″ straight bit to remove the bulk of the waste. Just make sure you set the bit depth to match the depth of the tail.
 Routing rather than chopping out the waste guarantees a consistent, flat-bottomed cut. If you work slowly with the router you can get really close to the layout lines.
Some people are hesitant to rout freehand like this, but you’ll find it’s much easier to control than you’d imagine – especially with a small bit like this. Just take the cut slowly and make sure you position yourself so you can see the bit clearly. If you’re uncomfortable with the idea of routing freehand, practice for a few minutes on a piece of scrap. You’ll be surprised how easy it is, and learning it will save you loads of time for on countless other tasks – especially when it comes time to install hinges and hardware.
 Once you’ve routed as close to the cutline as you’re comfortable with, chisel out the rest of the waste. Having the firmly established, routed baseline makes it easy.
Test the fit of the tail in the slot on the leg. If adjustments need to be made, make them using a chisel and only in the dovetail slot. Take it slowly and test the fit often. This technique works no matter how you decide to build the drawer. “Four Good Ways to Build Drawers” gives you plenty of drawer-making options.
Once installed, the stretcher solidly ties the legs together. In the table I just built, the false drawer front abuts the edge of the stretcher. And remember, the joint needs to be strong – which is easy to pull off simply because of the way a dovetail joint is engineered. But if there is a gap here or there, or the edges get nicked, don’t fret: The work gets covered by the tabletop anyway.


Here are some supplies and tools we find essential in our everyday work around the shop. We may receive a commission from sales referred by our links; however, we have carefully selected these products for their usefulness and quality.


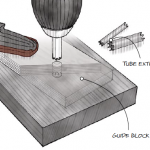

You can control the router better and it is easier to route the socket if your bench is tall enough to let you lower the leg so its end is flush with the benchtop. The bench and top of the jaw provide much better support for the router than the end of the leg alone.
You got me! I saw the headline and thought to myself … “so he’s got a drawer basically done and needs to make it wider than it is. Right. I know it’s not April 1, but still …”
Great article Mathew, many thanks
for explaining the process.