<img height="1" width="1" style="display:none" src="https://www.facebook.com/tr?id=376816859356052&amp;ev=PageView&amp;noscript=1">
 In Projects, Shop Blog, Techniques

We may receive a commission when you use our affiliate links. However, this does not impact our recommendations.

Weekend Kitchen Projects

Here are three ways to improve storage space in any kitchen.
You can whip through each project in an afternoon, using only
a tablesaw and a plunge router.
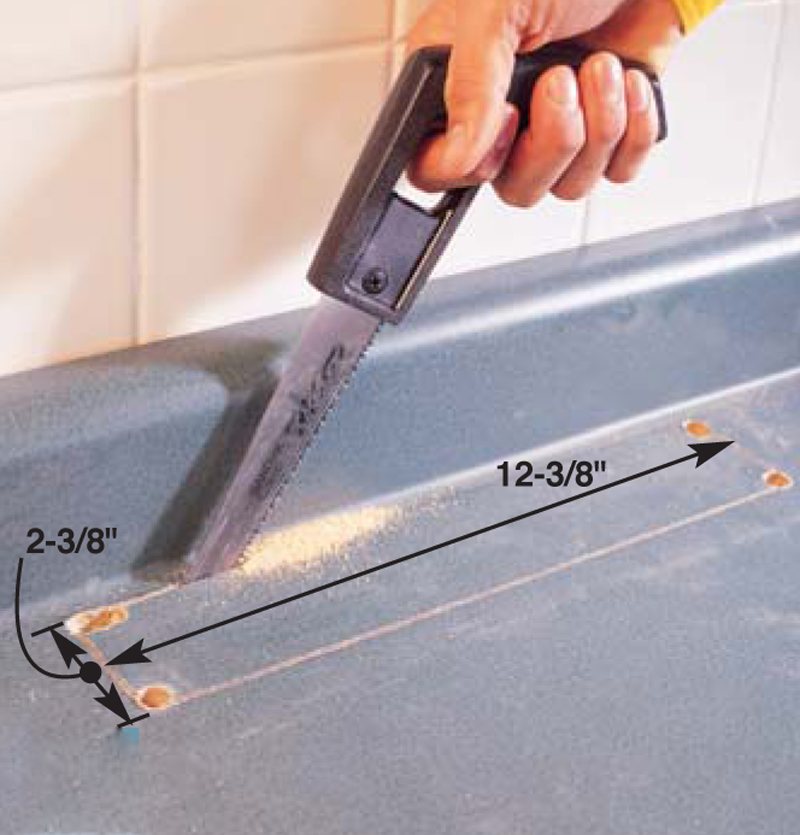
Countertop Knife Rack

Store up to nine knives in a handy rack that puts
sharp edges out of the reach of children.We’ve
arranged the slots to fit a particular set of knives
(Fig.A), but you can alter the pattern to suit your
set. Experiment by cutting slots in a piece of cardboard.
Then make the rack from any hardwood
you like. After cutting, sand the rack smooth and
finish it with three coats of spray polyurethane.A
spray finish is easy to get into the knife slots.

Install a knife-blade shield under the counter
(Fig. B and Photo 4). You may need to slightly
shorten a drawer to make room for the shield.
Also,make sure the shield doesn’t interfere with the
drawer slides.

Fig. A: Knife Rack Layout

Fig. B: Knife Blade Shield

Click on any image to view a larger version.

Store knives within easy reach!
This countertop knife rack stores
a complete set of knives right where
you need them. The lipped edges
conceal a hole you cut in the
countertop. You can easily remove
the rack for cleaning.

1. Mark the rack’s outline and the knife slot
locations on an oversized piece of hardwood.
An oversized board provides support for your
router and room to clamp a guide board.

2. Cut the knife slots with a plunge router.
Cut out the rack, round over the top edges
with a router and cut rabbets around the
bottom edges to form lips.

3. Cut an opening in your countertop with a
keyhole saw. Lay out the opening far enough
from the backsplash so the lips of the knife
rack sit flat on the countertop.Then drill
holes in the corners and saw away. (You may
have enough room to use a jigsaw to make
the long cut farthest from the backsplash.)
Add a couple dabs of silicone caulk to the
sides of the rack so it fits tight in the slightly
oversized opening.

4. Fasten a blade shield to the back of
the cabinet, underneath the knife rack.
Build the shield from 1/4-in. plywood and
3/4-in. solid wood.

Sink Cabinet Shelf

It’s easy to customize this catchall shelf to fit your
cabinet doors.Measure the opening of your cabinet
(not the door!) and plug your numbers into
the Cutting List below. The shelf unit clears the
opening by 1/4-in. on all sides.

You can mount this shelf on a cabinet door
made of plywood or a door with a raised panel.
Solid mounting strips get screwed into the stiles of
the door, not the thinner panel.

Note: If you have small
children, be sure that
cabinets containing
cleaning products and
other toxic substances
have child-proof latches
attached.

Cutting List

Hardware

Keep cleaning supplies at your fingertips!
Want a sink cabinet shelf that’s
better than store-bought plastic or
wire racks? Make one that mounts
securely to the frame of your
paneled door, has the same look as
your cabinet and maximizes space
because it’s custom fit.

1. Cut two pairs of 3/4-in.-wide, 1/4-in.-deep
dadoes in the sides; a pair for the two shelves
and a pair for the mounting strips. Line up the
mounting-strip dado with the shelf dado. Note: The guard must be removed for this step. Be careful!

2. Slip the shelves into their dadoes. First drill
holes for the mounting screws 3/8-in. from the
end of the mounting strips. Glue the mounting
strips to the shelves. Drill pilot holes in the sides
and fasten the shelves with long screws.

3. Fasten the rails to the front of the shelves
with short screws. Finish washers save you the
trouble of perfectly countersinking each hole!

4. Clamp and screw the
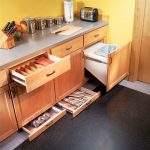
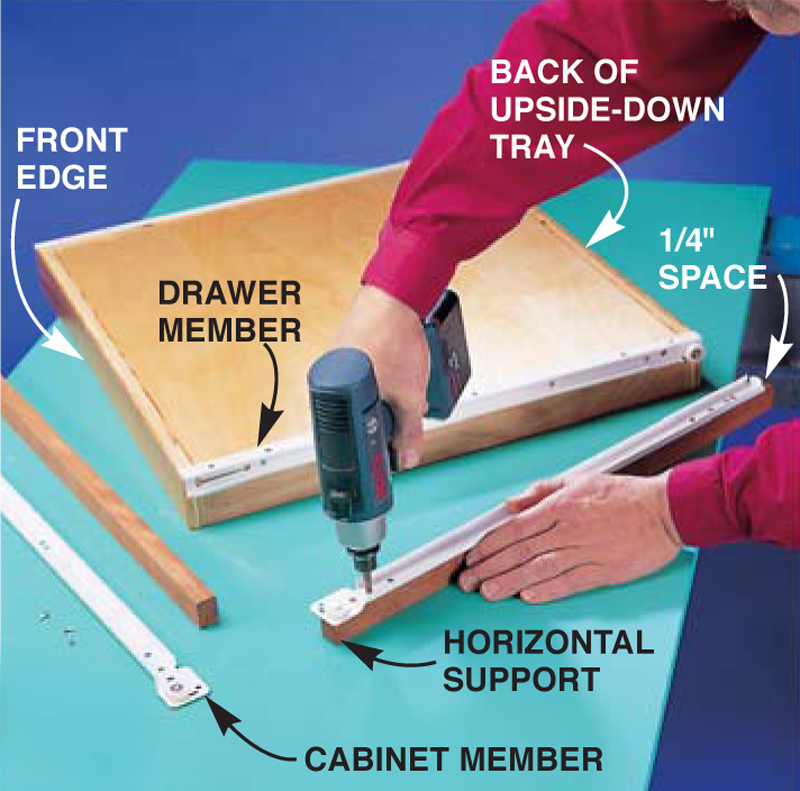
shelves
to your door, using
3/4-in. screws and finish
washers.You may need to add a
third hinge and a magnetic
catch if the weight of the
loaded shelves prevents the
door from closing easily.

Roll-Out Kitchen Trays

Trays on wheels put all the pots and pans in a
deep cabinet within easy reach. If your doors can’t
open more than 90-degrees, plan on making the
horizontal supports wider than shown here.There
must be 1/4-in. clearance between the slides and
the inside faces of your doors.

Cutting List

Hardware

Source

(Note: Source information may have changed since the original publication date.)

Woodcraft, woodcraft.com, 800-225-1153, Blum 230 Series 22" Drawer Slides, #01V10
$17.49 per pair.

This story originally appeared in American Woodworker February 2001, Issue #85.

Reach that stuff in the back!
Roll-out kitchen trays replace
awkward, deep shelves. They’ll fit
in any cabinet, are adjustable in
height and are especially handy for
older or disabled people. Budget
about $45 per cabinet for the
hardware and wood.

1. Mark the dadoes on one wide hardwood
board. The four upper dadoes make the top
shelf adjustable.

2. Cut dadoes 1/4-in. deep, then rip the wide
board into four vertical supports. Cut
horizontal supports to hold the slides.

3. Glue the vertical supports
in place with a couple dabs of
construction adhesive.Then fit
the horizontal supports tightly in the dadoes,
without glue.The horizontal supports must
stick out at least 1/4 in. beyond the face frame
of your cabinet door.You’ll need this clearance
for the drawer side to travel freely.

4. Build the plywood trays
with plywood or hardwood
sides.The corners may be
simply butted together.Align
the slide’s drawer members
flush with the front of the tray.
Fasten the slides to the trays
and the horizontal supports.
Place the rear end of the
cabinet member at least 1/4 in.
away from the end of the
horizontal support.


Product Recommendations

Here are some supplies and tools we find essential in our everyday work around the shop. We may receive a commission from sales referred by our links; however, we have carefully selected these products for their usefulness and quality.

Recommended Posts

Start typing and press Enter to search