We may receive a commission when you use our affiliate links. However, this does not impact our recommendations.
It’s safe, it slides like a dream and a replaceable throat plate makes it last forever!
by Travis Larson
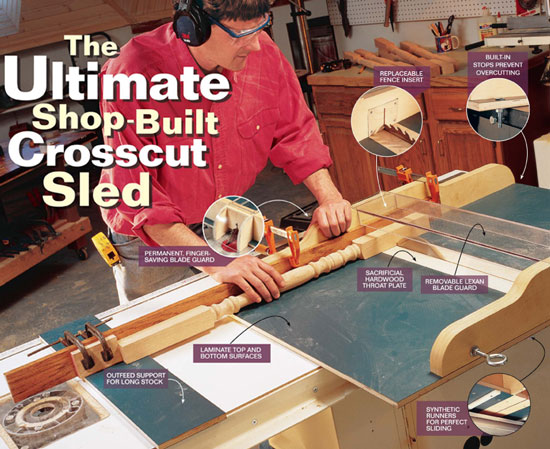
A good tablesaw sled makes perfect crosscuts easy, accurate and very safe. In addition, a well-designed sled can be used for bevel cuts, dadoes and with a few shop-made jigs,
you can make tenons or repeated miter cuts at any angle.
I used to handle crosscuts with my sliding miter saw (with inevitable tear out). For wider stock, I employed the miter gauge on my tablesaw and sometimes fit it with all sorts of
Rube Goldberg-style contraptions to handle various specialty cuts. But I always felt a little queasy with these devices because they put expensive stock (not to mention my fingers)
in serious jeapordy. This sled is a much better way to crosscut.
Materials Needed
For this sled you’ll need Baltic birch plywood (one 5×5 sheet), plastic laminate (one 4×8 sheet), plastic runner and guard material, and fasteners—all of which will cost under $100. An equivalent-sized factory-built model sells for about $350 but isn’t designed to handle dadoes or bevel cuts without wrecking the table and fences. Without any mistakes, you should have enough material left over for a miniature sled for lighter, smaller crosscut work.
Tailor the Sled to Suit Your Work
The sled shown in this story handles material up to 24-in. wide, such as cabinet sides and most furniture parts. I haven’t seen many larger sleds, but some people prefer smaller ones. Size your sled wide enough to handle the work you usually do. Some woodworkers use larger sleds for wide work and lighter, smaller, more portable ones for narrow cuts.
Two Sleds from One Sheet of Plywood
Six hours of shop time will produce this sled. We used a sheet of Baltic birch plywood, and had enough to make a sled for small tasks and the larger model shown here. You can use any 1⁄2-in.- or 3⁄4-in.-thick, cabinet-grade plywood—as long as it’s flat.
The runners are made of ultra-high molecular weight plastic (1⁄2-in. x 4-ft. x 4-in. sheets run about $20; see Sources, below). Slop-free sizing of the runners is crucial for an accurate sled. They should be the same length as the sled table, just under 3⁄8-in. thick (so they won’t bottom out in the miter slot) and should slide in the slots easily with no side-to-side movement.
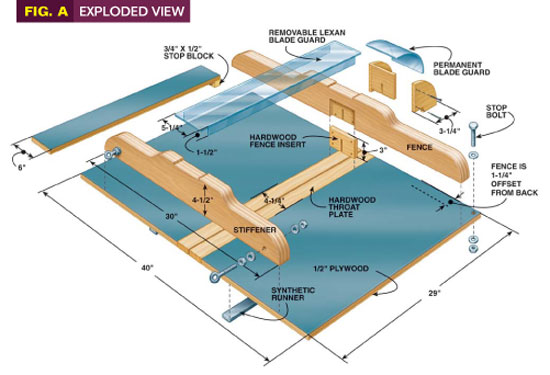
Centering the blade in the table allows for the necessary 2-in. overhang for the stop (Photo 13) on the left side of the saw table and access to the adjusting screw for the fence. Check your saw to confirm that the dimensions of this sled (built to fit a Delta Unisaw) will allow enough overhang. If not, either make the table wider or offset everything so the sled has at least 2-in. overhang over the left side of the saw.
Front Stiffener and Fence
Shape the stiffener and fence contours however you wish, but leave at least 41⁄2 in. about 5-in. away from the left and right sides of the saw blade. The stiffener and fence are all that’s holding the right and left halves of the table together after cutting through the sled table, so they need to be stout and stable. To size the shorter left- and right-hand areas, I tested various heights and found that a 3-in. height was comfortable for my fingers to wrap over the fence and easily hold 3⁄4-in. material. Ease or round over the sharp edges.
Don’t be overly fussy about mounting the front stiffener. Clamp it flush with the rear edge of the table and fasten it with countersunk 21⁄2-in. drywall screws spaced about every 3 in. Keep all screws outside the area where the 41⁄2-in.-wide throat plate will be. Proper, square placement of the rear fence is the key to a successful sled (Photos 7 and 8).
Seal all exposed wood surfaces with a coat of polyurethane if you like smoother, stay-clean surfaces. Waxing the saw table also helps smooth operations. We installed a couple of eye hooks in the stiffener for stowing the sled on the wall.
Replaceable Throat Plates and Clear, Plastic Saw Guards
Impact-resistant polycarbonate plastic (see Sources, below) is best suited for guards and can be machined with woodworking techniques and tools (Lexan and Cyrolon are two common brands), but bending and burnishing edges requires either a heat gun or propane torch and a bit of patience.
If you want smooth, clear edges on plastic, joint or sand off saw marks and run a torch over the edge to get slightly rounded, translucent edges (a “flame finish”). Practice on a piece of scrap before bending or softening the edges on your guard to get the feel for using the torch or heat gun without damaging the surface.
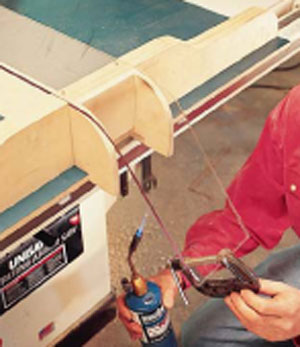
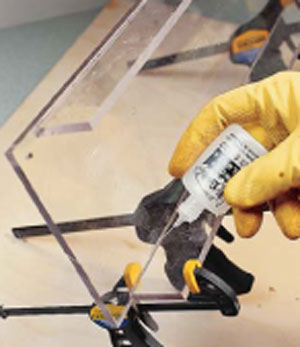
After you get the plastic parts cut, polished and clamped, weld the sides on with polycarbonate cement (Photo 12) using a gluing syringe, eye dropper or a “worm blower” (available at fishing tackle shops).You’ll find that a well-made tablesaw sled, like a lead sled dog, is dependable, solid and holds up over the long haul. Mush!
|
Clamp a 45-degree (or any other angle you need) jig to the fence to use the sled for cutting miters.
Cut tall stock by removing the top guard for clearance and using a stop block on the saw fence to prevent kickbacks.
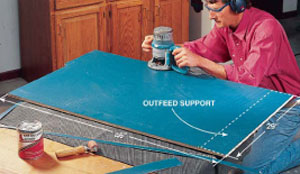
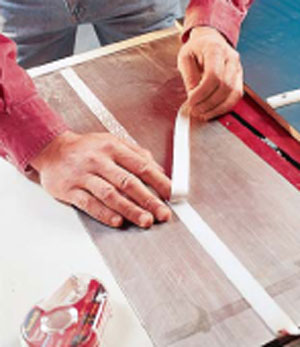
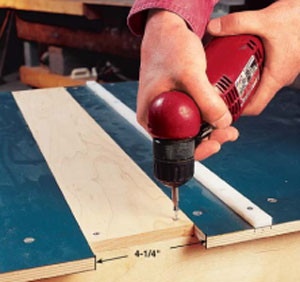
Photo 1: Cover plywood with plastic laminate for the base and two slightly larger squares of laminate for the top and bottom. Glue the laminate onto both sides with contact cement, roll it down and trim off the excess with a flush-trim router bit. Rip a 6-in. strip off the width for the outfeed support and glue and nail on a stop block (see Fig. A).
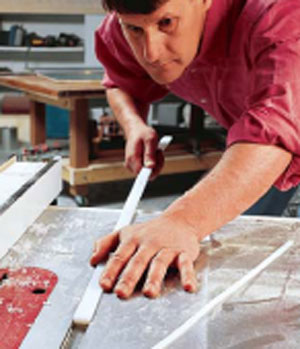
Photo 2: Fit the plastic runners. They should slide easily in the miter gauge slots without any binding or slop. Cut them to the sled table width.
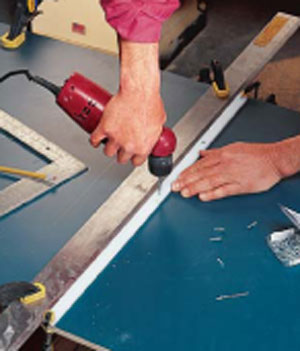
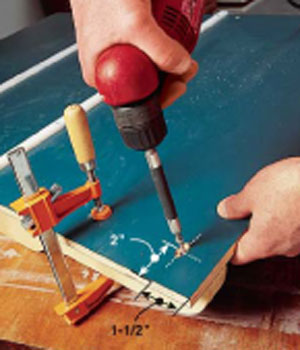
Photo 3: Pre-drill and countersink five evenly spaced holes for 3⁄4-in. No. 6 wood screws in both runners. Mount only the first one to the bottom of the sled using a carpenter’s square with a metal straightedge to hold the runner straight and square. Drill the holes for the screws slightly larger than the shafts (9⁄64-in. for No. 6 screws) or the plastic will bulge and cause binding in the slots.
Photo 4: Attach the second runner with double-sided tape. Align the rear edge of the runner with the back edge of the saw table. Slip the sled’s attached runner into the miter slot keeping the end of the runner flush with the rear edge of the table and lower the sled onto the taped runner. Carefully lift off the sled, pre-drill through the runner holes into the sled bottom and screw the runner to the bottom of the sled with five evenly spaced screws. Test fit on the saw table for easy, no-play movement. If the runners are binding, lift off the sled and inspect the runners for darker areas where they rub on the miter slot edges (usually bulges around the screws). Remove the runners and shave those areas with a block plane.
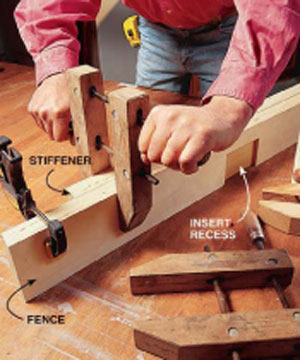
Photo 5: Glue together two sets of plywood strips for the fence and stiffener blanks. Make the fence blank about 42-in. long (use a jigsaw to cut the fence throat plate recess in one of the fence strips before gluing) and the stiffener blank about 32-in. long. Joint one edge, rip to final width, cut to length and shape the curved edges.
Photo 6: Cut dadoes into the centers of the two fence blanks to receive the blade guard. (This step is optional. You can also surface mount the guards.) Use a band saw or jigsaw to cut contours on the fence and stiffener and ease the edges with sandpaper. Attach the stiffener flush with the edge of the sled with six evenly spaced 3-in. countersunk drywall screws. Keep all screws 21⁄2 in. away from the center of the table for cutting the throat plate slot.
Photo 7: Attach the fence at the right side of the table with a countersunk screw and attach the left side using a screw in a router-cut slot. This allows for squaring adjustment. Raise the saw blade to full height and make a pass through the stiffener and base, stopping the cut at the fence.
Photo 8: Make a test cut on a straight-edged scrap of plywood. Flip the left half of the plywood over to see if the cut is square. Loosen the alignment screw and tap the fence to adjust. Re-tighten the screw and make another test cut. When you achieve a perfectly square cut, flip over the table and install the rest of the fence screws.
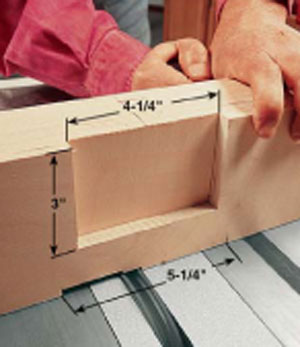
Photo 9: Cut the throat and fence plates, fit them to the recesses and fasten with four 11⁄4-in. countersunk drywall screws.
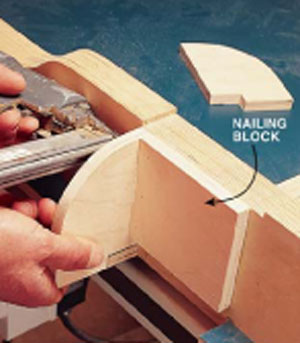
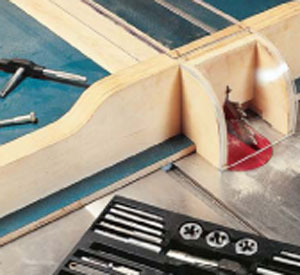
Photo 10: Attach two rounded blocks to a nailing block with glue and nails. Cut two notched, rounded blocks (a 3-lb. coffee can is a good curve pattern). Fasten a nailing block to the back side of the fence and glue and nail on the curved blocks.
Photo 11: Bend plastic around the blocks the fence and stiffener with 3⁄4-in. pan head screws. Bend the curve with a heat gun or torch and apply pressure to mold the plastic over the blocks. Use a handsaw to cut off the excess flush with the bottom of the blocks. Pre-drill screw holes at all four corners of the curved part of the guard. Remove the guard and use the sled to cut off the curved portion and re-install both guards on the sled.
Photo 12: Weld the sides to the underside of the guard with polycarbonate cement.
Photo 13: Install one stop in the side of the tablesaw table and another in the left rear corner of the sled table. (Depending on your fence guide, you may have to go with a shorter bolt for clearance). Raise the blade to maximum height and make a pass through the throat plate and rear fence stopping the saw 1⁄2-in. short of the rear plastic blade guard. Clamp the sled to the saw table. Center punch, drill and tap a hole for the saw table stop bolt. |


Sources
Plastic runner material: Woodcraft, 210 Wood County Industrial Park, P.O. Box 1686, Parkersburg, WV 26102; (800) 225-1153; www.woodcraft.com Polycarbonate guard material and welding cement: Plastics To Go, (612) 551-1140; www.plasticstogo.com
Here are some supplies and tools we find essential in our everyday work around the shop. We may receive a commission from sales referred by our links; however, we have carefully selected these products for their usefulness and quality.