


We may receive a commission when you use our affiliate links. However, this does not impact our recommendations.
This article is excerpted and abridged from the Winter 2010 issue of Woodwork Magazine.
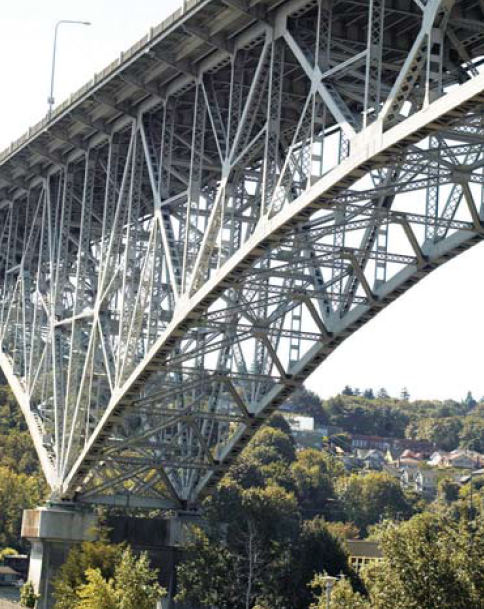 Lost in thought, I stood in the grocery store checkout line, with the design for a table desk on my mind. To be frank, I was frustrated with my design efforts in general, because they were bounded by rules that were locked in formulas and equations. I needed a new approach—I needed to break some rules. Through the store’s overhead windows loomed Seattle’s Aurora Bridge, with its network of beams and arches (photo, left). My thoughts drifted to the main arch, and I marveled at its sense of strength.
Although myriad connecting structural members supported the arch, nothing was superfluous—just as in nature. Is this how Mother Nature would have built this bridge? If the plans were coded in DNA rather than calculated in blueprints, would this be the result?
Asking these questions energized my thinking, because visualizing a design’s DNA scheme requires using imagination and intuition—the opposite of using formulas and equations. Although I don’t depend exclusively on this approach, visualizing the DNA scheme is a tool that I use from time to time when I get stuck, to consider a design without placing undue restrictions on it—it’s really just another way of saying “form follows function.”
I don’t use design formulas any more. I prefer to put an image in my head and let my imagination and intuition work out the details. I’ve learned to trust these two senses as symbiotic cohorts in my mental design dialogues. I visualize the weight and balance of a piece, and I justify every detail by how it feels to me.
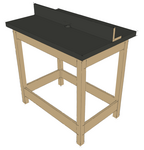
 Aurora Table Desk
Let’s start with my Aurora Table Desk (1), the piece I was thinking about while standing in the checkout line. Designed for residential use, with three shallow drawers and an abundance of open space between the legs (also called negative space), this type of design typically feels light and feminine to me.
I like a bit of masculinity, so I did some genetic engineering—you might say that I added some bulldog genes. Although four legs would have been sufficient, I gave this desk eight legs, to create a sense of abundant support. And taking advantage of the negative space, I made the distance between the center legs greater than between the space between the outer legs. This gave the design additional visual weight, by creating a center “primary mass,” even though
it was actually “thin air.”
As on the Aurora Bridge, an arch defines this desk. Here, the drawer rails form a continuous arch that passes through the front legs, defining the shape of the drawers in the process. Cloud lift details visually support this arched span by providing additional mass at each end. (This mass also genuinely strengthens the joints.) The cloud lift—a rise in a horizontal line—is a design detail the Greene brothers borrowed from Asia. It’s so named, because it was was originally meant to depict clouds.
The indented detail at the bottom of the legs is another classic Greene and Greene design element. This detail works well with lighter designs such as this one, because it visually gathers the table’s weight, pushes it down, and transfers it to the bottom of the legs, which thus receive the entire weight of the design. The legs’ slight taper and roundover at the bottom, below the supporting mass, visually contain the weight, so it’s not dispersed to the floor.
 More Greene and Greene details enhance the design by visually implying solid construction. Ebony pegs and exposed breadboard splines add visual strength to joints, even though they’re non-functional. And a feature that I call the Greenes’ “relief detail” calls for every structural element (real or perceived) to exist in its own plane, so that no two elements meet at the same level (2). Here, steps between the top, breadboard end and spline highlight each joint and structural member.
Here are some supplies and tools we find essential in our everyday work around the shop. We may receive a commission from sales referred by our links; however, we have carefully selected these products for their usefulness and quality.


Thats a pretty darn interesting article you’ve penned up there Mr. Peart……….. I live out here in Pasadena and haven’t traveled up to the Seattle area…………… but I often wander around the Greene and Greene Houses and even toured the Gamblers Mark, down on Orange Grove Blvd…………. my neighbor thinks, that the ghost of the Hahamogna Tongva peoples hangs out in there from Sunset to Sunrise but I can’t be so sure about that man, he gets a bit frustrated at times too, some of these ladies just won’t stop calling him and he has a hard time saying, NO to certain things…………….. anyways though, those are some magnificent projects and I enjoyed reading through your article…………..
I usually size things up by starting at the base and working up. I did the reverse in this instance because of the analogy to the arch.m I indeed liked the view at the top. It floated as intended . I crashed when I reached the base. Stretchers – too many stretchers. Unlike the budge where all elements lead you aloft, the desk is firmly planted in the ground. Had I followed my usual practice, I would never have reached the top.