We may receive a commission when you use our affiliate links. However, this does not impact our recommendations.
3. Quite a Joint!
With the post essentially complete, it’s time to make the legs. You will be making four duplicate leg sections, each made of three pieces. (See the attached pdf for a pattern.)
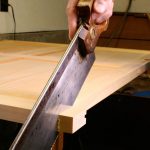
Cut the pieces to rough size, being careful to mark the 45°-angle location exactly. On each leg’s top and center pieces you still have a flat edge to use as a guide to cut the angles on your table saw, or power miter box. On each leg’s bottom you’ll need to make the cut with the band saw or a hand saw and sand the face flat.
These are critical joints that determine how flat your table will sit, so pay special attention to making them meet correctly.

Clamp carefully. Properly gluing and clamping the leg sections is awkward. The clamp arrangement shown here glued two leg sections at the same time with only four clamps. The block between the leg bottoms kept the clamps from sliding on the sculpted leg
With the pieces roughed to shape, make the two rabbet cuts on the leg centers to leave a 1 1/16″ x 3/4″-wide tenon. Check the fit with the grooves in the post. It should be a hand-tight fit.
Next sand the leg pieces to match the templates. A spindle sander is great for this step, but a drum sander chucked in your drill press will work, too. When you sand the shapes, leave a couple of inches to either side of each joint wide of the line. The joints should be shaped to match after the leg pieces have been glued together to ensure a smooth transition.
Lay out the locations for the 1/2″ dowels as shown on the pattern and in the photo.

Details. The half-lapped pieces of maple are shown in place (top), shaped, screwed and plugged. The process was more time consuming, but the finished appearance is dramatic. The photo at left shows a recessed screw slot to attach the top to the base.
4. Clamping Ballet.
The glue-up of the leg components is tricky, but the photo shows a method that worked well for me. Next, again look to the patterns for the locations of the 1/8″ dowels used to pin the larger dowels. Drill completely through the leg and dowel, but use a backing board to avoid tear out on the exit side.
Then add some glue to the 2″ dowel lengths and tap them into place so the dowel protrudes on both sides. When the glue dries, sand the dowels flush.
With the pinning done, use a 1/2″ roundover bit with a bearing guide to ease all the edges of each leg — except the tenon edge and the top edge. Be careful while routing because the grain is likely to change direction, especially at the joint, and tear out.
After routing, glue the legs to the center post. Definitely dry-fit the base assembly, clamping the legs in place. Make sure the base sits flat without rocking, and mark the center post to cut it to length to match the legs. After that, glue and clamp the base.

Illustrations and cut list. For the full-size illustration, download the PDF.
5. Strength and a Decorative Touch.
Before sanding, there is one detail Maloof adds to his sculpted-base tables that adds strength, as well as a nice touch.
The half-lapped maple cross pieces are added to provide strength across the base, tying the opposing legs together with the center post. Chisel the 3/4″-wide x 5″-long grooves for the pieces to a depth of 1/2″ at the center of the “X” and allow the bottom of the groove to level out into the legs. This leaves the trench about 5/8″ deep at the ends of the grooves.
Next, cut the half-lap joint in the two maple pieces and fit them into the two grooves. Then drill four 1/8″ pilot holes, 1/2″ in from the ends of the pieces. Then drill 3/8″ x 3/8″ deep holes to allow the screw heads to recess into the maple. After inserting the four #8 x 2″ flathead screws, plug the holes with 3/8″ diameter walnut plugs.
After that, the rest is rasping and sanding. Maloof’s pieces are known for their contours and smoothness of transitions. I spent about six hours shaping and sanding the base through to #220 grit. It was worth the effort.
It seems silly, but the most visible part of the table took the least amount of effort. The 42″ square/round top was made of four 7/8″ x 11″ walnut boards. I didn’t want to use more than four boards for the top, so I had to buy 8?4 lumber to get the width I needed — the result was that after resawing the boards on the band saw I had some nice 3/4″ walnut for another project.
While Maloof makes no bones about using sapwood on his tops as long as it’s stable, I prefer a more consistent appearance — though I did leave a little sap as a nod to Maloof, the master.
The top was edge-glued using six #20 biscuits per joint. To shape the top, mark a point 2″ in from each corner, and locate the center of each edge. Bend a strip of 1/4″ maple across the center point of each edge in toward the 2″ marks and mark the curve for the top edges.
Complete the top (except for sanding) with a 1/4″ roundover on the top and bottom edges.
To finish the table, I used Sam Maloof’s line of finishing products offered through Rockler (800-279-4441). These reproduce the Poly/Oil and Oil/Wax formulas mentioned in “A Maloof Finish” below.
A Maloof Finish
Mix one-third semi-gloss polyurethane varnish, one-third pure tung oil and one-third boiled linseed oil. You can substitute linseed oil with another third tung oil if it is polymerized (pure tung oil dries too slowly). Apply this mixture three times at one-day intervals.
For a final coat, heat a 50?50 mix of pure tung oil and boiled linseed oil (or 100-percent polymerized tung oil) in a double boiler. Grate solid beeswax and add it to the heated mix until it is the consistency of heavy cream (about two double-handfuls of wax per gallon of mix). Let cool. The wax in the cooled mixture will stay in suspension and has a good shelf-life. This is applied a minimum of three times, vigorously rubbing in the mixture each time. PW
David is a former senior editor of Popular Woodworking.
Click here to download the PDF for this article.
Here are some supplies and tools we find essential in our everyday work around the shop. We may receive a commission from sales referred by our links; however, we have carefully selected these products for their usefulness and quality.