


We may receive a commission when you use our affiliate links. However, this does not impact our recommendations.

Customize their fit for comfort and performance.
Decades ago, woodturning tools came without handles, and turners would simply fashion their own. This makes perfect sense, because a handle that fits and feels “right” gives a turner confidence. And who better to custom-fit the handle than the person who’ll use the tool?
Turning and installing your own handles is a great exercise in designing, turning to fairly tight tolerances, and drilling wood on the lathe. To get started, you can buy tools unhandled (still an option) or remove their commercial handles (really easy). .
Use strong, dry wood
Select stock with straight grain, especially for the tool end of the handle (use the strongest grain orientation for this critical area). Traditional hardwoods, many exotic woods, and even local woods that you harvest and dry yourself are all good options. Do not use weak woods such as pine, poplar, butternut, willow, spruce and fir.
Make sure the wood is dry. If you have any doubt about the moisture content, let the handle stabilize for several days (or longer) after rough-turning and drilling the initial hole.

1. Choose straight-grained hardwood for the handle. Use brass, copper or steel fittings to make the ferrule, which reinforces the joint between the tool and the handle. Copper couplings make excellent ferrules.
I make each handle unique, by using different woods and finish colors, so that I can immediately identify each tool. I normally start with stock that’s 1-3/4″ to 2″ square (Photo 1). The length of the blank depends on a number of factors, including personal preferance and the tool itself. Figure A (below) lists handle lengths that work well for me. It’s always better to make a handle too long, rather than too short.
Ferrule stock

2. Turning tool shanks (or “tangs”) are either round or flat. Both types mount in holes bored in the end of the handle. Flat-tang tools require stepped holes to accommodate their tapered shape.
Every woodturning tool handle must have a metal ferrule to reinforce the joint between the handle and the tool’s shank, or “tang” (Photo 2). Hardware stores and salvage yards are good sources for ferrule stock. Copper couplings (used to join copper pipe and tubing) are some of the best. They’re available in a variety of diameters and each one can be cut in half to make two ferrules. Choose a diameter that allows plenty of wood between the tool’s shank and the ferrule, usually at least 1/4″–if there’s any question, go with a larger diameter.
Make a handle

3. Start by drilling a pilot hole for the tool’s tang in one end of the handle blank. Then use a cone-shaped center to mount the blank on the lathe, so the pilot hole will be centered when the blank is turned round.
1. The first step is to drill a 3/8″ dia. x 3/4″ deep pilot hole for the tang in the blank (Photo 3). Note: If the tang is smaller than 3/8″, match the pilot hole’s diameter with the tang. The end you choose for mounting the tang should have straight grain and be free of checks and knots. Clamp the blank in a vise and use a hand-held drill.
2. Install a live center with a cone in the tailstock. The cone will automatically center the pilot hole when the blank is mounted on the lathe. If you don’t have a cone-type live center, turn a tapered piece of wood to fit into the blank’s pilot hole and protrude about 1/2″ beyond it. When you mount the blank, center the live center’s point on the protruding end.
3. Turn the ferrule end–or the entire blank–to round, using a spindle roughing gouge.

4. Drive on the ferrule after turning a tenon to fit. This ferrule is a copper coupling that’s been cut in half. If the tenon is longer than the ferrule, use another ferrule (the other half of the coupling) to drive the first one home.
4. Turn a tenon on the end to match the ferrule’s length and inside diameter–go for a driven-on fit. Slightly taper the tenon’s end to help get the ferrule started. Drive on the ferrule, factory end first, all the way to the tenon’s shoulder (Photo 4). This orients the ferrule’s rough-cut end with the end of the tenon. Turn down this rough edge after reinstalling the blank on the lathe. If the edge is very rough, use a mill file, off the lathe.
5. Turn a bulb directly behind the ferrule, to provide the greatest support for the tool’s tang. Most of the handle’s shaping can be done with a spindle roughing gouge.
5. For safety, turn a bulb over the part of the handle that will house the tang (Photo 5). This provides maximum strength in the event of a catch or dig-in.
6. Turn the blank to a diameter slightly larger than final size. Then use a detail/spindle gouge to round the back end of the handle.

6. Shape the handle to fit your grip, gradually and selectively reducing the diameter, until it feels just right. Remove the handle often, to check the way it feels in your hand.
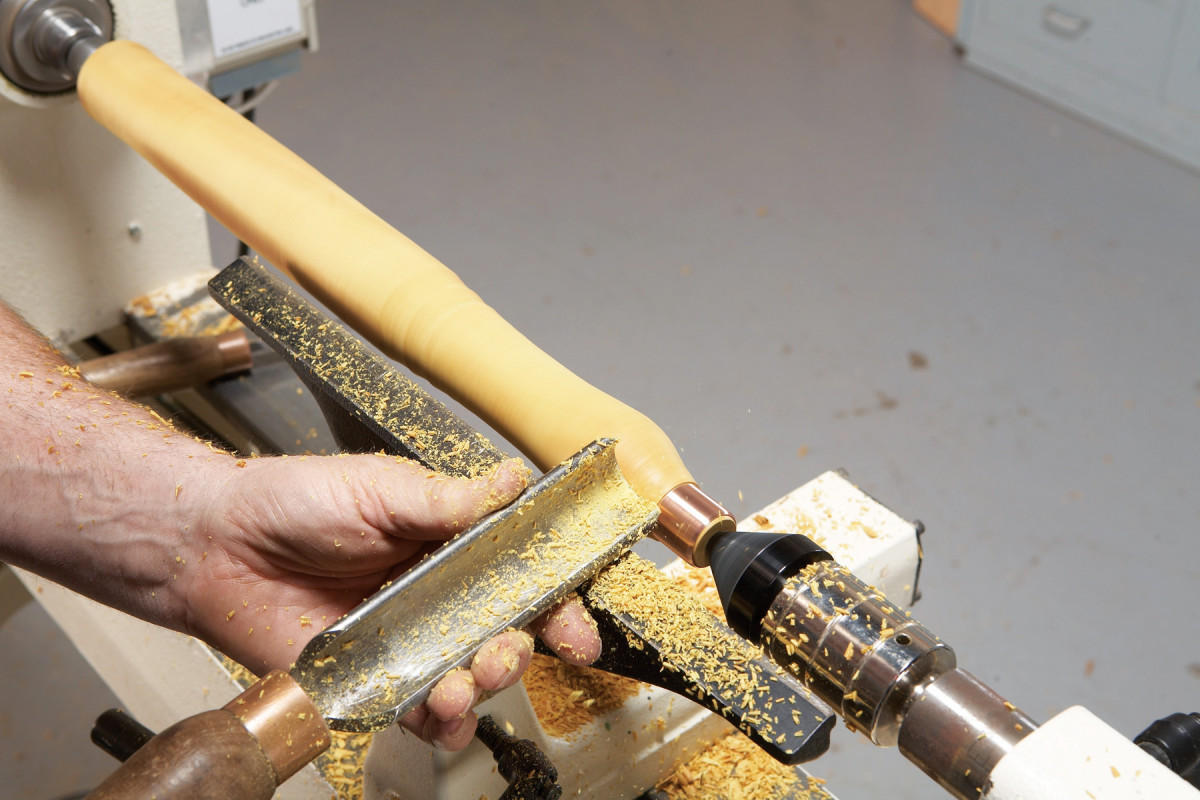
7. Turn the gripping area of the handle into a shape that you like (Photo 6). Be sure to test the grip with the hand that you will use to control the tool. As the gripping area nears perfection, shape the transition to the bulb to create the optimal feel and balance, but beware of making any portion too thin.
8. Finish-sand the handle and ferrule to 150 grit, with the lathe running. Turn off the lathe and sand with the grain to finish the job.

7. Install a chuck in the headstock to drill the tang hole. With the lathe running at slow sped, simultaneously grip the handle (so it doesn’t turn) and crank the tailstock, to carefully drive the handle onto the spinning bit.
9. Remove the tool rest to drill the tang hole (Photo 7). For round-tang tools, the hole’s depth should be one fourth to one third of the tool’s length. For flat-tang tools, the hole should house the entire tang—almost to the tool’s shoulder. Mount a Jacobs-type drill chuck in the headstock and install an ordinary tapered-point bit (other types of bits won’t enter the pilot hole accurately). Place the handle’s pilot hole against the bit, bring up the tailstock, and lock it. Advance the live center to engage the center hole on the waste end of the tool handle. Put on a full-face shield and set the lathe’s speed between 400 and 600 rpm.
10. Turn on the lathe and check to see that the handle runs true. There should be little or no “ghosting” at the ferrule end. If you see ghosts, stop the lathe and re-center the drill bit in the pilot hole. Once all is running well, take two simultaneous actions to drill the hole: Grasp the spinning handle about halfway back with one hand while cranking the tailstock’s handwheel with the other. Go slowly. If you feel too much resistance, slowly back out of the hole, to remove chips.
11. If the hole must be made larger, to accommodate round tangs that are larger than 3/8″ dia., simply repeat the drilling operation, using the appropriate larger tapered-point bit. Drill stepped holes to accommodate tools with flat tangs. Drill the small dia. hole the full length of the shank; drill the larger hole only as far as necessary.
12. Finish the back end of the handle off the lathe. Simply cut off the waste with a handsaw and then sand.

8. Drive the handle onto the tang, using a waste block to protect the edge. Check frequently to make sure the tool and handle remain properly aligned.
13. Set the tool into the handle. This step is critical. I’m a firm believer in using epoxy to anchor the tool, so start by pouring a generous amount into the hole. Drive the handle onto the tang (Photo 8). Stop about every quarter of the way to check for alignment—sighting the tool and handle much as you would sight a gun. Look for misalignment left or right and up or down. Tap the tool with the mallet to make corrections.
14. My favorite tool-handle finish is the one that comes from hard use: sweat, dirt, wear–and maybe even a little blood. A pure oil finish is another option, but any film-forming finish (including wipe-on oil-varnishes) will make the handle too slick.
Here are some supplies and tools we find essential in our everyday work around the shop. We may receive a commission from sales referred by our links; however, we have carefully selected these products for their usefulness and quality.


