We may receive a commission when you use our affiliate links. However, this does not impact our recommendations.

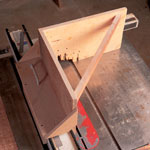
The first tenoning jig I built years ago. It’s seen a lot of use on my table saw and my router.When I went to build a new jig, I realized that this one served me so well that I didn’t need to add any more features to make it more useful.
Several years ago my brother-in-law was thinking about buying a commercial tenoning jig because he was having trouble keeping his work flat against his table saw’s small fence while cutting tenon cheeks.
“Don’t do that,” I told him. “I’ll show you how to build a jig from a few pieces of scrap that will do the job just fine.” So I built the jig in the photo above and have used it just about every day in my shop to cut tenons on my table saw and sliding dovetails on my router table. The high side and back keep my tenons in position as I cut the cheeks. It’s difficult to mess up a tenon with this jig.
When I decided to retire the old jig and build a new one, I thought about adding some fancy features. Then I realized that simple is best, and I stuck with my original design. This jig is built to be used with a commercial Biesemeyer fence. If you don’t have a Biesemeyer, you’ll have to change the dimensions of the top and side runners, but that’s simple to do.
Simplicity Itself
Basically, this jig is two pieces of plywood in an “L” shape that have a couple pieces of wood screwed to them to allow them to ride the table saw’s fence. After settling on the dimensions that are right for your fence, cut all your pieces to size. First clamp the side piece and top runner in position on your fence. Mark where the two pieces intersect and screw and glue the two pieces together. Be sure to countersink the screw heads in the side piece. Position the side runner in place under the top runner. You want it to be tight against the fence — but not too tight.
Screw it into place.

The first tenoning jig I built years ago. It’s seen a lot of use on my table saw and my router.When I went to build a new jig, I realized that this one served me so well that I didn’t need to add any more features to make it more useful.
Now glue and screw the large back piece to the side piece. You want the angle to be 90 degrees between the two pieces, so check your work. Later you’ll add a corner brace that will keep this angle fixed at 90 degrees. Attach the two triangular braces to the side and runners. Attach the braces with nails and glue.
Now miter the corner brace to fit. Put an engineer’s square between the back and side and adjust the brace until it holds these pieces at exactly 90 degrees. Now nail the brace in place.
Set up and Use
Before you go cutting tenons, wax the areas of the runners that come in contact with your fence. If your jig won’t slide, unscrew the side runner and take a light jointer pass on it. When the jig slides smoothly, add some glue to the joint between the side and top runner to make it permanent.
Cutting tenons is now simple. First use your miter gauge and fence to define your shoulders. Then put your jig up on the saw and make your cheek cuts. PW
Click here to download the PDF for this article.
Glen is a senior editor with Popular Woodworking and Woodworking magazines, the author of “Fine Furniture for a Lifetime”, “Building Fine Furniture” and “Building Period Furniture” as well as the host of the Woodworker’s Edge DVD series.
Here are some supplies and tools we find essential in our everyday work around the shop. We may receive a commission from sales referred by our links; however, we have carefully selected these products for their usefulness and quality.


Glen;
I’ve used this jig for several years, now, myself. As you point out, simple is best. I have managed to adjust the jig to suit a couple of different tablesaws in that time, and the results have remained excellent!
Dave