We may receive a commission when you use our affiliate links. However, this does not impact our recommendations.
When this technique was first shown to me, my eyes became as wide as saucers and as bright as a supernova. I couldn’t believe this method actually worked – not to mention it is easily repeatable and consistent.
Whenever I demonstrate this technique to others, I’m delighted to see their eyes grow wide and bright as well.
You may think I’m about to describe a standard, well-known method that has you make numerous passes over the jointer knives until you’ve achieved the needed taper, counting the passes as you go so the steps can be repeated on other legs. (I’ve seen this process touted in other magazines.) It’s not.
This entire operation is completed with a single setup at the jointer and in two passes. Yes, precise jointer setup and accurate layout on the leg stock is necessary to match your desired profile. But once set, the method produces any number of matching legs as long as you hit the marks. Here you go!
 1. Half the total taper. The most important mark on the leg stock is a line drawn at half the total length of the taper – measured from the bottom of the leg upward. Square that line around the leg on all four faces and mark an “X” on the two adjoining faces that you wish to taper.
 2. Precise setup required. In order to create an exact taper, your jointer has to be set up properly. The cut required is going to be more aggressive than you normally make with your jointer, but it’s OK and possible. Set the depth of cut to one-half the total amount of taper. Check your setup on a scrap to confirm.
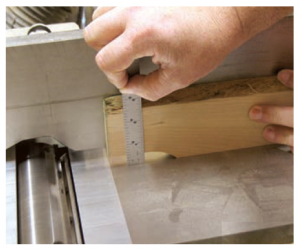
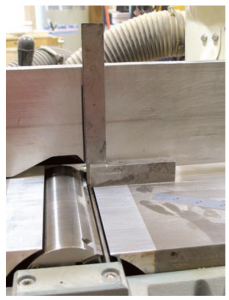
 3. Find the cut. For consistent results, it’s crucial to find the exact point where the knives begin to cut. With the machine unplugged, set a square to the knives and on the infeed table. Slowly rotate the cutterhead toward the square, pushing the tool back, until the square stops moving. At that point, mark the jointer fence and extend a live up the fence face.
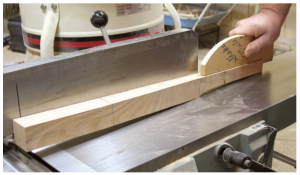
 4. Step one of the cut. Start the first cut at the bottom of the leg. Place one “X”-marked face flat to the jointer bed and slowly push the stock into the knives until the layout line on your leg touches the line marked on the jointer fence. Carefully remove the leg from the jointer. To cut the second face, rotate the leg 90° and pass the leg over the knives again. Complete step one on all leg blanks. Note: The guard has been removed for clarity in the picture.
 5. Step two of the cut. Flip the leg end for end so the top of each leg points toward the knives and one of the two cut faces is flat to the bed. Apply pressure to the cut end to make the leg “wheelie” up at the top end. Make one continuous pass over the knives to remove the balance of your waste material. As you complete this pass, you’re making two small tapered cuts. The first begins at the top of the full-length taper and takes a 1/2″ cut at the termination of step one. The second small taper begins at that same point and continues through the bottom end of the leg. Rotate the leg to make another pass over the knives and the tapered leg is finished.
Are you ready to take this method into the shop for some Shaker furniture builds? Well, I’m excited to announce that the September value pack in our store is all about Shaker style furniture-making. With Glen’s technique for tapered legs, you should be able to work your way through the entire value pack in no time! Click here to visit the exclusive Shaker furniture offer in our store, and buy it today before we run out.
–Dan Farnbach
Here are some supplies and tools we find essential in our everyday work around the shop. We may receive a commission from sales referred by our links; however, we have carefully selected these products for their usefulness and quality.


I would sure like to know the motivation for whoever figured this out. But it’s genius.
I had to try this as soon as I read the post. Amazing! Perfectly placed, sized, and smooth tapers. Whoever comes up with this stuff is good, really good.