We may receive a commission when you use our affiliate links. However, this does not impact our recommendations.
 Two simple router jigs to get perfectly sized dados and grooves, even for undersized plywood.
 Two simple router jigs to get perfectly sized dados and grooves, even for undersized plywood.
Project #2217 • Skill Level: Beginner • Time: 1 Day • Cost: $75
The ability to cut perfectly snug-fitting dados and grooves is one of those fundamental skills that will catapult your woodworking into the realm of cabinets and fine furniture. Sure, you can cut accurate dados on the table saw with a stacked dado set, but that’s a real challenge if you have large workpieces or stopped dados. A bookcase, hutch, or cabinet project may leave you wanting an alternate way to cut dados.
The concept of an exact width dado jig is pretty simple. Just use the actual shelf stock you intend to use for your project as a thickness gauge to set up your jig. From there, you can rout the groove and expect perfect fitting dados each time … even if your project includes 3/4“ plywood that actually measures 23/32“ or some other odd dimension. These jigs aren’t new, and I’ve been using one for the better part of a decade with predictable results. My first jig used a short-length bearing-guided bit, but you can also use a guide bushing, as long as your jig design accounts for the offset between the bit and bushing. So, I came up with a design that can be built for either style of dado jig and made sure to include some creature comforts like ‘finger grip’ openings to help close the jig on your shelf material and sliding stop blocks. Both versions provide zero clearance to protect delicate plywood veneers and will have you making perfect dados in no time. Choose the version that best fits your shop or make them both!
Cutlists and Diagrams

 Build Guide Bushing Jig

 Build Guide Bushing Jig
Supplies:
6x 1/4” x 20 threaded inserts
2x 5/16” multi-knobs; Woodpeckers
2x 5/16” x 18 nuts for multi-knobs
2x 1/4” mini-T multi-knobs; Woodpeckers
2x 1/4” x 20 bolts for mini-T multi-knobs
#6 x 5/8” wood screws to attach 1/4” MDF
#8 x 1″ wood screws to attach cleats to rails
2x 5/16” T-bolts, 2-1/2” long
This first version uses a 5/8“ diameter guide bushing and a 1/2“ diameter router bit. This allows the most efficient and clean cutting of common 3/4“ wide dados. If you plan to cut 1/2“ wide dado with the jig, select a 1/2“ diameter guide bushing and a 3/8“ diameter bit. It’s worth noting that this jig will work with most any medium-length straight bit, but a down-cut spiral bit will give the best results in plywood. Cut parts for the rails of the jig using 1/2“ MDF. Make the fixed rail 5“ wide and the adjustable rail 7“ wide. The length of the rails depends on your needs, but I sized them at 30-1/2“ overall length, which accommodates a 22-1/2“ wide case piece. If you plan on building kitchen cabinets, you can make the jig 2“ longer. Then cut the end cleats from 3/4“ thick plywood or a suitable hardwood.

1 Make a pair of end cleats from 3/4″ thick plywood (or hardwood) sized 12-3/4″ long x 4″ wide. These cleats will hold the rails together and accept the hardware that makes the jig adjustable.

2 You’ll need two strips of 1/2″ thick MDF for the rails of the jig. Make one 7″ wide and the other 5″ wide. Trim them to 30-1/2″ long.
Shape the Moveable Rail
One thing I learned from using my large, clucky dado jig all those years is you want the jig as small and light as possible. With that goal in mind, I shaped the moveable rail as shown in the detail rendering (see cultists and diagrams at top). By removing about 2“ of material from one side of this rail, you’ll trim some weight but still leave plenty of room for the tool-free adjustment knobs.

3 Make a small template to help rout the cutouts. I added three openings on each rail — one 51/2″ from each end of the jig and one centered between the others. Carpet tape secures the template while you rout the opening with a spiral bit and guide bushing.

4 Rout “finger grip” cutouts in both rails to help pinch the shelf stock in place when using the jig. This solves a common problem with my original shop-made jig and makes it much easier to set the width of your jig.

5 Trim away 2″ of width on the moveable rail. This will lighten the jig while still preserving enough room for knobs and clamps.
Now move on to milling the end cleats to accept 5/16“ T-bolts. You’ll make a shallow recess in the underside of these cleats, as well as a through-slot with two different bits at the router table.
Use a straight bit that matches the width of your T-bolt hardware and create a 2-1/2“ long groove at the router table. Move the cleat between two stop blocks on the router table fence to control the length of the cut.

6 Set the bit height slightly more than the thickness of the T-bolt head. Carefully pass the end cleat over a straight bit. Stop blocks installed on the router table fence control the length of the cut.

7 Make sure the T-bolt easily slides in the groove. If you need to widen the slot with a second pass, make sure to move the router table fence away from you for the second pass (to avoid making a climb cut).
Then switch to a 5/16“ spiral bit and make a slot within the groove you just made. This is simple if you keep your stop blocks and fence in the same position and mill the slot in multiple passes. Increase the depth no more than 1/4“ per pass until the bit breaks through the top side of the cleat.

8 Switch to 5/16″ spiral bit and complete the slot in multiple passes. The key here is to leave your router table fence and stop blocks in the same position as the last operation. Make multiple passes, raising the bit no more than 1/4″ per pass.

9 Now a 5/16″ T-Bolt will fit perfectly into the cleat from the underside, yet slide freely when adjusting your jig.
Next, you’ll mark and drill holes in the moveable rail for the T-bolts. Position the jig, so the gap between the rails is 7/8“ and center the hole in the slot. The jig relies on the inner edges of the rails being straight and true. Take a moment to slide the rails together to confirm that your parts come together without any gaps. If any adjustment is needed, a light pass over the jointer should correct any irregularities.

10 Slide the fixed rail and moveable rail together to make sure the edges come together perfectly. If the edges of your 1/2″ MDF parts are straight and true, you can move on to marking and drilling holes to mount the end cleats.
If you wish to have optional sliding stop blocks for your dado jig, take a minute to drill for a series of 1/4“ x 20 threaded inserts at the drill press. The threaded inserts are installed 3“ apart in the fixed rail. If your threaded inserts have a lip on top, drill a shallow recess first. Then drill a through hole, sized to easily fit your particular threaded inserts. I installed mine with a dab of epoxy for good measure.
Now attach the end cleats to the fixed rail. Glue and screws ensure the jig will hold up to the rigors of everyday shop life. Use an accurate square to set the cleats and fixed rail 90° to one another.

11 Use a square to set the cleats 90° to the fixed rail. Although the cleats will be assembled with glue and screws, it’s useful to start with a couple of brad nails to lock the parts in position. Then predrill for six screws at each end.
At this point, you’re ready to add an important element to the bushing-guided jig. A layer of 1/4“ MDF is attached to the underside of the rails. This functions as a physical indicator of the cut line and helps you set your jig to the correct width. It also makes the jig zero clearance in nature, which leads to some of the cleanest looking dados you’ll ever see. Instead of adding the 1/4“ MDF as a single piece, I added it in strips. The outer strip on each rail will permanently remain on the jig. The inner strips can be replaced as needed and are attached with #6 x 5/8“ wood screws from underneath.

12 Basically, you’ll attach 1/4″ MDF to the bottom of the jig, between the cleats. Instead of installing it as two large strips, I made 11/2″ wide strips on either side of the jig opening (painted red for clarity). Now they are easily replaceable if they get damaged or if you change bushing and bit combinations.
13 The thin strips will overhang the opening in the jig about 1/4″ and are trimmed the first time it’s used. Secure the sacrificial strips through pre-drilled and countersunk holes with five #6 x 5/8″ screws.
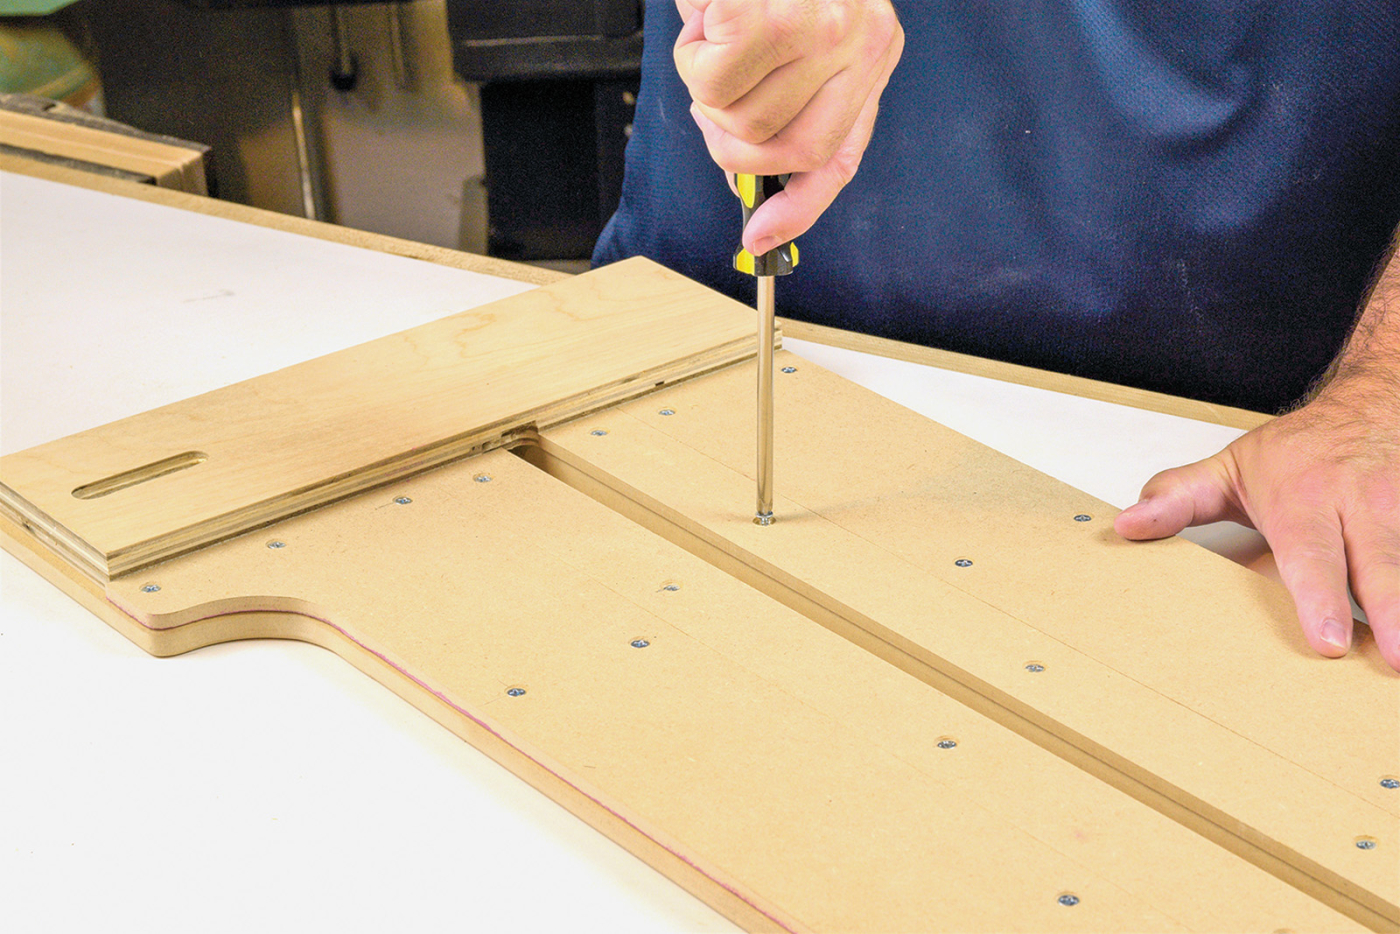
Now all that’s left to do is trim the jig to suit your bit and bushing combination (remember to carefully center your router sub-base first!). Once that’s taken care of, you can pinch the shelf stock between the rails of the jig and tighten down the knobs. Then clamp the jig to your workpiece with a few small F-style clamps and rout the dado.
Sliding Stop Blocks Add Functionality
Since the template-guided jig is made from 1/2“ thick MDF rails, mounting T-track isn’t really an option. So, I came up with an alternate method using sliding stop blocks. The stop blocks have a slot that allows adjustability, and they lock in place with a single male threaded knob. A hardwood strip attached to the stop block helps hold it in position. Just make sure the hardwood strip is sized to fit in the opening of the jig when in use. Since I only use my jigs to make 3/4“ dados, I sized the strips 13/16“ wide and 11/16“ tall. If you like to make 1/2“ dados, you’ll need a thinner hardwood strip.
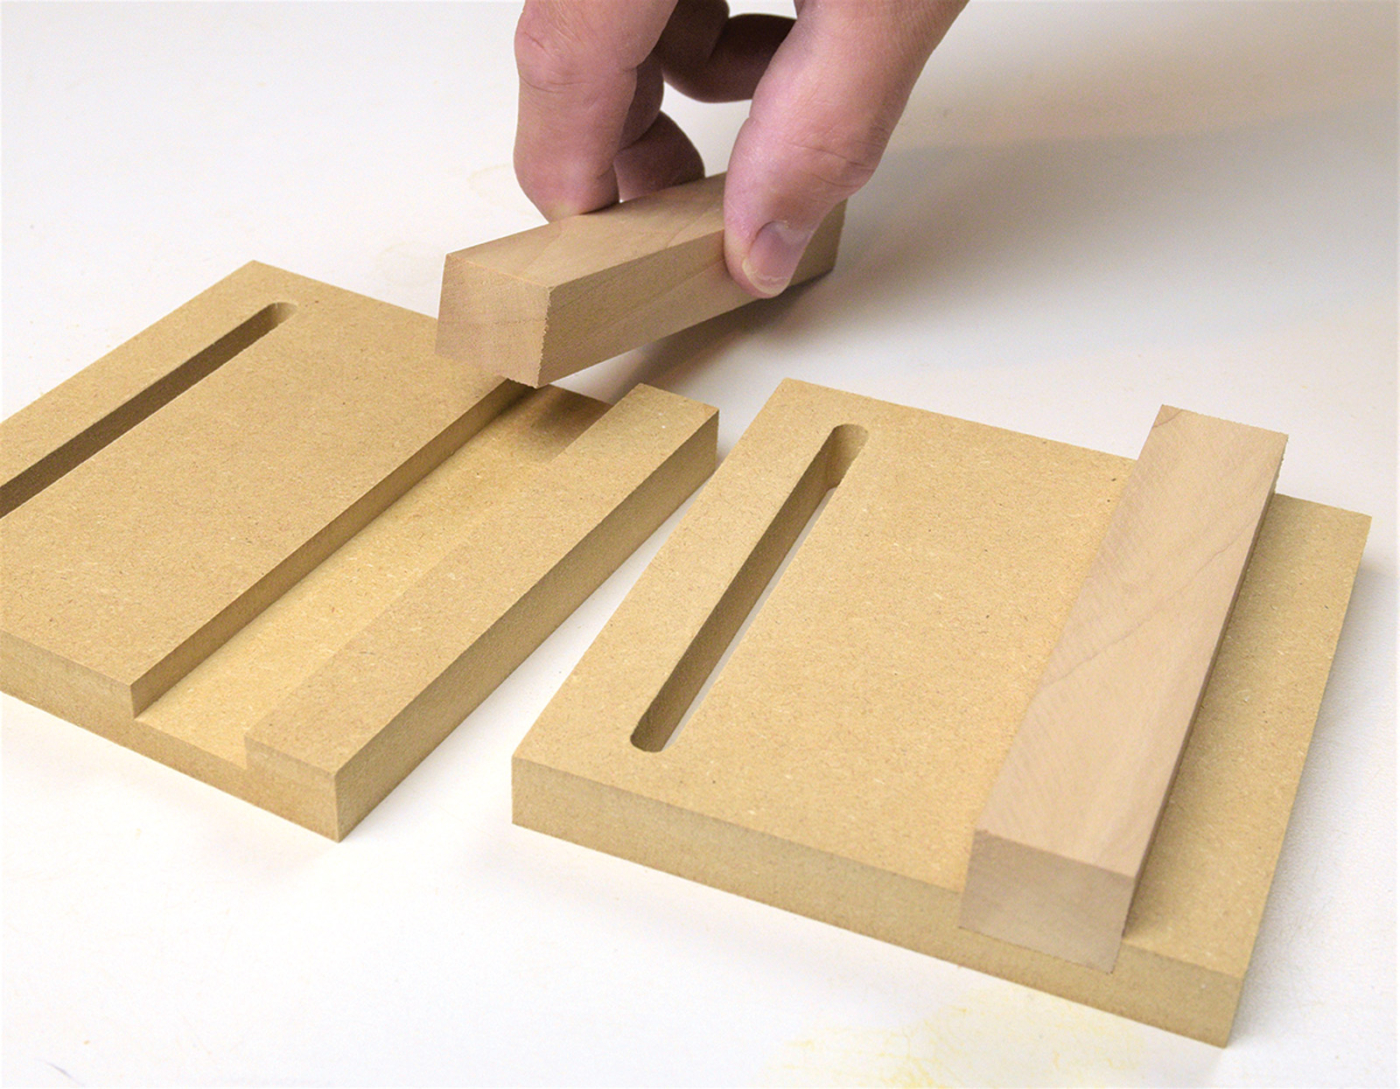
14 Make stop blocks starting with pieces of 1/2″ MDF. Once cut and routed, glue a hardwood strip in the groove to complete the stop blocks.
Make Bearing-Guided Jig
Supplies
6x 1/4” x 20 threaded inserts
2x 5/16” 5-star female knobs; Rockler #51036
2x 1/4” 4-star male knobs; Rockler #51597
#8 x 1″ wood screws to attach cleats to rails
2x 5/16” T-bolts, 21/2” long
If you prefer to use a bearing-guided bit, and skip the guide bushing altogether, this is the jig for you. The black bearing-guided jig is simplicity at its best. The bearing simply rides along the rails of the jig to create a perfectly sized dado every time. The extra thickness of the 3/4“ MDF rails and short-length pattern bit are keys to making the jig work.
When it comes to building this jig, luckily, the two jigs share the major parts in common, and in fact the cleats and rails of the jig are identical except the rails are made from 3/4“ MDF. I built both jigs at the same time, so I made the wide curved rail for one jig, and pattern routed the other to match. Assembly proceeds just the same as before, although you won’t need to add 1/4“ MDF to the underside of the bearing guided jig. In operation, you’ll want to use a 1/2“ long x 1/2“ diameter router bit. One other minor difference relates to the stop blocks for the bearing guided jig. Make the hardwood strip 1-1/16“ wide, so it will fit between the rails.
Pros & Cons of Each Jig
I enjoy using these jigs and reach for both quite often. The bushing-guided jig requires you to install and carefully center the router sub-base. If your sub-base isn’t centered, it will trim more of the sacrificial strip on one side than the other. This can cause fitment issues the next time you use the jig. Luckily, the MDF strips are easily replaceable. On the plus side, the guide bushing lets you plunge into your workpiece at any point without damage to the jig.
The bearing-guided jig is a little trickier to use. In order to not cut into the rails, you need to plunge the bit between them carefully. Once the bearing reaches the guide surface, the cut will proceed predictably. If you make the plunge cut starting over the end cleat, an accidental nick in the guide rail won’t affect the operation of the jig. Or better yet, start with the router plunged just enough for the bearing to contact the rail of the jig. I’m so accustomed to this style of dado jig, that’s not an issue for me. I encourage you to build both versions and see which jig fits best for the work you do.
Using the Exact Width Dado Jigs
(Red) Guide Bushing Jig
 1 – Calibrate
Select the bit and bushing combination you’ll use with this jig. I use a 1/2” down-cut spiral bit and 5/8” O.D. bushing. Use the same combination each time you use the jig. Simply move the router in a clockwise direction to cut the dado or groove. My favorite thing about exact width jigs is that they show you precisely where the cut will be made. There’s no offset to measure or calculations to make. It removes the guesswork and inspires confidence in your work.
 2 – Set Width
But first—use your actual shelf stock to set the width of the opening and tighten the knobs. Note that with the bushing guide jig, you’ll pinch the shelf stock between the sacrificial red strips. Next clamp the jig and workpiece securely to a bench to prepare for the cut. If you need a stopped dado, take a minute to set the extent of the cut with the sliding stock blocks.
 3 – Test Fit
Now test the fit of your shelf stock in the dado. I’ve come to expect precisely fitting grooves and dadoes with this jig and rely on it for large and small cases alike. It handles hardwood shelves just as well as undersized plywood.
(Black) Bearing-Guided Jig
 1 – Set Width
Place a scrap of your intended shelf stock between the rails and pinch the jig closed. Tighten the knobs to secure the movable rail and chuck a 1/2” diameter by 1/2” long bearing-guided bit in your router. Clamp the jig down over workpiece so it’s firmly anchored to the bench. Set the stop blocks as required for your project and rout the dado in a clockwise direction.
 2 – Rout Dado
Make sure to keep the router bit between the rails as you make the initial plunge. With the bearing-guided jig, it’s also critical that the router stays fully plunged for the entire cut. Don’t raise the router bit until after you shut off the router.
How Do They Compare to Commercial Jigs?
There are several jigs and gadgets on the market to help woodworkers make dados with a router. Some of them work, and others are a bit gimmicky. Woodpeckers makes a no-compromises premium dado jig that I’ve tested in my shop. It creates accurate grooves and dados and features robust construction from anodized aluminum, phenolic rails, and stainless-still clamping plates. If ‘only the best’ will do in your shop, then you should give it a look.

15 If you’d rather spend your time getting straight to work on projects, consider Woodpecker’s Exact Width Dado Jig. It has several built-in features including dado stops and a scale, as well as secure clamping plates. It’s very solidly built and performed well in testing.
To see both of these jigs in action, you can watch a video of them on my YouTube channel, The Thoughtful Woodworker.
Here are some supplies and tools we find essential in our everyday work around the shop. We may receive a commission from sales referred by our links; however, we have carefully selected these products for their usefulness and quality.