


We may receive a commission when you use our affiliate links. However, this does not impact our recommendations.
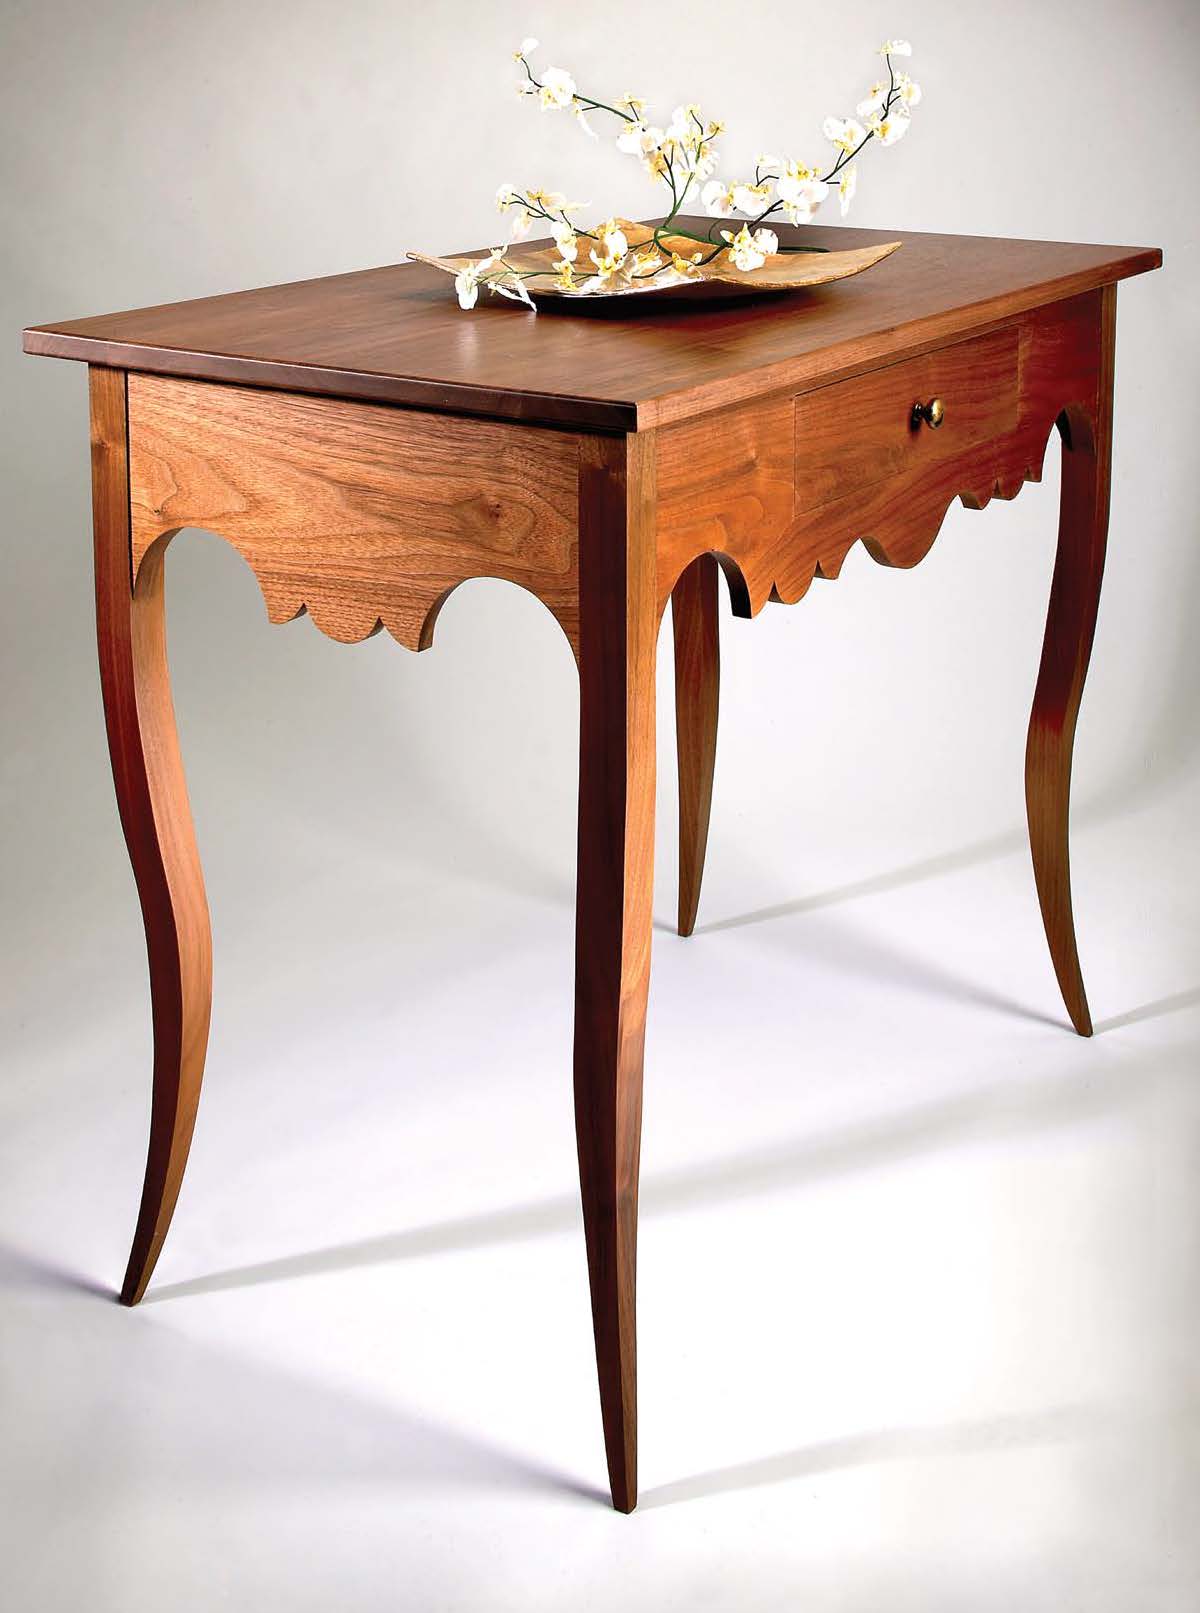
Christopher Schwarz built this lovely and delicate Creole Table for our February 2007 issue (an issue that also includes a nice Greene & Greene side table, Michael Dunbar’s discussion of traditional handscrews, an easy and accurate way to sharpen scrapers and more).
You can read it free here, but I recommend downloading the PDF at the end for the cutlist and illustrations (and the images align better in the text than online). Note that the step photos below are “clickable” – that is, they will get larger if you click on them.
Creole Table
by Christopher Schwarz
 Until recently, Creole-style furniture was a bit obscure, known mostly to a handful of furniture collectors who specialized in pieces made in the Mississippi valley. But that’s changing.
The original version of this 18th-century walnut table sold for $54,625 at a 2003 auction. And other Creole pieces, such as armoires, are commanding prices up to $140,000.
So what is the Creole style? Essentially, Creole encompasses furniture made in the Mississippi valley by furniture makers who were usually French-Canadian. The pieces have lots of French touches, such as cabriole legs, but also have the unmistakable restraint of early American furniture that collectors seek.
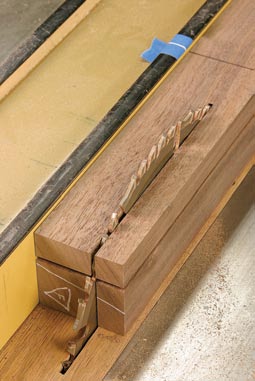
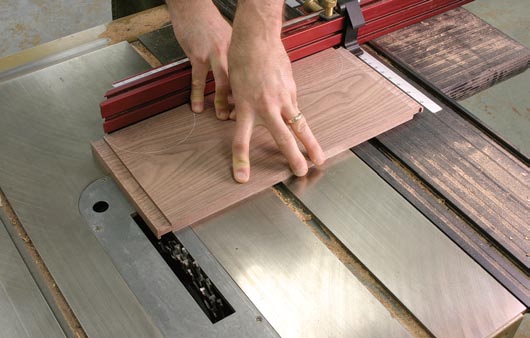
Stop-cuts on the table saw are not my favorite thing. You have to raise the blade all the way to get a cut that ends close to vertical. I have our basket guard raised up here and the saw turned off to show my setup. Use a mark on your fence and the work to indicate when to stop cutting. And don’t pull the work back out of a running saw. Turn off the saw.
This table, for example, looks quite a bit like drawings of 18th-century French furniture from Denis Diderot’s “L’Encyclopedie ou Dictionnaire Raisonné” (1751-1780) – but without the banding, inlay, carving and marquetry.
I first saw this table in the magazine Early American Life and was completely enamored. Our project illustrator, John Hutchinson, took a photograph and produced the construction drawings. And 37 hours of shop-time later, this is the result.
How the Carcase Works
At its heart, the Creole table is a typical apron table, with only a few surprises in its construction: The four aprons are secured to the legs with mortise-and-tenon joints, and reinforced with triangular corner blocks.
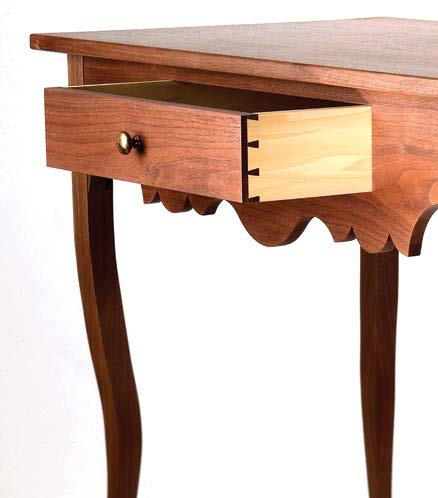
The dovetailed drawer slides in and out on a classic web frame. The top is attached to the base with screws driven up through the corner blocks.
Hanging on those classic bones are a few shapely French curves. The sinuous legs and the scalloped aprons make the table appear difficult to build, but it’s not the curves that will trip you up. If you prepare your patterns with care, the curves will come easily; the real challenge is the overall fit of the parts – but isn’t that always true?
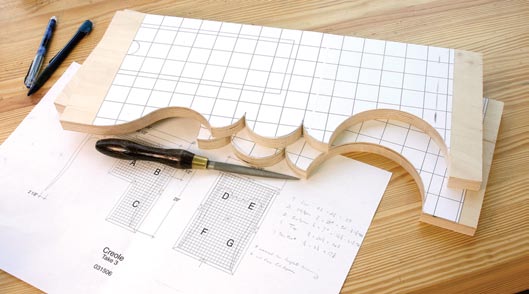
You can use the scaled drawings (in the PDF at the end) to create your own paper patterns, or you can download the patterns from our web site.
Making Patterns
When conquering any complex shape, such as the scalloped aprons, making a template for pattern-routing is a good idea.
There are two patterns for the aprons: One for the side aprons and one for both the front and back. The pattern for the front and back aprons is a mirror image of the left and right sides of the apron. After marking, cutting and routing one end of the apron, you flip the pattern over to do the same to the other end of the apron.
Make your patterns using the drawings or downloadable plans from our web site.

Marking walnut is a challenge. After trying a variety of pens, the best was a white ink pen available from an art supply store. The Sakura Pen-touch (gellyroll.com), costs about $2.50. Here’s a tip about its tip: A light touch will give you a fine line.
Putting the Patterns to Work
Begin construction by shaping the legs. This style of cabriole legs has good points and bad. Good: The shape is simple and easy to cut and smooth. Bad: The legs curve toward the inside of the table. This means that you will have to cut the mortises in the legs after you roughly shape things.
I tried different ways to go about this and the following is the least awkward method. Begin by taking the stock for your legs and cutting one long edge so it parallels the grain of the board. Rip out your four leg pieces.
Mark the shape of the cabriole on two faces of each leg. It helps to bundle the four legs as you make these marks, slashing your chance for a disastrous error.
You could band saw out these leg shapes directly, but you would be in for a bit of fussing when you joined the aprons to the legs. That’s because the straight surfaces of the legs where the aprons attach are now buried inside your leg blanks. Band saw them out and you’ll have a difficult time truing up that surface for joinery.

Make your mortises a little deeper than the tenons are long. The two mortises in the legs may end up meeting a bit at one corner, but that’s OK. You’re not removing material that will ultimately assist in strengthening this joint.
Don’t get me wrong, it’s do-able. I made two practice legs this way to try it. A block plane and a try square are all you need, but it’s a fussy job. So I made another pair of legs by cutting the straight sections with a table saw. This involves stop cuts: You rip the leg to a certain point and then turn the saw off.
This works quite well.
With the stop cuts complete, remove the rest of the waste with a hand saw or your band saw.
Now cut your mortises on the legs because they are still easy to manage with their long straight edges and faces. I used a 1⁄4″ hollow-chisel mortising bit in a mortiser, which is appropriate for the 5⁄8″-thick aprons. The aprons’ tenons are 1⁄4″ thick, 3⁄4″ long and 3″ wide. So start making your mortises 1″ from the top of the leg. Set the fence so the apron will set back 1⁄16″ from the legs.

Here you can see the Shinto Saw-Rasp with a handle. Remove the handle and use the tool with two hands – though some cuts are made one-handed. The Shinto is available from a number of catalog companies, including Rockler (rockler.com) and Highland Hardware (tools-for-woodworking.com).
More Nerve Than Skill
Many woodworkers are spooked by cabriole legs. Cabrioles appear daunting because of the curves and the compound shape. Here’s the truth: Cutting cabriole legs is easy. Designing a nice-looking leg is hard.
If your band saw blade is sharp and well-tensioned (we like a 1⁄4″ skip-tooth blade), the work is easy. Cut the pattern on one face of your leg. Tape the fall-off pieces back in place. Rotate the leg 90° and cut that pattern. Remove the tape and voilà – you’re halfway home.
The second half of a cabriole leg – shaping the sawn surface into something sinuous – is easy with the right tool. Recently I was turned onto a simple and inexpensive tool that is ideal for the job.
Glen Huey convinced me to try out the Shinto Saw-Rasp. It is, in essence, a bunch of hacksaw blades riveted together into a boat-shaped tool. One side is coarse and the other is fine. You can buy this tool with or without a handle. It is a nimble tool and is easy to master, much like a high-quality rasp.
Glue the 3⁄4″ strip back to the apron. Make sure you line up the grain as best you can. On my apron, I positioned my cutline so it would run through some straight quartersawn grain on the apron. That helped conceal the joint line on the finished piece.
I removed the saw marks from the legs with the Shinto’s coarse side and then smoothed things up with the smooth side. After some work with a card scraper, the legs were ready to finish. I had planned on spending an entire day shaping these legs. The Shinto turned it into a two-hour job.
Speaking of Japanese …
Before you cut the tenons and the curves on the aprons, you need to decide what you are going to do about the drawer front. On the original, the drawer front appears to be cut directly from the apron, instead of using a different piece of wood for the drawer front. If you want to do this, too, you’re going to need a couple thin-bladed saws – I like Japanese saws for this.
Here’s how I did it: First rip 3⁄4″ off the top of your front apron piece using your table saw. Once you cut the drawer front free on its remaining three sides, you’ll glue this 3⁄4″ strip back to the top of the apron.
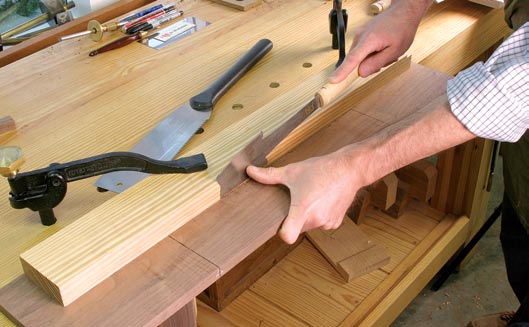
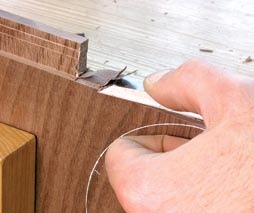
Once you’ve cut the ends of what will become your drawer front, connect the two crosscuts with a rip. A Japanese saw with a curved blade (such as the Azehiki shown here) is ideal. Score your cutline with a sharp chisel, which will make it easier for the saw to follow the kerf. Once you’ve plunged through the board, switch to a Ryoba saw, which is faster because its blade is longer.
Though you could cut out the drawer front freehand, I recommend you clamp a block of wood to the apron as a guide.
With the drawer front cut free you can then tweak the apron to tighten things up if you had problems with your rip cut. You can reduce the width a bit by running the top edge of the apron over your jointer. This is a good idea anyway as you’ll be gluing the strip back in place shortly and want a clean joint.
Now true up all the surfaces that will be your drawer opening. Chisel out the junk in the corners. Smooth the end grain with a file. Now glue the 3⁄4″ strip back onto the front apron.
Fussy but Worth It
Joining the aprons to the legs requires concentration. This joint is highly visible, so gaps are particularly ugly.
Begin by marking the shape of the aprons on all four pieces. This will keep your parts straight as you proceed. Now cut your tenons on your aprons. I use a stack dado set in my table saw for this operation. I guide the work past the blades using a fence on my miter gauge (or the fence on a sliding table). A stop on the fence keeps my cut positioned. This technique is quick – one blade setup cuts both the cheeks and the shoulders of the tenon. And it is safe.
A fair amount of downward pressure ensures accuracy with this technique. If you don’t keep the board pressed down flat, it will try to rise up on you. Even a bit of this will result in a too-thick tenon. If you are not sure that you are holding the piece down firmly, make a second pass over the blades.
Once you have cut the face shoulders and face cheeks, you can cut the edge shoulders on a band saw.
And Heading Into the Curve
The scalloped shapes on the aprons are a cinch if your templates are made well. The only wrinkle to the process is leaving a little bit of material behind on the aprons to make them robust enough to survive assembly.
The weak spots on the aprons are where they curve dramatically to meet the legs. By leaving an extra 1-1⁄4″ of the apron behind you create a place where this weak spot can be clamped without snapping it off.
Mark out your strategy for cutting the apron, then cut the scallop shapes. With the rough shapes cut out, I then clamp the pattern to the workpiece and use a router with a bearing-guided pattern bit to smooth out the arcs on the aprons. A laminate trimmer has all the guts you need. However, the tight transition points must be cleaned up by hand.
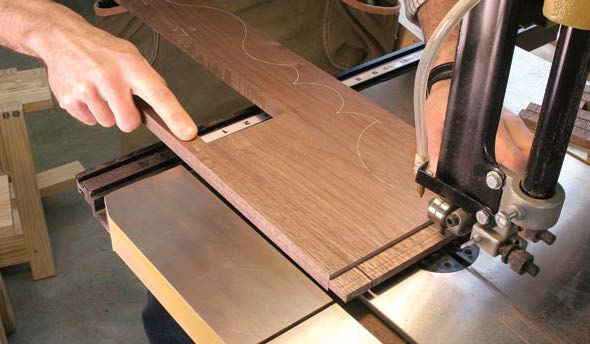
Trim the edge cheeks of your aprons with a band saw. Then cut the edgeshoulders. Cut close. But not too close.
Cleaning up the corners is easy if you’ve cut out your aprons carefully on your band saw. A few quick cuts with a sharp chisel will bring the tight corners into line.
Fit for a Fit
Now settle in and fit each joint. Your best friends during this process are a small square, a sharp eye and an old joiner’s trick. The square can show you where things are amiss. And your sharp eye?

I place relief cuts at some of the tighter curves. This is efficient because the waste falls away at the same time I need to turn the piece around to cut from the other direction. Note how I’ve left some extra waste near the tenons to strengthen the apron’s curve at that point.
Every time you try the joint, scrutinize the area between the leg and apron. If you can’t close this joint with hand pressure, find out what is preventing it from closing. Don’t count on the clamps to fix it.
In the end, your best bet is to slightly undercut the tenon shoulders on all the inside surfaces. This “cheat” was handed down to us by 17th-century joiners, who would undercut a shoulder for a tight fit.
This approach doesn’t weaken the joint much. Most of a tenon’s strength
is in its length, according to studies of the joint by the U.S. Forest Products Laboratories. I undercut my interior shoulder with just a pass or two of a shoulder plane.
Before you assemble the table’s base, prepare all the exterior surfaces for finishing.
A wide paring chisel makes short work of the waste left from cutting the edge shoulders. Work carefully here and avoid cutting past the shoulder line. If you are skittish, use a 3⁄8″-wide chisel, which will keep you clear of the shoulders, but it will be a bit harder to steer in the cut.
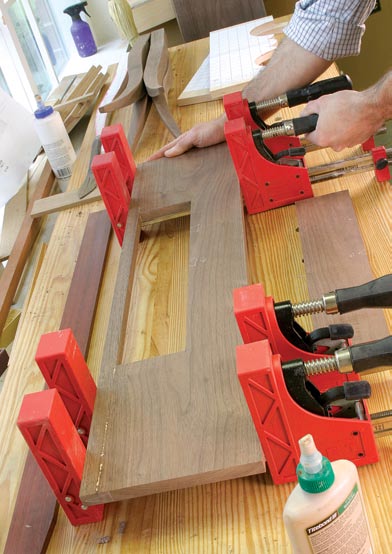
Glue up your base and reinforce it in two ways. One: Add corner blocks that tie together the aprons. My corner blocks are in the shape of triangles and cut from pieces that are 3⁄4″ x 3-3⁄8″ x 3-3⁄8″. I notched the corner blocks around the legs and then glued and screwed them to the aprons.
The second reinforcement is at the point where the aprons meet the legs. I was worried that the weak short grain here would pop off as I sawed or chiseled it.
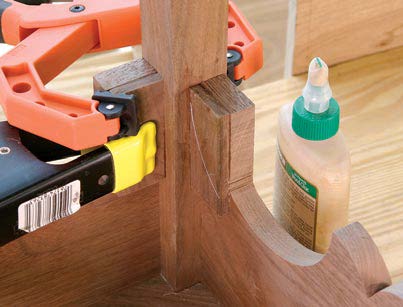
So I glued a 1⁄4″-thick backing block behind each curve. The grain of these runs 90° to that of the apron, so they glued well to both the leg and the apron. And because they are so small, wood movement won’t (realistically) ever be a problem.
Making the Cut (& Guts)
As with all things in woodworking, if you do enough preparation work, then actual execution is smooth and quick. Such was the case as I cut the ends of aprons to their final shape with a coping saw.

Because I cut right on my line, there is little material to remove with the router and pattern bit. I clamped the work on top of the pattern and used a bit that has the guide bearing at the bottom of the bit. This allows me to work on top of my bench and prevents me from exposing more of the bit than necessary.
Once you make the saw cut, clean up your work with a chisel, rasp and sandpaper.
The inside guts of the table are conventional. The drawer rides on a web
frame that is attached to the front and back aprons with glue, screws and two cleats. I made the web frame using mortise-and-tenon joints. After I glued up the web frame’s joints and allowed them to dry, I glued the frame between the front and back aprons. Then I glued and screwed cleats underneath the web frame to strengthen the assembly.
You also should install what is sometimes called a “drawer kick.” The kick is a single stick of wood between the front and back aprons that is above the drawer. It keeps the drawer from drooping when it is pulled out of the case. I attached the kick to the table base with glue and pocket screws.
When you glue up the base, the extra waste you left on the aprons comes in handy. Though most authorities on joinery will tell you not to bother gluing the end-grain shoulder area at the bottom of the apron, I think it’s essential here. You want all the help you can get when you cut the waste away, and modern PVAs do a better job of gluing end grain than most people realize.
My Style of Drawers
When most woodworking magazines describe how to build a drawer for a project, it’s usually something like: Build the drawers using the techniques you prefer. While that sounds like the author ran out of steam, I think it’s actually a fair statement.
I’ve seen a lot of drawers made by a lot of craftsmen. Each one is a little surprise when I pull it out and a reflection of that woodworker’s personality.
Here is how I go about it and why. Drawers have a hard life. So if I want a drawer to last 200 years instead of 20, I prefer the dovetail joint for the corners.
I build most of my drawers using 1⁄2″-thick poplar for the sides, back and bottom. I use 1⁄2″-thick wood for the front that matches the species of the carcase. I join all the corners with through-dovetail joints and then glue a piece of 1⁄4″-thick veneer (resawn from the piece cut from the apron) on the drawer front and trim it to the size of the drawer opening.
This strategy allows me to stretch my supply of well-figured wood for drawer fronts.
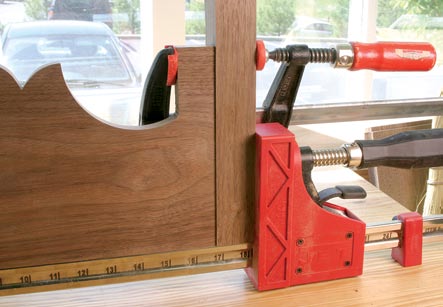
I glued in the backing blocks with spring clamps. One clamp pressed the block to the apron; the other clamp pulled the block against the leg. Here I’m removing the clamps after the glue has dried. With the clamps off, mark the final shape of the apron on the inside as shown.
The other detail is how I fit the bottom into the drawer. I plow a 1⁄4″ x 1⁄4″ groove in the sides and front to hold the bottom. The groove is located 1⁄4″ up from the bottom edge of the sides and front. I make the back of the drawer 1⁄2″ narrower than the sides and front, which allows me to slip the bottom in place.
Here are a couple other details about the bottom: I cut the bottom so the grain runs from left to right in the drawer, so the seasonal expansion and contraction occurs at the rear of the drawer. I also cut a 1⁄4″ x 3⁄8″-wide rabbet on three sides of the bottom that allows the
bottom to slide in the grooves cut in the sides and front.
The bottom is secured to the back with a single nail. Be sure to cut the bottom so there’s a little expansion room – I make the bottom 1⁄4″ narrower overall.
Once I assemble the drawer with dovetails, I glue the drawer front on and trim it to fit the assembled drawer. Then I fit the drawer in the carcase so there is an even gap (about 1⁄32″) all the way around the drawer front.
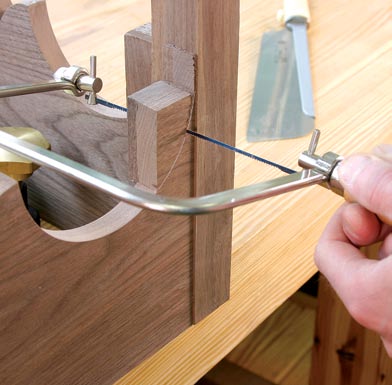
Having the shape of the apron marked on both the inside and outside of the work helps keep the blade square through the cut.
Finally, I clamp the drawer in the table’s base and then glue the drawer runners to the web frame so they are snug against the drawer.
Assembling the Top
Tabletops are a bit of a blend of art and science. A bit of effort can result in a top that looks right and is easy to plane or scrape to get it ready for finishing. So choose your boards wisely.
I eased all the edges of the top with a small roundover bit in a trim router. Then I screwed the table’s base to the top. I made the clearance holes at the rear corner blocks oval-shaped to allow the top to expand a bit.
Finishing & Hardware

Here you can see how the inside of the table works: corner blocks reinforce the aprons, a web frame supports the drawer and a drawer kick stops the drawer from drooping. The only thing missing is the drawer runners to guide the sides of the drawer. Those come later.
The original table looks redder than I expect natural walnut to. Perhaps it was originally stained or has acquired a patina during the last 200 years. My finish consists of a couple coats of amber shellac, which I applied with a small natural-bristle brush and a rag.
After the shellac dried, I applied two coats of spray lacquer that has a satin sheen. After the finish cured, I rubbed it out with a plain brown paper bag.
The knob is a simple 25mm knob from Lee Valley Tools (item #01A0525, $3.30. 800-871-8158 or leevalley.com).
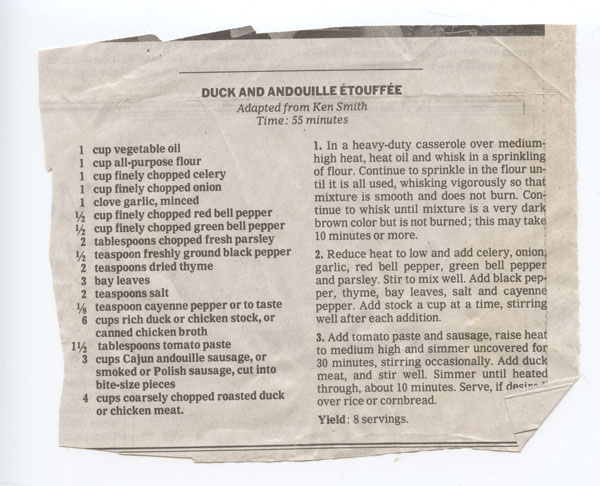
When complete, the table is quite a spicy charmer. If you want the complete effect in your home, try serving it up with some duck étouffée – you’ll find the recipe below. PWM
Download the PDF of this article here:
CreoleTable
Here’s the author’s favorite étouffée recipe (I’ve made it with chicken, that I bought pre-roasted; it is delish). — Megan Fitzpatrick
Here are some supplies and tools we find essential in our everyday work around the shop. We may receive a commission from sales referred by our links; however, we have carefully selected these products for their usefulness and quality.


Megan,
Love that table! I still think it’s Chris’s masterwork. The illustrator ignored (wasn’t aware of) some the cardinal rules for skirt boards and table legs. Chris stepped up to the plate, solved the impossible problems, and knocked it out of the park. Because of its delicacy, I’ve always wondered how it’s held up.
Al’s spectacular photography was the icing on the cake.
John Hutchinson
Megan,
Thank you so much for the free table plans and recipe.
I have to get started on both this weekend:)
Creole food is one of my favorites.
Have you tried making duck gumbo yet?
If you need a good recipe for that let me know.
Ciao
Rocky