


We may receive a commission when you use our affiliate links. However, this does not impact our recommendations.
 Great ideas from space-challenged woodworkers just like you.
1. Sliding Wall-O-Tools
2. Pantry Door Tool Cabinet
3. Instant Surface
4. Expandable Parts Rack
5. Clamp Camp
6. Small Parts Carousel
1. Sliding Wall-O-Tools
I built this 8-ft.-long shelf system to take advantage of the narrow space in the corner of my garage. When the unit is “closed,” I’ve got ready access to the tools hanging on both doors. By sliding one or both doors, I can get to every inch of shelf space behind them. I got everything I needed to build this unit at a home center.
The key was to mount the pegboard doors at least 5 in. apart, so I could load the back door with tools and still have it pass behind the front door. I bought two 96-in. Overhead Bypass Door Sets so each door could slide on its own track. Each kit contains a single length of track designed to hold both doors, two pairs of door hangers and a tracking guide designed to keep both doors in line at the floor.
How I Built It
I installed the shelves first, leaving enough room underneath to store my lawnmower and other garage essentials. All three shelves came from a single sheet of plywood. The upper shelves are 11 in. wide and the bottom one is 20 in. I used 11-in. doublemount brackets for the upper shelves and 14-in. double-mount brackets with support arms for the wide bottom shelf.
I mounted the sliding-door tracks on a 2×10 header that I anchored directly above the wide shelf with lengths of slotted angle extending from both the ceiling and wall.
To make the sliding doors, I cut a single sheet of pegboard in half and framed both pieces with 1×2 stock (each door has four vertical stiles for rigidity). I suspended each door from four hangers (middle photo, below) and fastened the tracking guides, one per door, on the wide plywood shelf. After installing the doors, I blocked the open end of the tracks with a stop.

The doors hang from widely spaced tracks mounted on a 2 x10 header. Lengths of slotted angle hold the header securely in place.
 The doors glide smoothly on roller-equipped hangers. Each track has two grooves, so you can easily change the spacing between the doors and shelves, if necessary.
 Each door has its own tracking guide. My system uses two sliding-door hardware kits. Each kit contains one guide designed for two doors. I customized them with a hacksaw.
-Sue Brunclik
 2. Pantry Door Tool Cabinet
Inspired by the pantry cabinet in the kitchen of our new house, I built this compact version for my workshop. It has the same deep double-hinged doors that make everything inside easy to reach. I used 3/4-in.-thick stock so I could use screws to hang tools inside. The thick back made it easy to fasten the cabinet to the wall.
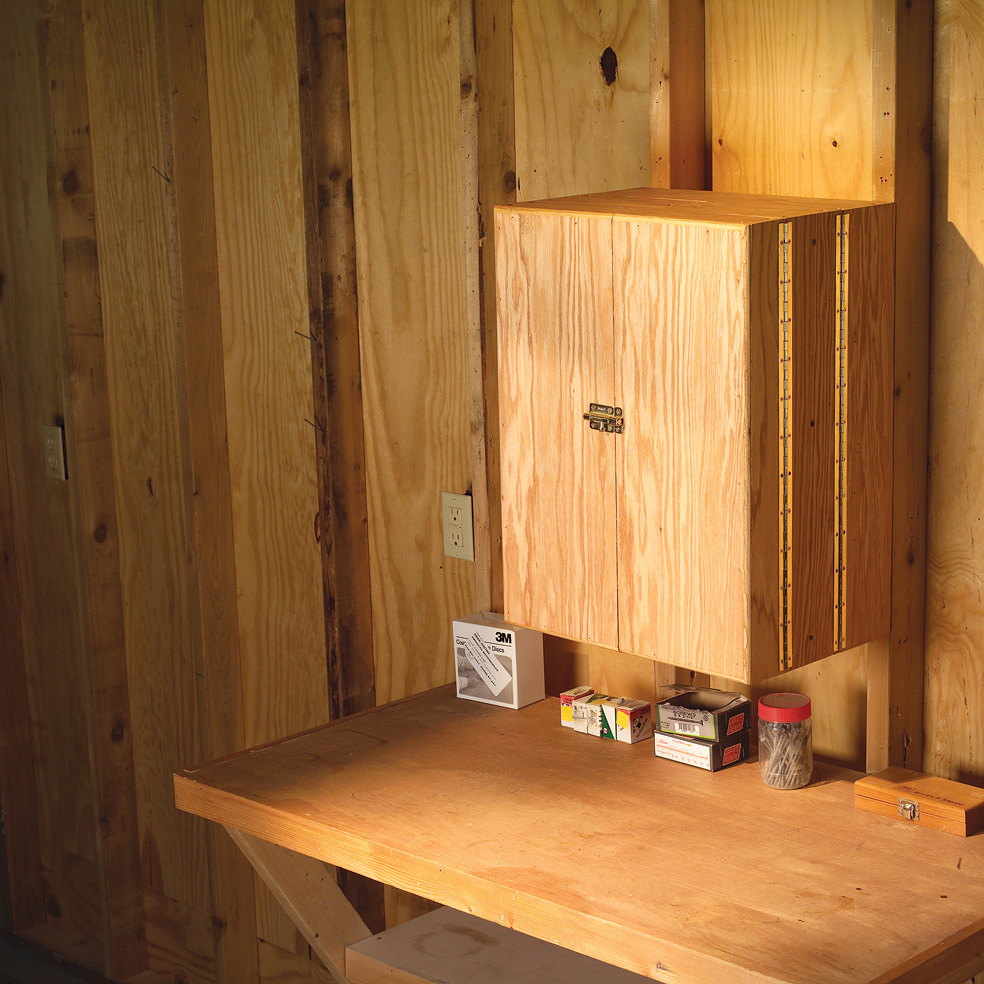 I used less than a sheet of 3/4-in.-thick plywood and two 4-ft.-long continuous hinges to build my cabinet. I got everything I needed at the local home center.


How I Built It
1. Cut the cabinet frame pieces to size. Rabbet the sides (A) for the ends (B) and the back (C). Rabbet the ends for the back, too.
2. Glue the cabinet frame and back simultaneously. Make sure the assembly is square before you drive the nails and screws.
3. Install the shelves (D). Drill holes for router bits and other accessories before installation. Bevel the shelves’ back edges to match the slope that works best for you. Screw the shelves from the back and nail them from the side.
4. Cut the door frame pieces. Rabbet the door sides (E and H) for the ends (F and J).
5. Cut or rout grooves in the inner door frame pieces (E and F) for the dividers (G).
6. Assemble the inner doors. Make sure they’re square.
7. Round over the edges and rout rabbets around the outer door faces (K).
8. Assemble the outer doors. Make sure they’re square.
9. Cut the hinges to length with a hacksaw.
10. Lay the cabinet on its back to install the doors. Clamp the inner doors in position on top of the cabinet. Then attach the hinges.
11. Clamp the outer doors on the inner doors and attach the remaining hinges.
12. After hanging the doors, install magnetic catches and mount the latch.
-Ernest Blair
 3. Instant Surface
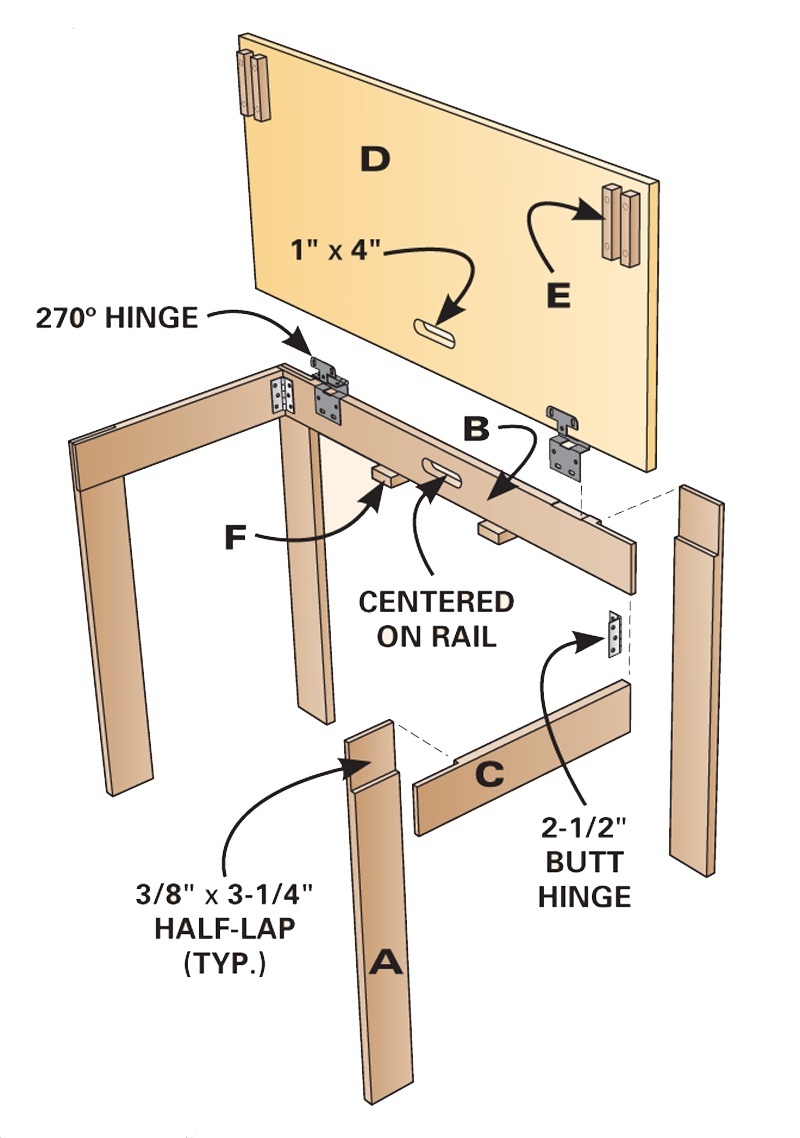
In my compact shop, everything has to be portable and stowable, including my work surfaces. Whenever I need tabletop space for processing parts, milling boards or even assembling a project, I whip out this little gem. It’s easy to maneuver because it folds flat for storage and weighs less than 25 lbs. It sets up in seconds and is surprisingly rigid.

How I Built It
1. Cut the legs (A) and rails (B and C) to size.
2. Cut the hand hole and mortises for the 270-degree hinges in the back rail.
3. Cut half-lap joints in the legs and rails.
4. Lay the back assembly on your bench and clamp the swing-leg assemblies on top of it in the open position. Make sure the top edges and outside faces of the swing-leg rails (C) are flush with the top and outside edges of the back rail (B).
5. Screw on the butt hinges.
6. Install the 270-degree hinges and fasten the top (D).
7. Transfer the location of the hand hole from the back rail to the top and cut it out.
8. Turn the table upside down, swing the legs wide open (so they bear against the back rail) and fasten the cleats (E and F).
-Tim Johnson
Source
Woodworker’s Hardware: Full overlay 270-degree hinge, # C374, (2 required).
 4. Expandable Parts Rack
When I worked on a big project, every surface in my shop used to get covered with stacks of parts. While visiting a small production shop, I saw an expanding metal rack in the finish room, loaded with kitchen cabinet doors.
A light bulb went on in my head and this wooden version now graces my shop.


How I Built It
1. Cut all parts to size and drill the bolt holes.
2. Drill angled holes for the dowel support arms (A) in both edges of the uprights (B).
3. Attach fixed brackets (C) to the top of each upright.
4. Rout rabbets in the cleats (D) and attach them.
5. Glue and screw the legs (E) to the uprights after drilling holes and installing the caster sleeves.
6. Attach the foot (F) to the bottom of each sliding bracket (G) and then bolt these brackets to the scissor arm (H). The bolt head goes against the bracket, the wing nut against the arm.
7. Install the sliding brackets between the cleats on the uprights and position them at the bottom. Rotate the scissor arms upward.
8. With help from a friend, stand the uprights opposite one another and bolt the scissor arms to the fixed brackets on the opposing uprights (again, bolt heads against the bracket).
9. Install the spacer (J) and bolt the scissor arms together.
10. Install the swivel casters and fasten a mailing tube to store the support arms.
-Jock Holman
 5. Clamp Camp
I’ve got a lot of clamps, but they don’t take up much space. I simply drilled 5/8-in.-dia. holes through 3/4-in. plywood at a slight upward angle and glued in 9-in.-long 5/8-in.-dia. dowels. Each pair of dowels holds six clamps, so I can hang 18 adjustable clamps and four spring clamps in only 2 sq.-ft. of wall space.
-Tim Johnson
 6. Small Parts Carousel
While visiting an antique shop, I discovered a way to store all that indispensable small stuff that used to clutter my workshop. On display was a rotating bolt cabinet from an old-fashioned hardware store. When I got home, I designed this carousel that rotates on inverted swivel casters. It’s easy to build, because there’s no complicated joinery. All the parts are cut to size and assembled with glue and screws.
My design requires 1-1/2 sheets of plywood, a quarter sheet of 1/8-in. hardboard, six swiveling casters, a 1-1/4-in.-dia. hardwood dowel and a 3-ft.-long 2×4. I used Tapcon cement anchors to bolt this baby to the floor. I got everything I needed at my local home center.
 Assembly is easy, because everything is screwed and glued. Stagger the shelves and fasten them to the two narrow uprights. Then fasten these assemblies to the wide upright.
 The carousel rides on casters and rotates on a large wooden pin.


How I Built It
1. Cut and smooth the round carousel bottom (A) and base (B).
2. Drill 1-1/4-in.-dia. holes through the centers of both pieces.
3. Cut out the shelves (C). Use the round carousel bottom as a template for the curved edges.
4. Mark the locations of the shelves on the two narrow uprights (D) and fasten them. Space the shelves to suit your needs, but be sure to stagger them, so they’re easy to fasten.
5. Attach the two shelf/upright assemblies to the wide upright (E). Note: These assemblies must not be mirror images!
6. Fasten the carousel bottom to the completed shelf assembly.
7. Fasten the casters to the base (photo at lower left).
8. Attach the six feet (F). If your bin is going on an unfinished cement floor, use pressure-treated 2×4 stock for the feet.
9. Attach the center foot (H) to the base and glue in the dowel (G).
10. Position the base and level it with shims.
11. Anchor the base to the floor.
12. Drill a 1-1/4-in. hole in the glued-up mounting block (J) and fasten it to the carousel bottom.
13. Mount the carousel on the base.
14. Glue and screw the shelf edges (K). Cut them to length after installation.
-Jeff Timm
Here are some supplies and tools we find essential in our everyday work around the shop. We may receive a commission from sales referred by our links; however, we have carefully selected these products for their usefulness and quality.


Been organizing my shop for maximum space, these 6 space saving ideas are the best most practical I’ve come across. Keep it up great. Thanks Frank Debooy.
Very useful. Thank you for sharing!