|
You can find a place for every
conceivable sewing notion in this
Shaker-inspired chest of drawers.
Mix 'n' match modular trays fi t perfectly
in the middle drawers. Store patterns or
magazines in the large lower drawer.
There’s enough compartments for a
complete sewing kit.
You’ll make the most out of your
router and half-blind dovetail jig when
you build this cabinet. Not only are the
drawers dovetailed, but the case is as well!
All the joints are modern variations of the
dovetails made by Shaker cabinet-makers
150 years ago.
Tools and materials
In addition to a standard set of power tools, you’ll need a halfblind
dovetail jig and a biscuit joiner. Any brand of jig will do.
I’ve based the dimensions of this case on the dovetails made by
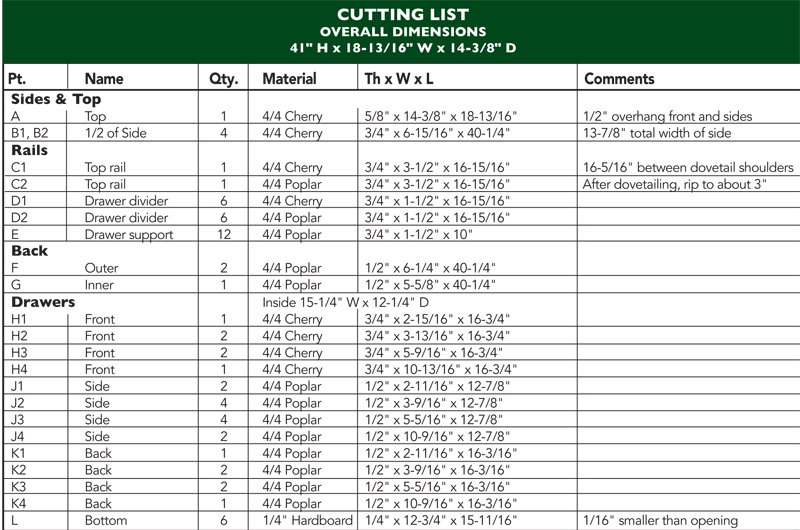
a Porter-Cable jig. You’ll have to slightly alter the Cutting List, below, if your jig cuts wider or longer dovetails (see "Changing
Dimensions to Suit Your Jig", below). A router table
makes cutting the casework dovetails a lot easier.
The chest requires about 25 bd. ft. of 4/4 primary wood and
25 bd. ft. of 4/4 secondary wood. I used cherry and yellow poplar. The modular trays for each drawer are
made by Rubbermaid and are available at sewing centers
nationwide. I bought the drawer
pulls from a company that specializes in Shaker reproductions
(see Sources, below).
The sides
Be a stickler for fl atness throughout this project, particularly
when you mill and glue up the sides. You’ll go nuts trying to
fi t dovetails in cupped or warped boards.
Begin by making the case; then build the drawers to fit.
(Here’s a woodworking truism: “Always make the holes first,
and then the parts that go into them!”) Start building the case
by milling and routing the sides. They’re split in half because
they’re too wide to fi t into a standard dovetail jig.
Mill the wood for sides B1 and B2. Cut them to width and
length, and mark the front and top. Avoid sapwood on the
front edge.
Next, mill the top rails C, dividers D and supports E. They’re
all the same thickness. (Make a few extra supports E as test
pieces.) The parts that show in the front of the case (C1 and
D1) are made from cherry, while those that don’t show (C2 and D2) are made from yellow poplar. Rip all
parts C and D to width, and then cut
them all to the same length.
Set up your half-blind dovetail jig and
cut dovetails in the sides and top rails
(Photo 1). The two pieces aren’t the
same width, so chances are you’ll cut an
extra socket in the side. No big deal. It
won’t show.
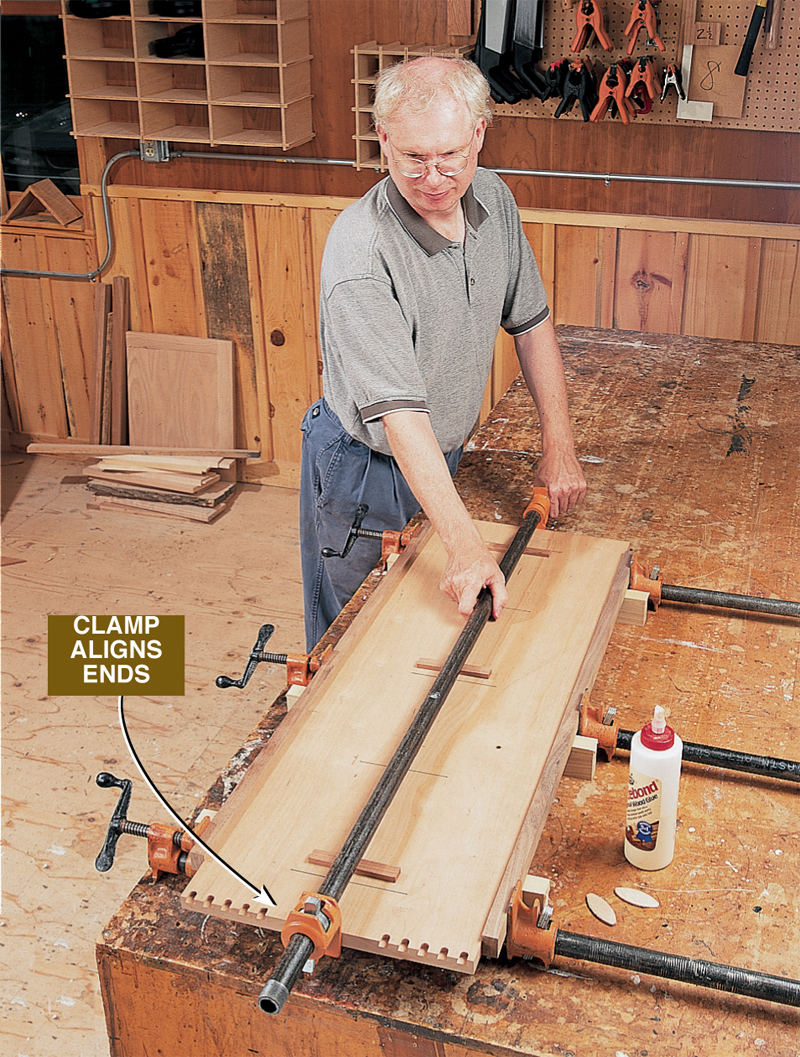
Join the sides together with biscuits or
splines (Photo 2). Glue the sides with
the help of one long clamp to align the
ends (Photo 3).
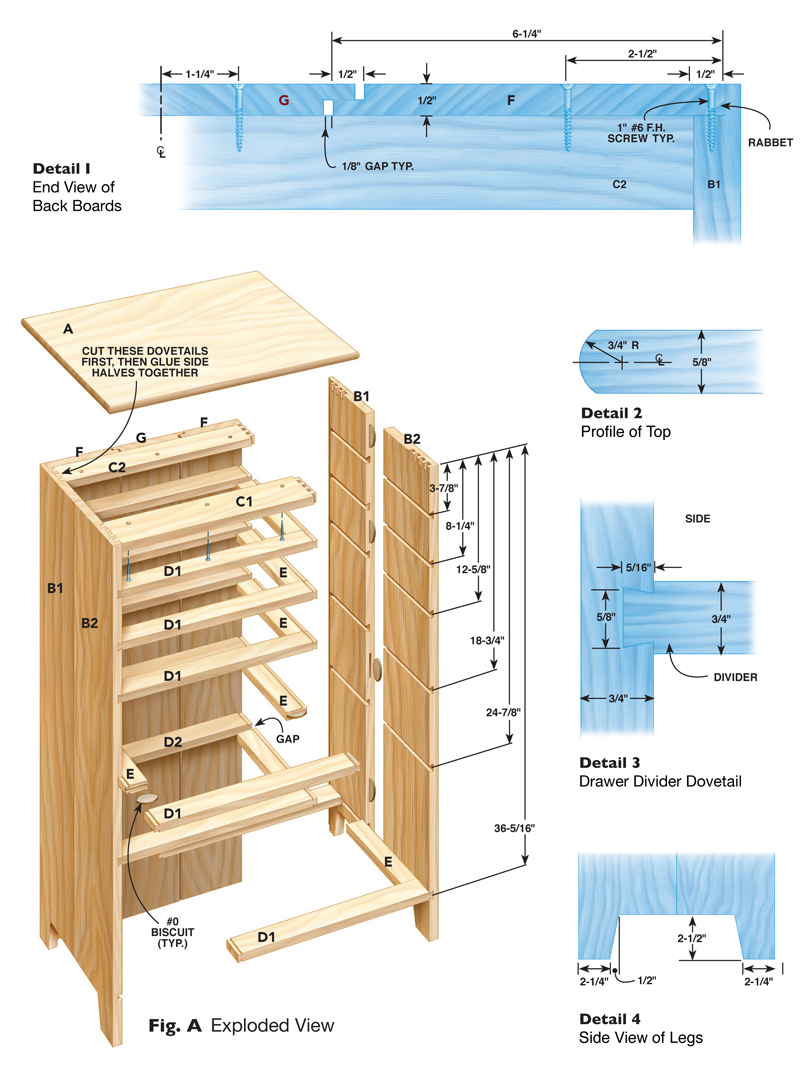
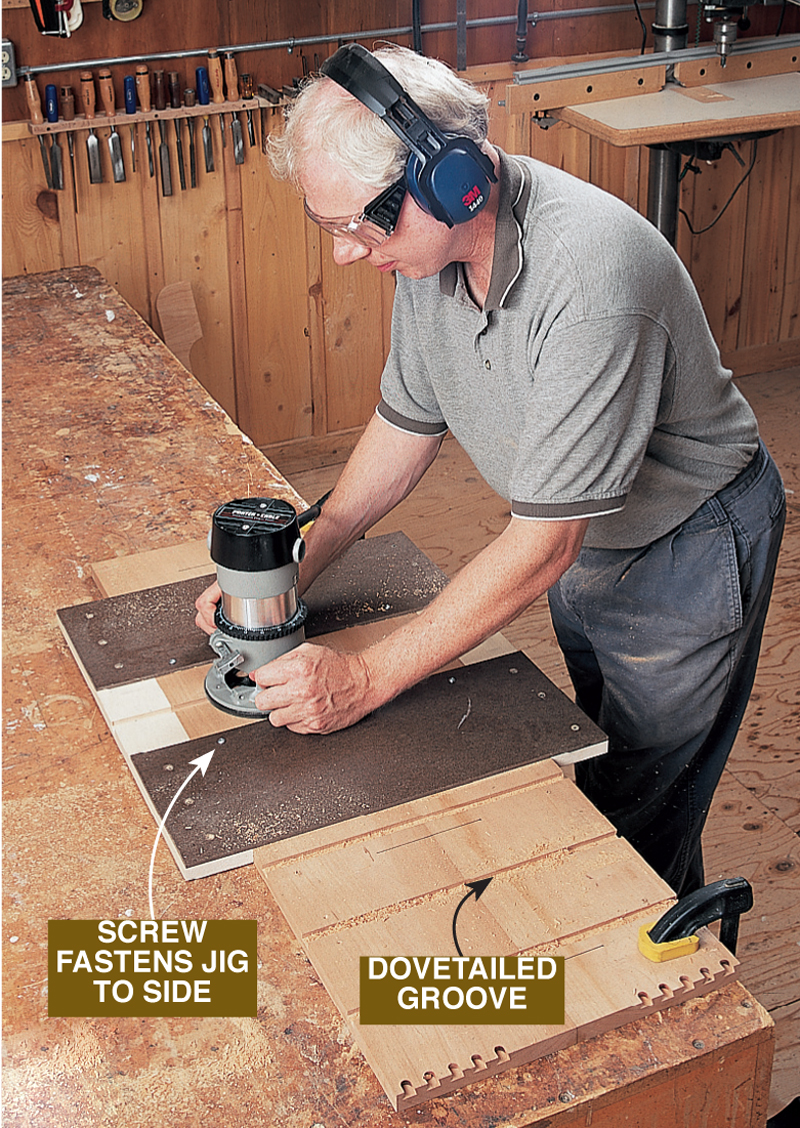
Now, make sliding dovetails to hold
the drawer supports (Fig. A, Detail 3). Begin by laying out the centerlines of
each dovetail on the outside face of a
side (for the dimensions, see Fig. A).
Then make a jig for your router (Fig. B)
and have at it (Photo 4). I screwed the
jig to the side for the most consistent
results. This pays off when you fit the
supports and dividers to the dovetailed
slots. Don’t mind the screw holes.
They’re on the inside of the cabinet, after
all.
Lastly, rabbet the rear edges of the
sides to hold the back (Fig. A, Detail 1).
Saw out the legs on the bottom of the
sides (Fig. A, Detail 4).
Rails, dividers and supports
Every one of these pieces is dovetailed in
a different way, but don’t worry; setting
up your router to make safe and accurate
cuts is easy.
You’ve already cut half-blind dovetails
on the top rails C, but with the rabbet cut
for the back boards, rail C2 has to be
ripped about 1/2" narrower. The back
boards sit on top of the rail and are
screwed into it, so cut the rail just enough
to match the rabbet (Fig. A).
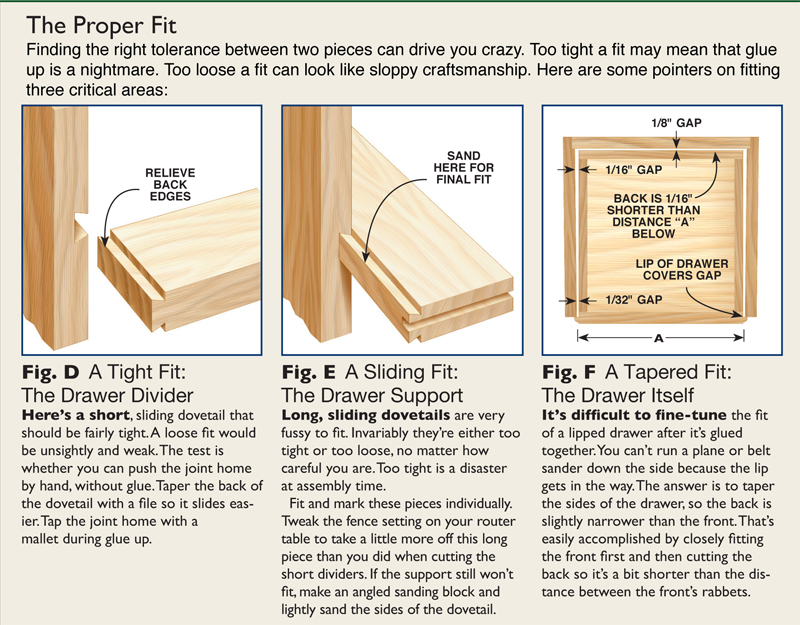
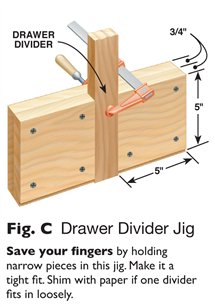
Dovetail the ends of each divider D on
a router table (Photo 5). It’s dangerous to
hold such a narrow piece on end by itself,
so make a jig to hold it (Fig. C). Setting
up the cut is kind of fussy (Fig. D), so
chew up your test pieces before cutting
into the good stuff. The length of the
router-table dovetail must exactly match
the length of the dovetails you made with
the half-blind jig. No problem. Set the
height of the bit in the router table
directly from the dovetailed end of one of
the top rails C.
Cut sliding dovetails on the drawer
supports E with the same setting on the
router table (Photo 6 and Fig. E).
Cut biscuit slots in the ends of the supports
E and dividers D1 (Photo 7). Mark
the top sides of both parts so you won’t
accidentally fl ip one during the glue up.
A spline or tongue-and-groove joint made
on the router table would also work here.
Assembly
Gluing up the case is quite easy because you only add one
divider at a time. Plus, you won’t need dozens of clamps! The
divider’s dovetailed ends hold themselves in place.
Begin by inserting (without glue) a few of the dividers D1 and D2 to square up the case. Then, glue the top rails C1 and
C2. Glue each of the front dividers D1, starting at the top
(Photo 8).
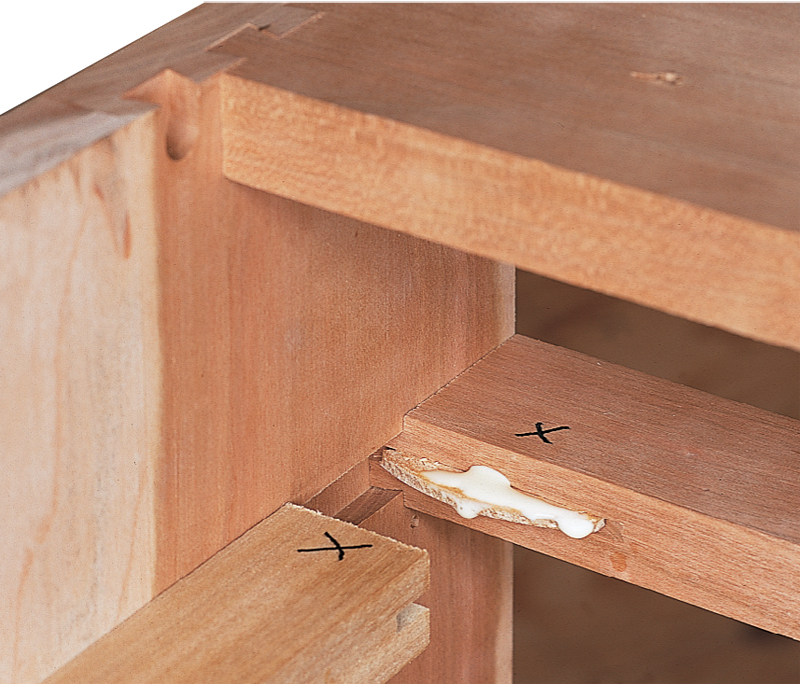
Leave the lowest rear divider D2 in place and remove the
others. Now you have room to glue supports E to the front dividers D1 (Photo 9). Clamp the supports to the divider.
Finally, glue all the rear dividers D2. Make sure their outer edge is flush with the bottom
of the back board rabbet. There’s a gap between the back of support E and each divider
D2 to allow for wood movement of the case sides (Fig. A).
Changing Dimensions
to Suit Your
Dovetail Jig
You’d think all half-blind dovetail
jigs would cut the same size
dovetails, but they don’t. Both
their length and width vary from
jig to jig. We’ve based our Cutting
List on the dovetails made
by a Porter-Cable jig. They’re
5/16" long and spaced 7/8" on
center. Here’s what to watch
out for if you’re using a different
dovetail jig:
– Drawer thickness. Longer
dovetails require a 13/16"
thick front so they don’t cut
into the drawer lips. Make the
rabbets 7/16" deep.
– Drawer sides. The
upper half-pin may not work
out. Change the width of the
drawer parts to get a balanced
look.
Our case and drawers are
dimensioned to fi t Rubbermaid
modular trays. If you want to
use these trays, but cut your
parts on a different jig, pay
attention to these details:
– Length of rails and
dividers. The width of the
drawer opening is fi xed. So the
distance between the dovetail
shoulders is fi xed, too ( it’s
noted in the Cutting List).
Change the overall length of the
rails and dividers to suit your
dovetails.
– Length of drawer
sides. Longer dovetails will
reduce the inside depth of the
drawer. Compensate by adding
length to the drawer sides.
Drawers, back and top
See "Making Lip Drawers with a Dovetail Jig" for complete how-to instructions.
Fit the drawers to the case. There should be 1/16" clearance between the tops of a drawer
side and the divider above it (1/8" for the big drawer).
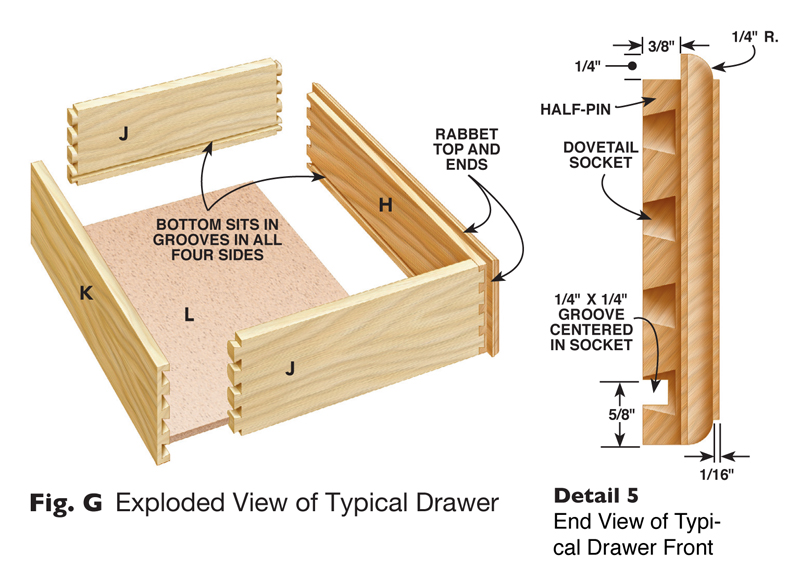
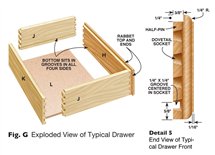
The drawers have trapped bottoms (Fig. G). I used tempered hardboard for the bottoms
because it’s inexpensive and doesn’t show once the drawer is full. You could use
hardwood plywood instead. I’ve dimensioned the drawers so there’s a half-pin showing
at the top and bottom (Detail 5). Note in the Cutting List, that the back of each
drawer is 1/16" narrower than the distance between the rabbets in the front (Fig. F).
This kind of tapered fit helps drawers slide smoothly, in any project.
Drill holes in the center of each drawer front for pulls. You could turn your own, but
I found some high-quality mail-order pulls that look terrific (see Sources).
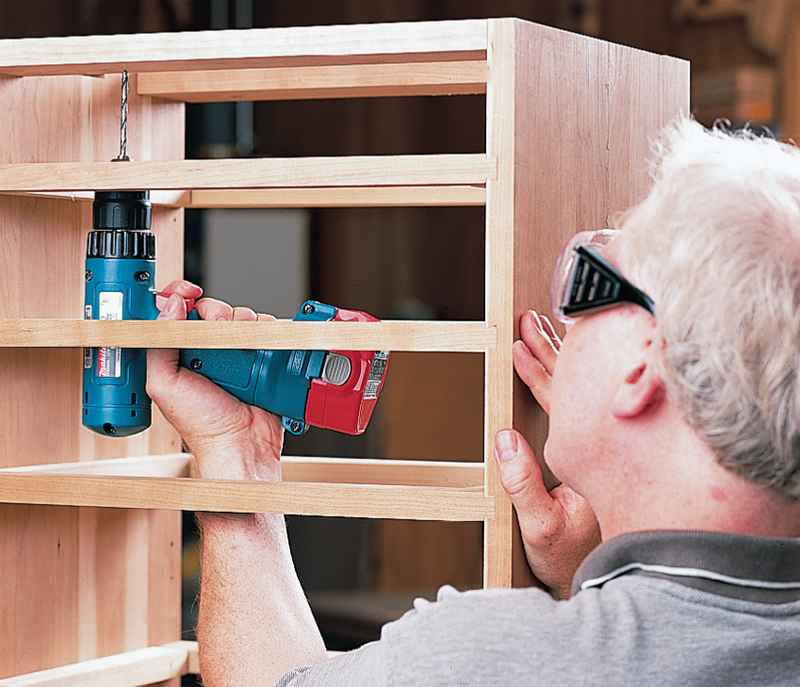
Drill holes through the top rail C1 for the screws that hold the top (Photo 10). Make the top and shape its edges (Fig. A, Detail 2) by taking two passes
with a 3/4" round-over bit (see Sources) or one pass with a halfradius
bullnose bit on the router table. Fasten the top to the case.
Make the backs and screw the boards to the case, rails and
dividers (Fig. A, Detail 1). They’re not glued together.
Apply a wipe-on varnish or brush on an oil-based varnish.
I used Minwax Antique Oil on our lightly fi gured cherry, and
it looks great. Give the cabinet some sun and it’ll slowly darken
to a beautiful color.
Sources
Smith Woodworks & Design, niceknobs.com,
908-832-2723, Shaker-style pulls, #SO118, cherry, $1.53 ea., min. order of 10.
MLCS Woodworking, mlcswoodworking.com, 800-533-9298, 3/4"
radius round-over bit, 1/2" shank, #8656, $21; Half-radius bullnose bit,
1/2" shank, #8884, $17.
Cutting List
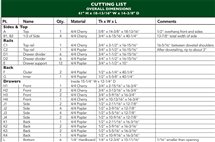
Fig. A: Exploded View

Fig. B: Sliding Dovetail Jig
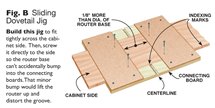
Fig. C: Drawer Divider Jig
The Proper Fit: Fig. D, Fig. E., Fig. F.
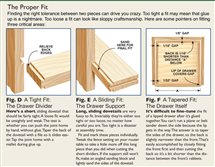
Fig. G: Exploded View of Typical Drawer
This story originally appeared in American Woodworker December 2000, issue #84.

December 2000, issue #84
Purchase this back issue.
|
|
Click on any of the images to view a larger version
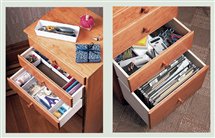
Cabinet of a hundred uses. We designed the
drawers so modular
plastic trays found
at most sewing
centers (left) fit
perfectly with no
rattling around.
Plus the bottom
drawer is just the
right size for file
folders to keep
patterns organized.
Office supplies
(right), fly-tying
gear—you name
it—this cabinet can
organize tons
of stuff.
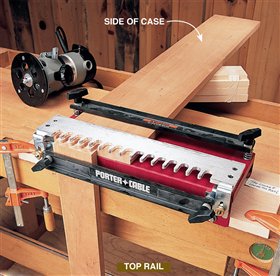
1. Cut dovetails in the sides and top rails. Each side of the
cabinet is composed of two pieces that are glued together
after the dovetails are cut because the complete side is too
wide to fit in a basic dovetail jig.
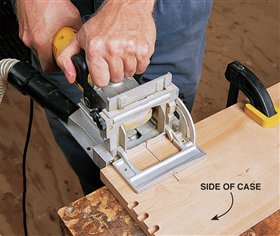
2. Cut biscuit slots in each half of one side. Use biscuits or
splines to align the two halves when you glue them together.
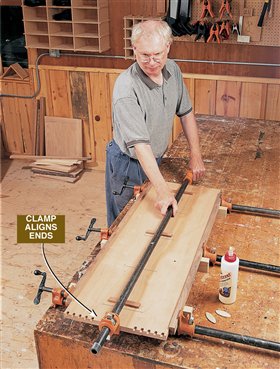
3. Glue the side together. Align the ends with a clamp
placed lengthwise. With biscuits in the glue joint, you’ll need the
force of a clamp to shift the boards. Once the ends are aligned, remove the long clamp and check
the side for flatness. Flat sides are necessary for the next step
to succeed!

4. Rout dovetailed grooves in the
sides. Align the jig (Fig. B) with center
marks on the edge of the side. Screw the
jig directly to the side; the screws will
hold down the far side of the jig, where
clamps can’t reach. The screw holes are
invisible in the fi nished case.

5. Cut dovetails in the ends of the
dividers. Rout equally from both sides of
the divider so the dovetail is centered.
Clamp the narrow workpiece to the jig
so it doesn’t slip down into the opening
of the router table.

6. Dovetail the drawer supports. It’s basically the same
setting as in Photo 5. You may have to move the fence to cut a
fraction deeper, because the fi t over a longer distance needs to
be looser (Fig. E).
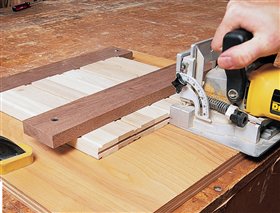
7. Cut slots in the ends of the drawer supports for #0 biscuits.
Line up all the supports and make, in effect, one continuous slot.
Biscuits align all the pieces that support the drawer so the drawer
will slide smoothly, without hitting any uneven edges.
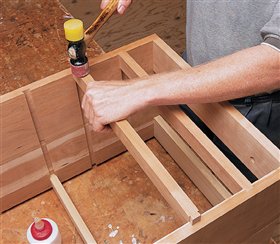
8. Assemble
the case
one piece at
a time. That’s
the beauty of
dovetails! You
don’t have to
clamp a dozen
pieces at once.

9. Glue the drawer supports to the front dividers. The
drawer supports are only glued at the front, not in the groove,
so the case side is free to expand and contract.
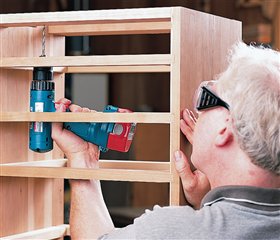
10. Drill screw holes for the top from inside the case. That way
you know the holes will be accessible when you install the top.
|