


We may receive a commission when you use our affiliate links. However, this does not impact our recommendations.

Goof-Proof Crown Molding
By Tom Caspar
| Cutting perfect miters on crown molding can be a real challenge. Make a mistake and a lot of expensive wood goes to waste. This method, which uses a shop-made miter box, puts the molding in its “natural” position, the way it will be placed on your project. It’s easy to set up the saw and tweak the miter’s angle for inside and outside joints. The saw’s blade stays at 90 degrees to the table, so you don’t have any complicated compound cuts to set up.
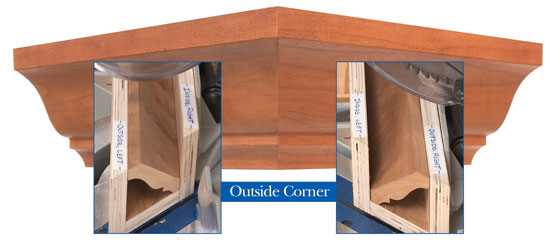
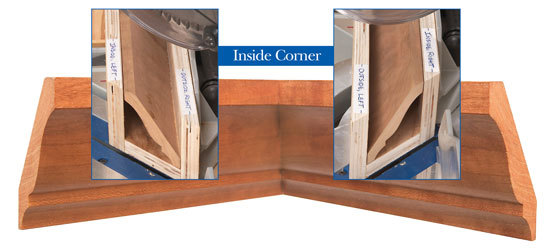
Start by building the miter box (see photo, below). Don’t use screws; you don’t want to accidentally cut into one. Use a combination square to figure out how wide the box’s pieces must be to hold the molding in its natural, upright position. The bottom piece’s width equals the molding’s depth when it’s installed. The side pieces’ width equals the molding’s height when it’s installed plus the thickness of the bottom piece. Cut these pieces about 12 in. long and leave the ends square for now. Glue the box together; then miter the ends. Label each corner. Cutting miters is very straightforward (see photos, right). For convenience, I always hold the box on the saw’s left side. For the best results, screw the box to the miter saw’s fence. For some cuts, the box’s long side goes against the fence. For others, the short side goes against the fence. Using a high-tooth count blade will produce a very smooth cut, with no tearout on the molding’s face. This method won’t work on all saws and all crown moldings. Success depends on the molding’s height and the saw’s capacity. Many tall moldings can be cut this way using a 12-in. saw, but a 10-in. saw may not have adequate clearance. |
Click any image to view a larger version.
Build the miter box from three pieces of plywood. Label the corners to indicate how the crown molding is oriented for each miter cut.
Place the molding’s top edge against the label identifying the cut and you can’t go wrong. |

| This story originally appeared in American Woodworker January 2007, issue #126.
|

Here are some supplies and tools we find essential in our everyday work around the shop. We may receive a commission from sales referred by our links; however, we have carefully selected these products for their usefulness and quality.


