We may receive a commission when you use our affiliate links. However, this does not impact our recommendations.

Hand-Planed Moldings
Use a pair of planes to create custom profiles.
By Bill McCarthy
A woodworker who needs a small amount of hardwood molding for a furniture or cabinet project is often out of luck. Hardwood moldings are scarce at local home centers, and most commercial shops can’t economically set up a molding machine for a short run. And the typical small-shop shaper can’t produce moldings wider than about 3 in.
Fortunately, there’s a way to make your own custom moldings using traditional molding planes. In this article, I’ll show you how to tune up and use a hollow plane and a round plane—two of the most versatile molding planes. The hollow plane, with its concave sole, cuts a rounded shape (lead photo). The round plane has a convex sole and cuts a hollow in the workpiece. A pair of these planes with the same radius is commonly used to produce a true ogee—one whose curves mirror each other.
In this article, I’ll show you how I make a 41⁄2-in.-wide crown molding using a set of complementary, 1-in.- radius planes. Once you get the hang of working with these time-honored tools, you’ll be able to make a variety of moldings (see Fig. A).
Selecting and Tuning Up the Planes
Old hollow and round planes are often available at flea markets or from antique dealers for less than $35 apiece. Look for a pair with matching radii. When selecting a plane, make sure it is in good overall condition. It should have no cracks in the plane body and no heavy rust or deep pitting on the iron.
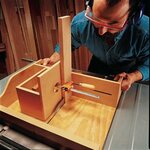
You’ll want to tune up each plane before using it. It’s best to start with the round plane. Use a reliable straightedge to check the flatness of the sole along its length. If the sole is bowed, plane it straight using a block plane set for a light cut. Take a series of light, overlapping passes to shape the cross section of the sole to the desired radius (Photo 1). You can make a cardboard template to check the radius all along the sole. Finish up by smoothing and fairing the curve of the sole with sandpaper.
Next, check the shape of the iron’s cutting edge. It should conform as closely as possible to the curvature of the plane’s sole. If the curve is off, you’ll need to reshape it. Begin by coating the back of the iron with machinist’s layout bluing. The bluing allows you to scribe a highly visible line into the iron. Insert the iron in the plane so its entire cutting edge projects about 1⁄16 in. Transfer the curvature of the sole onto the iron using a dull knife (Photo 2).
Grind the cutting edge down to your scribed line. I use a 60-grit white or pink grinding wheel. Dip the iron in water frequently to prevent overheating. After grinding, hone the bevel and the back of the iron to bring the cutter to a razor-sharp edge. Reassemble the plane, set it for a light cut, and test it on a piece of scrap. To adjust the iron for a deeper cut, tap it lightly downward with a hammer. To retract the iron slightly, tap on the rear of the plane body.
You can now use the tuned round plane to shape the sole of the hollow plane. Afterward, scribe the hollow’s iron as you did the round plane’s iron. I find that grinding a concave cutting edge is easier on a grinding wheel with a rounded edge (see Shaping a Grinding Wheel, below).
I hone the iron (Photo 3) with a soft, aluminum oxide “roughing” stone. To hone a concave cutting edge, I grind off the stone’s corners using a typical, vitrified, gray grinding wheel.
Making a Crown Molding
With your planes tuned up, you’re ready to make some molding. Fig. B shows a nice molding profile that incorporates an ogee and a cove, with a shoulder separating them. To lay out the molding, first make a cardboard template of the profile. Lay out the profile on the end of a short length of 13⁄16-in.-thick by 4-1⁄2-in.-wide straight-grain softwood. You will use this piece for practice.
Before planing, you need to do a little tablesaw work: First, saw all the 45- degree bevels on the edges of the molding stock (Fig. B). Then, saw a 45-degree V-shaped notch in the face of the stock to create the shoulder. I use a jack plane to clean up any saw marks on the four edge bevels.
Begin shaping the molding by planing the concave half of the ogee with the round plane. Make sure you’re working on a firm, flat surface. I clamp a 1-in.- thick wooden straightedge to the molding to guide my first few strokes. I plane to about 1⁄8-in. deep. After that, I remove the straightedge and let the hollow guide the plane.
Make each planing pass with a firm, steady stroke. Each complete pass should yield one continuous shaving. If you find yourself fighting the plane, retract the iron slightly. If the plane skips over the middle of the board, try shimming under the center of the molding to raise it a bit.
As I approach the final depth of cut, I roll the plane to one side or the other as necessary to widen the hollow and match the desired profile. The outside edge of the hollow should meet the sawn bevel in a sharp edge.
After completing the hollow, I use a rabbet plane to remove any saw marks on the edge of the molding’s shoulder (Photo 4).
Next, clamp your straightedge to guide the first few passes on the molding’s cove (Photo 5). Remove the straightedge as before and complete the cuts, again rolling the plane to one side or the other to create the desired profile. The cove should meet the bevel and shoulder in a sharp edge.
The last step is to plane the convex section of the ogee using the hollow plane. The V-shaped ridge on the sole of the plane rides against the molding’s shoulder to guide this cut.
Place the sole’s ridge into the molding’s V-shaped notch and make your first cut. For each subsequent cut, tilt the plane farther into the workpiece (see lead photo). You’re done when the ogee’s curves meet in a smooth transition that matches your profile.
If you’ve done your work well, you should have a lovely molding that needs little or no sanding.
Shaping a grinding wheel

Dressing a wheel. A diamond-point dresser will shape a soft grinding wheel to any profile you need for grinding concave plane irons.
The squared edge of a typical grinding wheel doesn’t lend itself well to shaping the concave profiles you’ll find on molding plane irons, carving tools, and turning gouges. To make grinding odd profiles much easier, it’s a simple matter to reshape a wheel to suit the desired profile of the iron.
All you need is a “soft” grinding wheel and a tool to dress it. White or pink grinding wheels have a softer bond than typical gray wheels and can easily be shaped with a dressing tool. I prefer 60-grit grinding wheels.
Dressing sticks are commonly available, and work fine for rounding over a grinding wheel. But I prefer using a diamond- tipped dresser. Don’t panic; they only cost about $6. This dresser is simply a steel rod with an industrial diamond mounted on its end. It allows you to dress the edge of a grinding wheel to any shape you like.
When dressing a grinding wheel, adjust the grinder’s rest about 1⁄2 in. below the center of the wheel (see photo, above). Apply light pressure to the wheel and don’t overheat the diamond. You can’t cool it in water or it could break. Rotate the diamond occasionally to distribute wear.
Fig. A: Crown Molding profiles

Fig. B: Ogee Crown Molding Profile

Click any image to view a larger version.

1. Planing the plane. The bottom of an old plane often needs to be reshaped. I used a block plane to true up the bottom of this round plane before smoothing the contour with sandpaper.
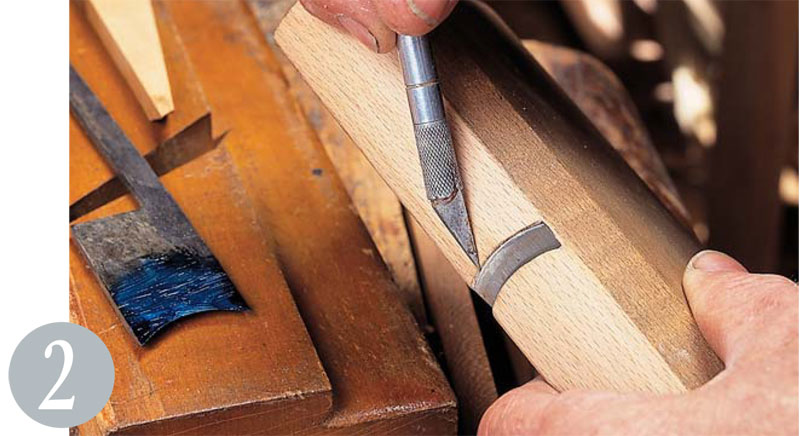
2. Scribing a round iron. To transfer the shape of the sole to the plane iron, coat the iron with machinist’s bluing, then scribe it with a knife.

3. Honing a hallow iron. After grinding the iron, I bring it to final shape using a modified “roughing” stone.

4. Planing the shoulder. A rabbet plane cleans up any saw marks left on the molding’s shoulder.

5. Starting straight. Guide the first few hollowing passes with a wooden straightedge that’s clamped along the workpiece.
This story originally appeared in American Woodworker June 1999, issue #73.

Here are some supplies and tools we find essential in our everyday work around the shop. We may receive a commission from sales referred by our links; however, we have carefully selected these products for their usefulness and quality.