We may receive a commission when you use our affiliate links. However, this does not impact our recommendations.

Making Curved Doors
Kerfkore flexible panels handle curves with ease.
By Brad Holden
Curved doors and panels add elegance to any project, especially kitchen cabinets. Making these complicated parts requires careful planning and building. The task can be made much easier by using a flexible panel product called Kerfkore (see photo, right, top). It follows the same principle that cabinetmakers use when they saw multiple kerfs on the back of a piece of plywood to make it flexible. A disadvantage to this saw-kerfing method is the risk of the face veneer cracking or kinking at the kerfs, spoiling the curve’s smooth surface. Kerfcore’s advantage is that that the kerfing is done for you. Its flexible paper backing provides a smooth surface to attach your veneer.
There are several important tricks and techniques to working with Kerfkore but it’s a surprisingly easy material to work with. I’ll walk you through the main steps of making a curved door with Kerfkore from layout to final trimming. Information on using Kerfkore in other applications can be found at the Web site www.kerfkore.com.
What is Kerfkore?

Kerfkore is a very flexible panel made of 3/8-in.-wide ribs spaced 1/8 in. apart on a paper backer sheet. The spaces between the ribs allows the board to flex. The flexible backer sheet provides a smooth surface for veneering. The ribs in different Kerfkore products are made of particleboard, luan plywood, poplar plywood, MDF, fire-rated treated particleboard or lightweight styrene foam. These different cores have different weights, strengths and screw-holding characteristics. The particleboard core works well for generalpurpose doors, such as those for kitchen cabinets.
Kerfkore with paper backer on both sides is also available. This makes the material more rigid and somewhat easier to handle and enables you to create a curve that turns into a straight run. To make the twosided variety bend, you cut the backer on one side with a utility knife where you need the bend to occur.
Kerfkore comes in 4-ft. by 8-ft. sheets in 1/4-in., 3/8-in., 1/2-in., 5/8-in. and 3/4-in. thicknesses and costs between $40 and $125 per sheet (see Sources, below).
Click any image to view a larger version.
Kerfkore flexes easily in both directions.

Doors made with Kerfkore have a smooth, even curve.
Pick your veneer
1. Your three main veneer choices are two-ply wood veneer (shown here), phenolic-backed (plastic-laminate) wood veneer or vertical-grade plastic laminate. The twoply veneer is the most flexible of the three and is easily cut with a utility knife or scissors. The phenolic-backed veneer and plastic laminate must be sawn or scored and snapped. The cut edge of the two-ply veneer leaves a dark line that may show on your finished door, depending on the wood species and the finish you apply. The phenolicbacked veneer and plastic laminate both leave a black edge line.

Make a full-size drawing
2. Use a top-view drawing to determine the size of the Kerfkore panel and the angles at the edges. The width of the Kerfkore should be the outer circumference of the curve minus 1-1/2 in. to 2 in. for the solid-wood edges. The measurement is easy to take using a flexible curve. Calculate the angles of the edges by drawing a line tangent to the front curve at the corner of the door and then measure the angle with a protractor.

Apply the front veneer first
3. Use contact cement and work flat when applying the first sheet of veneer. Working flat may seem odd, but when you do so, the contact cement remains flexible and a good bond is ensured. The panel will gain a bit of stiffness but will remain flexible enough to form to its final shape later on.

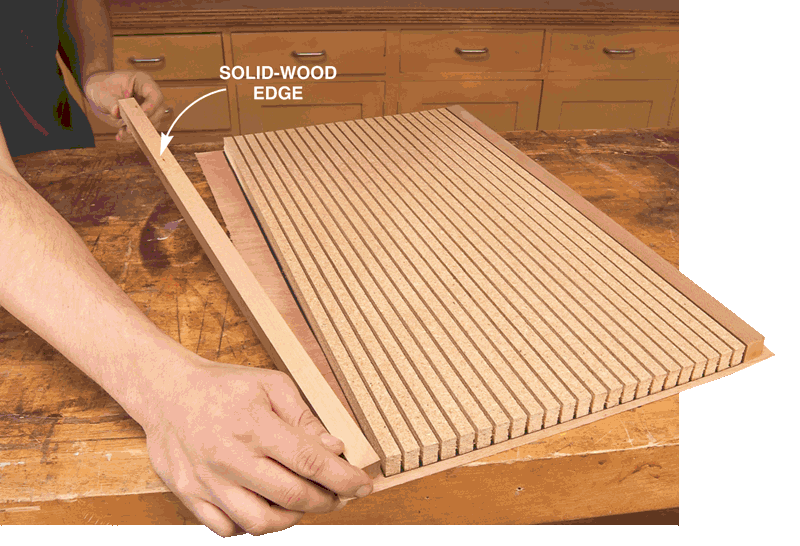
Add solid-wood edges for strength, appearance
4. Solid-wood strips provide durable finished edges when the door is done. Each strip can be up to 1 in. wide. Leave a 1/8-in. gap between the solid-wood strip and the adjacent rib to maintain maximum flexibility. Attach the strip with contact cement. After the edge strips are attached, use a small router and a shopmade edge guide (Photo 8) to trim the veneer flush around the entire panel.
Cut the edges to the required angle
5. It’s easier and safer to cut the angles on the panel while it’s flat, rather than after it has been curved. Cut at the angles you measured on the full-size drawing (Photo 2). The panel is sufficiently stiff at this stage that it saws much like a normal piece of plywood.

Attach the back veneer with yellow wood glue
6. Yellow glue dries stiff and helps the curved door hold its shape. The folks at Kerfkore recommend yellow glue for both two-ply and phenolic-backed veneer. The grain on the back of two-ply veneer runs 90 degrees to its face side and adds stiffness to the door when the glue dries.

Attach the back veneer with a vacuum press
7. A curved form—made from two curved ribs and a spare piece of Kerfkore covered with plastic laminate—provide the shape. A vacuum bag provides clamping pressure. Mark centerlines on the form and on the ends of the door. Line up the marks prior to clamping to ensure the curved door ends up straight after the glue dries. With the whole assembly in a vacuum bag (see Sources, below), pump the air out. Netting in the bag prevents air pockets from forming. Let the glue dry completely before you remove the door.

Trim the curved edges
8. This shop-made edge guide (see photos, right) simplifies routing the veneer on the curved edges. The guide fence has an angled opening and clearance slot that allow it to trim around the curved overhanging veneer. It works equally well on the convex and the concave sides of the door. You can use either ball-bearing guided straight bit or a standard straight bit with this guide. The edge guide is slotted so its fence can be adjusted flush with the edge of the router bit.

Veneer the ends and trim flush
9. Apply veneer to the end with contact cement or yellow glue and trim flush. When all edges and veneers are trimmed, the doors can be installed. Hanging a curved door is not difficult. Butt hinges go on the same way as they do with a flat door. For European-style hinges, support the door on the drill-press table so the hinge-hole drill bit drills square to the surface of the door. If the hinge-cup screws land in a gap between the wood ribs, squeeze in some epoxy glue as a filler and anchor.

Sources
Note: Product availability and prices are subject to change.
Kerfkore Co., kerfkore.com, 800-637-3539, Kerfkore, 3/4 in. x 4 ft. x 8 ft. single-sided; 3/4 in. x 4 ft. x 8 ft. doublesided.
Roarockit, roarockit.com, 416-938-4588, Thin Air Press kit vacuum press, #01301.
This story originally appeared in American Woodworker September 2006, issue #123.
Here are some supplies and tools we find essential in our everyday work around the shop. We may receive a commission from sales referred by our links; however, we have carefully selected these products for their usefulness and quality.